Thingiverse

Ender5 Plus - Top Front Cross Member Relocator by RedWhere2020
by Thingiverse
Last crawled date: 3 years, 1 month ago
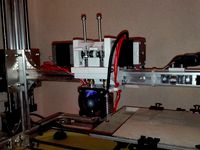
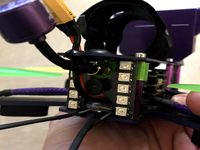
Sick of not being able to see the nozzle on your E5+? these two brackets I modelled (to fit in with my tensioners) drop the front extrusion bar down 40mm so when homing you can easily see the nozzle when the bed is raised to Z0.
New brackets do not interfere with current frame on either side and actually gives you more space for a larger print head with cooling ducts or fans.
Install by..
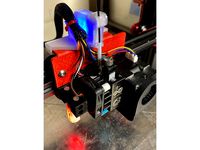
Removing the internal angle brackets, giving you 4x M5 BH bolts, 2x will be used again with T nuts. Photo shows BH bolts from underneath.
Removing the front belt tensioners from either side, giving you 2x M5 HH bolts, these to be used again in same place through new bracket.
Removing the top front cross member.
Install the top front cross member approx 40mm down from where it had been, rolling it over 90° so that the through hole can be used with an existing M5 BH bolt with washer from croner brackets adding T nut into the front vertical extrusion. Photo shows existing BH bolt from underneath.
Install new printed brackets with 2x M5 HH bolts with T nuts on, screwing back in the existing M5 bolt (leaving slack) into the top of the existing exposed vertical extrusion. Install all other bolts (leaving slack) with T nuts.
Evenly tighten all bolts a little at a time. Do a final pinch/torque, but do not over tighten.
BOM
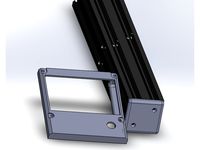
2x Brackets. PLA+ 0.2 layers, 5x Walls, 3x bottoms, 4x tops, 40-50% Infill.
10-12x M5 T nuts
6x M5 x 10mm HH bolts
2x M5 x 20mm HH bolts
2x Existing M5 HH bolts with washer.
2x Existing M5 BH bolts with washer.
Works for me.
New brackets do not interfere with current frame on either side and actually gives you more space for a larger print head with cooling ducts or fans.
Install by..
Removing the internal angle brackets, giving you 4x M5 BH bolts, 2x will be used again with T nuts. Photo shows BH bolts from underneath.
Removing the front belt tensioners from either side, giving you 2x M5 HH bolts, these to be used again in same place through new bracket.
Removing the top front cross member.
Install the top front cross member approx 40mm down from where it had been, rolling it over 90° so that the through hole can be used with an existing M5 BH bolt with washer from croner brackets adding T nut into the front vertical extrusion. Photo shows existing BH bolt from underneath.
Install new printed brackets with 2x M5 HH bolts with T nuts on, screwing back in the existing M5 bolt (leaving slack) into the top of the existing exposed vertical extrusion. Install all other bolts (leaving slack) with T nuts.
Evenly tighten all bolts a little at a time. Do a final pinch/torque, but do not over tighten.
BOM
2x Brackets. PLA+ 0.2 layers, 5x Walls, 3x bottoms, 4x tops, 40-50% Infill.
10-12x M5 T nuts
6x M5 x 10mm HH bolts
2x M5 x 20mm HH bolts
2x Existing M5 HH bolts with washer.
2x Existing M5 BH bolts with washer.
Works for me.
Similar models
thingiverse
free

CR-10 Y Motor Stiffening Bracket by junaling
...ck alignment while tightening
6) tighten motor bolts to frame, check alignment
7) tighten bracket bolt to frame
8) tighten y belt
thingiverse
free

40mm fan duct mount with X-axis belt tensioners by leshric
...d around the small curved pieces, then can be zip-tied to itself. repeat for the other side. tighten bolts to increase tension.
thingiverse
free

Filament holder
...n testing stage.
required parts
8mm shaft
2x fl08 bearings
2x m5 bolts
4x m5 washers
2x m5 nuts
1x m3 bolt
1x m3 washer
1x m3 nut
thingiverse
free

Belted Extruder v4 bracket for 2020 Extrusion by yesimnathan
...er is built & connected to the bracket, connect the bracket to your 2020 extrusion with the m5x10mm screws & t-slot nuts.
thingiverse
free

Belt Tensioner by JimXYZ
...fill: 25% grid
top layers: 10
bottom layers: 10
tensioner housing:
wall line count: 7
infill: 0%
top layers: 16
bottom layers: 16
thingiverse
free

Tronxy x5s Belt Tensioner by unnefer
...stment spacers until you find the one that removes the remaining slack in the belts and keeps the belts tensioned to your liking.
thingiverse
free
Dual Extruder by Psycho1981
...ng:
4x allen screw m5
4x square nut m5
4x washer m5
electronic:
-ramps 1.4 board
-atx power supply
-firmware "marlin"
thingiverse
free
Hemera Aluminium adaptor plate V2, CR-10S Pro by Portzal
... position and install the bottom wheel on the bolt,
adjust eccentric nut and tighten fixing bolt nut.
reinstall and tighten belt.
thingiverse
free

MKS Gen 1.4 support AM8 by suelenbraga
...m8 by suelenbraga
thingiverse
mks gen 1.4 support for am8 (2040 extrusion)
2x m5 x 8
2x t nut m5 (for 2020 extrusion)
4x m3 x 20
thingiverse
free

Support raspberry pi 3b+ AM8 by suelenbraga
... by suelenbraga
thingiverse
raspberry pi 3b+ support for am8 (2040 extrusion)
2x m5 x 8
2x m5 t nuts (2040 extrusion)
4x m3 x 20
Redwhere2020
thingiverse
free

Desk Tidy by RedWhere2020
...desk tidy by redwhere2020
thingiverse
a simple desk tidy of difeering heights, holders from 25mm to 75mm high.
works for me.
thingiverse
free

Desk Tidy by RedWhere2020
...desk tidy by redwhere2020
thingiverse
simple desk tidies for what ever you want to hold. small and large.
works for me.
thingiverse
free

Vase by RedWhere2020
...ge glass to hold water.
110mm diameter x 200mm tall.
print in clear petg and can be used as a candle holder. use at you own risk.
thingiverse
free

Ender5+ Cable Cover by RedWhere2020
...ender5+ cable cover by redwhere2020
thingiverse
cable cover/enclosure for the ender 5+ cables coming out of the control box.
thingiverse
free

Plant Pot with a twist by RedWhere2020
...plant pot with a twist by redwhere2020
thingiverse
simple bowl type plant pot with a 30° twist. print in vase mode in cura.
thingiverse
free

Ender-3v2 BLT Bracket by RedWhere2020
...2 blt bracket by redwhere2020
thingiverse
bltouch bracket for the ender-3v2. included 1mm packer.
allows for the x-axis endstop.
thingiverse
free

Dynamix Cat5e Coupler/Jointer by RedWhere2020
...e coupler/jointer by redwhere2020
thingiverse
something i could not find so i drew it.
dynamix cat5e coupler with panel housing.
thingiverse
free

Micro Swiss Hotend Cable Strain Relief by RedWhere2020
...micro swiss hotend cable strain relief by redwhere2020
thingiverse
microswiss hotend cable strain relief.
thingiverse
free

Remixed Voron Switchwire Blocks for MGN12C rails by RedWhere2020
...r mgn12c rails by redwhere2020
thingiverse
the blocks have been remixed to suit the mgn12c linear rails for those who need them.
thingiverse
free

DIN Rail Terminal Label Clip by RedWhere2020
...ths provided.
i printed in pla+ @ 0.2 layer height solid filled.
tip. best printed on their edge for clip strength.
works for me.
Ender5
thingiverse
free

Ender5 MicroSwíssDD 40mmFan BLT by h3nkGer
...ender5 microswíssdd 40mmfan blt by h3nkger
thingiverse
ender5 microswíssdd 40mmfan blt
thingiverse
free

Ender5 Tool Holster On 2020 clip
...ender5 tool holster on 2020 clip
thingiverse
ender5 tool holster for stock tool kit that clips to 2020 extrusion.
thingiverse
free

Ender5 - tool drawer - zásuvka na nářadí by drakarr601
...ender5 - tool drawer - zásuvka na nářadí by drakarr601
thingiverse
zásuvka na nářadí ender5
thingiverse
free

Ender5 -display by drakarr601
...ender5 -display by drakarr601
thingiverse
just my design of a insta360 go camera mount for the diatone tinawhoop. super simple.
thingiverse
free

Ender5 Plus MI Home Camera Mount by webcheese
...ender5 plus mi home camera mount by webcheese
thingiverse
ender5 plus mi home camera mount
thingiverse
free

Ender5 PrintBed model
...n the front left corner (so not rotated by 180 degrees as original ender3 with marlin) but you can rotate and move it as you like
thingiverse
free

Ender5 Filament holder for Direct Drive Extruder by FYSETC_Ltd
...lder for direct drive extruder by fysetc_ltd
thingiverse
this filament holder can be used in ender5 dual direct drive extruders.
thingiverse
free

ender5 pro filament Spool Holder by jinjin2
...er5 spool 2 1ea
ender5 spool 3 2ea
bearing 6906z 2ea
ender5 spool 4 1ea
if you want bearing spacers
used spool- extra spacer
thingiverse
free

Ender5 4020 Part Cooler with retaining pins by h3nkGer
...der5 4020 part cooler with retaining pins by h3nkger
thingiverse
ender5 part cooler for a 4020 fan
stl includes 2 retaining pins
thingiverse
free

Ender5/3 Hotend_cable_relief_modified by Wombii
...ender5/3 hotend_cable_relief_modified by wombii
thingiverse
this is original for ender 3 but i adjusted it so it fits ender 5.
Relocator
3d_export
$5

watering can
...equest i can relocate on origin on handle.<br>polygons: 30156<br>vertices: 15161<br>i hope you enjoy the model.
3d_export
$20

stylish black metal x chair
... the perfect convenient seating solution and have a padded seat and back cushion for added comfort. great finish, amazing design.
3d_export
$110

stug iii ausf g
...ompleted 50 mm armour existed. for those, a 30 mm additional armour plate still had to be welded or bolted on until october 1943.
3d_export
$7

astronaut
... you like that model don't forget to excellent rate product as it is important for me.<br>-regards my wish -thanks.....
thingiverse
free
Extruder Relocation by ketchu13
...xed from
cr-10s extruder relocation plate and filament sensor housing by xxfreshxx
cr-10 extruder relocation bracket by wayneuk
thingiverse
free

Power switch relocation by Georgero
...witch relocation by georgero
thingiverse
20/20 power button relocation. i made this for my tronxy but can be adapted for others.
thingiverse
free

Ender 5 screen relocation
... 5 screen to lay flat on the control box while making it easier to install and maintain access to the usb and micro sd card slot.
thingiverse
free
Ender 3 Screen relocation by BogdanS96
...ns96
thingiverse
this is a mount for the ender 3 screen to be relocated on the left of the extrusion to save some lateral space.
thingiverse
free
Eachine Wizard X220S Antenna Relocation
...rd x220s antenna relocation
thingiverse
relocates the antenna to a much more crash resistant location.
print in tpu, petg or abs
thingiverse
free

Endstop X relocation bracket by dvjcodec
...rse
this simple relocation bracket is dedicated for:http://www.thingiverse.com/thing:15156http://www.thingiverse.com/thing:31021
Member
turbosquid
$9

Fortress Member
...model fortress member for download as ma, obj, fbx, and sldpr on turbosquid: 3d models for games, architecture, videos. (1240951)
turbosquid
$1

Member Berrie
... available on turbo squid, the world's leading provider of digital 3d models for visualization, films, television, and games.
turbosquid
$20

Cartoon Chemical protective member
...artoon chemical protective member for download as max and obj on turbosquid: 3d models for games, architecture, videos. (1660873)
3d_export
$8

Wheel center member 3D Model
...wheel center member 3d model
3dexport
wheel car
wheel center member 3d model romas 38464 3dexport
turbosquid
$199

library of congress members room
... congress members room for download as 3ds, obj, c4d, and fbx on turbosquid: 3d models for games, architecture, videos. (1281945)
turbosquid
$199

Black Male gang member
... available on turbo squid, the world's leading provider of digital 3d models for visualization, films, television, and games.
3d_export
$20

cartoon chemical protective member
...cartoon chemical protective member
3dexport
texture size:512px+256px number of texture:2
3d_export
$25

classic guitar
...classic guitar 3dexport the classical guitar is a member of the guitar family used in classical...
archive3d
free

Grating 3D Model
...grating 3d model archive3d grating filler element filler member decor n210808 - 3d model (*.gsm+*.3ds) for interior 3d...
archive3d
free

Grating 3D Model
...grating 3d model archive3d grating filler element filler member decor n210708 - 3d model (*.gsm+*.3ds) for interior 3d...
Plus
turbosquid
$2
plus-plus puzzle and lego
...d model plus-plus puzzle and lego for download as stl and obj on turbosquid: 3d models for games, architecture, videos. (1662633)
3ddd
$1
Стенка Plus
...стенка plus
3ddd
plus , модная мебель
фабрика "модная мебель", модель plus
3ddd
$1
Спальня METIS plus
... hulsta , metis , спальня
спальня metis plus
design_connected
$11
be plus B+
...be plus b+
designconnected
blå station be plus b+ chairs computer generated 3d model. designed by börge lindau.
design_connected
$11
Bank Plus
...bank plus
designconnected
röthlisberger kollektion bank plus coffee tables computer generated 3d model. designed by atelier oi.
3ddd
$1

elos Plus
... candela
elos plus — мультифункциональный аппарат для проведения лазерного и ipl лечений
3ddd
$1
Calligaris Even Plus
...calligaris even plus
3ddd
calligaris
calligaris_chair_even plus
design_connected
$29
Basket Plus
...nconnected
photo-realistic 3d models of the basket plus bed from bonaldo for 3d architectural and interior design presentations.
3ddd
free
Artpole Faktum Plus
... артполе , панель
artpole faktum plus
размеры:
высота 625мм
ширина 800мм
глубина 17мм
3ddd
$1
Мария / Jazz Plus
...мария / jazz plus
3ddd
мария
кухня фабрики мария модель__jazz plus
Cross
3d_export
$5

Cross
...cross
3dexport
cross
archibase_planet
free

Cross
...cross
archibase planet
cross
church sanctuary cross - 3d model for interior 3d visualization.
3d_export
$25
golden cross cross 3d gold cross
...golden cross cross 3d gold cross
3dexport
archibase_planet
free

Cross
...cross
archibase planet
cross crucifix rood
cross n220513 - 3d model (*.3ds) for interior 3d visualization.
3d_export
$5
cross
...cross
3dexport
body cross jewelry 70мм * 50мм
design_connected
$16
Cross
...cross
designconnected
two.six cross computer generated 3d model. designed by ferreira, domingos.
turbosquid
$1

Cross
...cross
turbosquid
free 3d model cross for download as blend on turbosquid: 3d models for games, architecture, videos. (1319421)
turbosquid
$15

Cross
...s
turbosquid
royalty free 3d model cross for download as 3dm on turbosquid: 3d models for games, architecture, videos. (1203663)
turbosquid
$10

Cross
...s
turbosquid
royalty free 3d model cross for download as max on turbosquid: 3d models for games, architecture, videos. (1030743)
turbosquid
$3

Cross
...s
turbosquid
royalty free 3d model cross for download as max on turbosquid: 3d models for games, architecture, videos. (1555121)
Front
archibase_planet
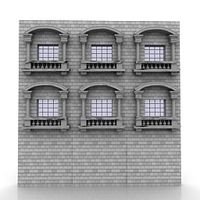
free

Front
...front
archibase planet
facade front bluff
front 3d01a - 3d model (*.gsm+*.3ds) for interior 3d visualization.
3d_export
$5
front fork
...front fork
3dexport
front fork
3d_export
$5

Front Desk
...front desk
3dexport
modern and minimal reception front desk
3d_ocean
$4
Medical Front
...medical front
3docean
horror low medical
medical front
3d_ocean
$5
Front Desk
...front desk
3docean
desk front office reception
office reception counter or front desk. cad file and obj file included.
3ddd
free

Axor WaterDream by Front
...r , waterdream , front
axor waterdream by front
3d_export
$5

front nut eye
...front nut eye
3dexport
front nut eye
3d_export
$5
front screw eye
...front screw eye
3dexport
front screw eye
3d_export
$5
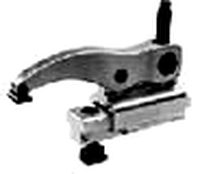
front clamping device
...front clamping device
3dexport
front clamping device
archive3d
free
Front 3D Model
...rchive3d
facade front bluff
front 3d01a - 3d model (*.gsm+*.3ds) for interior 3d visualization.
Top
archibase_planet
free
Top
...top
archibase planet
top
top - 3d model (*.gsm+*.3ds) for interior 3d visualization.
3ddd
free
Range Top V36C top
...range top v36c top
3ddd
гриль
проф. гриль range top v36c top
archibase_planet
free
Top
...top
archibase planet
dresser kitchen furniture
top - 3d model (*.gsm+*.3ds) for interior 3d visualization.
archibase_planet
free
Top
...top
archibase planet
bracket bar furniture
bar top - 3d model (*.gsm+*.3ds) for interior 3d visualization.
turbosquid
$5

Top
...lty free 3d model top for download as ma, max, blend, and obj on turbosquid: 3d models for games, architecture, videos. (1579951)
turbosquid
$39
Top
... available on turbo squid, the world's leading provider of digital 3d models for visualization, films, television, and games.
turbosquid
$30
Top
... available on turbo squid, the world's leading provider of digital 3d models for visualization, films, television, and games.
3d_export
$15

top knifle
...top knifle
3dexport
top knifle
design_connected
$11
Drop Top
...drop top
designconnected
plumen drop top computer generated 3d model.
3d_export
$245
top of the material
...top of the material
3dexport
top of the material,commercial ceiling ceiling material, metal material