Thingiverse
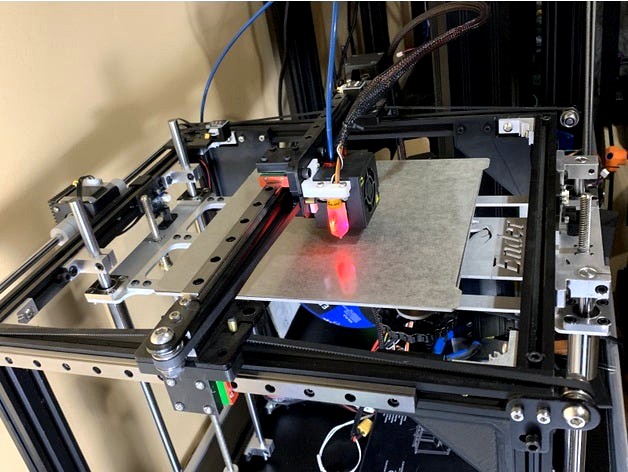
Ender 5 – Dual Z setup by Elescar
by Thingiverse
Last crawled date: 3 years, 3 months ago
Parts
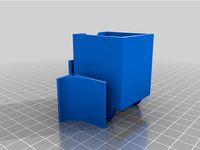
1x Dual Z plate sold by Two Six Engineering (https://twosixengineering.com/gtr-shop/ols/products/ender-5-dual-z-axis)
2x endstops sold by TriangleLab (https://www.aliexpress.com/item/32852113543.html), the wires provided should be long enough
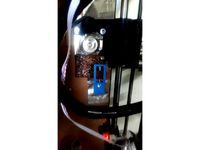
Upgraded board – Instruction provided will be for RepRapFirmware 3 on an SKR1.3
4x M3 T-nuts
8x M3x8mm
How to install RepRapFirmware 3
LPC1768/1769 boards (SKR1.3, 1.4, 1.4 Turbo): https://reprap.org/forum/read.php?147,874661
STM32F4 boards (SKR Pro 1.1, 1.2 or GTR v1.0): https://reprap.org/forum/read.php?147,876357
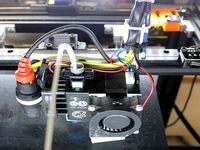
Note: I have also a BL Touch but it works very well without.
Files to print:
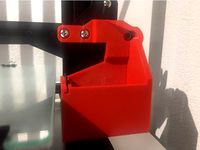
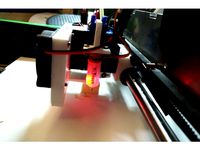
2x optical support v3.stl - Support for the optical Endstop
2x Ender 5 - Endstop trigger v1 15mm.stl - Parts to trigger the optical endstop 15mm should be the one you need but I included a shorter one just in case
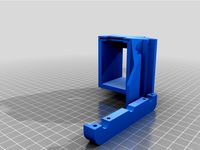
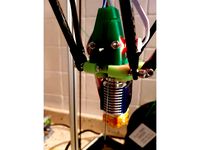
1x Ender 5 - Dual Z cable relieve v4.stl – prevent to damage the soldered connections on the heated bed.
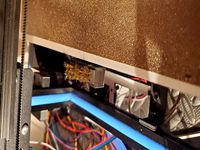
The endstop triggers can be glued directly on the plate as there is no contact or constraint applied on them.
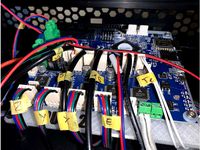
Wiring
Back stepper motor connected on Driver 2
Front stepper motor connected on Driver 4
Extruder connected on Driver 3
Back Optical Endstop connected on Z Stop Max
Front Optical Endstop connected on X Stop Min
Optional: BL Touch connected on Z Stop Min
RepRapFirmware 3 modifications
M569 P2 S1 ; physical drive 2
M569 P3 S0 ; physical drive 3
M569 P4 S1 ; physical drive 4
S0/S1 is a parameter used to reverse the stepper motor if needed.
The Z axis needs to be split in Z and U for homing purpose
M584 X0 Y1 Z2:4 U:4 E3 P3
Driver U must be added in M92, M566, M203, M201 and M906 (same values as Z), this is what I used on my Ender 5:
M350 X16 Y16 Z16 E16 I1 ; configure microstepping with interpolation
M92 X80.00 Y80.00 Z800.00 U800.00 E92.6 ; set steps per mm
M566 X900.00 Y900.00 Z12.00 U12.00 E120.00 ; set maximum instantaneous speed changes (mm/min)
M203 X6000.00 Y6000.00 Z180.00 U180.00 E1200.00 ; set maximum speeds (mm/min)
M201 X500.00 Y500.00 Z20.00 U20.00 E250.00 ; set accelerations (mm/s^2)
M906 X800 Y800 Z1200 U1200 E800 I30 ; set motor currents (mA) and motor idle factor in per cent
You MUST used values that are correct for your Ender 5, for example I have .9degree stepper motor on Z et U which means the step are doubled and the currents must be higher.
Endstops for the Dual Z
M574 Z1 S1 P"zstopmax" ; configure active-high endstop for low end on Z via pin zstop
M574 U1 S1 P"xstop" ; configure active-high endstop for low end on Z via pin zstop
Optional - BL Touch – Example, must be adjusted specifically for your printer
M950 S0 C"servo0" ; create servo pin 0 for BLTouch
M558 P9 C"^zstop" H5 F120 T6000 ; set Z probe type to bltouch and the dive height + speeds
G31 P500 X-38.2 Y-12.35 Z1.35 ; set Z probe trigger value, offset and trigger height
M557 X30:190 Y30:190 S20 ; define mesh grid
Example of files used for homing – These files may need to be adjusted for your printer
homez.g
; homez.g
; called to home the Z axis
M913 X100 Y100 Z100
; split Z motor control to Z and U
; for it to work we have to show U (param P4) in the UI
M584 Z2 U4 P4
; Move Z and U down until the switches triggers
G1 H1 Z-405 U-405 F1500
; back to combined axes and hidden U
M584 Z2:4 P3
G1 Z10 F3000
; Back to absolute positioning
G90
homeall.g
; homeall.g
; called to home all axes
M913 X100 Y100 Z100
G91 ; relative positioning
G1 H2 Z5 F6000 ; lift Z relative to current position
G1 H1 X235 Y235 F1800 ; move quickly to X and Y axis endstops and stop there (first pass)
G1 H2 X-5 Y-5 F6000 ; go back a few mm
G1 H1 X235 Y235 F360 ; move slowly to X and Y axis endstops once more (second pass)
G90 ; absolute positioning
; split Z motor control to Z and U
; for it to work we have to show U (param P4) in the UI
M584 Z2 U4 P4
; Move Z and U down until the switches triggers
G1 H1 Z-405 U-405 F1500
; back to combined axes and hidden U
M584 Z2:4 P3
G92 Z7
G1 Z10 F3000
; Back to absolute positioning
G90
G1 X100 Y100 F6000 ; go to first bed probe point and home Z
G30 ; home Z by probing the bed
; Uncomment the following lines to lift Z after probing
;G91 ; relative positioning
;G1 Z5 F100 ; lift Z relative to current position
;G90 ; absolute positioning
1x Dual Z plate sold by Two Six Engineering (https://twosixengineering.com/gtr-shop/ols/products/ender-5-dual-z-axis)
2x endstops sold by TriangleLab (https://www.aliexpress.com/item/32852113543.html), the wires provided should be long enough
Upgraded board – Instruction provided will be for RepRapFirmware 3 on an SKR1.3
4x M3 T-nuts
8x M3x8mm
How to install RepRapFirmware 3
LPC1768/1769 boards (SKR1.3, 1.4, 1.4 Turbo): https://reprap.org/forum/read.php?147,874661
STM32F4 boards (SKR Pro 1.1, 1.2 or GTR v1.0): https://reprap.org/forum/read.php?147,876357
Note: I have also a BL Touch but it works very well without.
Files to print:
2x optical support v3.stl - Support for the optical Endstop
2x Ender 5 - Endstop trigger v1 15mm.stl - Parts to trigger the optical endstop 15mm should be the one you need but I included a shorter one just in case
1x Ender 5 - Dual Z cable relieve v4.stl – prevent to damage the soldered connections on the heated bed.
The endstop triggers can be glued directly on the plate as there is no contact or constraint applied on them.
Wiring
Back stepper motor connected on Driver 2
Front stepper motor connected on Driver 4
Extruder connected on Driver 3
Back Optical Endstop connected on Z Stop Max
Front Optical Endstop connected on X Stop Min
Optional: BL Touch connected on Z Stop Min
RepRapFirmware 3 modifications
M569 P2 S1 ; physical drive 2
M569 P3 S0 ; physical drive 3
M569 P4 S1 ; physical drive 4
S0/S1 is a parameter used to reverse the stepper motor if needed.
The Z axis needs to be split in Z and U for homing purpose
M584 X0 Y1 Z2:4 U:4 E3 P3
Driver U must be added in M92, M566, M203, M201 and M906 (same values as Z), this is what I used on my Ender 5:
M350 X16 Y16 Z16 E16 I1 ; configure microstepping with interpolation
M92 X80.00 Y80.00 Z800.00 U800.00 E92.6 ; set steps per mm
M566 X900.00 Y900.00 Z12.00 U12.00 E120.00 ; set maximum instantaneous speed changes (mm/min)
M203 X6000.00 Y6000.00 Z180.00 U180.00 E1200.00 ; set maximum speeds (mm/min)
M201 X500.00 Y500.00 Z20.00 U20.00 E250.00 ; set accelerations (mm/s^2)
M906 X800 Y800 Z1200 U1200 E800 I30 ; set motor currents (mA) and motor idle factor in per cent
You MUST used values that are correct for your Ender 5, for example I have .9degree stepper motor on Z et U which means the step are doubled and the currents must be higher.
Endstops for the Dual Z
M574 Z1 S1 P"zstopmax" ; configure active-high endstop for low end on Z via pin zstop
M574 U1 S1 P"xstop" ; configure active-high endstop for low end on Z via pin zstop
Optional - BL Touch – Example, must be adjusted specifically for your printer
M950 S0 C"servo0" ; create servo pin 0 for BLTouch
M558 P9 C"^zstop" H5 F120 T6000 ; set Z probe type to bltouch and the dive height + speeds
G31 P500 X-38.2 Y-12.35 Z1.35 ; set Z probe trigger value, offset and trigger height
M557 X30:190 Y30:190 S20 ; define mesh grid
Example of files used for homing – These files may need to be adjusted for your printer
homez.g
; homez.g
; called to home the Z axis
M913 X100 Y100 Z100
; split Z motor control to Z and U
; for it to work we have to show U (param P4) in the UI
M584 Z2 U4 P4
; Move Z and U down until the switches triggers
G1 H1 Z-405 U-405 F1500
; back to combined axes and hidden U
M584 Z2:4 P3
G1 Z10 F3000
; Back to absolute positioning
G90
homeall.g
; homeall.g
; called to home all axes
M913 X100 Y100 Z100
G91 ; relative positioning
G1 H2 Z5 F6000 ; lift Z relative to current position
G1 H1 X235 Y235 F1800 ; move quickly to X and Y axis endstops and stop there (first pass)
G1 H2 X-5 Y-5 F6000 ; go back a few mm
G1 H1 X235 Y235 F360 ; move slowly to X and Y axis endstops once more (second pass)
G90 ; absolute positioning
; split Z motor control to Z and U
; for it to work we have to show U (param P4) in the UI
M584 Z2 U4 P4
; Move Z and U down until the switches triggers
G1 H1 Z-405 U-405 F1500
; back to combined axes and hidden U
M584 Z2:4 P3
G92 Z7
G1 Z10 F3000
; Back to absolute positioning
G90
G1 X100 Y100 F6000 ; go to first bed probe point and home Z
G30 ; home Z by probing the bed
; Uncomment the following lines to lift Z after probing
;G91 ; relative positioning
;G1 Z5 F100 ; lift Z relative to current position
;G90 ; absolute positioning
Similar models
thingiverse
free
CR-10 Mini Nozzle Purge with Microswiss Direct Drive by jefber
...raise the head slightly to adoid hitting glass on the way back
g90; switch back to absolute moves
m211 s1; turn on software stops
thingiverse
free
SVO2 Purge Bucket and GCODE by RedSquirrelHobbies
... positioning on
g1 z-1 f1000 ; lower nozzle by 1mm
g90 ; absolute positioning on
m400 ; wait for finish
thingiverse
free
Nozzle Cleaner for Solid Bed on Adimlab Printer
...g1 x0 y140 f6000
g1 x0 y180 f6000
g1 y140 f6000
g1 x0 y180 f6000
g1 x0 y140 f6000
g1 y180 f6000
g1 x0 y140 f6000
g1 x20 z40 f6000
thingiverse
free
Box Switch auto ShutDown by P69Greco
...olute positioning
m107 ;turn the fan off; -- end of end gcode --
g4 s120; attendi 2 minuti
g1 x0 y210 f2000; turn off print
thingiverse
free
Adjustable Z endstop Prusa I3 by Volkvanmyn25
...iverse
screw adjustable z endstop trigger to make fine tuning of the z home position. you need an optical endstop for this part.
thingiverse
free
Ormerod BLTouch Mount by dapol
...0 p3 s10 i1 ; deploy probe
g4 p75 ; wait 75ms
and a "retractprobe.g" which reads
m280 p3 s90 i1 ; retract bltouch probe
thingiverse
free

BFPTouch - Poor's man BLtouch. A simple, cheap, neat, precise, compact and reliable any surface Z Proble for bed leveling. by brunofporto
...e final mod was adding more space for the spring as a release mechanism. during these iterations i also modified some tolerances.
thingiverse
free
Kossel Mini Optical Z-Probe Mount by dd4v3
...for kossel mini z-probe.
it uses a simple handcrafted "allen key" made of 1mm steel wire.
deploy and retract is manual.
grabcad
free

ENDSTOP SWITCH ENDER 5 Z AXIS
...d
endstop switch for creality ender 5 z axis.
mount with two screws.
it is adjustable in a vertical position.
size is 38x22x5mm
thingiverse
free
Anet A8 Profile
...g90 ;absolute positioning
g1 y190 f9000 ;use this line if you want the bed to move to the front. delete if not.
m84 ;steppers off
Elescar
thingiverse
free
Delta (Anycubic Predator) - Upgrade de RRF2.x à RRF3.2 by Elescar
...de base en vue de passer le firmware reprapfirmware 2.x à 3.2.
la configuration utilisé est une duet 2 wifi et un smart effector.
thingiverse
free
Hemera mount for Ender 5 EZABL
...ender 5 ezabl thingiverse this is a remix of elescar#39;s ender 5 mount and joe casha's ender 3 mount...
Ender
3ddd
$1

Enders / Elegance
...enders / elegance
3ddd
обогреватель
уличный газовый обогреватель enders elegance
высота: 2200 мм
3d_export
free

ender 3 frame cavity covers
... of the creality ender 3 - makes it look a bit more attractive it just slides into the open channels of the aluminium framework
turbosquid
$1

pen support for ender 3
...y free 3d model pen support for ender 3 for download as blend on turbosquid: 3d models for games, architecture, videos. (1611282)
3d_ocean
$9

Ender Dragon Minecraft
...ojang obj poly videogames
ender dragon minecraft created with cinema 4d r15 formats included: max 2013 – fbx 2012 – c4d r15 – obj
3d_export
free

Creality ender enclosure webcam mount
...e creality enclosure. sure is better than a tripod. change it up if it helps. i printed pla with 50% infill on my dd ender 3 pro.
3d_export
free

ender 3 enclosure corners
...er corners and 4 upper corners, using 25mmx25mm angled aluminium pieces that gets covered on inside of the frame with plexiglass
3d_export
free

ender 3 3d print bed clips
...ed + normal aluminium bed frame of the creality ender 3 = 6mm (b) these clips are designed for glass plate + aluminium bed = 4mm
3d_export
$5

GRUMPY CAT
...grumpy cat 3dexport grumpy cat to print in ender ...
3d_export
$5

Logs fire
...with one multi material for corona and vray r ender. albedo, normal, uvmap, roughness format jpg 4096x4096 models:...
3d_export
$42

excavator
...is the original size. 0.12 mm printing surface creality ender5 ...
Dual
turbosquid
free

Dual Pistols
...ls
turbosquid
free 3d model dual pistols for download as fbx on turbosquid: 3d models for games, architecture, videos. (1320360)
turbosquid
$2

Dual Axe
...urbosquid
royalty free 3d model dual axe for download as fbx on turbosquid: 3d models for games, architecture, videos. (1332372)
turbosquid
$10

Dual Lesaths
... available on turbo squid, the world's leading provider of digital 3d models for visualization, films, television, and games.
3ddd
$1

плитка Dual Bianco (Испания)
...й плитки venis dual (испания). технические качества: устойчивость к стирания, отличная геометрия, отсутствие проблем при укладке.
turbosquid
$35

Dual Mesh Fonts
...ree 3d model dual mesh fonts for download as ma, obj, and fbx on turbosquid: 3d models for games, architecture, videos. (1352989)
turbosquid
$29

Dual Flask with Bungs
...del dual flask with bungs for download as obj, fbx, and blend on turbosquid: 3d models for games, architecture, videos. (1210512)
turbosquid
$19

Dual Socket Plug
...3d model dual socket plug for download as obj, fbx, and blend on turbosquid: 3d models for games, architecture, videos. (1303912)
turbosquid
$13

Dual Adjustable Pulley
... available on turbo squid, the world's leading provider of digital 3d models for visualization, films, television, and games.
turbosquid
$10

Amoi N809 Dual
... available on turbo squid, the world's leading provider of digital 3d models for visualization, films, television, and games.
turbosquid
$5

Dual Turret Tank
... available on turbo squid, the world's leading provider of digital 3d models for visualization, films, television, and games.
Z
3d_export
$5

nissan z
...nissan z
3dexport
nissan z
3ddd
$1

Vase Z
...vase z
3ddd
vase z
3ddd
$1

полотенцесушить Z
...полотенцесушить z
3ddd
полотенцесушитель
полотенцесушить z
design_connected
free

Z-Chair
...z-chair
designconnected
free 3d model of z-chair designed by karman, aleksei.
design_connected
$11

Z Lamp
...z lamp
designconnected
phillips z lamp computer generated 3d model. designed by kalff, louis.
3d_export
$5

Dragon balls z
...dragon balls z
3dexport
dragon ball z
turbosquid
$20

Fighter Z
...
turbosquid
royalty free 3d model fighter z for download as on turbosquid: 3d models for games, architecture, videos. (1292563)
turbosquid
$9

Pen Z
...pen z
turbosquid
free 3d model pen z for download as obj on turbosquid: 3d models for games, architecture, videos. (1686775)
turbosquid
free

z chair
...z chair
turbosquid
free 3d model z chair for download as max on turbosquid: 3d models for games, architecture, videos. (1410230)
turbosquid
$5

Letter Z
...urbosquid
royalty free 3d model letter z for download as max on turbosquid: 3d models for games, architecture, videos. (1408540)
Setup
3d_ocean
$5

Light Setup
...
3docean
light setup lightbox lights render setup
that’s light setup. easy for use. just delete spheres and position your object!
turbosquid
free
Desk setup
...oyalty free 3d model desk setup for download as fbx and blend on turbosquid: 3d models for games, architecture, videos. (1300745)
turbosquid
free
the library.max(setup)
... available on turbo squid, the world's leading provider of digital 3d models for visualization, films, television, and games.
3d_ocean
$5

HDRI Studio Lighting Setup
...ate the hdri into many lighting combinations. increase/decrease intensity. this is the complete lighting setup for vray using ...
3d_ocean
$9

Fireworks - Render Setup
...can be used for any kinds of short movies, or other works. includes a well documentation which includes the steps to change th...
3d_ocean
$5

MentalRay Studio Lighting Setup
...ene which you can change. the colors of the lights are ofcourse tweak-able. this is a basic light setup for you to use for pro...
3d_ocean
$5

Vray scene setup
...studio scene 2. vray setup 3. 2 vray cameras, one of them with dof 4. vray lights 5. vitra panton chair model 6. photoshop fil...
3d_ocean
$15

Render Setups Chair Wall
...render setups chair wall
3docean
chair max render setups vray wall white
render setups chair wall
turbosquid
$25
Interior light setup
...oyalty free 3d model interior light setup for download as c4d on turbosquid: 3d models for games, architecture, videos. (1539984)
turbosquid
$1
basic pc setup
...d
royalty free 3d model basic pc setup for download as blend on turbosquid: 3d models for games, architecture, videos. (1650020)
5
turbosquid
$6

Rock 5-5
...urbosquid
royalty free 3d model rock 5-5 for download as obj on turbosquid: 3d models for games, architecture, videos. (1639063)
3d_export
$5

hinge 5
...hinge 5
3dexport
hinge 5
turbosquid
$10

A-5
... available on turbo squid, the world's leading provider of digital 3d models for visualization, films, television, and games.
turbosquid
$2

A-5
... available on turbo squid, the world's leading provider of digital 3d models for visualization, films, television, and games.
turbosquid
$12

Calligraphic Digit 5 Number 5
...hic digit 5 number 5 for download as max, obj, fbx, and blend on turbosquid: 3d models for games, architecture, videos. (1389333)
3ddd
$1

5 роз
...5 роз
3ddd
5 роз в стеклянной вазе
design_connected
$11

iPhone 5
...iphone 5
designconnected
apple iphone 5 computer generated 3d model.
3ddd
$1

Lola 5
...lola 5
3ddd
miniforms
lola 5 miniforms 300*65*134
3ddd
$1

Nexus 5
...dd
nexus , phone , телефон
google nexus 5 phone
3d_ocean
$15

iPhone 5
...iphone 5
3docean
3d 4d apple cinema iphone model modeling phone screen texture
iphone 5 3d model and texture realistic iphone 5.