Thingiverse
Ender 3 (V2) quick-switch Filament Roller Guide by MrWraith2
by Thingiverse
Last crawled date: 4 years, 7 months ago
I enjoyed the roller guides from https://www.thingiverse.com/thing:3052488, but I found it annoying that you need to thread the filament through the roller, and can't add/change the roller with filament already installed.
So this is a version that allows you to add/remove the filament to the roller, even if it's already fed into the machine (or even if it's currently printing). The filament can be added easily like this, but is still being held carefully on the roller (I found that the filament could sometimes come off of open rollers during retraction etc).
There is a version that allows filament to go UP, and a version that allows filament to go DOWN (I use both configurations on my printer).
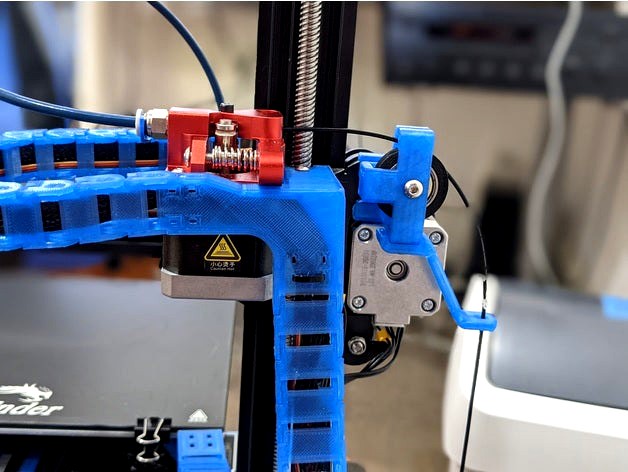
Also, I added an (ignorable) expansion spot, because I wanted to be able to add a stop for my filament cleaner. You can see in the pictures that my down roller has an "arm" attached (with an M3 nut and a short M3 bolt). This arm stops the filament cleaner from climbing all the way up to the roller. It's also a nice secondary guide to encourage the filament to go straight down to the filament box under the table.
The rest is much the same as in the model I remixed from:
You will need to print:
1 - bracket (either UpRoller or DownRoller),
1 - ring - (print ring.stl first, if it isn't tight enough then ring-sm.stl is slightly smaller inside).
2 - spacers
1 - arm (optional)
Plus you will need:
1 - 608 bearing (probably the most commonly available bearing, used for skateboard wheels and other things).
1 - M4 x 16mm bolt (spare part with my Ender 3, hopefully yours too).
1 - M3 nut, and 1 - M3 x 10mm bolt (optional - this if if you want to install the arm)
Assembly (pretty straightforward):
1) Lay the ring on a flat surface and press the bearing all the way in - if you feel it isn't on tight enough then print ring-sm and use that one.
2) Push a spacer into each side of the bearing
3) OPTIONALLY install the arm by placing a nut in the nut recess on the bracket, and push your M3 bolt through the arm, into the bracket, and secure it to the nut. It's ok if the bolt sticks out past the nut, as long as there's room still for the bearing.
4) Fit assembled bearing into bracket, insert and tighten bolt from the front - the back hole is smaller so the bolt can cut a thread as you wind it in.
5) Firmly push the bracket all the way onto the Z-axis carriage (the cutouts wrap around the axle spacer and nut). If it's too loose, or if it gets loose over time, just put some tape over the thing before you push it in.
6) Add your filament (which could already be fed into the machine) through the slot and onto the bearing. Optionally hook the filament into the arm too.
So this is a version that allows you to add/remove the filament to the roller, even if it's already fed into the machine (or even if it's currently printing). The filament can be added easily like this, but is still being held carefully on the roller (I found that the filament could sometimes come off of open rollers during retraction etc).
There is a version that allows filament to go UP, and a version that allows filament to go DOWN (I use both configurations on my printer).
Also, I added an (ignorable) expansion spot, because I wanted to be able to add a stop for my filament cleaner. You can see in the pictures that my down roller has an "arm" attached (with an M3 nut and a short M3 bolt). This arm stops the filament cleaner from climbing all the way up to the roller. It's also a nice secondary guide to encourage the filament to go straight down to the filament box under the table.
The rest is much the same as in the model I remixed from:
You will need to print:
1 - bracket (either UpRoller or DownRoller),
1 - ring - (print ring.stl first, if it isn't tight enough then ring-sm.stl is slightly smaller inside).
2 - spacers
1 - arm (optional)
Plus you will need:
1 - 608 bearing (probably the most commonly available bearing, used for skateboard wheels and other things).
1 - M4 x 16mm bolt (spare part with my Ender 3, hopefully yours too).
1 - M3 nut, and 1 - M3 x 10mm bolt (optional - this if if you want to install the arm)
Assembly (pretty straightforward):
1) Lay the ring on a flat surface and press the bearing all the way in - if you feel it isn't on tight enough then print ring-sm and use that one.
2) Push a spacer into each side of the bearing
3) OPTIONALLY install the arm by placing a nut in the nut recess on the bracket, and push your M3 bolt through the arm, into the bracket, and secure it to the nut. It's ok if the bolt sticks out past the nut, as long as there's room still for the bearing.
4) Fit assembled bearing into bracket, insert and tighten bolt from the front - the back hole is smaller so the bolt can cut a thread as you wind it in.
5) Firmly push the bracket all the way onto the Z-axis carriage (the cutouts wrap around the axle spacer and nut). If it's too loose, or if it gets loose over time, just put some tape over the thing before you push it in.
6) Add your filament (which could already be fed into the machine) through the slot and onto the bearing. Optionally hook the filament into the arm too.