Thingiverse
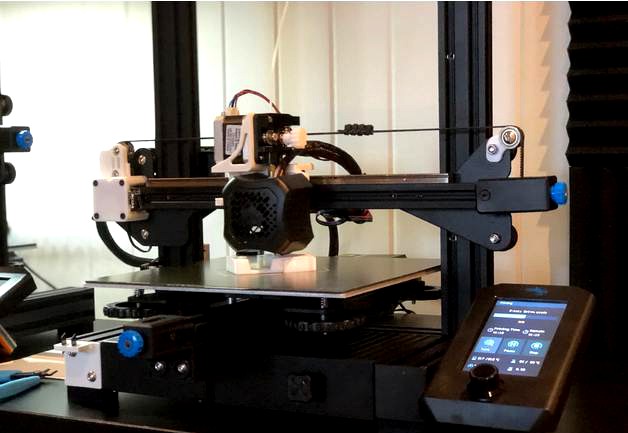
Ender 3 V2 Linear Rail Direct Drive X-Axis Conversion V1 by VonTaube
by Thingiverse
Last crawled date: 3 years, 3 months ago
Ender 3 X-Axis Linear Rail Direct Drive Conversion V1
Notes:
Linear Rail Mount must be printed in PETG, ASA or a higher temp material
Linear Rail Belt Guide V5 is an updated right side X-Axis idler mount. Extra support to resist torqueing/twisting effect.
Required Hardware:
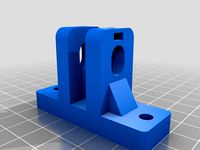
Direct Drive RE BLTouch - Linear Rail mount v3
Linear Rail Carriage: M3x8 (x4)
Hot End: M3x20 (x2) + M3 Nut (x4) +M3 Washer (x4)
Fan Shroud: M3x12 (x1)
BLTouch: M3x6 (x2)
Extruder: OEM hardware
Belt: 2mm Pitch 6mm Width
Material: PETG/ASA or high temp material recommended
X-Axis Stepper Pulley Cover v3
Idler Pulleys: Creality idler pulleys (x2) OR (5mm bore x 10mm width idlers) (x2)
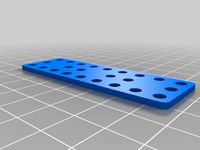
Idler Pulley Mounting: M5x20 (x2) + M5 Nut (x2) + M5 Washer (x2) + Bearing Sleeve v0 (x2)
X-Axis Cover: OEM Hardware
End Stop Switch: OEM Hardware
Linear Rail Belt Guide v4
Idler Pulley: Creality idler pulleys (x1) OR (5mm bore x 10mm width idlers) (x1)
Idler Pulley Mounting: M5x20 (x1) + M5 Nut (x1) + M5 Washer (x1) + Bearing Sleeve v0 (x1)
Belt Guide Mounting: OEM Hardware
300mm MGN12H Mini Linear Rail with MGN12H Carriage Block
MGN12H Rail: M3x8 (x4) + M3 T-Slot Nuts (x4)
Installation
Remove all track rollers, belt tensioner and guide belt. Set aside print head.
Install linear rail, on top of x-axis extrusion, with at least four M3x8 screws and M3 T-slot nuts. Be sure to mount within 5mm of x-axis stepper cover on left side of printer.
Install Linear Rail Belt Guide v4 idler pulley with M5 hardware and mount assembly to upper track roller hardware above belt tensioner.
Prep 3D Printed Linear Rail Carriage:
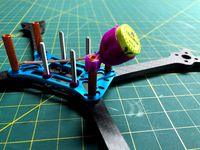
Remove fan shroud and hot end from OEM carriage.
Install (2x) M3x20 screws from back to front of linear rail carriage. These will act as studs to mount the hot end on the front.
Moving to the front of the linear rail carriage, secure (2x) M3 Nuts and (4x) M3 Washers on your M3x20 studs in the following order:
Carriage/Stud -> M3 Washer - > M3 Nut -> M3 Washer -> Hot End -> M3 Nut (This can be seen in the above image of the hot end with fan shroud removed)
Before installing the OEM fan shroud, you will need to trim off a locating tab on the left side of the shroud. This locating tab is on the side closest to the X-Axis Stepper, near the BLTouch mount.
Using (1x) M3x12 install OEM fan shroud from the backside of carriage. Use the existing locating tab to orient the fan shroud correctly, tighten down shroud from the back of the carriage with the upper hole on tensioner side.
Install Belts
Trim the crimped ends off two OEM creality x-axis belts and slot the remaining crimped ends into either side of the linear rail carriage.
Once belts are attached you can go ahead and install the carriage to the linear rail block. You will be routing the belt through both the X-Axis Stepper Pulley Cover v3 and belt tensioner as you install each. Join the belts in the center above the rail.
Alternatively, you can purchase a 5m roll of 6mm wide 2mm pitch belt and trim to size. If using this method you must install the X-Axis Stepper Pulley Cover v3 and belt tensioner first, then route the belt from top down through both sides and secure to the linear rail carriage.
Install Linear Rail mount v3 (If using two belt method)
Using (4x) M3x8 mount the prepped linear rail carriage to the linear rail carriage block
Install X-Axis Stepper Pulley Cover v3
Install the (2x) idler pulleys to the cover using M5x20, M5 Nut, M5 Washer and Bearing Sleeve v0
Remove OEM x-axis stepper cover and move end stop limit switch to new linear rail x-axis cover.
Mount linear rail x-axis cover to stepper with OEM hardware. Route belt through x-axis idler pulleys and stepper gear before mounting the screws for the cover.
Install Belt Tensioner
Install belt tensioner with belt coming straight out of the hole in the top, wrapping around Linear Rail Belt Guide v4 idler pulley.
Finishing Belts
a. Two Belts
If using two OEM creality belts you can now join the belt in the center of the x-axis above rail. Center to avoid belt joint/seam going over idler pulley on either end of rail during operation.
b. Single Belt (5m)
Once belt is routed through both side of the printer start the belts through the bottom of the carriage.
Secure carriage to linear rail block with M3x8 (x4)
Crimp belt and tension
See Ender 3 V2 Direct Drive link below for extruder install infohttps://www.thingiverse.com/thing:4621486
Notes:
Linear Rail Mount must be printed in PETG, ASA or a higher temp material
Linear Rail Belt Guide V5 is an updated right side X-Axis idler mount. Extra support to resist torqueing/twisting effect.
Required Hardware:
Direct Drive RE BLTouch - Linear Rail mount v3
Linear Rail Carriage: M3x8 (x4)
Hot End: M3x20 (x2) + M3 Nut (x4) +M3 Washer (x4)
Fan Shroud: M3x12 (x1)
BLTouch: M3x6 (x2)
Extruder: OEM hardware
Belt: 2mm Pitch 6mm Width
Material: PETG/ASA or high temp material recommended
X-Axis Stepper Pulley Cover v3
Idler Pulleys: Creality idler pulleys (x2) OR (5mm bore x 10mm width idlers) (x2)
Idler Pulley Mounting: M5x20 (x2) + M5 Nut (x2) + M5 Washer (x2) + Bearing Sleeve v0 (x2)
X-Axis Cover: OEM Hardware
End Stop Switch: OEM Hardware
Linear Rail Belt Guide v4
Idler Pulley: Creality idler pulleys (x1) OR (5mm bore x 10mm width idlers) (x1)
Idler Pulley Mounting: M5x20 (x1) + M5 Nut (x1) + M5 Washer (x1) + Bearing Sleeve v0 (x1)
Belt Guide Mounting: OEM Hardware
300mm MGN12H Mini Linear Rail with MGN12H Carriage Block
MGN12H Rail: M3x8 (x4) + M3 T-Slot Nuts (x4)
Installation
Remove all track rollers, belt tensioner and guide belt. Set aside print head.
Install linear rail, on top of x-axis extrusion, with at least four M3x8 screws and M3 T-slot nuts. Be sure to mount within 5mm of x-axis stepper cover on left side of printer.
Install Linear Rail Belt Guide v4 idler pulley with M5 hardware and mount assembly to upper track roller hardware above belt tensioner.
Prep 3D Printed Linear Rail Carriage:
Remove fan shroud and hot end from OEM carriage.
Install (2x) M3x20 screws from back to front of linear rail carriage. These will act as studs to mount the hot end on the front.
Moving to the front of the linear rail carriage, secure (2x) M3 Nuts and (4x) M3 Washers on your M3x20 studs in the following order:
Carriage/Stud -> M3 Washer - > M3 Nut -> M3 Washer -> Hot End -> M3 Nut (This can be seen in the above image of the hot end with fan shroud removed)
Before installing the OEM fan shroud, you will need to trim off a locating tab on the left side of the shroud. This locating tab is on the side closest to the X-Axis Stepper, near the BLTouch mount.
Using (1x) M3x12 install OEM fan shroud from the backside of carriage. Use the existing locating tab to orient the fan shroud correctly, tighten down shroud from the back of the carriage with the upper hole on tensioner side.
Install Belts
Trim the crimped ends off two OEM creality x-axis belts and slot the remaining crimped ends into either side of the linear rail carriage.
Once belts are attached you can go ahead and install the carriage to the linear rail block. You will be routing the belt through both the X-Axis Stepper Pulley Cover v3 and belt tensioner as you install each. Join the belts in the center above the rail.
Alternatively, you can purchase a 5m roll of 6mm wide 2mm pitch belt and trim to size. If using this method you must install the X-Axis Stepper Pulley Cover v3 and belt tensioner first, then route the belt from top down through both sides and secure to the linear rail carriage.
Install Linear Rail mount v3 (If using two belt method)
Using (4x) M3x8 mount the prepped linear rail carriage to the linear rail carriage block
Install X-Axis Stepper Pulley Cover v3
Install the (2x) idler pulleys to the cover using M5x20, M5 Nut, M5 Washer and Bearing Sleeve v0
Remove OEM x-axis stepper cover and move end stop limit switch to new linear rail x-axis cover.
Mount linear rail x-axis cover to stepper with OEM hardware. Route belt through x-axis idler pulleys and stepper gear before mounting the screws for the cover.
Install Belt Tensioner
Install belt tensioner with belt coming straight out of the hole in the top, wrapping around Linear Rail Belt Guide v4 idler pulley.
Finishing Belts
a. Two Belts
If using two OEM creality belts you can now join the belt in the center of the x-axis above rail. Center to avoid belt joint/seam going over idler pulley on either end of rail during operation.
b. Single Belt (5m)
Once belt is routed through both side of the printer start the belts through the bottom of the carriage.
Secure carriage to linear rail block with M3x8 (x4)
Crimp belt and tension
See Ender 3 V2 Direct Drive link below for extruder install infohttps://www.thingiverse.com/thing:4621486
Similar models
thingiverse
free
Hictop 3dp11 Adjustable Y Idler Mount by SaberShip
...rts:
x1 stock 608zz idler bearing
x1 stock m3 bolt and nut
x2 stock m5 bolts
x2 stock m5 t-slot nuts
x2 m3 x 10 screws
x2 m3 nuts
thingiverse
free

Prusa i3 X-Axis Tensioner by BillyKalfus1
...rew pulls the tensioner closer to the back of the axis mount, pulling the pulleys back, and increasing the tension in the x-axis.
thingiverse
free

Tronxy X5S - Linear Guide Rails Conversion Kit
...s on slider_plate_right_part7 / slider_plate_left_part8 / hotend_plate_part10 / hiwin_x_plate_part12 / left_spacer_body_v2 _part1
thingiverse
free

Kossel carriage with implant screw support for belt tension and endstop trigger adjustable by 3DPW
...ll circle on belt, insert the circle to be belt holder. pull belt then the belt will be tighted. use zip tie to tighten the belt.
thingiverse
free

Tronxy Y axis stabilizer prototype by Damiken
...e pressing them into them. included are pics for reference. the zip tie is unnecessary, just from a problem with my motor damper.
thingiverse
free

Hictop 3dp11 Adjustable Y Idler Mount 2.0 by SaberShip
...ler pulley for 6mm wide gt2 belt
1x m5 x30 bolt
1x m5 nylon lock insert nut (regular m5 nut may work)
2x m3 x10 screws
2x m3 nuts
thingiverse
free

Better Y axis for flsun cube with belt tensioner by MichaelLamb
...at will loosen over time causing headaches... unfortunately that does not correct crooked 8mm rods that came with the printer...
thingiverse
free

Adimlab Gantry-S X Axis Tensioner
...the pulley.
m4 x 25 or m4 x 30 screw and a backing nut to keep this screw from spinning.
m4 nylock nut to insert into the knob.
.
thingiverse
free

Makergear Prusa simple X-axis belt tensioner by Prestonf
...adjustable x-axis belt tensioner for the makergear prusa that takes the place of the two 8mm washers for the x-axis idler pulley.
thingiverse
free

Prusa Steel X axis with tensioner and 8mm leadscrew support by fedewolfie
...ner and a m5 screw and nut for the toothed idler, i use a cheap aliexpress toothed idler with a m5 bore.
prints without supports.
Vontaube
thingiverse
free

Sanding Wedge by VonTaube
...sanding wedge by vontaube
thingiverse
hardware:
1x m4 nut
1x m4x25
thingiverse
free

Ergonomic Wrist Rest by VonTaube
...ergonomic wrist rest by vontaube
thingiverse
ergonomic wrist rest
thingiverse
free

Bottle Cap Grip by VonTaube
...bottle cap grip by vontaube
thingiverse
bottle cap grip
use a high-strength, fast-bonding adhesive to attach parts.
thingiverse
free

Rigid Industries Dually D2 Bezel by VonTaube
...rigid industries dually d2 bezel by vontaube
thingiverse
rigid industries dually d2 front bezel
thingiverse
free

Ender 3 SD Card Holder by VonTaube
...ender 3 sd card holder by vontaube
thingiverse
creality ender 3 sd card holder
thingiverse
free

Weber Summit BBQ Door Latch V2 by VonTaube
...weber summit bbq door latch v2 by vontaube
thingiverse
weber summit door latch v2
thingiverse
free

Cabin Style Bird House by VonTaube
...ontaube
thingiverse
cabin style bird house
designed as a nesting shelf with 3 open sides to attract robins (non-cavity nesting).
thingiverse
free

Ender 3 X-Axis Motor Cover by VonTaube
...ender 3 x-axis motor cover by vontaube
thingiverse
remake of ender 3 oem x-axis stepper cover.
thingiverse
free

Fanatec Podium Nexus 7 Tablet Mount by VonTaube
...fanatec podium nexus 7 tablet mount by vontaube
thingiverse
fanatec podium dd1/dd2 nexus 7 tablet mount
thingiverse
free

TPU Accessory Clamp 1"-2.25" by VonTaube
... 1"-2.25" by vontaube
thingiverse
tpu accessory clamp 1"-2.25"
note: riser mount.stl - 20mm height increase.
Conversion
thingiverse
free

Converse keychain for Converse's fan by theletech
...converse keychain for converse's fan by theletech
thingiverse
please print in 0.15 or 0.2 for the best quality
thingiverse
free

Blockjacker arm conversion
...blockjacker arm conversion
thingiverse
a conversion for a giant robot. mirror to print l and r arms
thingiverse
free

Converse Shoes by spekdesign
...converse shoes by spekdesign
thingiverse
simple converse shoes (left + right) intended for small prints with minimal detail.
thingiverse
free

Conversation Hearts by PfLibrarian
...n hearts by pflibrarian
thingiverse
conversation hearts with three different candy heart phrases. great for valentine's day!
thingiverse
free

associated B4 conversion pancar
...associated b4 conversion pancar
thingiverse
associated b4 conversion pancar
thingiverse
free

Rotofury Elite Conversion by Hooliganblasterco
...rotofury elite conversion by hooliganblasterco
thingiverse
rotofury elite conversion, reversable
thingiverse
free

Conversation Hearts
... the heart instead of popped out. get creative if you like and fill the indents with paint or glitter and seal to make an impact!
thingiverse
free

Conversion Kit Box (Slide Conversion Kit) by Ziggi42
...nd tpu (buffers).
everything you have to know is in the readme.txt or look at print settings misc.
thanks and gimme a like!!!
sfo
thingiverse
free

BOOMBASTIC .22 CONVERSION by mussy
...boombastic .22 conversion by mussy
thingiverse
this is a .22 rim fire blank conversion... enjoy
thingiverse
free

20mm Fan conversion by fluxcore
...20mm fan conversion by fluxcore
thingiverse
conversion from a 20mm fan to a blower or extractor.......unfinished
Linear
thingiverse
free

MGN12 Linear Guide + MGN12H Long linear carriage by Artu66
...//pl.aliexpress.com/item/free-shipping-for-12mm-linear-guide-mgn12-l-300mm-linear-rail-way-mgn12c-or-mgn12h-long/32540712851.html
thingiverse
free

LM16UU Linear bearing
...lm16uu linear bearing
thingiverse
linear bearing...
thingiverse
free

linear Slide by pmf10
...linear slide by pmf10
thingiverse
linear slide.
thingiverse
free

Linear extrude by Gutenber3D
...linear extrude by gutenber3d
thingiverse
linear extrude
thingiverse
free

LInear Rail by Galione1
...linear rail by galione1
thingiverse
linear rail with slider.
thingiverse
free

Linear Slide by xM0NKEYM4Nx
...linear slide by xm0nkeym4nx
thingiverse
tetrix linear rack
thingiverse
free

linear bearing 8mm
...linear bearing 8mm
thingiverse
linear bearing 8mm lm8uu
thingiverse
free

Linear bearing by ilVerza
...linear bearing by ilverza
thingiverse
linear bearing for y axis
thingiverse
free

Vex Linear by Greaser57
...vex linear by greaser57
thingiverse
plastic part for the vex linear kit
thingiverse
free

Linear Axis by wizard23
...linear axis by wizard23
thingiverse
a linear axis i wanted to test.
V1
thingiverse
free

Pinquin v1 by bjarkemape
...pinquin v1 by bjarkemape
thingiverse
pinquin v1
thingiverse
free

Minion v1 by bjarkemape
...minion v1 by bjarkemape
thingiverse
minion v1
thingiverse
free

Arrowhead V1 by ogill117
...arrowhead v1 by ogill117
thingiverse
arrowhead v1
thingiverse
free

Duct Vortex V1
...duct vortex v1
thingiverse
duct vortex v1
thingiverse
free

ParaBracci Bolt V1
...parabracci bolt v1
thingiverse
parabracci bolt v1
thingiverse
free

ParaMotori Bolt V1
...paramotori bolt v1
thingiverse
paramotori bolt v1
thingiverse
free

ParaBracci ThunderStorm V1
...parabracci thunderstorm v1
thingiverse
parabracci thunderstorm v1
thingiverse
free

ParaBracci Bit V1
...parabracci bit v1
thingiverse
parabracci bit v1
thingiverse
free

ParaMotori ThunderStorm V1
...paramotori thunderstorm v1
thingiverse
paramotori thunderstorm v1
thingiverse
free

ParaMotori Bullet V1
...paramotori bullet v1
thingiverse
paramotori bullet v1
Rail
thingiverse
free

VECTOR rail
...vector rail
thingiverse
vector rail
thingiverse
free

Railing
...railing
thingiverse
for gaming and modeling
thingiverse
free

Fingerboard rail
...fingerboard rail
thingiverse
cool rail for fingerboarding!!!!
thingiverse
free

Guide Rail
...guide rail
thingiverse
different guide rail options. i found the long rail provide to most stability.
thingiverse
free

Rail for Tramways
...rail for tramways
thingiverse
it is just a replacement for the rails of tramways.
thingiverse
free

Scope rail by rundown
...scope rail by rundown
thingiverse
scope rail for a lower rail.
thingiverse
free

Picatinny Rail
...u need.
this rail segment has a 1 inch wide baseplate. this surface is what i used to glue the rail into the target application.
thingiverse
free

Dovetail Rail
... and realized it used a dovetail rail contrary to a picatinny rail, made this and super glued it on my rifle, no problems so far.
thingiverse
free

Ak side rail mount with extra rail by HomieStarks
...ak side rail mount with extra rail by homiestarks
thingiverse
just added another rail on it.
thingiverse
free

Nerf Rail to Picatinny Rail Adapter by mshukr1
...y rail adapter. you can either print a long 'combined' rail, or separate parts, and glued them together (easier to print)
Drive
thingiverse
free

USB Drive / Flash Drive / Pen Drive Case by BrosJr
...usb drive / flash drive / pen drive case by brosjr
thingiverse
spare part for a broken usb drive case.
my mom´s request :-)
thingiverse
free

Turret Drive
...turret drive
thingiverse
drive key and housing
thingiverse
free

USB Flash Drive Holder of Drives by paxamime
...ot of flash drives for various purposes so while 20 drives may sound like a lot, this is only one of 3 that i am currently using.
thingiverse
free

Ender3 Direct drive duel drive mount
...have created for the ender3 and should fit the cr10 printers. this is for the duel drive mount version not the standard version.
thingiverse
free

Drive Shaft by RedMerlin
...drive shaft by redmerlin
thingiverse
a drive shaft.
thingiverse
free

Driving Message by Mariblueruby
...driving message by mariblueruby
thingiverse
cheeky driving message
thingiverse
free

G-Drive External Hard Drive Case by EvanVS
...ve case by evanvs
thingiverse
this is a case for an external usb harddrive.
this case is designed to fit the "g-drive"
thingiverse
free

MK2 Drive Bashguards
...mk2 drive bashguards
thingiverse
bashguards for the mk2 avio at gear drive!
thingiverse
free

Harmonic drive
...harmonic drive
thingiverse
harmonic drive i made, uses 7.9 mm steal ball bearings. make sure to split into parts before printing
thingiverse
free

Waterjet Drive
...waterjet drive
thingiverse
waterjet model
Direct
thingiverse
free

IeC Direct - Basculating MK8 Direct Extruder by Immaginaecrea
...iec direct - basculating mk8 direct extruder by immaginaecrea
thingiverse
another mk8 direct extruder
thingiverse
free

Directed Numbers by hachihung
...directed numbers by hachihung
thingiverse
directed numbers model for students playing
thingiverse
free

Direct Extruder by ManfredSaemann
...direct extruder by manfredsaemann
thingiverse
conversion of the ender-6 to direct extruder with filament guide.
thingiverse
free

Directional Marker (Arrow) by Crazy_Diver_84
...directional marker (arrow) by crazy_diver_84
thingiverse
directional marcer for cavediving
thingiverse
free

Direct Drive Delta by gustofusion
...direct drive delta by gustofusion
thingiverse
direct drive delta
thingiverse
free

Direct Drive Extruder by djBo
...ig big fan of this)
compact bowden extruder
one piece simple direct drive extruder
mariusmartin's direct drive extruder
thingiverse
free

Sapphire Pro bowden to direct
...sapphire pro bowden to direct
thingiverse
bracket model for direct extruder.
thingiverse
free

cable manager for zav direct
...cable manager for zav direct
thingiverse
cable manager for zav direct
thingiverse
free

Direct mounting NEMA17 by adolf81
...direct mounting nema17 by adolf81
thingiverse
direct mounting nema17 for cnc
thingiverse
free

Sunlu direct extruder by masbytes
...sunlu direct extruder by masbytes
thingiverse
adapter for direct extruder for sunlu s8
Ender
thingiverse
free
Ender-5
...ngiverse
3d model of ender-5.
attention: there are some changes in later versions on ender-5, so use this 3d model with caution.
thingiverse
free

USB Holder (Ender 3 / Ender 3 Pro)
...usb holder (ender 3 / ender 3 pro)
thingiverse
usb holder that easily mounts to the ender 3 / ender 3 pro lcd housing
thingiverse
free

Ender 3V2 LCD Cover with Ender Dragon by PhotoBud
...mplistic cover with extruded ender dragon and handle designed on fusion 360 to cover and protect the lcd screen of the ender 3v2.
thingiverse
free

ENDER 3
...ender 3
thingiverse
this is my first upgrade for ender 3 printer from long extruder to short extruder
thingiverse
free

Simple QUICK PRINT LCD Cover for Creality Ender-3/Ender-3s/Ender-3 Pro/Ender-5 by 1MavZ
...e quick print lcd cover for creality ender-3/ender-3s/ender-3 pro/ender-5 by 1mavz
thingiverse
quick and simple upgrade print...
thingiverse
free

Mini Ender 3
...mini ender 3
thingiverse
mini ender 3
thingiverse
free
Ender Dragon by piisawesome314159
...ender dragon by piisawesome314159
thingiverse
the ender dragon with a base.
thingiverse
free
Ender 3 / Ender 3 / Pro - 3D Filament Support
...ender 3 / ender 3 / pro - 3d filament support
thingiverse
filament holder for plug-in ender 3 / ender 3 / pro 3d printers
thingiverse
free
Filament Guide for ENDER 3 and ENDER 3 V2 by muhannad703
...filament guide for ender 3 and ender 3 v2 by muhannad703
thingiverse
ender 3 v2
thingiverse
free
fancover ender 3
...fancover ender 3
thingiverse
fan cover for ender 3
V2
thingiverse
free

Schleuder V2 / Slingshot V2 by Ju5tMak3
...schleuder v2 / slingshot v2 by ju5tmak3
thingiverse
schleuder v2 / slingshot v2
have fun
thingiverse
free

V2 by LeoRadstrom
...v2 by leoradstrom
thingiverse
v2
thingiverse
free

Yugioh V2
...yugioh v2
thingiverse
yugioh v2
thingiverse
free

WOPR v2
...wopr v2
thingiverse
wopr v2
from the "wargame" film
thingiverse
free

KeyHolder V2
...keyholder v2
thingiverse
keyholder v2.
for those who don't like to hear keys shaking.
thingiverse
free

v2 deck by ltl20
...v2 deck by ltl20
thingiverse
v2 deck
thingiverse
free

pinquin v2 by bjarkemape
...pinquin v2 by bjarkemape
thingiverse
pinquin v2
thingiverse
free

Minion v2 by bjarkemape
...minion v2 by bjarkemape
thingiverse
minion v2
thingiverse
free

LogoAlpha v2 by AlphaProject
...logoalpha v2 by alphaproject
thingiverse
logoalpha v2
thingiverse
free

Arrowhead V2 by ogill117
...arrowhead v2 by ogill117
thingiverse
arrowhead v2
Axis
thingiverse
free

Axis
...axis
thingiverse
had no dowels laying around so modeled an axis in 360
thingiverse
free

Axis
...axis
thingiverse
an right handed cartesian axis. notches indicate positive rotation direction.
thingiverse
free

CR10S X-axis & Y-axis spacer
...cr10s x-axis & y-axis spacer
thingiverse
4mm spacer for x-axis & y-axis on the cr10s.
thingiverse
free

AXYS KEYCHAIN
...axys keychain
thingiverse
polaris axys platform keychain
thingiverse
free

for Axis by bassemwagih
...for axis by bassemwagih
thingiverse
axis diameter = 1.3 cm
thingiverse
free

Axis Tree - 3 and 5 Axis by zefram
...and 5 axis by zefram
thingiverse
flexible 3 and 5 axis tree signpost to demonstrate or remind the axes on a 3 or 5 axis machine.
thingiverse
free
Linear Axis by wizard23
...linear axis by wizard23
thingiverse
a linear axis i wanted to test.
thingiverse
free

2 adjustable axis (Y-Z Axis) by NerdCorner
... (y-z axis) by nerdcorner
thingiverse
detailed explanation in my blogpost: https://nerd-corner.com/2-adjustable-axis-cad-design/
thingiverse
free

z axis motor holder for metal x axis to go from prusa I2 x axis to I3 x axis by brunoschoofs
...al x axis from aliexpress
that is like a prusa i3 x-axis to fit on your prusa i2
the bottom holder are comming to patience please
thingiverse
free

Z axis regulation
...z axis regulation
thingiverse
z axis regulation without synchronization, for artillery
3
thingiverse
free
Raspberry 3 and 3+ case
...raspberry 3 and 3+ case
thingiverse
case for raspberry 3 and 3+ wit fan
thingiverse
free

Cube Dissection Puzzle/ Model for 3^3 + 4^3 +5^3 = 6^3 by lgbu
...: oxford university press. (p. 203). the authors gave credit to a solution in eureka, the magazine of the cambridge archimedeans.
thingiverse
free
Makeblock Aluminum Pieces 3*3/3*9
...makeblock aluminum pieces 3*3/3*9
thingiverse
makeblock pieces 3x3 and 3x9 recreated for 3d printing
thingiverse
free
Floss 3 Lite - lollipop 3
...floss 3 lite - lollipop 3
thingiverse
antenna mount for floss 3 lite.
thingiverse
free

3 by obstacledaddy
...3 by obstacledaddy
thingiverse
3
thingiverse
free

????????? ??? ??????? 3 ?? by Rigel
...????????? ??? ??????? 3 ?? by rigel
thingiverse
????????? ??? ??????? 3 ??
thingiverse
free
oloid 3
...oloid 3
thingiverse
oloid 3
thingiverse
free

A stand 3
...a stand 3
thingiverse
a stand 3.
thingiverse
free

Tischlampe #3
...tischlampe #3
thingiverse
tischlampe #3
thingiverse
free
3/8 to 3/4 grommet by quikniq
...3/8 to 3/4 grommet by quikniq
thingiverse
3/8" to 3/4" grommet.