Thingiverse
Ender 3 Enclosure by stinkbug58
by Thingiverse
Last crawled date: 3 years, 3 months ago
Simple enclosure for an Ender 3 or anything with similar dimensions
I used PETG but I suppose any filament would work. This is all designed around 2mm plexiglass and 13mm PVC (13mm inside diameter, 18mm outside)
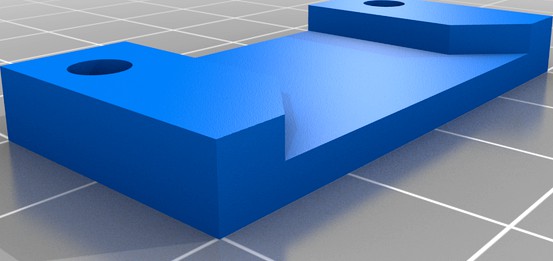
(1) is the top corners. Print 4 ea
(2) is the middle for the sides, back, and top. Print 4 ea
(3) is an edge for the back, and top, Print 5 ea
(4) is a bottom edge for the back and sides. Print 3 ea
(5) is an edge for the front/top and front/bottom. Print 2 ea
(6) is an edge for the front sides. Print 2 ea
(7) is the bottom corners. Print 4 ea.
Should be a total of 24 pieces. My first draft of these components used exact measurements and I found that it was somewhat difficult to assemble without breaking some of the pieces. Gorilla glue seems to hold them back together but I decided to modify my original designs to add about .5mm clearance for the plexiglass and 1mm for the PVC. I also increased the thickness of the tabs slightly to accomodate.
All of the holes are 4mm diameter so M3 screws/bolts work the best. M3*12 is probably the best length as the tabs are each 2.75mm + 2.5mm gap for the plexiglass (8mm total thickness)
The sides, back and top each get 4 panels. The dimensions are:
Sides - 271mm x 246mm
Top - 271mm x 221mm
Back - 246mm x 221mm
The dimensions for the front are 510mm x 460mm
From the front panel I cut a rectangle 350mm x 300mm for the door.
For the door hardware (Hinges/handle/latch) you can use basically anything.
For the hinges I used https://www.thingiverse.com/thing:2971343 and it took M4*12 bolts
For the latch mechanism I created my own rack and pinion vault style latch from scrap plexiglass from the project. This requires 2 of the "Latch Guide Frame" prints, 4 of the "Latch Guide Door" prints and 1 "Handle" print. All of the latch guide parts take M3*12 bolts.
The rack and pinion gear setup was cut using a laser. This also includes a large diameter circle to both hold the handle to the door and keep the gears in alignment. The parts of the vault style lock are all in the "Lock Mechanism" file. I suppose this could be used to extrude the parts if you would prefer to 3D print rather than laser cut. The bolt for attaching the handle to the plate is an M5*12
I've also included a file that I used for the layout of all of the laser cuts on the front panel (door and holes for attaching hardware)
All of the holes for the panels can be drilled or laser cut. they are 4mm holes centered on a 10mm square measured from each corner. AKA, 5mm from each edge.
For the filament routing I just mounted my existing filament holder to the top of the enclosure using a good old hand drill and M4*12 bolts. (back left corner slightly forward of the center of the panel). You will have to eyeball the placement to make sure that the filament will travel in a relatively straight line from the spool down through the panel and into the printer. I created a feedthrough that is 12mm in diameter. I don't have metric drill bits so i just picked something that was slightly larger and drilled very carefully! The mounting hardware for this is M3x12 bolts, again.
To finish up the filament routing I modified a bunch of preexisting designs and came up with this: https://www.thingiverse.com/thing:4645150
For assembly instead of precision cutting all of the PVC to length I was pretty much mentally done with putting the enclosure together so I just cut all of the pieces to fit, as I went. Warning, putting it together is like an annoying logic puzzle; I can't even begin to describe what order is best to put all of the panels together.
I used PETG but I suppose any filament would work. This is all designed around 2mm plexiglass and 13mm PVC (13mm inside diameter, 18mm outside)
(1) is the top corners. Print 4 ea
(2) is the middle for the sides, back, and top. Print 4 ea
(3) is an edge for the back, and top, Print 5 ea
(4) is a bottom edge for the back and sides. Print 3 ea
(5) is an edge for the front/top and front/bottom. Print 2 ea
(6) is an edge for the front sides. Print 2 ea
(7) is the bottom corners. Print 4 ea.
Should be a total of 24 pieces. My first draft of these components used exact measurements and I found that it was somewhat difficult to assemble without breaking some of the pieces. Gorilla glue seems to hold them back together but I decided to modify my original designs to add about .5mm clearance for the plexiglass and 1mm for the PVC. I also increased the thickness of the tabs slightly to accomodate.
All of the holes are 4mm diameter so M3 screws/bolts work the best. M3*12 is probably the best length as the tabs are each 2.75mm + 2.5mm gap for the plexiglass (8mm total thickness)
The sides, back and top each get 4 panels. The dimensions are:
Sides - 271mm x 246mm
Top - 271mm x 221mm
Back - 246mm x 221mm
The dimensions for the front are 510mm x 460mm
From the front panel I cut a rectangle 350mm x 300mm for the door.
For the door hardware (Hinges/handle/latch) you can use basically anything.
For the hinges I used https://www.thingiverse.com/thing:2971343 and it took M4*12 bolts
For the latch mechanism I created my own rack and pinion vault style latch from scrap plexiglass from the project. This requires 2 of the "Latch Guide Frame" prints, 4 of the "Latch Guide Door" prints and 1 "Handle" print. All of the latch guide parts take M3*12 bolts.
The rack and pinion gear setup was cut using a laser. This also includes a large diameter circle to both hold the handle to the door and keep the gears in alignment. The parts of the vault style lock are all in the "Lock Mechanism" file. I suppose this could be used to extrude the parts if you would prefer to 3D print rather than laser cut. The bolt for attaching the handle to the plate is an M5*12
I've also included a file that I used for the layout of all of the laser cuts on the front panel (door and holes for attaching hardware)
All of the holes for the panels can be drilled or laser cut. they are 4mm holes centered on a 10mm square measured from each corner. AKA, 5mm from each edge.
For the filament routing I just mounted my existing filament holder to the top of the enclosure using a good old hand drill and M4*12 bolts. (back left corner slightly forward of the center of the panel). You will have to eyeball the placement to make sure that the filament will travel in a relatively straight line from the spool down through the panel and into the printer. I created a feedthrough that is 12mm in diameter. I don't have metric drill bits so i just picked something that was slightly larger and drilled very carefully! The mounting hardware for this is M3x12 bolts, again.
To finish up the filament routing I modified a bunch of preexisting designs and came up with this: https://www.thingiverse.com/thing:4645150
For assembly instead of precision cutting all of the PVC to length I was pretty much mentally done with putting the enclosure together so I just cut all of the pieces to fit, as I went. Warning, putting it together is like an annoying logic puzzle; I can't even begin to describe what order is best to put all of the panels together.
Similar models
thingiverse
free

Ender 3 Zinus Table Enclosure
...that has been made for the ender 3 and similary sized printers uses the ikea lack table, but i...
thingiverse
free

1/4 Solidoodle 3 Plexiglass side clip enclosure by marcvw79
...2. the 1/4 wide clips secure the top and will side up to insert or remove the side. i used 3/8 x 1/8 foam tape to seal the sides.
thingiverse
free
Folgertech Kossel 2020 Plexiglass Enclosure support by mcclarydesign
...ces of plex. the third side should have a door cut in it. i have also uploaded magnetic latches which can be used for the door.
thingiverse
free

Laser-cut Filament Box by gauravmm
...or plug.
you should assemble these with m3x6mm screws and nuts.
it is compatible with any 40mm humidity sensor. i recommend this.
thingiverse
free

Side Panel Insert for Makerbot Replicator Enclosure by DrazzticAction
...r clones, as part of an enclosure to improve printing. goes well with this front door (http://www.thingiverse.com/thing:757385).
thingiverse
free

Replicator 2 (lockable) Case by fumalcon
... 91290a330 mcmaster
nuts(4) 90685a043 mcmaster
the top panel also has two bends that need to be made after the acrylic is cut.
thingiverse
free

Lulzbot Enclosure Left Side Panel by DrazzticAction
...aser cut the panels, i've also put together a kit with everything you need.
blue skies,
jim rasmussen
tabsynth design works
thingiverse
free

Rostock Max V3 slim enclosure by Noircogi
...e temperature inside the enclosure. https://www.amazon.com/gp/product/b00d79yu9i/ref=oh_aui_detailpage_o00_s00?ie=utf8&psc=1
thingiverse
free

Laser cut panel for Printrbot LCD. by StElmo
...);
increase hole sizes by about 0.4mm to allow for filament width.
i can send you .stl file if you want
stelmo@pyramidpower.co.za
thingiverse
free

ROBO3D Filament Guide by 58webbing
...penny" washer on opposite side of slot. this items sole purpose is to prevent the filament cutting into the abs robo3d case.
Stinkbug58
thingiverse
free

Ender 3 Short Secure Filament Guide by stinkbug58
...h the security of some of the press-in style filament guides and i needed a different length and angle to work with my enclosure.
thingiverse
free

Smooth Q Counter Weight by stinkbug58
...ments.
i've only tested it on the smooth q gimbal but i suppose due to it's simple nature that it could be used on others
Enclosure
3d_export
free

electrical enclosure
...l enclosure where electrical devices like (relays, contactors, busbars ) are kept in order to protect from hazardous environment.
turbosquid
$100

GPU Enclosure
...yalty free 3d model gpu enclosure for download as obj and stl on turbosquid: 3d models for games, architecture, videos. (1381061)
3d_export
$5

Electrical Enclosure
...ed. also has tower lights attaced on the top.<br>file format that are available:<br>.step<br>.obj<br>.stl
archive3d
free

Enclosure 3D Model
...closure 3d model
archive3d
shower enclosure-acquarius- 3d model for interior 3d visualization.
archive3d
free

Enclosure 3D Model
...enclosure 3d model
archive3d
shower enclosure-omega- 3d model for interior 3d visualization.
archive3d
free

Enclosure 3D Model
...enclosure 3d model
archive3d
shower enclosure-vega - 3d model for interior 3d visualization.
archive3d
free

Enclosure 3D Model
...enclosure 3d model
archive3d
shower enclosure-zenith - 3d model for interior 3d visualization.
turbosquid
$20

shower enclosure
... available on turbo squid, the world's leading provider of digital 3d models for visualization, films, television, and games.
turbosquid
$14

Dumpster Enclosure
... available on turbo squid, the world's leading provider of digital 3d models for visualization, films, television, and games.
turbosquid
$25

3d printer enclosure
... model 3d printer enclosure for download as ipt, skp, and fbx on turbosquid: 3d models for games, architecture, videos. (1634310)
Ender
3ddd
$1

Enders / Elegance
...enders / elegance
3ddd
обогреватель
уличный газовый обогреватель enders elegance
высота: 2200 мм
3d_export
free

ender 3 frame cavity covers
... of the creality ender 3 - makes it look a bit more attractive it just slides into the open channels of the aluminium framework
turbosquid
$1

pen support for ender 3
...y free 3d model pen support for ender 3 for download as blend on turbosquid: 3d models for games, architecture, videos. (1611282)
3d_ocean
$9

Ender Dragon Minecraft
...ojang obj poly videogames
ender dragon minecraft created with cinema 4d r15 formats included: max 2013 – fbx 2012 – c4d r15 – obj
3d_export
free

Creality ender enclosure webcam mount
...e creality enclosure. sure is better than a tripod. change it up if it helps. i printed pla with 50% infill on my dd ender 3 pro.
3d_export
free

ender 3 enclosure corners
...er corners and 4 upper corners, using 25mmx25mm angled aluminium pieces that gets covered on inside of the frame with plexiglass
3d_export
free

ender 3 3d print bed clips
...ed + normal aluminium bed frame of the creality ender 3 = 6mm (b) these clips are designed for glass plate + aluminium bed = 4mm
3d_export
$5

GRUMPY CAT
...grumpy cat 3dexport grumpy cat to print in ender ...
3d_export
$5

Logs fire
...with one multi material for corona and vray r ender. albedo, normal, uvmap, roughness format jpg 4096x4096 models:...
3d_export
$42

excavator
...is the original size. 0.12 mm printing surface creality ender5 ...
3
turbosquid
$10

Mountain Bike 3 -3 of 3
...model mountain bike 3 (#3 of 3) for download as fbx and blend on turbosquid: 3d models for games, architecture, videos. (1438752)
turbosquid
$6

Rock 3-3
...urbosquid
royalty free 3d model rock 3-3 for download as obj on turbosquid: 3d models for games, architecture, videos. (1628065)
turbosquid
$29

Books 150 pieces 3-3-3
...books 150 pieces 3-3-3 for download as max, obj, fbx, and stl on turbosquid: 3d models for games, architecture, videos. (1384033)
turbosquid
$3

Genesis 3 Clothing 3
... available on turbo squid, the world's leading provider of digital 3d models for visualization, films, television, and games.
3d_export
$5

hinge 3
...hinge 3
3dexport
hinge 3
3ddd
$1

Розетка 3
...розетка 3
3ddd
розетка
розетка 3
turbosquid
$50

is-3
... available on turbo squid, the world's leading provider of digital 3d models for visualization, films, television, and games.
turbosquid
$10

Mountain Bike 3 -2 of 3
...model mountain bike 3 (#2 of 3) for download as fbx and blend on turbosquid: 3d models for games, architecture, videos. (1438750)
turbosquid
$10

Mountain Bike 1 -3 of 3
...model mountain bike 1 (#3 of 3) for download as fbx and blend on turbosquid: 3d models for games, architecture, videos. (1438743)
3d_export
$5

3 CATS
...3 cats
3dexport
3 cats pen holder