Thingiverse
Ender 3 Direct Drive Compatible X Gantry Cable Chain Mounts
by Thingiverse
Last crawled date: 5 years, 11 months ago
First, I'd like to say how awesome both JohnnyWhiskey and CouterMash's designs are. If I hadn't done the direct drive extruder mod to my Ender3, their designs would have been amazing solutions. Obviously, none of us would be making these remixes without JohnnyWhiskey's original design.
First, a disclaimer:
These parts are only intended to work properly if you have installed the Direct Drive Upgrade Kit sold by Basaraba Innovations on Ebay. I could not find the kit for the Ender 3 on ebay anymore, but it might be this one on Amazon. It looks the same anyway...
The other mod that may be of consequence is that I am using the Hero Me Gen3 by MediaMan and the subsequent remix of the main duct itself (due to the Direct Drive kit changes) by TeachingTech who also reviewed the direct drive kit on his Youtube channel. I am really happy with all of these mods mentioned and recommend them for anyone with interest. These designers are amazing, and I cannot thank them all enough.
Printing:
As for the parts, they are a pretty straightforward print, they should work with JohnnyWhiskey's original chain, but I wanted more fusion360 practice so I made some small tweaks. I still recommend his links, since it is a lighter design, but if you can't get them to stop breaking, try these (or fix your printer settings, which apparently I was too lazy to do). I needed 18 links when its all said and done. Both brackets need supports, and unfortunately I am not sure how to make them come out of Fusion360 in the correct orientation yet, so they will need to be rotated.
X Drive Gantry Chain Mount (left hand side, front of printer):
I designed this part to go on the side of the X axis drive pulley cover (that holds the limit switch) as opposed to a complete integrated cover replacement. Reason being is that the direct drive extruder kit came with extra long bolts to replace the two that were there, and I needed extra length to meet up with where the kit required the cables to go (also installed a BLtouch and didn't want to keep rerouting all the wires). Really the only slightly tricky thing here is getting the supports out of the ziptie hole. I used a steel dental pick (from amazon) to mash it up until i could pull it out with pliers (its a 3x5mm channel). I placed the first two chain links attached to this part upside down, it helps to keep the chain out of the way at full left travel. This part prints best with the cable channel facing to the side (longer side down), and it will need full supports.
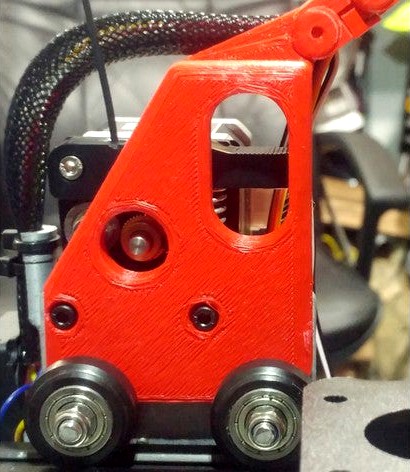
Extruder Carriage Chain Mount Bracket (backside of the extruder carriage):
This part has two holes for bolts not supplied in the kit or stock (listed below) and two cutouts at the bottom to rest on the two carriage wheels. Believe it or not, these cutouts caused the most trouble, which was solved by adjusting my "horizontal expansion" setting in Cura. The wheel sleeves are 8.1mm in diameter (stock for my Ender3) and the cutouts are 8.5mm. If they wont easily sit on top of the sleeves, then it is most likely a problem caused by the material shrinking around the small holes. The M3 bolts should also go through their holes freely, if not, it is likely the same reason. The large hole is clearance for the extruder gear, so you can easily check for problems. The large oval is clearance for the stock Ender3 extruder arm so you can see it and or use the oval as leverage (hard to explain but makes sense when you try it). This part prints with the largest flat side down, it will need full supports for the cable mount.
Carriage Chain Mount Test Bracket:
This is just the bottom part of the extruder carriage bracket (below the slight setback under the chain shelf), if you want to check your slicer settings against the spacing of the wheel sleeves and the two mounting bolts. It is much less PLA than the main bracket and prints in under an hour. Fun fact, it took no less than 7 of these to get the spacing correct... Its worth printing it if you aren't 100% sure of your slicer settings, PLA tolerances, or ability to measure ( o.0 )...
Moto's Required Hardware List:
2x M3 x 50mm Socket Head Cap Screws (supplied in Direct Drive kit)
2x M3 x 30mm Socket Head Cap Screws (user supplied)
1x Small Ziptie (optional)
First, a disclaimer:
These parts are only intended to work properly if you have installed the Direct Drive Upgrade Kit sold by Basaraba Innovations on Ebay. I could not find the kit for the Ender 3 on ebay anymore, but it might be this one on Amazon. It looks the same anyway...
The other mod that may be of consequence is that I am using the Hero Me Gen3 by MediaMan and the subsequent remix of the main duct itself (due to the Direct Drive kit changes) by TeachingTech who also reviewed the direct drive kit on his Youtube channel. I am really happy with all of these mods mentioned and recommend them for anyone with interest. These designers are amazing, and I cannot thank them all enough.
Printing:
As for the parts, they are a pretty straightforward print, they should work with JohnnyWhiskey's original chain, but I wanted more fusion360 practice so I made some small tweaks. I still recommend his links, since it is a lighter design, but if you can't get them to stop breaking, try these (or fix your printer settings, which apparently I was too lazy to do). I needed 18 links when its all said and done. Both brackets need supports, and unfortunately I am not sure how to make them come out of Fusion360 in the correct orientation yet, so they will need to be rotated.
X Drive Gantry Chain Mount (left hand side, front of printer):
I designed this part to go on the side of the X axis drive pulley cover (that holds the limit switch) as opposed to a complete integrated cover replacement. Reason being is that the direct drive extruder kit came with extra long bolts to replace the two that were there, and I needed extra length to meet up with where the kit required the cables to go (also installed a BLtouch and didn't want to keep rerouting all the wires). Really the only slightly tricky thing here is getting the supports out of the ziptie hole. I used a steel dental pick (from amazon) to mash it up until i could pull it out with pliers (its a 3x5mm channel). I placed the first two chain links attached to this part upside down, it helps to keep the chain out of the way at full left travel. This part prints best with the cable channel facing to the side (longer side down), and it will need full supports.
Extruder Carriage Chain Mount Bracket (backside of the extruder carriage):
This part has two holes for bolts not supplied in the kit or stock (listed below) and two cutouts at the bottom to rest on the two carriage wheels. Believe it or not, these cutouts caused the most trouble, which was solved by adjusting my "horizontal expansion" setting in Cura. The wheel sleeves are 8.1mm in diameter (stock for my Ender3) and the cutouts are 8.5mm. If they wont easily sit on top of the sleeves, then it is most likely a problem caused by the material shrinking around the small holes. The M3 bolts should also go through their holes freely, if not, it is likely the same reason. The large hole is clearance for the extruder gear, so you can easily check for problems. The large oval is clearance for the stock Ender3 extruder arm so you can see it and or use the oval as leverage (hard to explain but makes sense when you try it). This part prints with the largest flat side down, it will need full supports for the cable mount.
Carriage Chain Mount Test Bracket:
This is just the bottom part of the extruder carriage bracket (below the slight setback under the chain shelf), if you want to check your slicer settings against the spacing of the wheel sleeves and the two mounting bolts. It is much less PLA than the main bracket and prints in under an hour. Fun fact, it took no less than 7 of these to get the spacing correct... Its worth printing it if you aren't 100% sure of your slicer settings, PLA tolerances, or ability to measure ( o.0 )...
Moto's Required Hardware List:
2x M3 x 50mm Socket Head Cap Screws (supplied in Direct Drive kit)
2x M3 x 30mm Socket Head Cap Screws (user supplied)
1x Small Ziptie (optional)