Thingiverse

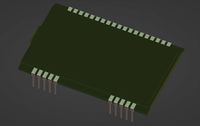
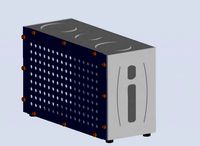
ENDER 3 Control Panel Circuit Cover for TFT35-E3 V3.0 Display
by Thingiverse
Last crawled date: 4 years, 3 months ago
IMPORTANT, PLEASE NOTE: 06/01/2020:
Thingiverse user biniecki reports that BIGTREETECH HAVE CHANGED THE BOARD DESIGN, and that my case no longer fits the revision.
BigTreeTech have indeed added a riser board to the rear of the main board, immediately behind the rotary encoder, even though BTT haven't yet mentioned it in their listing.
If your TFT35 has this extra board (marked "BTT TFT35-E3 ENC V1.0") attached to it, I recommend the use of Andy1974's design (https://www.thingiverse.com/thing:4091472).
I'll leave this design on Thingiverse for those who wish to use the Sketchup design as a starting point, or for those who just want to point and laugh!
Thanks to biniecki for the heads-up, and further thanks to user JDPenney for letting me know about the two other designs (and for helping me with my firmware!)
Update 11/12/2019: Added a variant permitting access to all 3 EXP ports for those needing to use two ribbon cables. Many thanks to Thingiverse user 5bites for alerting me to the need for this.
I upgraded to the rather nice BigTreeTech TFT35-E3 control unit - https://www.biqu.equipment/collections/lcd/products/btt-tft35-e3-v3-0-display-touch-screen-two-working-modes . But then I found that my previous circuit board cover didn't fit (thing 2858209 by Rocco81-92).
I couldn't find any modified versions on Thingiverse. Probably because (at the time of writing) it's a relatively new design and all the truly talented people haven't got around to it yet. So, despite my obvious lack of talent, I was obliged set about drawing up my own.
It's inspired by Rocco's original, but is a complete new ground-up design. I started from the circuit board specs on the BIQU page to get the fixing holes in the right place, and applied my trusty (some say rusty) vernier calipers for the port locations.
It took me several prints to finally get one that fitted - although there is still room for improvement here and there. The first print was my biggest blunder: as you can see in the bonus picture, I placed the top ribbon cable ports on the wrong side! D'oh!
I wanted to have recessed screw heads. But as I draughted it up it quickly became apparent that the multiple port openings limited the space available for such niceties. Thankfully, the screws are on the underside when it's fitted, so it's not really a problem. Speaking of screws, you'll need longer ones: The top two need to be 20mm, and the lower two need to be 15mm.
I had hoped to print it without supports. But the slope on the case means that the printer doesn't bridge the side ports in one go. That, combined with the thin walls of the case, causes a very unsightly result. So I used Cura's experimental tree-support to see what difference it made. I'd never tried it before, but I was pleased with the results - Although I'm sure normal support will do the job just as well, and custom support would be better still.
Design tweaks I would consider if I were printing another? I'd consider increasing the depth of the case so that the entire USB port is enclosed, and I'd definitely open the SD card port about 2mm towards the PCB. It works fine, but the card does rub on the edge as you push it in. I could attack it with a file but, thanks to Octoprint, the amount of times I actually use an SD card on my printer could be counted on the fingers of a leper's left hand.
Thoughts on the BigTreeTech TFT35-E3 V3.0.
Although I am pleased with the panel, I was disappointed to find the display screen doesn't quite line up with the aperture on my Ender 3's mounting plate. The display is offset towards the left edge, which is distracting enough. But you can also see some of the conductive traces for the screen connections on the right edge, and it looks a bit of a bodge (I'd be interested to know if they are all like that, so let me know in the comments).
Don't get me wrong; they've made a great board, at an amazing price, and I have no doubt that designing it to fit it into the original footprint was quite a challenge for them. But it still sets my teeth on edge when I see it.
I hope to update the firmware for more colourful icons. But I'm still very much a beginner with that stuff and, despite attempt after attempt, I have yet to get anything to compile into a .bin file.
That's yer lot. And, as badly translated instructions might well say:
Many printings of happiness to you all.
Similar models
thingiverse
free

BTT TFT35-E3 V3.0 bezel and case
...9;s metal bracket i wasn't over happy with the fit and decided it needed a bezel. so began my journey down the rabbit hole...
thingiverse
free

BTT TFT35 E3 V3.0 CR-10/CR-10S Case & Mounting by arcmal_22
...rcmal_22
thingiverse
my design to mount the bigtreetech tft35 e3 v3.0 to cr-10/cr-10s...please download & enjoy....
-arcmal-
thingiverse
free

Ender-5 TFT35 V3 E3
... cutouts for usb and sd.
slides over the screen, no need for screws or support
(https://github.com/bigtreetech/btt-tft35-e3-v3.0)
thingiverse
free

BTT TFT35 E3 V3.0 Case for Ender 5 by Efflon
...kercad so there are some tiny leftovers inside the case.
the tolerances are tight so measure what you have and scale accordingly.
grabcad
free

Bigtreetech TFT35-E3 V3.0
...bigtreetech tft35-e3 v3.0
grabcad
bigtreetech tft35-e3 v3.0
grabcad
free

BTT TFT35 E3 V3.0 Model
...btt tft35 e3 v3.0 model
grabcad
a model of the display board for making enclosures around
thingiverse
free

NEREUS mount by kriscarr
...vs.
the link to the bigtreetech tft35 e3 v3.0 case skr 1.3 .1.4 is under this sentence.
https://www.thingiverse.com/thing:4168682
thingiverse
free

TFT35 E3 V3.0
...tft35 e3 v3.0
thingiverse
this is remix for my bigtreetech tft35 e3 v3.0
is complet, back and front.
grabcad
free

BigTreeTech TFT35-E3 V3 Display
...https://grabcad.com/library/bigtreetech-tft35-e3-v3-display-case-1
includes the optional esp-01s wifi board. fusion360 and step.
thingiverse
free

ENDER 3 BIGTREETECH-TFT35-E3-V3.0 cover by philoupat6283
...creen-two-working-modes-12864lcdtouch-screen-mode-ultra-clear-3d-printer-display-p-1649859.html?rmmds=search&cur_warehouse=cn
Tft35
thingiverse
free
TFT35 E3 V3.0
...tft35 e3 v3.0
thingiverse
this is remix for my bigtreetech tft35 e3 v3.0
is complet, back and front.
thingiverse
free

MKS TFT35 CASE by olo2000pm
...mks tft35 case by olo2000pm
thingiverse
mks tft35 case
thingiverse
free

TFT35 V2.0 case and mount
...tft35 v2.0 case and mount
thingiverse
the case and mounting brackets are designed for the tft35. prints without supports.
thingiverse
free

tft35 enclosure by dubaimodeler
...imodeler
thingiverse
i made a small enclosure for new tft35 lcd display, you need two m4 screws to fix it on top of the printer.
thingiverse
free

TFT35 ESP01 box by Botond08
...tft35 esp01 box by botond08
thingiverse
this very simple box allows you to cover the esp01 wifi module on the tft35 screen.
thingiverse
free

Bigtreetech TFT35 3.0 Case
...bigtreetech tft35 3.0 case
thingiverse
bigtreetech tft35 3.0 case
now with the right front ;)
https://youtu.be/v2-i9zmzli0
thingiverse
free

TFT35 iTouchCase v0.2 by fumihiko1226
...thingiverse
biqu & bigtreetech tft35 v1.0 graphiccontroller case
tft35itouchback.stl (100%)
tft35itouchcase.stl(expand 101%)
thingiverse
free

BTT B1 TFT35 V3.0 by ArgusNavis
...r mounting a tft35 b1 to 2020 aluminum extrusion, the b1 version of this display has different dimensions than the standard tft35
thingiverse
free

BIGTREETECH TFT35 V2.0 Case and Mount
...bigtreetech tft35 v2.0 case and mount
thingiverse
bigtreetech tft35 v2.0 touch screen case and mount
thingiverse
free

BIGTREETECH TFT35 V2.0 by 3dpartmaker
...the plain step file is without the sd card and wifi expansion board.
i created this for designing my bigtreetech tft35 v2.0 case.
E3
3ddd
free

ODESD2 E3
...e3
материал: сталь, массив ясеня, войлок, шенилл.
размеры: ширина: 605мм, длина: 525мм, высота: 700ммhttp://odesd2.com
turbosquid
$26

Ship screw E3
...quid
royalty free 3d model ship screw e3 for download as fbx on turbosquid: 3d models for games, architecture, videos. (1495801)
turbosquid
$35

morphosmart cbm e3
...del morphosmart cbm e3 for download as 3ds, obj, bip, and 3dm on turbosquid: 3d models for games, architecture, videos. (1329237)
turbosquid
$25

Sony Xperia E3
... available on turbo squid, the world's leading provider of digital 3d models for visualization, films, television, and games.
turbosquid
$20

Sony Xperia E3
... available on turbo squid, the world's leading provider of digital 3d models for visualization, films, television, and games.
turbosquid
$20

Sony Xperia E3
... available on turbo squid, the world's leading provider of digital 3d models for visualization, films, television, and games.
turbosquid
$13

Acer Liquid E3
... available on turbo squid, the world's leading provider of digital 3d models for visualization, films, television, and games.
3d_export
$28

E3 Sentry AWACS 3D Model
...ghter bomber close support interceptor spy attacker plane stealth transport
e3 sentry awacs 3d model martialartist 22655 3dexport
turbosquid
$20

Sony Xperia E3 Copper
... available on turbo squid, the world's leading provider of digital 3d models for visualization, films, television, and games.
cg_studio
$165

Messerschmitt BF109-E3 Emil3d model
...dio
.3ds .fbx .max .obj - messerschmitt bf109-e3 emil 3d model, royalty free license available, instant download after purchase.
Circuit
turbosquid
free

Circuit Board
...turbosquid
free 3d model circuit board for download as blend on turbosquid: 3d models for games, architecture, videos. (1279126)
turbosquid
$20

CIRCUIT BREAKER
... available on turbo squid, the world's leading provider of digital 3d models for visualization, films, television, and games.
turbosquid
$19

Circuit Breaker
... available on turbo squid, the world's leading provider of digital 3d models for visualization, films, television, and games.
turbosquid
$19

Circuit Breaker
... available on turbo squid, the world's leading provider of digital 3d models for visualization, films, television, and games.
turbosquid
$19

Circuit Breakers
... available on turbo squid, the world's leading provider of digital 3d models for visualization, films, television, and games.
turbosquid
free

Circuit Breaker
... available on turbo squid, the world's leading provider of digital 3d models for visualization, films, television, and games.
3d_export
$65

circuit board
...circuit board
3dexport
simple rendering of the scene file
archive3d
free

Circuit breaker 3D Model
...rcuit breaker schneider electric n240211 - 3d model (*.gsm+*.3ds) for interior 3d visualization.
turbosquid
$35

Short circuit key
...
royalty free 3d model short circuit key for download as 3ds on turbosquid: 3d models for games, architecture, videos. (1187722)
design_connected
free

Circuit 1 Sconce Lamp
...circuit 1 sconce lamp
designconnected
free 3d model of circuit 1 sconce lamp by apparatus
V3
3d_export
$5
Poison-v3
...poison-v3
3dexport
poison-v3
3ddd
$1

Curtain v3
...curtain v3
3ddd
полупрозрачная штора v3
turbosquid
free
v3
... available on turbo squid, the world's leading provider of digital 3d models for visualization, films, television, and games.
3d_export
$5
potato v3
...potato v3
3dexport
turbosquid
$69
Skeletor v3
...royalty free 3d model skeletor v3 for download as ztl and obj on turbosquid: 3d models for games, architecture, videos. (1712713)
turbosquid
$49
Zombie v3
...
royalty free 3d model zombie v3 for download as obj and ztl on turbosquid: 3d models for games, architecture, videos. (1342458)
turbosquid
$2

Bitcoin v3
...
royalty free 3d model bitcoin v3 for download as c4d and prj on turbosquid: 3d models for games, architecture, videos. (1182845)
turbosquid
$29
Turret V3
...alty free 3d model turret v3 for download as ma, obj, and fbx on turbosquid: 3d models for games, architecture, videos. (1217498)
turbosquid
$20
Radiators v3
... free 3d model radiators v3 for download as max, max, and obj on turbosquid: 3d models for games, architecture, videos. (1607437)
turbosquid
$10
Wheel V3S
...e 3d model wheel v3s for download as 3ds, obj, fbx, and blend on turbosquid: 3d models for games, architecture, videos. (1344250)
Ender
3ddd
$1

Enders / Elegance
...enders / elegance
3ddd
обогреватель
уличный газовый обогреватель enders elegance
высота: 2200 мм
3d_export
free

ender 3 frame cavity covers
... of the creality ender 3 - makes it look a bit more attractive it just slides into the open channels of the aluminium framework
turbosquid
$1

pen support for ender 3
...y free 3d model pen support for ender 3 for download as blend on turbosquid: 3d models for games, architecture, videos. (1611282)
3d_ocean
$9

Ender Dragon Minecraft
...ojang obj poly videogames
ender dragon minecraft created with cinema 4d r15 formats included: max 2013 – fbx 2012 – c4d r15 – obj
3d_export
free

Creality ender enclosure webcam mount
...e creality enclosure. sure is better than a tripod. change it up if it helps. i printed pla with 50% infill on my dd ender 3 pro.
3d_export
free

ender 3 enclosure corners
...er corners and 4 upper corners, using 25mmx25mm angled aluminium pieces that gets covered on inside of the frame with plexiglass
3d_export
free

ender 3 3d print bed clips
...ed + normal aluminium bed frame of the creality ender 3 = 6mm (b) these clips are designed for glass plate + aluminium bed = 4mm
3d_export
$5

GRUMPY CAT
...grumpy cat 3dexport grumpy cat to print in ender ...
3d_export
$5

Logs fire
...with one multi material for corona and vray r ender. albedo, normal, uvmap, roughness format jpg 4096x4096 models:...
3d_export
$42

excavator
...is the original size. 0.12 mm printing surface creality ender5 ...
Display
3ddd
$1

Display
...display
3ddd
терминал
display computer 3d model
3d_export
$5
Display
...display
3dexport
display<br>verts 2.262<br>faces 3.928
turbosquid
$8

Display
...turbosquid
royalty free 3d model display for download as fbx on turbosquid: 3d models for games, architecture, videos. (1634534)
3ddd
$1
Display cabinet
...display cabinet
3ddd
витрина
display cabinet
turbosquid
$50

display
... available on turbo squid, the world's leading provider of digital 3d models for visualization, films, television, and games.
turbosquid
$25

DISPLAY
... available on turbo squid, the world's leading provider of digital 3d models for visualization, films, television, and games.
turbosquid
$10
Display
...e 3d model display for download as ma, max, obj, fbx, and dae on turbosquid: 3d models for games, architecture, videos. (1387472)
3d_export
$6
display stand
...display stand
3dexport
super market display stand
3d_ocean
$12
Display Case
...rnishing furniture glass storage vetrinetta white
a 3d model of a display case. the texture for the back of the case is provided.
3d_export
$30

Vehicle display
...vehicle display
3dexport
vehicle display consists of podium and vehicle cover no vehicle there is a veiled vehicle silhouette
0
turbosquid
$12

Calligraphic Digit 0 Number 0
...hic digit 0 number 0 for download as max, obj, fbx, and blend on turbosquid: 3d models for games, architecture, videos. (1389318)
3d_export
$6

set-0
...set-0
3dexport
turbosquid
$6

hedge 0
...yalty free 3d model hedge 0 for download as max, obj, and fbx on turbosquid: 3d models for games, architecture, videos. (1450353)
turbosquid
$5

Nuber 0
...oyalty free 3d model nuber 0 for download as ma, obj, and fbx on turbosquid: 3d models for games, architecture, videos. (1564674)
turbosquid
$22

0.jpg
... available on turbo squid, the world's leading provider of digital 3d models for visualization, films, television, and games.
turbosquid
free

Steam Locomotive Fowler 4F 0-6-0
... available on turbo squid, the world's leading provider of digital 3d models for visualization, films, television, and games.
turbosquid
$10

Liquid Number 0
... model liquid number 0 for download as c4d, 3ds, fbx, and obj on turbosquid: 3d models for games, architecture, videos. (1689919)
turbosquid
$45

Dragon360_perspShape_tmp.0.jpg
... available on turbo squid, the world's leading provider of digital 3d models for visualization, films, television, and games.
turbosquid
$8

Rocks Debris 0
... available on turbo squid, the world's leading provider of digital 3d models for visualization, films, television, and games.
3d_export
$18

wood-guardrail-fence 0
...wood-guardrail-fence 0
3dexport
wood-guardrail-fence 0<br>3ds max 2015
Panel
3d_export
$15

panel
...panel
3dexport
panel
archibase_planet
free
Panel
...panel
archibase planet
panel
panel - 3d model for interior 3d visualization.
3d_export
$5

panel
...panel
3dexport
panel with cones
3ddd
$1
Panels
...panels
3ddd
панель
panels
3d_export
$5

panel
...panel
3dexport
panels grapes with birds
archibase_planet
free
Panel
...panel
archibase planet
panel wainscot dado
play panel n050707 - 3d model for interior 3d visualization.
archibase_planet
free
Panel
...panel
archibase planet
lining panel facing material
panel 2 - 3d model (*.3ds) for interior 3d visualization.
archibase_planet
free

Panel
...panel
archibase planet
lining panel facing material
panel 1 - 3d model (*.gsm+*.3ds) for interior 3d visualization.
archibase_planet
free
Panel
...panel
archibase planet
keyboard patchboard finger-board
security panel - 3d model for interior 3d visualization.
turbosquid
$10

Panel
...l
turbosquid
royalty free 3d model panel for download as stl on turbosquid: 3d models for games, architecture, videos. (1387163)
Control
3d_ocean
$4
Controller TQFP32
...qfp32
3docean
chip controller cpu electronic gpu mcu micro controller silicon smd tqfp wafer
a micro controller in tqfp32 package
3d_ocean
$4
Controller TQFP44
...44
3docean
chip controller cpu electronic gpu mcu micro controller package smd tqfp tqfp44
a micro controller in a tqfp44 package
3d_export
$15
control unit
...control unit
3dexport
control unit
3ddd
$1
Yacht control
...yacht control
3ddd
yacht control
3d_export
$5
controle pgdm
...controle pgdm
3dexport
carcaca controle pgdm
turbosquid
free
controler
... available on turbo squid, the world's leading provider of digital 3d models for visualization, films, television, and games.
3ddd
$1

Control
...
http://www.schmitz-leuchten.de/html-ru/einzelleuchten-lampentyp-details.php?lamptype_no=700&group;=917&id;=731
3d_ocean
$4
Controller TQFP100
...100
3docean
chip computer cpu electronic gpu mcu micro controller pin platine silicon wafer
a micro controller in tqfp100 package
3d_ocean
$4
Controller TQFP64
...qfp64
3docean
chip computer cpu gpu mcu micro controller package silicon tqfp tqfp64 wafer
a micro controller in a tqfp64 package
3d_ocean
$7

Remote controller
... control switcher tv remote
remote controller for tv, sound systems etc easy to edit textures photo real rendered with mental ray
Cover
archibase_planet
free

Cover
...cover
archibase planet
cover place setting
cover n170807 - 3d model for interior 3d visualization.
3ddd
$1
cover
...cover
3ddd
ковер , круглый
cover decor
archibase_planet
free

Cover
...cover
archibase planet
cover place setting setting
servis-cafe1930 - 3d model for interior 3d visualization.
turbosquid
free
Coverings
...rings
turbosquid
free 3d model coverings for download as dwg on turbosquid: 3d models for games, architecture, videos. (1279391)
3d_export
$5
plug cover
...plug cover
3dexport
plug cover
turbosquid
$25
Covers
... available on turbo squid, the world's leading provider of digital 3d models for visualization, films, television, and games.
3d_export
$10
manhole cover
...manhole cover
3dexport
manhole cover gost, stl, step
turbosquid
$5

Street Gas Cover Manhole Cover
... available on turbo squid, the world's leading provider of digital 3d models for visualization, films, television, and games.
3ddd
free
Bed cover
...bed cover
3ddd
постельное белье
very useful bed cover
3d_export
$5
cpu cover
...cpu cover
3dexport
cpu cover, cpu box, sheet metal container
3
turbosquid
$10

Mountain Bike 3 -3 of 3
...model mountain bike 3 (#3 of 3) for download as fbx and blend on turbosquid: 3d models for games, architecture, videos. (1438752)
turbosquid
$6

Rock 3-3
...urbosquid
royalty free 3d model rock 3-3 for download as obj on turbosquid: 3d models for games, architecture, videos. (1628065)
turbosquid
$29

Books 150 pieces 3-3-3
...books 150 pieces 3-3-3 for download as max, obj, fbx, and stl on turbosquid: 3d models for games, architecture, videos. (1384033)
turbosquid
$3

Genesis 3 Clothing 3
... available on turbo squid, the world's leading provider of digital 3d models for visualization, films, television, and games.
3d_export
$5

hinge 3
...hinge 3
3dexport
hinge 3
3ddd
$1

Розетка 3
...розетка 3
3ddd
розетка
розетка 3
turbosquid
$50

is-3
... available on turbo squid, the world's leading provider of digital 3d models for visualization, films, television, and games.
turbosquid
$10

Mountain Bike 3 -2 of 3
...model mountain bike 3 (#2 of 3) for download as fbx and blend on turbosquid: 3d models for games, architecture, videos. (1438750)
turbosquid
$10

Mountain Bike 1 -3 of 3
...model mountain bike 1 (#3 of 3) for download as fbx and blend on turbosquid: 3d models for games, architecture, videos. (1438743)
3d_export
$5

3 CATS
...3 cats
3dexport
3 cats pen holder