Thingiverse

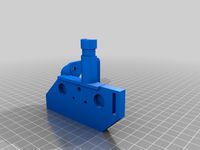
Ender 3 BMG E3D V6 - Mosquito Direct Drive Extruder BLTouch Lightweight Mount by ColdBrewSea
by Thingiverse
Last crawled date: 3 years, 4 months ago
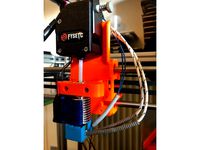
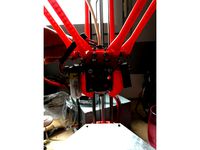
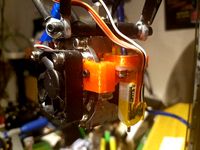
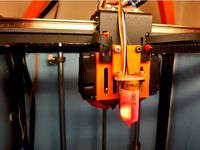
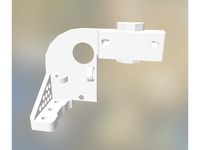
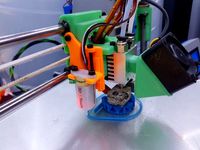
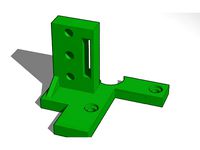
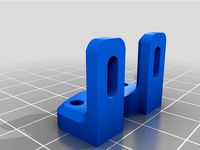
Ender 3 BMG E3D V6 Direct Drive Extruder Lightweight Mount
Updates:
2020-12-31 - Redesigned fan shroud and zip tie mounts. I removed the gantry clip because it provided no benefit to stability or wiring. Fan shroud mount should now only require supports on the extreme end with the screw hole. I have included a screen shot of how I have support blockers configured in my slicer.
NB. The previous versions had a mistake in the fan shroud position.
2020-12-29 - Added support for Slice Engineering Mosquito hotend. The back plate was thickened, the fan shroud was lowered 0.5mm. The hotend wiring and filament runout sensor was relocated to the front of the gantry.
2020-10-23 - Added .step file
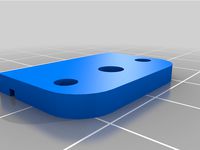
Parts:
(5) M3 x 6 mm Screw
(1) M3 x 8 mm Screw
(1) M3 x 10 mm Screw
(1) M3 x 20 mm Screw
(1) M3 Nut
(1) M3 x 7 mm Washer
(1) Short PTFE Tube
(n) Zip Ties
Genuine E3D V6 Full - Direct - 24V - Hotend
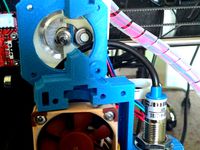
BMG (or clone) Left Handed Dual Drive Extruder
Short Body Nema 17 Bipolar Stepper Motor
Blower Fan 24V 5015
2.0mm Straight Single Row Breakaway Male Pin Header
2.0mm JST-PH JST Connector Kit
Optional:
Polyethylene Spiral Wire Wrap Tube PC Manage Cable 6mm
BLTouch v3.1
Smart Filament Sensor 1.75mm
Notes:
Depending on your setup, you may lose 10mm of Y build volume.
Z Probe Position: X = -37.0, Y = 18.5
Receiving screw holes are sized to be tapped using an appropriate M3 bit, but will hold a M3 screw if filed or drilled out to the right size.
The fan shroud is a modified part from the Prusa i3 MK3S, and can be substituted with the original Prusa part (with appropriate Square M3 Nut).
When using the Mosquito Groovemount adapter, the upper and lower parts are split to allow for printing without supports.
Preparation:
Print part with the large flat side down, and with support for the various external screw holes.
Assembly:
Guide coming soon... (hopefully...)
Firmware updates:
Thermistor to V6 cartridge style (#5)
E-Steps to 415
Home Y to -10
Additional information:
This is a good opportunity to ensure that the printer is square and adjusted properly.
V slot rollers should be held tight, but loose enough to roll in place when moved by hand.
Z screw and nut should be adjusted properly to where the nut is secure but allows some horizontal movement.
Slicer settings:
Retraction: 0.8mm
Lift Z: 0.6mm
Retraction speed: 35mm/s
Minimum travel after retraction: 1mm
Maximum acceleration E: 1500mm/s^2
Updates:
2020-12-31 - Redesigned fan shroud and zip tie mounts. I removed the gantry clip because it provided no benefit to stability or wiring. Fan shroud mount should now only require supports on the extreme end with the screw hole. I have included a screen shot of how I have support blockers configured in my slicer.
NB. The previous versions had a mistake in the fan shroud position.
2020-12-29 - Added support for Slice Engineering Mosquito hotend. The back plate was thickened, the fan shroud was lowered 0.5mm. The hotend wiring and filament runout sensor was relocated to the front of the gantry.
2020-10-23 - Added .step file
Parts:
(5) M3 x 6 mm Screw
(1) M3 x 8 mm Screw
(1) M3 x 10 mm Screw
(1) M3 x 20 mm Screw
(1) M3 Nut
(1) M3 x 7 mm Washer
(1) Short PTFE Tube
(n) Zip Ties
Genuine E3D V6 Full - Direct - 24V - Hotend
BMG (or clone) Left Handed Dual Drive Extruder
Short Body Nema 17 Bipolar Stepper Motor
Blower Fan 24V 5015
2.0mm Straight Single Row Breakaway Male Pin Header
2.0mm JST-PH JST Connector Kit
Optional:
Polyethylene Spiral Wire Wrap Tube PC Manage Cable 6mm
BLTouch v3.1
Smart Filament Sensor 1.75mm
Notes:
Depending on your setup, you may lose 10mm of Y build volume.
Z Probe Position: X = -37.0, Y = 18.5
Receiving screw holes are sized to be tapped using an appropriate M3 bit, but will hold a M3 screw if filed or drilled out to the right size.
The fan shroud is a modified part from the Prusa i3 MK3S, and can be substituted with the original Prusa part (with appropriate Square M3 Nut).
When using the Mosquito Groovemount adapter, the upper and lower parts are split to allow for printing without supports.
Preparation:
Print part with the large flat side down, and with support for the various external screw holes.
Assembly:
Guide coming soon... (hopefully...)
Firmware updates:
Thermistor to V6 cartridge style (#5)
E-Steps to 415
Home Y to -10
Additional information:
This is a good opportunity to ensure that the printer is square and adjusted properly.
V slot rollers should be held tight, but loose enough to roll in place when moved by hand.
Z screw and nut should be adjusted properly to where the nut is secure but allows some horizontal movement.
Slicer settings:
Retraction: 0.8mm
Lift Z: 0.6mm
Retraction speed: 35mm/s
Minimum travel after retraction: 1mm
Maximum acceleration E: 1500mm/s^2
Similar models
thingiverse
free

Shroud dual fan for BMG direct drive extruder, BLtouch, maxiwatt hotend by joalou
...direct drive extruder, bltouch, maxiwatt hotend by joalou
thingiverse
shroud dual fan for bmg extruder, bltouch, maxiwatt hotend
thingiverse
free

Ender 3 BMG E3D V6 Volcano Direct Drive with BLTouch by Simon3105
... is still in testing phase and i'm very new to designing models in fusion360. so please have mercy on me if it's ugly ;-;
thingiverse
free

Ender 3 Direct Drive Mini BMG Extruder mounting plate for E3D V6(V5) with adjustable BL-Touch mount by ru_ace
...www.thingiverse.com/thing:4620308
adjustable bl-touch mount compatible with mounts from https://www.thingiverse.com/thing:3148733
thingiverse
free
BMG Bondtech e3D v6 Hevo Hypercube Hotend Mount Extruder direct drive
...se
i remixed the hotend mount to have a bmg as a direct drive and the extruder screw isnt crashing the extrusion on the front ;)
grabcad
free

Anycubic Mega X V6 Hotend BMG Direkt Extruder Conversion Plate
...for anycubic mega x with a bmg direct extruder and a e3d v6 hotend.
pch holder included.
m3 nut for the variable compomnent fan.
thingiverse
free

Ender 3 BMG V6 Volcano Direct Drive with BLTouch by Simon3105
... something equal. pla will melt obvioulsy because it is close to the hotend, but also the extruder stepper motor gets really hot.
thingiverse
free

BMG direct drive extruder by DMGdesign
...t the case stl and combine the two files.
this should allow you to print this part whitout aditional supports and save some time.
thingiverse
free

Tevo Nereus Direct Drive, BLTouch, BMG, and V6 by turkal65
... for the tevo nereus
bmg extruder
e3d v6
bltouch 3.1
stock 30mm fan
you can use the stock or customized 30 mm v6 duct
5010 blower
thingiverse
free

Anycubic Chiron - BMG Bondtech Direct drive - SUPER VOLCANO VERSION (MIRRORED) - support - BLTouch - E3D V6 by shopbigduck
...nt this support for anycubic chiron, i used 5mm brim for the cooler without any support. for the main part i used a simple skirt.
thingiverse
free
Direct-drive extruder for E3D v6/v5 with Sensor by Marck80
...
2 x m3 x 20mm
2 x m4 x 3mm (1 fan - 1 support bearing)
nut:
2 x m4 square
working in progress....(second fan duct....) ;)

Mosquito
design_connected
$16

Mosquito
...mosquito
designconnected
rex kralj mosquito computer generated 3d model. designed by kralj, niko.
3d_export
$5
Mosquito
...of some place that is destroyed or abandoned long ago. with such models the application would top the charts and prove its worth.
turbosquid
$100

Mosquito
... available on turbo squid, the world's leading provider of digital 3d models for visualization, films, television, and games.
turbosquid
$69

Mosquito
... available on turbo squid, the world's leading provider of digital 3d models for visualization, films, television, and games.
turbosquid
$22

mosquito
... available on turbo squid, the world's leading provider of digital 3d models for visualization, films, television, and games.
turbosquid
$20

Mosquito
... available on turbo squid, the world's leading provider of digital 3d models for visualization, films, television, and games.
turbosquid
$15

mosquito
... available on turbo squid, the world's leading provider of digital 3d models for visualization, films, television, and games.
turbosquid
$3
Mosquito
... model mosquito for download as 3ds, obj, fbx, blend, and dae on turbosquid: 3d models for games, architecture, videos. (1311331)
3d_export
$25

mosquito
...mosquito
3dexport
simple rendering of the scene file
3d_export
$10

Mosquito 3D Model
...mosquito 3d model
3dexport
mosquito insect bug hexapod flyer
mosquito 3d model def 19400 3dexport
Bmg
turbosquid
$3

.50 BMG
... available on turbo squid, the world's leading provider of digital 3d models for visualization, films, television, and games.
turbosquid
$2

.50 BMG
... available on turbo squid, the world's leading provider of digital 3d models for visualization, films, television, and games.
turbosquid
$25
50 BMG Cartridge
...e 3d model 50 bmg cartridge for download as 3ds, max, and obj on turbosquid: 3d models for games, architecture, videos. (1303035)
turbosquid
$30

Sniper 50 bmg
... available on turbo squid, the world's leading provider of digital 3d models for visualization, films, television, and games.
turbosquid
free

Cal 50 BMG
... available on turbo squid, the world's leading provider of digital 3d models for visualization, films, television, and games.
cg_studio
$25
.50 BMG Cartridge3d model
...odel
cgstudio
.3ds .max .obj .wrl - .50 bmg cartridge 3d model, royalty free license available, instant download after purchase.
3d_export
$5
50 caliber BMG round 3D Model
...d 3d model
3dexport
50cal caliber 50 round bullet bmg cartridge browning rifle
50 caliber bmg round 3d model csw92 27660 3dexport
3d_export
$22
.50 BMG Cartridge 3D Model
...ectile rifle round pistol cartridge m2 hb 127x99mm nato browning barrett m82a1
.50 bmg cartridge 3d model plutonius 8091 3dexport
turbosquid
free
LAR Grizzly .50 BMG Sniper
... available on turbo squid, the world's leading provider of digital 3d models for visualization, films, television, and games.
3d_export
$8
cartrige m50 bmg
...aterials are logically named<br>the main format is in 3ds max 2009.<br>satisfcation garranteed..<br>thank you !
Bltouch
thingiverse
free
Support bltouch by TonyJ
...support bltouch by tonyj
thingiverse
support bltouch
thingiverse
free
BLTOUCH for MICRON3DP by lamerhouse
...bltouch for micron3dp by lamerhouse
thingiverse
bltouch for micron3dp
thingiverse
free
SapphirePro mount for Bltouch
...sapphirepro mount for bltouch
thingiverse
sapphirepro mount for bltouch
thingiverse
free
ender6 BLtouch by chimaer
...ender6 bltouch by chimaer
thingiverse
ender6 bltouch
this is an external bracket
thingiverse
free
BLTouch KP3s by 1devilman1
...bltouch kp3s by 1devilman1
thingiverse
bltouch mount for kingroon kp3s
thingiverse
free
Bltouch support adjustable
...bltouch support adjustable
thingiverse
adjustable support for bltouch, p3steel.
thingiverse
free
BMG NEREUS BLTOUCH
...bmg nereus bltouch
thingiverse
petg
m3 screws and nuts for the bltouch
thingiverse
free

BLTouch Bracket by tidh666
...bltouch bracket by tidh666
thingiverse
serves to attach the bltouch sensor to the extruders
thingiverse
free
bltouch mount by wars
...bltouch mount by wars
thingiverse
reinforced bracket for bltouch cooperates with high_clearance_cr10_oem_fang_mod
thingiverse
free
BLTouch Holder by Jonthan06
...bltouch holder by jonthan06
thingiverse
support bltouch pour wanhao d12
Lightweight
design_connected
$11

Lightweight
...lightweight
designconnected
foscarini lightweight pendant lights computer generated 3d model. designed by tom dixon.
turbosquid
$15

Lightweight
...y free 3d model lightweight for download as max, obj, and fbx on turbosquid: 3d models for games, architecture, videos. (1361264)
turbosquid
$2

Lightweight Shield
... available on turbo squid, the world's leading provider of digital 3d models for visualization, films, television, and games.
turbosquid
$12

Lightweight Toy Armor
... model lightweight toy armor for download as ma, obj, and fbx on turbosquid: 3d models for games, architecture, videos. (1386364)
turbosquid
$29

Lightweight Pine Chair
... available on turbo squid, the world's leading provider of digital 3d models for visualization, films, television, and games.
turbosquid
$20

Lightweight Task Chair
... available on turbo squid, the world's leading provider of digital 3d models for visualization, films, television, and games.
turbosquid
$20

Chandelier Lightweight Foscarini
... available on turbo squid, the world's leading provider of digital 3d models for visualization, films, television, and games.
turbosquid
$2

futuristic lightweight wheel
... available on turbo squid, the world's leading provider of digital 3d models for visualization, films, television, and games.
3d_export
free

Lightweight structure system animated
...lightweight structure system animated
3dexport
https://www.dock4all.com/
turbosquid
$15

03 LIGHTWEIGHT PATTERN WALL
...ghtweight pattern wall for download as 3ds, max, obj, and fbx on turbosquid: 3d models for games, architecture, videos. (1504846)
E3D
turbosquid
$23

E3D - Google Home
... 3d model e3d - google home for download as max, obj, and c4d on turbosquid: 3d models for games, architecture, videos. (1192509)
cg_studio
free

e3d model
...e3d model
cgstudio
- e 3d model, royalty free license available, instant download after purchase.
turbosquid
$2

Syringe C4D (E3D Ready)
...lty free 3d model syringe c4d (e3d ready) for download as c4d on turbosquid: 3d models for games, architecture, videos. (1336720)
turbosquid
$12

Microphone USB E3D and C4D
...ree 3d model microphone usb e3d & c4d for download as c4d on turbosquid: 3d models for games, architecture, videos. (1568216)
turbosquid
$29

E3D - OnePlus 6 Black
...model e3d - oneplus 6 black for download as max, obj, and c4d on turbosquid: 3d models for games, architecture, videos. (1358534)
turbosquid
$29

E3D - Motorola One 2018
...del e3d - motorola one 2018 for download as max, obj, and c4d on turbosquid: 3d models for games, architecture, videos. (1358533)
turbosquid
$29

E3D - Disney MagicBands 2
...l e3d - disney magicbands 2 for download as max, obj, and c4d on turbosquid: 3d models for games, architecture, videos. (1355515)
turbosquid
$29

E3D - Samsung Z4 Smartphone
...e3d - samsung z4 smartphone for download as max, obj, and c4d on turbosquid: 3d models for games, architecture, videos. (1182179)
turbosquid
$23

E3D - Razer Phone model
...del e3d - razer phone model for download as max, obj, and c4d on turbosquid: 3d models for games, architecture, videos. (1231207)
turbosquid
$23

E3D - Alcatel Idol 5
... model e3d - alcatel idol 5 for download as max, obj, and c4d on turbosquid: 3d models for games, architecture, videos. (1212799)
V6
3d_export
$100

v6 engine
...engine
3dexport
complete v6 engine modeled on solidworks 2017 along with .stl, .sldprt and .sldasm of all th parts and assembly.
3d_export
$10

V6 engine
... the first v6 engines were designed and produced independently by marmon motor car company, deutz gasmotoren fabrik and delahaye.
3d_export
$35

v6 engine
...s a complete model of a v6 engine containing over 400 components. you can contact me for a video of all the components assembling
3d_export
$10

v6 engine
...v6 engine
3dexport
turbosquid
$25

Bed1001-v6
... available on turbo squid, the world's leading provider of digital 3d models for visualization, films, television, and games.
turbosquid
$22

Chair2-v6
... available on turbo squid, the world's leading provider of digital 3d models for visualization, films, television, and games.
turbosquid
$20

V6.mb
... available on turbo squid, the world's leading provider of digital 3d models for visualization, films, television, and games.
3d_export
$20

V6 engine
...rovided in this package is all the parts in sldprt format and assembly in sldasm format. i can also convert the format on demand.
3ddd
$1

Стол V6
...6" в стиле дизельпанк изготовлен из блока двигателя, 4х поршней и 4х шатунов.
столешница изготовлена из стекла толщиной 8мм.
cg_studio
$199

V6 VVTi3d model
...v6 vvti3d model
cgstudio
.3ds - v6 vvti 3d model, royalty free license available, instant download after purchase.
Ender
3ddd
$1

Enders / Elegance
...enders / elegance
3ddd
обогреватель
уличный газовый обогреватель enders elegance
высота: 2200 мм
3d_export
free

ender 3 frame cavity covers
... of the creality ender 3 - makes it look a bit more attractive it just slides into the open channels of the aluminium framework
turbosquid
$1

pen support for ender 3
...y free 3d model pen support for ender 3 for download as blend on turbosquid: 3d models for games, architecture, videos. (1611282)
3d_ocean
$9

Ender Dragon Minecraft
...ojang obj poly videogames
ender dragon minecraft created with cinema 4d r15 formats included: max 2013 – fbx 2012 – c4d r15 – obj
3d_export
free

Creality ender enclosure webcam mount
...e creality enclosure. sure is better than a tripod. change it up if it helps. i printed pla with 50% infill on my dd ender 3 pro.
3d_export
free

ender 3 enclosure corners
...er corners and 4 upper corners, using 25mmx25mm angled aluminium pieces that gets covered on inside of the frame with plexiglass
3d_export
free

ender 3 3d print bed clips
...ed + normal aluminium bed frame of the creality ender 3 = 6mm (b) these clips are designed for glass plate + aluminium bed = 4mm
3d_export
$5

GRUMPY CAT
...grumpy cat 3dexport grumpy cat to print in ender ...
3d_export
$5

Logs fire
...with one multi material for corona and vray r ender. albedo, normal, uvmap, roughness format jpg 4096x4096 models:...
3d_export
$42

excavator
...is the original size. 0.12 mm printing surface creality ender5 ...
Direct
design_connected
free
Compas Direction
...compas direction
designconnected
free 3d model of compas direction by vitra designed by prouvé, jean.
design_connected
$18

Direction Pivotant
...direction pivotant
designconnected
vitra direction pivotant computer generated 3d model. designed by prouvé, jean.
turbosquid
$6
not direct the front
...oyalty free 3d model not direct the front for download as max on turbosquid: 3d models for games, architecture, videos. (1213034)
turbosquid
$10

Rails Direct
... available on turbo squid, the world's leading provider of digital 3d models for visualization, films, television, and games.
3d_export
$5

Picto toilet directions
...lude 3d files next to rhino6: x3dv, step, igus, obj and stl. double-sided, flipping changes the gender directions to the toilets.
3ddd
$1
fauteuli direction
...d
chair , vitra , fauteuli
fauteuli vitra chair
design_connected
$18

Fauteuil Direction, 1951
...fauteuil direction, 1951
designconnected
vitra fauteuil direction, 1951 computer generated 3d model. designed by prouvé, jean.
3d_export
$5
Directional tactile 3D Model
...tactile 3d model
3dexport
directional tactile braille tile flooring interior
directional tactile 3d model renob000 71068 3dexport
turbosquid
$26

Radio direction finder A
...ty free 3d model radio direction finder a for download as fbx on turbosquid: 3d models for games, architecture, videos. (1212490)
turbosquid
$7

Wooden direction signage
...ty free 3d model wooden direction signage for download as max on turbosquid: 3d models for games, architecture, videos. (1453747)
Drive
turbosquid
$90
Drive
...turbosquid
royalty free 3d model drive for download as blend on turbosquid: 3d models for games, architecture, videos. (1654393)
3d_export
$10

cycloidal drive
...cycloidal drive
3dexport
cycloidal drive
3d_ocean
$5

Flash Drive
...h drive included : – materials – scene ( lighs / room ) – .c4d + .obj for any questions please feel free to contact me thank you.
3d_ocean
$5

Usb drive
...s shaders and a lighting setup. it also has a small animation of it going in and out. i saved it out as both a .blend file and...
3d_ocean
$5

Pen Drive
...est computer drive game model good low poly new pen pen drive textured unwrapped uv very low poly
a very beautiful low poly model
3d_ocean
$10

External hard drive
... is a detailed model of a trekstor external hard drive. you can easily modify the label on the top. simply edit the text objects.
turbosquid
$60

Star Drive
...squid
royalty free 3d model star drive for download as blend on turbosquid: 3d models for games, architecture, videos. (1254314)
turbosquid
$50
Star Drive
...squid
royalty free 3d model star drive for download as blend on turbosquid: 3d models for games, architecture, videos. (1263524)
turbosquid
$45

Star Drive
...squid
royalty free 3d model star drive for download as blend on turbosquid: 3d models for games, architecture, videos. (1287060)
turbosquid
$40
Star Drive
...squid
royalty free 3d model star drive for download as blend on turbosquid: 3d models for games, architecture, videos. (1261902)
Extruder
3ddd
$1

Extruded Chair
...extruded chair
3ddd
extruded , tom dixon
inspired by tom dixon extruded chair
turbosquid
$15

Extruded Table
... extruded table for download as blend, dae, fbx, obj, and stl on turbosquid: 3d models for games, architecture, videos. (1634137)
turbosquid
$2

3D Printer Extruder
...d
royalty free 3d model 3d printer extruder for download as on turbosquid: 3d models for games, architecture, videos. (1537359)
turbosquid
$1

Zombie extruded text
...oyalty free 3d model zombie extruded text for download as obj on turbosquid: 3d models for games, architecture, videos. (1322198)
turbosquid
$4

Extruder conical screw
...el extruder conical screw for download as sldpr, ige, and stl on turbosquid: 3d models for games, architecture, videos. (1524433)
turbosquid
$50

3d PRINTER - Extruder
... available on turbo squid, the world's leading provider of digital 3d models for visualization, films, television, and games.
turbosquid
$15

Extruded Table 2
...xtruded table 2 for download as blend, dae, fbx, obj, and stl on turbosquid: 3d models for games, architecture, videos. (1621846)
turbosquid
$10

Maya Extrude Tool
... available on turbo squid, the world's leading provider of digital 3d models for visualization, films, television, and games.
3d_export
$5

world earth extrude map
...world earth extrude map
3dexport
3ddd
$1

Simply Elegant Extruded Tree Coffee Table Design
...ble by link studios. the silhouette of a tree is visible at one angle, extruded from the surface to create the support structure.
Mount
3d_export
free

mounting bracket
...mounting plate is the portion of a hinge that attaches to the wood. mounting plates can be used indoors, cabinetry and furniture.
turbosquid
$2

MOUNTING
... available on turbo squid, the world's leading provider of digital 3d models for visualization, films, television, and games.
turbosquid
free

Mounts
... available on turbo squid, the world's leading provider of digital 3d models for visualization, films, television, and games.
turbosquid
free

Mount Fuji
...fuji
turbosquid
free 3d model mount fuji for download as obj on turbosquid: 3d models for games, architecture, videos. (1579977)
3d_export
$5

Headphone mount LR
...headphone mount lr
3dexport
headphone mount l+r
turbosquid
$39

Mount rainier
...quid
royalty free 3d model mount rainier for download as fbx on turbosquid: 3d models for games, architecture, videos. (1492586)
turbosquid
$5

pipe mounting
...quid
royalty free 3d model pipe mounting for download as obj on turbosquid: 3d models for games, architecture, videos. (1293744)
turbosquid
$3

Mounting Tires
...uid
royalty free 3d model mounting tires for download as fbx on turbosquid: 3d models for games, architecture, videos. (1708511)
3d_export
$5

Magnetic GoPro Mount
...pro mount
3dexport
cool magnetic mount for gopro. allows you to mount the camera on flat metal surfaces and get exclusive shots.
turbosquid
$5

Stone Mount
...ty free 3d model stone mount for download as ma, obj, and fbx on turbosquid: 3d models for games, architecture, videos. (1370306)
3
turbosquid
$10

Mountain Bike 3 -3 of 3
...model mountain bike 3 (#3 of 3) for download as fbx and blend on turbosquid: 3d models for games, architecture, videos. (1438752)
turbosquid
$6

Rock 3-3
...urbosquid
royalty free 3d model rock 3-3 for download as obj on turbosquid: 3d models for games, architecture, videos. (1628065)
turbosquid
$29

Books 150 pieces 3-3-3
...books 150 pieces 3-3-3 for download as max, obj, fbx, and stl on turbosquid: 3d models for games, architecture, videos. (1384033)
turbosquid
$3

Genesis 3 Clothing 3
... available on turbo squid, the world's leading provider of digital 3d models for visualization, films, television, and games.
3d_export
$5

hinge 3
...hinge 3
3dexport
hinge 3
3ddd
$1

Розетка 3
...розетка 3
3ddd
розетка
розетка 3
turbosquid
$50

is-3
... available on turbo squid, the world's leading provider of digital 3d models for visualization, films, television, and games.
turbosquid
$10

Mountain Bike 3 -2 of 3
...model mountain bike 3 (#2 of 3) for download as fbx and blend on turbosquid: 3d models for games, architecture, videos. (1438750)
turbosquid
$10

Mountain Bike 1 -3 of 3
...model mountain bike 1 (#3 of 3) for download as fbx and blend on turbosquid: 3d models for games, architecture, videos. (1438743)
3d_export
$5

3 CATS
...3 cats
3dexport
3 cats pen holder