Thingiverse
Electronics Shelf by petLion
by Thingiverse
Last crawled date: 4 years, 5 months ago
Electronics shelf quick info.
ElecShelf.stl or ElecShelfwGlasses.stl: Choose 1. Only 1 needed, 0.3mm Z, 25% Grid infill, support everywhere.
Support.stl: 1 needed, 0.3mm Z, 15% Rectilinear infill, support.
LgCommandStripMount.stl: 2 needed, 0.3mm Z, 35% Rectilinear infill, no support.
Also needed: 2 3M Command Adhesive Strips, Large.
Optional: Super glue or the like.
Electronics shelf full info.
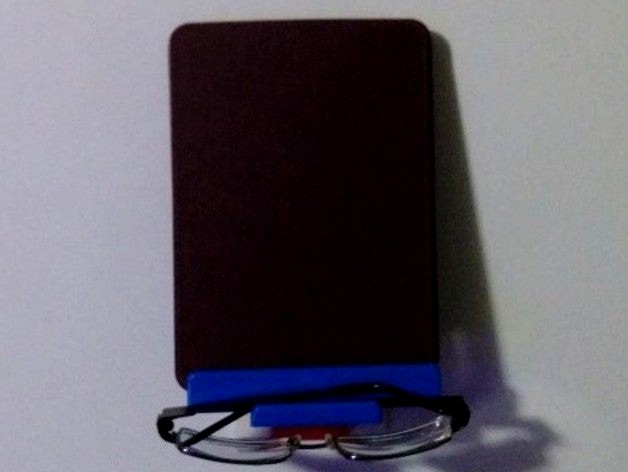
This is a shelf I designed to hold a Kindle and reading glasses
as a gift for my mom.
Of course it can be used to hold any small item(s).
The first photo shows it holding a kindle and my glasses.
In the second photo I have it holding a 10.1" tablet, Kindle and I put a small
smart phone on the glasses ledge just because it fit.
The red, white and blue shelf was printed using PLAs.
The other was printed with glow in the dark green PLA and red T-Glase.
Currently I have one next to my bed for my cell phone and glasses and
I have another that holds onto my cell phone during the day by the PC.
I gave one to a friend who is also using it as a bedside shelf and
my mom is using one to hold her Kindle and reading glasses.
Printing and assembling.
ElecShelf.stl and ElecShelfwGlasses.stl are the main body of the shelf,
one has the small ledge for glasses and one does not. I used MatterSlice in
MatterControl to slice it at 0.3mm Z Layers with 25% grid infill and the
"support everywhere" option checked, that allows the triangle notches to come
out nicely and after removing the support no other finishing work was needed
to get the other pieces to lock in.
Support.stl is the wedge shaped item that provides the main support for
the shelf. When assembling the support will stick out slightly past the shelf, this
is to compensate for the thickness that command strips add. The support I
sliced with Slic3r at 0.3mm Z Layers with a 15% rectilinear infill, supports needed.
The hole that goes through the support allows for a charging cable.
LgCommandStripMount.stl is the key to everything, for the shelf you will need
to print 2 of them. If possible print the flat side down so that it comes out as smooth
as possible, otherwise you may need to sand them smooth to allow the Command
adhesive strip to adhere properly. It is sized to use a Large 3M Command Adhesive
strip. Sliced mine with Slic3r with 0.3mm Z Layers and 35% rectilinear infill, no support needed.
After printing everything and removing support material from the shelf and support,
you simply slide the support into the back of the shelf then snap the Command strip
mounts into the matching triangular pattern on the back of the shelf. Super gluing
everything together is optional and you'll have to decide if you want to based on how
well your parts snap together and the weight you intend to keep on it.
Follow the directions on the package for attaching the command adhesive to the shelf and then to the wall.
Designed with Autodesk Fusion 360.
Used Microsoft's 3D Builder to change orientation of STL files.
Sliced with MatterControl and Slic3r.
ElecShelf.stl or ElecShelfwGlasses.stl: Choose 1. Only 1 needed, 0.3mm Z, 25% Grid infill, support everywhere.
Support.stl: 1 needed, 0.3mm Z, 15% Rectilinear infill, support.
LgCommandStripMount.stl: 2 needed, 0.3mm Z, 35% Rectilinear infill, no support.
Also needed: 2 3M Command Adhesive Strips, Large.
Optional: Super glue or the like.
Electronics shelf full info.
This is a shelf I designed to hold a Kindle and reading glasses
as a gift for my mom.
Of course it can be used to hold any small item(s).
The first photo shows it holding a kindle and my glasses.
In the second photo I have it holding a 10.1" tablet, Kindle and I put a small
smart phone on the glasses ledge just because it fit.
The red, white and blue shelf was printed using PLAs.
The other was printed with glow in the dark green PLA and red T-Glase.
Currently I have one next to my bed for my cell phone and glasses and
I have another that holds onto my cell phone during the day by the PC.
I gave one to a friend who is also using it as a bedside shelf and
my mom is using one to hold her Kindle and reading glasses.
Printing and assembling.
ElecShelf.stl and ElecShelfwGlasses.stl are the main body of the shelf,
one has the small ledge for glasses and one does not. I used MatterSlice in
MatterControl to slice it at 0.3mm Z Layers with 25% grid infill and the
"support everywhere" option checked, that allows the triangle notches to come
out nicely and after removing the support no other finishing work was needed
to get the other pieces to lock in.
Support.stl is the wedge shaped item that provides the main support for
the shelf. When assembling the support will stick out slightly past the shelf, this
is to compensate for the thickness that command strips add. The support I
sliced with Slic3r at 0.3mm Z Layers with a 15% rectilinear infill, supports needed.
The hole that goes through the support allows for a charging cable.
LgCommandStripMount.stl is the key to everything, for the shelf you will need
to print 2 of them. If possible print the flat side down so that it comes out as smooth
as possible, otherwise you may need to sand them smooth to allow the Command
adhesive strip to adhere properly. It is sized to use a Large 3M Command Adhesive
strip. Sliced mine with Slic3r with 0.3mm Z Layers and 35% rectilinear infill, no support needed.
After printing everything and removing support material from the shelf and support,
you simply slide the support into the back of the shelf then snap the Command strip
mounts into the matching triangular pattern on the back of the shelf. Super gluing
everything together is optional and you'll have to decide if you want to based on how
well your parts snap together and the weight you intend to keep on it.
Follow the directions on the package for attaching the command adhesive to the shelf and then to the wall.
Designed with Autodesk Fusion 360.
Used Microsoft's 3D Builder to change orientation of STL files.
Sliced with MatterControl and Slic3r.