Cults

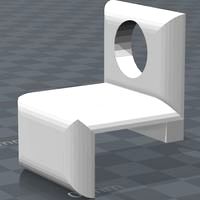
Electric_Driver_Upgrade_For_Slider_V4.0
by Cults
Last crawled date: 6 years, 2 months ago
Material:
Professional_DSLR_Slider_V4.0(https://cults3d.com/en/gadget/professional-dslr-slider-v4-0)
3D print parts;
Arduino mega2560;(https://www.dfrobot.com/product-655.html)
Customed made circuit board;
0.96’ 12864-OLED ;(CCD1306)(https://www.dfrobot.com/product-1576.html)
DRV8825 Stepper driver ;(https://www.amazon.com/Hobbypower-StepStick-4-layer-DRV8825-Stepper/dp/B00NCSK6T2/ref=sr_1_5?s=electronics&ie=UTF8&qid=1496825398&sr=1-5&keywords=stepper+driver)
GT2 timing belt ;(length:1.5m Width:6mm)
20 tooth GT2 pulley gear ;
42 Stepper motor 1.8° ;(Length:48mm)
Micro switch ;(with wires)
M6 30mm screw 1 pics ;
M4 5mm screw 2pics ;
M3 8mm screw 4pics ;
ID:6mm OD:12mm W:4mm bearing 2pics ;
About the software and the circuit board, you guys can go to Wogified's mainpage, there is an full explain and arduino tutorial for the software control. so that I can upgrade my design with electric control. Thanks guys, your works are awesome. Further more I will go on for the slider to make it better!
and for the hardware upgrade, first insert two bearings to the pulleywheels(printed), and assemble it to the other side of the slider. Next step,stick the Belt_connector to the bottom of the platform which I published before. Next step, however assemble the stepper motor into the Stepper_Motor_Mount(printed) and also the 20 tooth pulley gear. Final step, connect all the GT2 timing belt, and test it with arduino.(forget,you need to stick one micro switch to one side of the rod mount so that the platform can be reached)
by the way, my brandnew twitter:https://twitter.com/Swanglei_DF
Similar models
cults
free

DSLR Camera FollowSlider V2.0
....dfrobot.com/index.php?route=product/product&search=motor&description=true&page=6&product_id=1460
cults
$1

Belt Idler pulley GT2
...aring f605zz
smooth pulley in couple to it, it is possible to take here.
https://cults3d.com/en/3d-model/gadget/belt-idler-pulley
cults
$17

3D_Print_Follow_Focus_V2.0
... id4mm ;
ratio:1:5
link:https://item.taobao.com/item.htm?spm=a1z09.2.0.0.obnu1k&id=17352109451&_u=565kgh672ff
cults
free

belt idler pulley
...lley with teeths, it is possible to look at it here. that there was couple.
https://cults3d.com/en/3d-model/tool/idler_pulley_2gt
cults
free

Micro holder for cage modular DSLR
...lr. to attach the micro holder i use m4 vis screw.
link of my cage modular dslr : https://cults3d.com/en/tool/cage-modular-dslr
cults
free

Professional DSLR slider V4.0
...professional dslr slider v4.0
cults
dslr slider professional v4.0
professional dslr slider v4.0
cults
free

Customizable Flexible Tooth Belt
...tooth shape and spacing, optional tread pattern.
to be printed from flexible material. i am using flexfill from fillamentum.com.
cults
free

3D print photography light 55w
...;amp;_u=965kgh6a4b3
and the screws you will need
m6_50mm screws 2pics
m6 muts 2pics
m3_8mm screws 16pics
6mm rods l:110mm 4pics
cults
free

DC110 ABS FPV for SP F3 RACING EVO Brush Flight control
...t lipo
youtube test flight 2s: http://bit.do/video-youtube-brax-fpv-test-dc110-fpv-2s
https: // www .facebook.com / microdure /
cults
free

Remote for PC Youtube and netflix
... instructable.
video: https://youtu.be/cfqnek6cic4
tutorial: https://www.instructables.com/id/remote-for-pc-youtube-and-netflix
2560
cults
free

Boxing for Mega 2560 and Ramps 1.4 + Lcd plugged on
...for storing the mega2560 / ramps 1.4 assembly, the 12864 lcd connector.
box designed to contain a 10 mm thick 40x40 cooling fan.
cults
free

Arduino Mega 2560 holder
... screws and nuts m3 or tapping screw.
dimensions and other parts available on this site:
http://www.genapart.com/blog/ressources/
cults
free

Electronic case for Arduino Mega 2560 + Ramps 1.4 + LCD 2004 - 3D Modular Systems
...ww.3dmodularsystems.com
twitter: https://twitter.com/3dmodularsystem
youtube: http://www.youtube.com/c/3dmodularsystems3dprinters
cults
free

Anet AM8 RAMPS1.4 + Raspberry Pi 2 and 3 holder bracket 2020, 2040
...washer 4x hammer nut electronics ramps 1.4 board mega 2560 board (arduino clone) 4-5x drv8825 stepper driver raspberry pi...
cults
free

Modular Anet A8 RAMPS 1.4 + Raspberry Pi 2/3 Case
...pi: https://goo.gl/rahxua - ramps 1.4 board: https://goo.gl/ybxuoz - mega 2560 board (arduino clone): https://goo.gl/rvb4lo - 4-5x drv8825 stepper driver:...
Nikon
cults
free

NIkon Camera Extension Tube
...ults
camera nikon
extension tube for nikon camera, made by protype3d.
https://protype3d.fr/content/26-impression-sur-demande
cults
free

NIKON D300 CAMERA GRIP REPLACEMENT
...t at shapeways for €9.43 here in this link:
https://www.shapeways.com/product/rr6vag22v/nikon-d300-camera-grip?optionid=63100756
cults
free

Double Lens Cap
...3d printable accessory fits over 400 lenses, including all nikon f mounts. the free download includes files for nikon...
cults
free

Lens Hood
...all 52mm camera lenses—just download the free files for nikon and canon—and make it your own in basic black,...
cults
free

Scan 3D stone doe
...compilé pour la distribution self os et appareil photo nikon coolpix b500. 32 photos ont été nécessaires pour obtenir...
cults
free

Smartphone Teleprompter - Tripod Adapter
...adapter cults photography teleprompter autocue tele prompter diy canon nikon video youtube i would love to keep sharing my...
V4
cults
free

Makergear M2 Single V4 Extruder Fan Shroud
...gear m2 single v4 extruder fan shroud
cults
makergear m2 single v4 extruder fan shroud
makergear m2 single v4 extruder fan shroud
cults
$1

Lego Earrings v4
...lego earrings v4
cults
lego earrings
earrings designed in catia v5.
printing printer davinci junior. the material pla-red
cults
free

Shower massage
...>>> update <<< 12/17/2017 the threads have been changed (v4 version), these were not created in the 3d file....
cults
$1

Hydroponic Pot
...to print with the net, the latest version is v4 for both outer and inner. love the feel of...
cults
$1

Hydroponic Pot
...to print with the net, the latest version is v4 for both outer and inner. love the feel of...
cults
free

Batarang (Batman Beyond)
...for more information and to see the finished print: https://youtu.be/jm9yt5pf-v4 i printed them in pla on my robo 3d...
cults
free

Switchbox V5 - Hinged
...hinged cults nintendo nintendo switch nintendo_switch_case after using my v4 switchbox for a while i decided the sliding mechanism,...
cults
free

Sony Alpha, NEX battery (NP-FW50) strap case
...single case reported of the battery falling out on v4 and the clips on v5 may prove too stiff,...
cults
free

Batarang (Batman: Arkham Knight)
...to see the finished prints check out this video: https://youtu.be/jm9yt5pf-v4 i printed them in pla on my robo 3d...
cults
free

PINE A64 / A64+ computer case
...let me know how it works out! update 2016-06-07, v42 fixed the reset button slot which was too narrow,...
Canon
cults
free

Canon EF Eyecup
...cad
replacement canon eyecup (black) look for the small green arrow to understand which part it is.
created with www.selfcad.com
cults
free

Hot Shoe Mount for canon with sync
...hot shoe mount for canon with sync
cults
hot shoe mount for canon with sync
hot shoe mount for canon with sync
cults
free

Canon LP-E17 Battery Holder
...e lp-e17 battery for my canon t6i camera. the holder will also work on the "decoy batteries" that are similarly sized.
cults
free

Clean Canon EF mount ring
...a mount ring
just the mount ring for canon ef type reflex camera.
clean mesh and .blend file, easy to adapt for further projects.
cults
$1

Canon B4 lens mount
...e thickness washers; screws must not protrude into lens more than 4mm -or you will feel it locking the zoom and aperture rings).
cults
free

Adapter m43 (m4/3) to canon FD lens
... in black or paint it black
check out my portfolio and leave a like:
https://www.behance.net/andreziio6a17
it would help a lot!
cults
free

Action protection cover for Canon SX230 HS
...position is going out of the case.
designed this case specially for my son. he wants to make photos but not yet accurate user :)
cults
free

Shoulder rig for DSLR (NOT just for Canon 5D)
...same place,and the links is:https://item.taobao.com/item.htm?spm=a1z09.2.0.0.ngtbda&id=45114001387&_u=765kgh6babe
cults
free

Bill Boum
...boum cults bill boum bullet bill mario luigi gun canon of bullet bill in...
cults
$4

17th century naval cannon
...17th century naval cannon cults canon naval century xvii replica on scale of naval cannon...
Gimbal
cults
free

Gimbals - 2017
...gimbals - 2017
cults
gimbals - 2017
gimbals - 2017
cults
free

Lucky Gimbals (Mahjong)
...lucky gimbals (mahjong)
cults
lucky gimbals (mahjong)
lucky gimbals (mahjong)
cults
free

Zenmuse gimbal mount
...zenmuse gimbal mount
cults
drone uav
zenmuse gimbal mount
cults
free

Hand Gimbal GoPro 50 $ DIY
...dle
buy this gimbal for drones
http://amzn.to/2lvazdm
and made a hand gimbal printing these parts + a tube and 3 batteries 18650
cults
free

Simple 2 axis servo gimbal for SJ4000
...simple 2 axis servo gimbal for sj4000
cults
simple 2 axis servo gimbal for sj4000
simple 2 axis servo gimbal for sj4000
cults
free

Runcam 3 Frame For Handheld Gimball
...x is to be able to fit the runcam 3 on my handheld gimball. link to the gimball can be found in the video description, see below.
cults
$1

Xiami Mijia 3 Axis Stabilized Gimbal Holder
...y time you need it.
you can get more details on this amazing gimbal and camera here
http://bit.ly/2y81gks
http://bit.ly/2y6lcsn
cults
free

Flying Low Gimbal Protector
...1.0
facebook
@flyinglowar
https://m.facebook.com/flyinglowar/
instagram
https://www.instagram.com/flyinglowar/
cults
free

Taranis Q X7, Q X7S Gimbal Protectors/Guards
...ese on ebay.
update: added custom m7 hall gimbal protectors optimized to fit upgraded m7 hall gimbals and the q x7s transmitter.
cults
free

Sony Action Cam Handheld Gimbal
...ted in the bom)
update: due to the lack of availability gimbal controller micro storm32 , project will by distributed for free.
Mega
cults
free

mega drive sega
...mega drive sega
cults
sega video console mega drive
support for 4 game megadrive
cults
$3

Arduino Mega Case
...e idea of this stylish cover comes because always the development boards have a rustic style and they are unprotected.
enjoy it.
cults
free
Arduino Mega 2560 holder
... screws and nuts m3 or tapping screw.
dimensions and other parts available on this site:
http://www.genapart.com/blog/ressources/
cults
free

mosfet i3 mega
...oduct/b074kzmjrb/ref=oh_aui_detailpage_o01_s00?ie=utf8&psc=1
4 screws to fix the pc covers
4 allen screws 4x40 + nuts
cults
free

Graphica: MEGA Ghost - Print & Play - via 3DKitbash.com
...lts
graphica: mega ghost - print & play via 3dkitbash.com
graphica: mega ghost - print & play - via 3dkitbash.com
cults
free
Boxing for Mega 2560 and Ramps 1.4 + Lcd plugged on
...for storing the mega2560 / ramps 1.4 assembly, the 12864 lcd connector.
box designed to contain a 10 mm thick 40x40 cooling fan.
cults
free

Nerf MEGA Explosive Tips - Party Snap Foam Dart Tips
... shoot these at people or animals
for instructions and testing results, please view the video at: https://youtu.be/ybzklpjmo1i
cults
free
Electronic case for Arduino Mega 2560 + Ramps 1.4 + LCD 2004 - 3D Modular Systems
...ww.3dmodularsystems.com
twitter: https://twitter.com/3dmodularsystem
youtube: http://www.youtube.com/c/3dmodularsystems3dprinters
cults
free

My Marble Fidget Spinner
...my marble fidget spinner cults printer: anycubic i3 mega rafts: no supports: no resolution: .2mm infill: 100% notes:...
cults
$3

Arduino Uno R3 Case
...arduino uno r3 case cults arduino case mega uno r3 gadget breadbord the idea of this stylish...
Slider
cults
free

Camera slider
...ra dolly slider video mount gear linear
assembly, printing list and components on: http://horizonlab.co/2017/07/28/camera-slider/
cults
free

Simple Camera Slider
...simple camera slider
cults
simple camera slider
simple camera slider
cults
free

DIY Camera Slider
...diy camera slider
cults
diy camera slider
diy camera slider
cults
free

Bluetooth Motorized Camera Slider
...bluetooth motorized camera slider
cults
bluetooth motorized camera slider
bluetooth motorized camera slider
cults
free
Professional DSLR slider V4.0
...professional dslr slider v4.0
cults
dslr slider professional v4.0
professional dslr slider v4.0
cults
free

Curtain Rod Slider
...curtain rod slider
cults
.
cults
free

SLIDE | Smartphone Slider
...hone across your desk.
the attached stl carriage is the original slide file for the iphone 5
video: http://youtu.be/cu2ifrre4uu
cults
free

Bag Closing Slider
... alike.
just bend the bag over the middle part and then from the side slide the outer part over both the bag and the middle part.
cults
free

Motorized Camera Slider MK3
...ider at https://learn.adafruit.com/motorized-camera-slider-mk3/overview
visit the adafruit shop online - http://www.adafruit.com
cults
free

Slider Harrope S120 & X60 & X120
...es
bom and more information:
http://harrope.com/slider-harrope-x60/
chek the new slider motorized.
designed by guillermomaroto
Rig
cults
free

Shoulder rig
...camera steadicam steadycam dslr dslr rig shoulder rig
components and print list on: http://horizonlab.co/2017/06/22/shoulder-rig/
cults
free

Smartphone holder for a shoulder rig
...//horizonlab.co/2017/06/27/smartphone-holder-for-a-shoulder-rig/
the shoulder rig: http://horizonlab.co/2017/06/22/shoulder-rig/
cults
$105

Go Pro Mount & Rig
...go pro mount & rig
cults
go pro hero 5 360 mount rig stereo
go pro hero 5
mount for 360 degree
stereo rig
cults
$1

Cold Shoe DSLR Rig Clamp
...ig rod system, two m4 socket bolt holes for tightening the clamp, and an cold shoe for attaching lightning accessories et cetera.
cults
free

OctoPrint Raspberry Pi Rig 3.5" PiTFT Touch Display
...splay
cults
octoprint raspberry pi rig 3.5" pitft touch display
octoprint raspberry pi rig 3.5" pitft touch display
cults
$1

Cheese handle for DSLR video rig
... longer plug includes a cold shoe mount and a 15mm rod mount with a place for nut and bolt (m6 or 1/4") for locking the rod.
cults
free

Hero 3/4 stereo rig
...opro 3/3+/4 (pair must be the same model: 3 and 3 or 4 and 4 or 3+ and 3+)
video example is here (https://youtu.be/pyyktmbnb8w)
cults
free

Gopro Hero5 stereo rig
...ras there was vertical shift.
hole for menu button was added also.
so if you did not print it yet, please download fixed version
cults
free

3D print shoulder rig V2.0
...same place,and the links is:https://item.taobao.com/item.htm?spm=a1z09.2.0.0.ngtbda&id=45114001387&_u=765kgh6babe
cults
free
Shoulder rig for DSLR (NOT just for Canon 5D)
...same place,and the links is:https://item.taobao.com/item.htm?spm=a1z09.2.0.0.ngtbda&id=45114001387&_u=765kgh6babe
Dslr
cults
free

DSLR Slider_V1.0
...dslr slider_v1.0
cults
dslr slider_v1.0
dslr slider_v1.0
cults
free
Professional DSLR slider V4.0
...professional dslr slider v4.0
cults
dslr slider professional v4.0
professional dslr slider v4.0
cults
free

Handle for Cage modular DSLR
... a37 dslr. to attach the handle i use m4 vis screw.
link of my cage modular dslr : https://cults3d.com/en/tool/cage-modular-dslr
cults
free

Cage modular DSLR
...
and you can enhance fixing the module on the hot shoe.
all the hole have a spacing of 10 mm if you want to design some module.
cults
free

Cage modular DSLR mount for vanguard
... sony a37 dslr. to attach this i use m4 vis screw.
link of my cage modular dslr : https://cults3d.com/en/tool/cage-modular-dslr
cults
free

Remote button for cage modular DSLR
...a37 dslr. to attach the handle i use m4 vis screw.
link of my cage modular dslr : https://cults3d.com/en/tool/cage-modular-dslr
cults
free

Protective cage for cage modular DSLR
... to attach the protective cage i use m4 vis screw.
link of my cage modular dslr : https://cults3d.com/en/tool/cage-modular-dslr
cults
free
Micro holder for cage modular DSLR
...lr. to attach the micro holder i use m4 vis screw.
link of my cage modular dslr : https://cults3d.com/en/tool/cage-modular-dslr
cults
free

Iphone holder for Cage modular DSLR
...te a ball reinforced by a screw m4 for this think.
link of my cage modular dslr : https://cults3d.com/en/tool/cage-modular-dslr
cults
free

Lamp holder for Cage modular DSLR
...ate a ball reinforced by a screw m4 for this think.
link of my cage modular dslr : https://cults3d.com/en/tool/cage-modular-dslr
Fiber
cults
free

Fiber Keyring sfr.fr
...fiber keyring sfr.fr
cults
key ring fiber sfr box
fiber keychain sfr.fr (official logo)
cults
free

Multi-body Carbon Fiber Reinforced Gear
...multi-body carbon fiber reinforced gear
cults
multi-body carbon fiber reinforced gear
multi-body carbon fiber reinforced gear
cults
free

BOX HEAD DIRECT DRIVE 1.75 MM BY DAMAJU
...print special materials loaded in fiber as the carbon fiber the flax, the filament flexible... the head “direct drive”...
cults
free

BOX HEAD DIRECT DRIVE 3MM BY DAMAJU
...materials that are loaded in fiber such as carbon fiber linen, filament, flexible,... download files compatible with your head...
cults
free

3D print foldable photography light
...3d print foldable photography light cults 12mm carbon fiber tube 250mm / 3 12mm carbon fiber tube >400mm...
cults
free

Mortal Kombat Keyrings
...printing services for their cheap and incredibly strong carbon fiber reinforced sls nylon material: http://3dprintdirect.co.uk/...
cults
free
DSLR Camera FollowSlider V2.0
...slider with follow function bom list: 1m( 15mm) carbon fiber tube ×2 1m (12mm)carbon fiber tube ×1 4135mm bearing...
cults
free

CS:GO Knives SLS keyrings
...print direct printing services for their incredibly strong carbon fiber reinforced sls nylon material: http://3dprintdirect.co.uk/ https://www.3dhubs.com/milton-keynes/hubs/3d-print-direct...
cults
free

Twisted Vase Planter
...twisted vase planter cults amazing beautiful bowl bowls carbon fiber creative cup cups green holder pink plant planted planter...
cults
free

SMITE Kukulkan Bust
...the model in photos was printed in black carbon fiber reinforced sls nylon using 3d print direct services http://3dprintdirect.co.uk/...
Photography
cults
free
3D print photography light 55w
...;amp;_u=965kgh6a4b3
and the screws you will need
m6_50mm screws 2pics
m6 muts 2pics
m3_8mm screws 16pics
6mm rods l:110mm 4pics
cults
free
3D print foldable photography light
...heat sink
magic tape
3010 cooling fan
10w cob led (4000k & 5000k & 6000k +/-200k)
10w led constant current driver
cults
$1

Fields Medal (Fields Medal)
...medal modeled for a friend. (upcoming photography / upcoming photography rather cool as an object of collection or decoration....
cults
free

Digital Photo Frame
...digital photo frame cults decor digital_photo_frame frame photo photography photo_frame approximate project...
cults
free

Wing Knob for Photo Light Stand
...knob for photo light stand cults wing knob repair photography light stand wing knob for photo light...
cults
$1

M42 rear lens cap
...m42 rear lens cap cults m42 lens cap photography camera lens cap for m42 legacy lenses. plain or...
cults
free

Support for taking overhead shots
...support for taking overhead shots cults gadget photography support tripod with this support and a flexible tripod...
cults
free
Camera slider
...slider cults camera slider camera dolly dslr cameraslider cameradolly photography camera dolly slider video mount gear linear assembly, printing...
cults
$1

Hot shoe mount for flash diffuser
...hot shoe mount for flash diffuser cults photography flash diffuser dslr mirrorless hotshoe mount my first upload!!!...
cults
free

Background stand base bracket
...background stand base bracket cults photography repair_part studio_lighting this is a replacement for the bottom...
Driver
cults
free

Converter socket to bit screw driver & Bit driver
...ing.
i don’t recommend that you use the plastic converter peace for removing hot nozzles :-)
printed in pet-g, resolution 0.2mm
cults
free

Simple LED driver
... have to buy, the more expensive it will get :-).
maybe i will make a pwm driven driver in the future, but only if people ask me
cults
free

Stack Able Bit Holders/Driver
...bit organizer for your bike or car.
!don't forget to check out my other designs and follow my daily kookoo uploads, enjoy ;)
cults
$1

Thumbwheel M3 Knob
...construction. it is possible to use, the suitable, standard screw-driver ...
cults
free

Mini Screwdriver Cap
...our drivers.
example: driver's tip diameter 3.0mm -> adding clearance, 3.2mm -> print the model with 320% scale
cults
free

Case iPhone 6 Formula 1
...1 cults case iphone formula f1 formula 1 racing driver race iphone case design a racing...
cults
free

3A batteries mod for SMARS
...arduino. the model is designed to fit this motor driver https://goo.gl/v8adzu you will need some prong fastener (like these...
cults
$3

hex screw bit store
...used to store all of those hex bodied screw driver bits that seem to be in every bit set...
cults
free

Helmet for OpenRC F1 car
...car cults the f1 cars look odd without a driver so i made this simple halmet. it's not a...
cults
free

Kitengu tankoped
...tank combined - designed for infantry support. details include: driver#39;s view port, main cannon, rivets/bolts, guard rail, exhaust and...
Film
cults
free

A Fuji Film Instax Mini picture frame.
... landscape orientation.
- low cost and simple print for most consumer grade 3d printers and looks good in many different colours.
cults
$6

the film Brass Knuckles/Rings "Do the Right Thing" by Spike Lee
...er rap hiphop writer love hate
fight the power!
radio raheem brass knuckles/rings
https://www.youtube.com/watch?v=pa-ouptr9li
cults
$2

Tauntaun
...this tauntaun in light of the new star wars film. ...
cults
free

T800 + Base and support
...t800 + base and support cults t800 art figurine film terminator t800 + base and...
cults
free

Chaplin Pic
...chaplin pic cults the iconic silent film actor charlie chapin – your very own wall...
cults
free

Submarine Sword
...sword cults this submarine "starred" in the czechoslovak adventure film "the fabulous world of jules verne" in 1958. the...
cults
$8

DRACULA
...by the excellent gary oldman in the 1992 coppola film ...
cults
free

USCSS Prometheus
...covenant engineer low_res movie movies prometheus spaceship spaceships xenomorph film the uscss prometheus exploration vessel of the film of...
cults
free

Decoration Marvel Studio
...decoration marvel studio cults marvel studio comics film movies mcu universe hero simple logo marvel studio for...
cults
$1

Chuck Angry birds
...figure model reproduction angry birds movie chuck angry birds film model ready for printing, with supports at...
Tripod
cults
free

Tripod Screw
...tripod screw
cults
tripod tripod_mount tripod_screw
a basic 1/4-20 tripod screw, modified to be easily screwed by hand.
cults
free

Rod Tripod
...end using the pads at the end of the legs for better bed adhesion, you can detach them later if you prefer the clean tripod look.
cults
free

86Duino Tripod - Fair Wine
...86duino tripod - fair wine
cults
86duino tripod - fair wine
86duino tripod - fair wine
cults
free

Adjustable Tripod (spring loaded)
...adjustable tripod (spring loaded)
cults
adjustable tripod (spring loaded)
adjustable tripod (spring loaded)
cults
free

GoPro mini tripod mount
...gopro mini tripod mount
cults
gopro mini tripod mount
gopro mini tripod mount
cults
free

Camera Tripod Adapter for Telescope
...camera tripod adapter for telescope
cults
camera tripod adapter for telescope
camera tripod adapter for telescope
cults
free

IPhone4 holder for flexible mini tripod
...e with this:
http://www.ebay.co.uk/itm/large-universal-flexible-foam-octopus-mini-tripod-stand-for-slr-dslr-cameras-/351429881538
cults
free

Mount GoPro on a tripod camera
...mount gopro on a tripod camera
cults
fdm_center gopro
mount gopro on a tripod camera
cults
$1

Tripod battery cover (Cartoni Delta)
...tripod battery cover (cartoni delta)
cults
tripod spares cartoni
a replacement battery cover for a cartoni delta tripod..
cults
free

Raspberry Pi Camera Case and Tripod
...raspberry pi camera case and tripod
cults
raspberry pi camera case and tripod
raspberry pi camera case and tripod
Upgrade
cults
free

PrintrBot NinjaFlex Upgrade
...printrbot ninjaflex upgrade
cults
printrbot ninjaflex upgrade
printrbot ninjaflex upgrade
cults
free

Christmas Tree upgrade.
...christmas tree upgrade.
cults
christmas tree upgrade.
christmas tree upgrade.
cults
free

Google Cardboard kit upgrade
...google cardboard kit upgrade
cults
google cardboard kit upgrade
google cardboard kit upgrade
cults
free

Google Cardboard kit upgrade 1
...google cardboard kit upgrade 1
cults
google cardboard kit upgrade 1
google cardboard kit upgrade 1
cults
free

UPGRADE YOUR HAND SPINNER
...r reviews another autre_hand_spinner upgrade_hand_spinner beyblade
upgrade for classic hand spinner
https://youtu.be/_eytphyqxmi
cults
free

UPGRADE UM2
...giverse.com/thing:2593527
scaffold and poly plus pla with the dual-balance prototype:
https://www.thingiverse.com/thing:2608925
cults
free

Top upgrade Bowden Anet A6 Right
...ps://cults3d.com/en/modelo-3d/variado/top-upgrade-filament-holder-anet-a6-left
bearings / bearings:
http://amzn.eu/d2huwx9
cults
free

Star Wars Snowspeeder Upgrade
... barrels with ones that fire missiles.
more info at http://dragonmountaindesign.com/2015/11/16/star-wars-snowspeeder-upgraded/
cults
free

How to upgrade your Asus Xtion into a beautiful 3D scanner
...anner
cults
how to upgrade your asus xtion into a beautiful 3d scanner
how to upgrade your asus xtion into a beautiful 3d scanner
cults
free

Top upgrade Filament Holder Anet A6 Left
...-right
filament spool holder:
https://www.thingiverse.com/thing:2070272
bearings / bearings:
http://amzn.eu/d2huwx9
Carbon
cults
free
Multi-body Carbon Fiber Reinforced Gear
...multi-body carbon fiber reinforced gear
cults
multi-body carbon fiber reinforced gear
multi-body carbon fiber reinforced gear
cults
$20

Carbon Arc Searchlight
...t to us. please remember to upload your prints, and leave comments, or message us on twitter @collectorcnc
www.collectorcnc.com
cults
free

Space-filling molecular models: Carbon expansion set
...ink it looks better. perhaps this shouldn't be the first criterion to be considered, but it shouldn't be the last either.
cults
free

Motor mount
...motor mount cults motor mount for 14 mm carbon ...
cults
$10

NANOTUBE
...nanotube cults education jewerly representation of a carbon nanotube. the nanotube could be used as an original...
cults
free

QRH
...un pack est disponible contenant : 2 x bras carbon 4mm 1 x platine centrale carbone 2mm 11x insert...
cults
$5

TTV100 camera support for quadri
...ttv100 camera support to install on the quadri platform carbon tube diameter...
cults
free

NON LETHAL DARTS ( AIRGUN CROSSBOW)
...i designed...enjoy use 8 mm od 6 mm id carbon ...
cults
free

Multi-Color Caffeine Molecule Model
...multi-color caffeine molecule model cults caffeine carbon chemistry hydrogen molecule mosaic multicolor nitrogen oxygen palette+ science...
cults
free

T1000 SLING BOW (Toy)
...the limbs and the stabilizers have been reinforced with carbon rods, the bearing is replaced with carbon tube and...
0
cults
free

SquareMix 0
...3dmodel mathematics jewellry 3dp 3dpendant mix
pendant with unique design.
ready for 3d printing.
for a perfect gift !
enjoy! :)
cults
free

Test piece for the functional game (0 / 0.05 / 0.1 / 0.2 / 0.3 / 0.4 / 0.5)
...ticipate the shrinkage or widening of your hole, and to test the functional play suitable for your design requiring intertwining.
cults
free

A piranha Fish | you all must have need this one :0
...eir classification as omnivorous.
in venezuela, they are called caribes. they are known for their sharp teeth and powerful jaws.
cults
free

Support
...support cults gadget ergonomic smartphone support useful 0 ...
cults
free

Binary Numbers, Base Two System, Place Values
...the number piece has "1" on the front and "0quot; on the back. i have designed the numbers for...
cults
free

Zero Model, Negative & Positive Numbers
...into the small box on each side (at about 80 completion when printing). the magnets will then be fully...
cults
free

Coin punch
...coin punch cults figure multi-use coin punch from 0 to 9 height 4cm. writing style: comic without ms...
cults
free

Stamps stamps number _ Number plasticine stamps
...these stamps to print in 3d: all numbers from 0 to 9 as well as mathematical signs + -...
cults
free

10-sided die, d10, decahedral
... are numbered from 0 to 9. the opposite faces are always 9. the zero can be 0 or 10 depending on your choice.
dice size: 4,4 cm.
cults
free

Rotor Riot Coaster
...layer = 3 shell = 3 top layer = 0* ...
Arduino
cults
free

Arduino numeric keypad
...d
cults
keyboard keypad arduino arduino nano
j'ai réalisé ce boitier pour y intégrer un clavier numérique et un arduino nano.
cults
free

Arduino Insect
...w to make and program a arduino insect at: http://www.instructables.com/id/build-your-own-insect-robot-using-arduino-and-serv/
cults
free

Arduino Uno case
...arduino uno case
cults
arduino uno case easy open close light
http://horizonlab.co/2017/08/14/arduino-uno-case/
cults
free

Arduino and Mini Breadboard Caddy
...arduino and mini breadboard caddy
cults
arduino and mini breadboard caddy
arduino and mini breadboard caddy
cults
free

Arduino and NodeMCU box with screen
...arduino and nodemcu box with screen
cults
arduino and nodemcu box with screen
arduino and nodemcu box with screen
cults
free

Bumper for Arduino Uno Clone
...bumper for arduino uno clone
cults
bumper for arduino uno clone
bumper for arduino uno clone
cults
$1

Arduino distance sensor support
... suport sensor distance
arduino distance sensor support 3d print 3d print model
an printable arduino support for distance sensor
cults
free

Arduino Mounting Plate
...it: https://www.adafruit.com/product/275
this mount can be laser cut out of wood or acrylic. in addition, it can be 3d printed.
cults
free

MakerTron Arduino Smart Flight Suit
...makertron arduino smart flight suit
cults
makertron arduino smart flight suit
makertron arduino smart flight suit
cults
free

Arduino Attiny Arcade
...
tutorial
http://circuitomaker.com/attiny-arcade/
facebook
https://www.facebook.com/circuitomaker
https://youtu.be/gq5kqd6f1fs
Gopro
cults
$1

Yodix For Gopro
...yodix for gopro
cults
yodix for gopro
yodix for gopro
cults
free

Gopro extension
...gopro extension
cults
gopro extension
gopro extension
cults
$1

Gopro fastener
...gopro fastener
cults
gopro attached
attached to the original ribs
cults
$1

GoPro Stabilizer Hand
...gopro stabilizer hand
cults
gopro stabilizer hand
gopro stabilizer hand
cults
free

Floating mount for Gopro
...floating mount for gopro
cults
floating mount for gopro
floating mount for gopro
cults
free

Gopro Handle Multi
...gopro handle multi
cults
gopro handle multi
gopro handle multi
cults
free

Gopro Group Spike
...gopro group spike
cults
gopro group spike
gopro group spike
cults
free

GoPro bike mount
...gopro bike mount
cults
gopro bike mount
gopro bike mount
cults
free

The connector of GoPro with a cap
...the connector of gopro with a cap
cults
the connector of gopro with a cap
the connector of gopro with a cap
cults
free

The connector of GoPro on a bag
...the connector of gopro on a bag
cults
the connector of gopro on a bag
the connector of gopro on a bag
Electric
cults
free

turbocharger with electric motor
...turbocharger with electric motor
cults
turbocharger with electric motor
turbocharger with electric motor
cults
free

Electrical Connection Box
...electrical connection box
cults
electrical connection box
electrical connection box
cults
$5

Propeller Electric motor
...propeller electric motor
cults
propeller engine electric
propeller electric motor ø130 / ø14 / 22mm
cults
$5

Propeller Electric motor
...propeller electric motor
cults
propeller engine electric
propeller electric motor ø130 / ø14 / 32mm
cults
$1

Electric guitar with base
...ric guitar with base
cults
guitar electrical
electric guitar with rock and pop legend, can be used as an ornament or paperweight.
cults
$1

Electric motor mount
...electric motor mount
cults
avionrc rc batis engine electric 380-400
type 380-400 electric aircraft engine mount
cults
$1

electric toothbrush holder
...electric toothbrush holder
cults
brush at teeth
support for 2 electric toothbrushes and associated tips
cults
free

GELFEED glue electric feeder
...gelfeed glue electric feeder
cults
gelfeed glue electric feeder
gelfeed glue electric feeder
cults
$2

Electrical protection on Anet8
...electrical protection on anet8
cults
for 3d printer anet8
electrical protection consisting of a sheath and support switch
cults
$1

Electrical conductivity support
...cults
material conductivity support
small support that allows to make tests of electrical conductivity of a material for example.
Electronics
cults
free

R2D2 - Non Electronic Version
...r2d2 - non electronic version
cults
r2d2 - non electronic version
r2d2 - non electronic version
cults
free

Electronic cigarette holder
...rette electronic
support of the cigarette during its reloading with passage of the usb wire clipper on glass table of 10 mm thick
cults
$33

Electronic Tree 2016 with solar Energy
...ure. have one in your lab or your own home. this is what you waiting for.
this have a powerbank module and ilumination 24 hours.
cults
free

Electronic sound grenade
... to be proscribed in buildings. it is to solve this problem that i propose that the.
. to solve this problem i propose that one.
cults
free

Electron - Command Module for Proton & Neutron
...opensource proton the electron is a housing for the electronics extruder motor, and filament of the neutron and proton,...
cults
free

Tablet for Piano (Electronic Keyboard)
...e of the piano (metronome, cd player, ipad, ...).
the tablet is composed of 2 printed parts and a tube (curtain rod) of d20.
cults
free

Electronic thermostat knob
...eserved part.
everything works perfectly well.
tip this file served me to create a knurled button for the schoolboy soap holder.
cults
free

Flux Capacitor with LEDs
...with leds. this is meant to be a fun printing/electronics project and not meant to be a hyper-realistic prop....
cults
free

Roland drum stick holder
...roland drum stick holder
cults
accessories drums
support for tube (ø38) roland electronic drum rack
cults
free

Fan 40 x 40 mount
...fan fan_mount holder fan 40 x 40 mount for electronics board...
Banggood
cults
free

Drillpro center drill countersink set compartment
...buy something. this helps me doing more things. thanks! banggood https://goo.gl/zxgx3a gearbest: https://goo.gl/ffe59f aliexpress:...
cults
free

THERMOS JDC-350/351 Lid Hanger
...[magnet 6mm 3mm] at your familiar e-commerce sites. (amazon, banggood aliexpress, etc.)...
cults
free

Minimal Card Holder
...[magnet 6mm 3mm] at your familiar e-commerce sites. (amazon, banggood aliexpress, etc.)...
cults
free

Swivel Case 1 Remix
...[magnet 6mm 3mm] at your familiar e-commerce sites. (amazon, banggood aliexpress, etc.)...
cults
free

80's van body for the Ursa monster truck
...screws and super glue or hot glue: https://www.banggood.com/suleve-m3ash1-10pcs-m3-hex-socket-cap-head-screws-alloy-steel-titanium-plated-12_9-grade-p-1216271.html?p=hd240528697332015103 https://www.banggood.com/20g-401-instant-adhesive-rapid-stronger-super-glue-for-diy-crafts-jewelry-p-1199164.html?p=hd240528697332015103 https://www.banggoodcom/20w-electric-hot-melt-glue-gun-sticks-trigger-with-50-glue-sticks-p-961296.html?p=hd240528697332015103 ...
cults
free

2020 Side Mount for 0.28 inch Mini Digital Voltmeter Voltage Tester Meter
...buy something. this helps me doing more things. thanks! banggood https://goo.gl/zxgx3a gearbest: https://goo.gl/ffe59f aliexpress:...
cults
free

21mm Lens Cap (for H9 Ultra HD 4K Action Camera)
...buy something. this helps me doing more things. thanks! banggood https://goo.gl/zxgx3a gearbest: https://goo.gl/ffe59f aliexpress:...
cults
free

Anet AM8 Top Corner Bracket 2040
...buy something. this helps me doing more things. thanks! banggood https://goo.gl/zxgx3a gearbest: https://goo.gl/ffe59f aliexpress:...
cults
free

Mini Quadcopter fpv Racer 120mm micro FC lumenier racing F4 Brushless 1103 10.000kv 2S
...in camera a simple 600tvl 110 ° from banggood: http://www.banggoodcom/600tvl-1_8mm-14-cmos-120-degree-wide-angle-lens-fpv-camera-palntsc-3_7-5v-p-1092333.html?rmmds=search?p=ld020411878172015024 2 x m1.6 screws of 16 mm for the...
cults
free

Customizable Comb
...buy something. this helps me doing more things. thanks! banggood https://goo.gl/zxgx3a gearbest: https://goo.gl/ffe59f aliexpress:...
Slide
cults
free

Mouse Slide
...animal pet
here is my new stl file. a cute slide for mice. use it to play with your favorite animal to train and entertain them!
cults
$2

Sliding door cupboard
...sliding door cupboard
cults
sliding door roulette
replacement sliding closet caster 40mm diameter
cults
free
SLIDE | Smartphone Slider
...hone across your desk.
the attached stl carriage is the original slide file for the iphone 5
video: http://youtu.be/cu2ifrre4uu
cults
free

Mag-Lifter (Slide-Fit Model)
...mag-lifter (slide-fit model)
cults
mag-lifter (slide-fit model)
mag-lifter (slide-fit model)
cults
$2

Sliding patio door latch window
...pair
latch for closing sliding bay repair
qm3d
customized parts on www.qm3d.fr.nf
qm3dcontact@gmail.com
06 33 41 81 60
cults
$1

sliding door closet speed reducer
...sliding door closet speed reducer
cults
sliding door closet speed reducer
cults
free

Linear Slide for 8020
...use really well.
it has two 1/4" screw holes to attach to a perpendicular extrusion or directly to a camera tripod mount.
cults
$1

sliding cupboard door
...sliding cupboard door
cults
piece replacement
piece allowing now a panel in the rail at the top. piece for left door
cults
free

sliding door handle
...jigsaw.
the plastron protrudes widely to hide splinters due to cuts.
inexpensive these handles are functional and a sober design.
cults
free

Photo copier slides negative super 8
...photo copier slides negative super 8
cults
photo copier negative slide super 8
uses the macro mode of the camera
Pro
cults
free

Surface Pro Adapter Case
...surface pro adapter case
cults
surface pro adapter case
surface pro adapter case
cults
free

Mac pro side lamp #LightItUp
...mac pro side lamp #lightitup
cults
mac pro side lamp lightitup
mac pro side lamp #lightitup
cults
free

Bottle cap mount for Go Pro
...bottle cap mount for go pro
cults
bottle cap mount for go pro
cults
free

Rallonge Flashforge Pro
...rallonge flashforge pro
cults
rallonge de support bobine pour 2.3kg
cults
free

support go pro storex xtrem
...support go pro storex xtrem
cults
camera
support for go pro storex xtrem
cults
$105
Go Pro Mount & Rig
...go pro mount & rig
cults
go pro hero 5 360 mount rig stereo
go pro hero 5
mount for 360 degree
stereo rig
cults
free

Mac pro G5 DVD drive enclosure
...mac pro g5 dvd drive enclosure
cults
g5 mac drive dvd pro enclosure
mac pro g5 dvd drive enclosure
cults
free

Motor Protection ImmersionRC Vortex Pro
...or protection immersionrc vortex pro
cults
easypeasy motor protection for immersionrc vortex pro. works perfect with ninjaflex.
cults
free

The geometric stand for MacBook Pro Retina
...p and your back will say thank you!
.
.
info:
"the geometric stand" is designed for macbook pro retina 15 ".
cults
$2

Trimmer pro brand unknown
...is not more info (customer request .....)
qm3d
customized parts on www.qm3d.fr.nf
qm3dcontact@gmail.com
06 33 41 81 60
Interesting
cults
free

soap dish
...soap dish cults soap carry object house domesticated useful interesting small, convenient for hanging soap and small holes to...
cults
free

3D Printer Cabinet
...a few months ago, this way of doing is interesting because it makes it possible to make a custom-made...
cults
free

Furniture for 3D printer and are material
...a few months ago, this way of doing is interesting because it allows us to make a tailor-made piece...
cults
free

Tea Light Dispenser
...home decor home design brahmabeej 3d print organic and interesting tea light dispenser. print with abs and enjoy different...
cults
free

Pinion
...pinion cults pinion gears slide it is an interesting model for those looking to make a good impression....
cults
free

tutute racing circuit
...cuit
cults
tutute bolide circuit car child toy
small part circuit tutute racing car.
i will do another part if it interests me.
cults
free

wall-mounted
...art wall luminaire voronoi wall light the format becomes interesting from 170 cm high ability to add a color...
cults
$3

Pendant
...silk pla, or color it. follow brahmabeej for more interesting 3d prints and designs. for more interesting 3d printable...
cults
$2

Cup holder - ripples
...ripple pattern is fun to watch. it is also interesting to hold it in your hand and rotate a...
cults
free

Mobile Phone Stand
...home with an organic twist. follow brahmabeej for more interesting 3d prints and designs. for more interesting 3d printable...
Youtuber
cults
free

Youtube Logo
...pport
youtube logo with a support foot
to donate me if you like my content or support me !!!
https://www.paypal.me/valsant
cults
free

youtube diamond button
...mon play button
youtube diamond button
to donate me if you like my content or support me !!!
https://www.paypal.me/valsant
cults
free

Youtube button
...ww.thingiverse.com/3dpureprint/designs
to donate me if you like my content or support me !!!
https://www.paypal.me/valsant
cults
free

Youtube Plaque
...ueme:
youtube: https://www.youtube.com/c/dukedoks
instagram: @dukedoks
facebook: @doksmotion
twitter: @dukedoks
web:
www.doks.es
cults
free
Remote for PC Youtube and netflix
... instructable.
video: https://youtu.be/cfqnek6cic4
tutorial: https://www.instructables.com/id/remote-for-pc-youtube-and-netflix
cults
free

Planter_MK_6
...bsite www.brahmabeej.com for more designs.
visit our youtube channel for print setting video and 3d printing tips and timelapse.
cults
free

Support de Smartphone pour jouer aux échecs
...th the application lichess which has a pendulum mode in landscape mode.
of course, you can also use it to watch videos on youtube
cults
free

3D DRAWING BOB SPONGE
...be channel 3dlito
https://www.youtube.com/watch?v=t1ag0clrtne
to see other models of 3d drawing visit my youtube channel 3dlito
cults
free

LFS – MASK
...n mask
3d printed mask made with a 3d scan of my face !
the making of is on youtube: https://www.youtube.com/watch?v=kpmk5i3x7k4
cults
free

3D YODA DRAWING (STAR WARS)
...ube channel 3dlito
https://www.youtube.com/watch?v=t1ag0clrtne
to see other models of 3d drawing visit my youtube channel 3dlito
Youtube
cults
free
Youtube Logo
...pport
youtube logo with a support foot
to donate me if you like my content or support me !!!
https://www.paypal.me/valsant
cults
free
youtube diamond button
...mon play button
youtube diamond button
to donate me if you like my content or support me !!!
https://www.paypal.me/valsant
cults
free
Youtube button
...ww.thingiverse.com/3dpureprint/designs
to donate me if you like my content or support me !!!
https://www.paypal.me/valsant
cults
free
Youtube Plaque
...ueme:
youtube: https://www.youtube.com/c/dukedoks
instagram: @dukedoks
facebook: @doksmotion
twitter: @dukedoks
web:
www.doks.es
cults
free
Remote for PC Youtube and netflix
... instructable.
video: https://youtu.be/cfqnek6cic4
tutorial: https://www.instructables.com/id/remote-for-pc-youtube-and-netflix
cults
free
Planter_MK_6
...this planter and other 3d printable models, visit our youtube page. the design tutorial of this planter can be...
cults
free
Support de Smartphone pour jouer aux échecs
...jouer aux échecs cults chess pendulum clock smartphone support youtube this smartphone holder to be designed specifically if you...
cults
free
3D DRAWING BOB SPONGE
...to see other models of 3d drawing visit my youtube channel 3dlito https://www.youtube.com/watch?v=t1ag0clrtne to see other models of 3d...
cults
free
LFS – MASK
...my face ! the making of is on youtube: https://www.youtubecom/watch?v=kpmk5i3x7k4 ...
cults
free
3D YODA DRAWING (STAR WARS)
...to see other models of 3d drawing visit my youtube channel 3dlito https://www.youtube.com/watch?v=t1ag0clrtne to see other models of 3d...
Camera
cults
free

Camera _ Camera
...camera _ camera
cults
camera
imitation of a camera
cults
free

camera keychain
...camera keychain
cults
polaroid camera
camera keychain
cults
free

camera mount
...l standard stative.
m6 bolt needed for screwing
it seems to be working fine im using it to attach a lamp to my camera stative.
cults
free
Camera slider
...ra dolly slider video mount gear linear
assembly, printing list and components on: http://horizonlab.co/2017/07/28/camera-slider/
cults
free

CAMERA SUPPORT
...era support
cults
aeromodelling
camera support for model aircraft maginon
allows to fix the camera without the waterproof case.
cults
free

Camera housing for 36 mm mini FPV cameras.
...a housing for 36 mm mini fpv cameras.
cults
camera housing for 36 mm mini fpv cameras.
camera housing for 36 mm mini fpv cameras.
cults
free

Camera key holder _ Camera Keychain
...which is not the case for the model photographed).
keychain based on canon a1 camera.
print with support for a better quality.
cults
free
Simple Camera Slider
...simple camera slider
cults
simple camera slider
simple camera slider
cults
free

Instagram camera icon
...instagram camera icon
cults
instagram camera icon
instagram camera icon
cults
free

Camera LED Ring
...camera led ring
cults
camera led ring
camera led ring
Diy
cults
$2

DIY wall shelf
...diy wall shelf
cults
diy wall shelf
diy wall shelf
cults
free

DIY Reaction Button
...diy reaction button
cults
diy reaction button
diy reaction button
cults
free
DIY Camera Slider
...diy camera slider
cults
diy camera slider
diy camera slider
cults
free

DIY Cellphone Body
...diy cellphone body
cults
diy cellphone body
diy cellphone body
cults
free

DIY Toy the Joenny
...diy toy the joenny
cults
diy toy the joenny
diy toy the joenny
cults
free

DIY Toy the Joennymal
...diy toy the joennymal
cults
diy toy the joennymal
diy toy the joennymal
cults
free

DIY Sand casting kit
...diy sand casting kit
cults
diy sand casting kit
diy sand casting kit
cults
free

Ventilateur à main DIY
...ventilateur à main diy
cults
ventilateur à main diy
ventilateur à main diy
cults
free

DIY Airtight Spool Holder
...diy airtight spool holder
cults
diy airtight spool holder
diy airtight spool holder
cults
free

DIY Auto Plant Waterer
...diy auto plant waterer
cults
diy auto plant waterer
diy auto plant waterer
Accessory
cults
$2

Accessories of Ryunosuke
...accessories of ryunosuke
cults
accessories of ryunosuke idolish7
accessories of ryunosuke game: idolish7.
cults
free

Bathroom accessory
...bathroom accessory
cults
cup toothbrush soap dish bathroom sdb accessory
3 sdb accessory - cup - toothbrush holder - soap dish.
cults
$1
Accessory for cell phone
...accessory for cell phone
cults
accessory cell phone home charger cable
accessory so that the cell phone cable is not loose
cults
$3
Mason Jar Accessories
... home use. they are compatible with the united states version of the mason jar and they all work with the metal sealing insert.
cults
free

Kuromi accessories (Necklace, Earrings, Ring)
...sories (necklace, earrings, ring)
cults
kuromi accessories (necklace earrings ring)
kuromi accessories (necklace, earrings, ring)
cults
free

Rotating flower Accessories (ring, necklace)
...ing flower accessories (ring, necklace)
cults
rotating flower accessories (ring, necklace)
fb:https://www.facebook.com/3dppark/
cults
$6

Brush module c is accessory N ° 1
...dule c is accessory n ° 1
cults
module iron solder accessory screwdriver pliers brush modelisme
brush module c is accessory n ° 1
cults
$6
Module for screwdriver and c is accessory N ° 3
...ssory n ° 3
cults
module iron solder accessory screwdriver pliers brush modelisme
module for screwdriver and c is accessory n ° 3
cults
free

SmallToys - Freight Accessories
... compatible with most 3d printers.
instructions, videos and vehicle composition: www.wabbysland.com/3d-print-play/smalltoys/
cults
free

Wago modular accessory / Wago modular accessory
...n electrical panel.
thickness of layer 0.3
shell thickness 0.6
fill rate 25
print temperature 220c °
media type none
Accessories
cults
$2
Accessories of Ryunosuke
...accessories of ryunosuke
cults
accessories of ryunosuke idolish7
accessories of ryunosuke game: idolish7.
cults
free
Bathroom accessory
...bathroom accessory
cults
cup toothbrush soap dish bathroom sdb accessory
3 sdb accessory - cup - toothbrush holder - soap dish.
cults
$1
Accessory for cell phone
...accessory for cell phone
cults
accessory cell phone home charger cable
accessory so that the cell phone cable is not loose
cults
$3
Mason Jar Accessories
... home use. they are compatible with the united states version of the mason jar and they all work with the metal sealing insert.
cults
free
Kuromi accessories (Necklace, Earrings, Ring)
...sories (necklace, earrings, ring)
cults
kuromi accessories (necklace earrings ring)
kuromi accessories (necklace, earrings, ring)
cults
free
Rotating flower Accessories (ring, necklace)
...ing flower accessories (ring, necklace)
cults
rotating flower accessories (ring, necklace)
fb:https://www.facebook.com/3dppark/
cults
$6
Brush module c is accessory N ° 1
...dule c is accessory n ° 1
cults
module iron solder accessory screwdriver pliers brush modelisme
brush module c is accessory n ° 1
cults
$6
Module for screwdriver and c is accessory N ° 3
...ssory n ° 3
cults
module iron solder accessory screwdriver pliers brush modelisme
module for screwdriver and c is accessory n ° 3
cults
free
SmallToys - Freight Accessories
... compatible with most 3d printers.
instructions, videos and vehicle composition: www.wabbysland.com/3d-print-play/smalltoys/
cults
free
Wago modular accessory / Wago modular accessory
...n electrical panel.
thickness of layer 0.3
shell thickness 0.6
fill rate 25
print temperature 220c °
media type none
Photo
cults
free

Photo frame
...photo frame
cults
frame photo
photo frame
cults
$1

PHOTO DOOR
...photo door
cults
small photo door
cults
$1

photo support
...photo support
cults
picture
support for photo design i love you
cults
free

Photo frame
...ut 18 cm high the easel is adjustable thanks to an impression of a single block.
to highlight photos or postcards for your decor.
cults
free

Floating photo frame
...floating photo frame
cults
floating photo frame
floating photo frame
cults
free

Photo holder
...pport pour photo de 150*100 mm avec rangement pour bijoux en forme de cœur
-idéal pour offrir-
cults
free

@ Arob @ @ door @ photo!
...door @ photo!
cults
photo door at @ photo
nice little model of @ rob @ se to make a photo holder!
stable with its adapted base!
cults
free

4 Photo Rotating Frame (5x7 photos)
...i used (8) m4x20 screws and nuts & and 1 standard abec 7 bearing (typical in your fidget spinners and skateboard wheels).
cults
free
Digital Photo Frame
...digital photo frame
cults
decor digital_photo_frame frame photo photography photo_frame
approximate project cost:
cults
$5

Photo frame Nymphéalie
... by bonding without the clear glass anti-reflection of the frame obviously that you will have to find to the cut to a specialist.
Tool
cults
free

Tool
...tool
cults
tool
the tool group logo in 3d.
cults
free

Tool Stand for all kinds of tools
...tool stand for all kinds of tools
cults
tool stand for all kinds of tools
tool stand for all kinds of tools
cults
free

Support Tools
...support tools
cults
support tool
support tools (realize for anycubic tools)
cults
free

Tool Organizer
...tool organizer
cults
tool organizer
tool organizer
cults
free

Poly tool
...rtable,multi-tool and battery powered 3dprinter.
newsletter >>> https://www.poly3dp.com/newsletter-signup/
cults
free

Toy Tools
...toy tools
cults
hammer screwdriver pliers toy
toy tools: hammer, screwdriver, pliers.
cults
free

Desktop Gardening Tools
...desktop gardening tools
cults
desktop gardening tools
desktop gardening tools
cults
free

Swappable Butterfly Tools
...swappable butterfly tools
cults
swappable butterfly tools
swappable butterfly tools
cults
free

Atom2 Tool Holder
...atom2 tool holder
cults
atom2 tool holder
atom2 tool holder
cults
free

Kiwi Tool
...s
simple tool used to clean kiwis.
!don't forget to check out my other designs and follow my daily kookoo uploads, enjoy ;)
Tools
cults
free
Tool
...tool
cults
tool
the tool group logo in 3d.
cults
free
Tool Stand for all kinds of tools
...tool stand for all kinds of tools
cults
tool stand for all kinds of tools
tool stand for all kinds of tools
cults
free
Support Tools
...support tools
cults
support tool
support tools (realize for anycubic tools)
cults
free
Tool Organizer
...tool organizer
cults
tool organizer
tool organizer
cults
free
Poly tool
...rtable,multi-tool and battery powered 3dprinter.
newsletter >>> https://www.poly3dp.com/newsletter-signup/
cults
free
Toy Tools
...toy tools
cults
hammer screwdriver pliers toy
toy tools: hammer, screwdriver, pliers.
cults
free
Desktop Gardening Tools
...desktop gardening tools
cults
desktop gardening tools
desktop gardening tools
cults
free
Swappable Butterfly Tools
...swappable butterfly tools
cults
swappable butterfly tools
swappable butterfly tools
cults
free
Atom2 Tool Holder
...atom2 tool holder
cults
atom2 tool holder
atom2 tool holder
cults
free
Kiwi Tool
...s
simple tool used to clean kiwis.
!don't forget to check out my other designs and follow my daily kookoo uploads, enjoy ;)
Good
cults
$18

The Good
...ause the person stands alone)
size: the stl files to 80% = figurine 16,5 cm high this is the size of the figurines in the photos
cults
$10

The Good | Chest
... the good, the bad and the ugly. it is a 3d model for 3d printing. download this 3d file and make it with your 3d printer. enjoy!
cults
free

Good Enough Calipers
...good enough calipers
cults
good enough calipers
good enough calipers
cults
free

Arlo (The good dinosaur)
... disney good dinosaur stl kid kids tv show cartoon obj toy toys
arlo from the good dinosuar movie.
the mesh it's not perfect.
cults
free

girl good year
...girl good year
cults
girl good year sexy
sexy girl
cults
$2

The Phantom Ring - Good
...the phantom ring - good
cults
phantom superhero comic ring
modeled on the original phantom ring - the mark of good.
cults
free

Butterfly knife very good for tricks
...butterfly knife very good for tricks
cults
knife
i wanted a knife
cults
$1

SmallToys - Goods Train
...s (maximum length of parts: 5.9cm)
instructions, videos and vehicle composition: www.wabbysland.com/3d-print-play/smalltoys/
cults
free

scorpion ashtray
...everyone can do it without being a pro. but good for what you lazy there is the plan ^^...
cults
free

Towel holder
...small and convenient to hang a towel after a good ...
Mount
cults
free

Dovetail Mount
...dovetail mount
cults
dovetail mount
dovetail mount
cults
free

Poster Mount
...poster mount
cults
poster mount
good to mount posters on a wall, sturdy easy to print design without support.
cults
free
Motor mount
...motor mount
cults
motor mount for 14 mm carbon tube.
cults
free
Floating mount for Gopro
...floating mount for gopro
cults
floating mount for gopro
floating mount for gopro
cults
free
GoPro bike mount
...gopro bike mount
cults
gopro bike mount
gopro bike mount
cults
free

E3D Mounting for K8200
...e3d mounting for k8200
cults
e3d mounting for k8200
e3d mounting for k8200
cults
free

40mm fan mount
...40mm fan mount
cults
40mm fan mount
40mm fan mount
cults
free

endstop switch mount
...endstop switch mount
cults
endstop switch mount
endstop switch mount
cults
free

TileApp Seat Mount
...tileapp seat mount
cults
tileapp seat mount
tileapp seat mount
cults
free

Ukulele Wall Mount
...ukulele wall mount
cults
ukulele wall mount
ukulele wall mount
Video
cults
free

VIDEO PROTECTOR SUPPORT
...t configurable mount parametric projector projector mount
support for video projector under beam.
adjustable through the slicer.
cults
free

Video Stabilizer
...rks with sports cameras such as go-pro, eken, h9 ultra hd 4k, h2 4k ultra hd, being cost of the final product is very affordable.
cults
free

3D Printed Wearable Video Goggles
...3d printed wearable video goggles
cults
3d printed wearable video goggles
3d printed wearable video goggles
cults
$1

Video B4 Lens port cap
...video b4 lens port cap
cults
lens cap video port b4 digibeta
several versions included, with or without 'b4' text.
cults
free

DIY Video Glasses for Raspberry Pi
...pi for on-the-go linuxâing.
check ou the full tutorial: https://learn.adafruit.com/diy-wearable-pi-near-eye-kopin-video-glasses
cults
free

eTurbine TB250 support for video transmitter TS-351
...r ts-351
cults
here are a support for video transmitter ref: ts-351
the fixing is achieved by the screws existing on the frame
cults
free

Video Game/Anime Themed Wallets
...vorite video game and anime series. i also uploaded the scad file for the blank wallet so you can customize it any way you like.
cults
free

Cut/Copy We Are Explorers - 3D Printed Video
...lorers”. then, use the 3d files to print, shoot and reshape the narrative any way you want. this is an open call for exploration.
cults
free

Video Game Planter Collection
...inting stuff, matterhackers, filaments.directory, dattas moonchaser, midnightgiant, andrew howat, didier klein and david kessler!
cults
$1
Cheese handle for DSLR video rig
... longer plug includes a cold shoe mount and a 15mm rod mount with a place for nut and bolt (m6 or 1/4") for locking the rod.
Printing
cults
$1

Domoidalite print
...the geometry than my humble machine could print out. it's still fun to look at the details inside with a flashlight though :p
cults
free

3D Printed Stool
...3d printed stool
cults
3d printed stool
3d printed stool
cults
free

Bow easy to print
...bow easy to print
cults
bow easy to print
bow easy to print
cults
free

3D Printed Clock
...3d printed clock
cults
3d printed clock
3d printed clock
cults
free

Printed Google Cardboard
...printed google cardboard
cults
printed google cardboard
printed google cardboard
cults
free

Cat 3D printed
...cat 3d printed
cults
animals cat toy
cat 3d printed
cults
$1

Matryoshka (print-in-place)
...matryoshka (print-in-place)
cults
the very first matryoshka print-in-place model!!, no needed to separate parts.
enjoy!
cults
$1

halloween 3d model for printing
...model for printing
cults
halloween 3d printing printing 3d design funny party subdivision lowpoly
halloween 3d model for printing
cults
free

3D Printed Light Bulb
...3d printed light bulb
cults
3d printed light bulb
3d printed light bulb
cults
free

3D Printed Unicorn Horn
...3d printed unicorn horn
cults
3d printed unicorn horn
3d printed unicorn horn