Thingiverse
EL Wire Angel Fish Neon Christmas Ornament by swirlingbrain
by Thingiverse
Last crawled date: 3 years ago
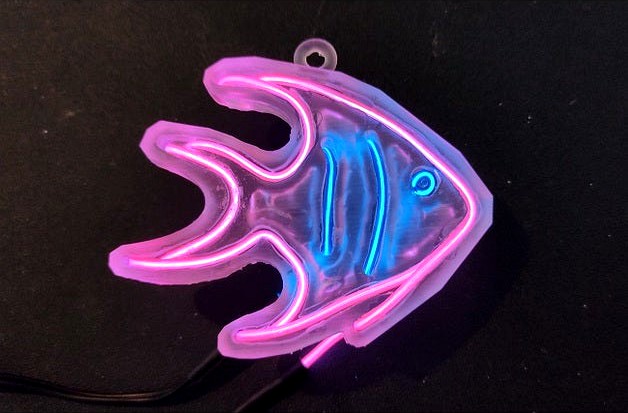
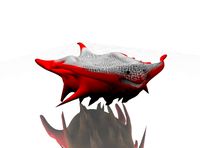
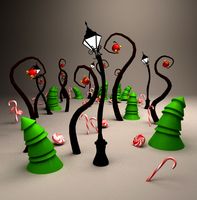
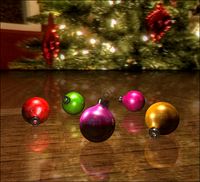
I saw a Neon Angel Fish and thought it would be cool to sort of reproduce it with electroluminescent wire and make a lighted Christmas Ornament. I add a different odd fish Christmas ornament on my Christmas Tree every year, so this would be my Christmas Ornament for this coming year. It looks a lot like Neon when lit up!
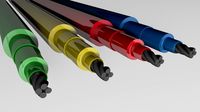
EL Wire can be bought on Ebay or AliExpress. EL Wire is about $3 a wire (1m) and about $5 for the driver. To have more than one color easily, a Y-splitter is also needed for about $4 or if you are really good, you can strip, solder, and heatshrink two color wires together. I tried it but the tiny corona wire breaks off really easily so I wouldn't recommend it but some people are able to do it. So 2 color wires, a splitter, and a driver is about $15 total (give or take). I got the USB end so I drive it from a USB charger but a AA battery pack driver can be found also. If you scour ebay and don't mind waiting a month for the delivery you might find the parts cheaper on Ebay or even AliExpress.
So I printed the fish and with my resin printer I hollowed the inside. I used clear resin. I added the wire and used a bit of super glue to glue the wire into the channel. My idea was to view the EL wire thru the clear resin printed part but then quickly realized the EL wire is viewed better from the exposed side. I then realized it would be good to drill some holes so I could string the wire thru it. I mean, I didn't need the holes before when wanting to view it thru the other side but viewing from the exposed side the holes makes sense for string the wire so added the holes. So in the resin printer software, hollow and punch drain holes form the solid side not the channel side so that the channel side (viewing side) looks nice.
So starting from the bottom whisker, the pink wire should go around the boarder, in and out of the tail holes and then tucked under the whisker. The blue wire should start at the back bottom zebra strip, then over to the next and finally to the eye and just wound and glued. The wire should be super glued about every inch or two just to hold it in place. The end of the wire that is cut off should be tucked under or else covered with e6000 glue or something like that to prevent shocks. The wires should be connected to the splitter and then the splitter connected to the driver circuit.
WARNING: The driver puts out high voltage (300v?) but with low amperage so you'd likely feel a shock but probably not die since the low amperage. But, I wouldn't try it to find out and possibly die! So be careful with the high voltage! Certainly don't lick on it!
Anyway, I accidentally bent the black part of the pink wire and broke the connection so it stopped working. ugg. So be careful with the connector wires. The EL wire can be bent a lot so it's not as much a problem as the black connection to the EL wire. I wish I would have know that. So I've reprinted the fish with stringing holes.
The EL wire that loops around on the back, you may wish to get some black enamel paint and paint over the EL wire to hide the light from shining through.
Anyway, if you don't want to make it a Christmas Ornament, you could also make a desk stand by adding a pedestool in Tinkercad or some such.
Other projects with this: I thought it might also be neato to make other designs such as a pineapple or a small restaurant open sign or other iconic neon name like CocaCola or something. With an Arduino and an EL Escudo Dos Shield board, some animated EL Wire (animated Neon looking) designs could be created or even a Nixie type clock thing (but it would be expensive since you'd need a few driver boards for that).
Similar models
thingiverse
free

Icicle Ornaments by 3dMadness
... a string so and wrapped around you christmas tree. you can also just stick the branch through the hole if you would prefer that.
thingiverse
free

Xmas Tree Ornament by christinachun
...and a blank version as well as a version with a hole to tie a string to if you don't feel like drilling a hole with a dremel.
thingiverse
free

Meeple Christmas Ornament by dmantech
... 1.75" tall. it has a hole in the side of the head so you can thread a piece of twine or wire through it to act as a hanger.
thingiverse
free

Avengers Christmas Tree Ornaments by TestaDiRapa
... me for some avengers-themed ornaments to put on the christmas tree. she liked them so i thought some of you would like them too!
thingiverse
free

Peacocks Ornament aka Peacecocks
...07ycs2mk3
the photos do not really do justice to the beauty of this model. it is really quite stunning. enjoy! merry christmas
thingiverse
free

Low-Poly Christmas Ornament
... type of string through the loop. the model can be scaled down aslong as the loop for the string stays sturdy.
made in tinkercad.
thingiverse
free

square pixel holder - pvc by stingray124
...rse
i printed some body else's and the wire would not fit thru .
so i modified it and not the square pixels slip right in .
thingiverse
free

Dachshund Christmas tree ornament
...i put some fishing line through the loop so a hook could be attached.
i did print at 140% which seems to be about a perfect size.
thingiverse
free

Elmo Ornament - Christmas Tree Ornament
...as tree ornament!
there are two connected holes on the top in which you can thread string through to hang it on your tree!
enjoy!
thingiverse
free

Etchable Thermocouple Sensor v1.0 by tinkerings
...long the end of the ec, sharing the two top screws.
note that in the photos, i hadn't added the outline or the capacitor yet.
Swirlingbrain
thingiverse
free

Yarn Bunny by swirlingbrain
...yarn bunny by swirlingbrain
thingiverse
my daughter made a yarn bunny. i scanned it with the revo pop 3d scanner.
thingiverse
free

Gemstone Diamond by swirlingbrain
...
thingiverse
a gemstone to put into a ring.
also attached is a javascript program i made to generate this correct diamond shape.
thingiverse
free

Caffeine Molecule by swirlingbrain
...ingiverse
i was playing with caffeine molecules and thought i would upload the models i created. my daughter painted it for me!
thingiverse
free

Kuzcotopia Earrings by swirlingbrain
...ted it in resin, painted it with metallic gold paint, added earring parts, and pulled the lever. why do we even have that lever?
thingiverse
free

Pitcher by swirlingbrain
...detail but the size and all is perfect, it came out ok and you can even make out the rose on the side although a bit rounded off.
thingiverse
free

Sign Pole by swirlingbrain
... to lay a piece of cardboard on the floor and glue the sign foot to it to make it more stable but it was fine without doing that.
thingiverse
free

Garden Gnome by swirlingbrain
...t on a formlabs resin printer but then ended up just printing it on a filament printer instead. (so can be printed on either one)
thingiverse
free

John 3:16 Coin by swirlingbrain
...on a filament printer, i had to enlarge about 1.75x. should work ok for a resin printer, tho, but i haven't tested that yet.
thingiverse
free

King Moon Razor (likeness) by swirlingbrain
...9;s not really an exact likeness but if you know who it is then you'll recognize him at least. i haven't printed it yet.
thingiverse
free

Texas Shaped Donut Cutter by swirlingbrain
...he best so i won't post a recipe but search youtube or instructables or allrecipes and you'll find lots of donut recipes.
Neon
turbosquid
$2

neon lamp / Lampadina Neon
... available on turbo squid, the world's leading provider of digital 3d models for visualization, films, television, and games.
turbosquid
$15

Neon
...on
turbosquid
royalty free 3d model neon for download as max on turbosquid: 3d models for games, architecture, videos. (1460133)
turbosquid
$3

Neon
...
turbosquid
royalty free 3d model neon for download as blend on turbosquid: 3d models for games, architecture, videos. (1410866)
3ddd
$1

Neon carpet
...neon carpet
3ddd
ковёр
ковёр neon.
3d_export
$5

neon
...neon
3dexport
3d_export
$15

Neon city
...neon city
3dexport
a city at night with neon buildings
3d_export
$10

Neon Bar
...neon bar
3dexport
bar with neon lights and logo
3d_export
$5

Neon scene
...neon scene
3dexport
neon stage for animations and photos
3d_ocean
$15

Neon typeface
...on neon font text typeface
detailed neon letters with configured vray materials. all objects are in layers, grouped by character.
turbosquid
$42

Neon
... available on turbo squid, the world's leading provider of digital 3d models for visualization, films, television, and games.
Angel
3d_export
$13

angel
...angel
3dexport
pendant angel
3ddd
$1

Angel
...angel
3ddd
addinterior
стул angel от addinteriorhttp://www.addinterior.dk/page/products/29/
3d_export
$80

angel sculpture
...angel sculpture
3dexport
angel
turbosquid
free

Angel
...angel
turbosquid
free 3d model angel for download as obj on turbosquid: 3d models for games, architecture, videos. (421674)
3d_export
$59

Angel sculpture
...angel sculpture
3dexport
angel sculpture
turbosquid
$36

Angel
...turbosquid
royalty free 3d model angel for download as blend on turbosquid: 3d models for games, architecture, videos. (1443719)
turbosquid
$17

Angel
...l
turbosquid
royalty free 3d model angel for download as max on turbosquid: 3d models for games, architecture, videos. (1594913)
turbosquid
$15

angel
...l
turbosquid
royalty free 3d model angel for download as stl on turbosquid: 3d models for games, architecture, videos. (1697805)
turbosquid
$8

angel
...l
turbosquid
royalty free 3d model angel for download as stl on turbosquid: 3d models for games, architecture, videos. (1253675)
turbosquid
$5

Angel
...l
turbosquid
royalty free 3d model angel for download as obj on turbosquid: 3d models for games, architecture, videos. (1404898)
Fish
archibase_planet
free
Fish
...fish
archibase planet
fish aquarium fish toy fish
fish n250113 - 3d model (*.gsm+*.3ds) for interior 3d visualization.
archibase_planet
free
Fish
...fish
archibase planet
fish aquarium fish toy fish
fish n310113 - 3d model (*.gsm+*.3ds) for interior 3d visualization.
archibase_planet
free

Fish
...fish
archibase planet
fish aquarium fish
fish - 3d model (*.gsm+*.3ds) for interior 3d visualization.
archibase_planet
free
Fish
...fish
archibase planet
fish aquarium fish
fish - 3d model (*.gsm+*.3ds) for interior 3d visualization.
turbosquid
$200
Fish Red | Fish 3D | Fish devil | Fish fat
... available on turbo squid, the world's leading provider of digital 3d models for visualization, films, television, and games.
3d_export
free
fish
...fish
3dexport
fish
3ddd
$1
fish
...fish
3ddd
рыба
fish
archibase_planet
free
Fish
...fish
archibase planet
fish sculpture statue
fish - 3d model for interior 3d visualization.
archibase_planet
free

Fish
...fish
archibase planet
fish picturesque element
fish - 3d model (*.gsm+*.3ds) for interior 3d visualization.
archibase_planet
free

Fish
...fish
archibase planet
fish picturesque element
fish - 3d model (*.gsm+*.3ds) for interior 3d visualization.
Ornament
3ddd
$1

ornament
...ornament
3ddd
ornament
3ddd
$1

Ornament
...ornament
3ddd
барельеф
ornament
3ddd
$1

ornament
...ornament
3ddd
gold ornament
3d_export
$5

rose ornaments
...rose ornaments
3dexport
rose ornaments rose ornaments
turbosquid
$2

Christmas Ornament Christmas Ornament
... available on turbo squid, the world's leading provider of digital 3d models for visualization, films, television, and games.
3ddd
$1

Ornament
...ornament
3ddd
узор
turbosquid
$6

ornament
...urbosquid
royalty free 3d model ornament for download as max on turbosquid: 3d models for games, architecture, videos. (1669158)
turbosquid
$5

ornament
...urbosquid
royalty free 3d model ornament for download as stl on turbosquid: 3d models for games, architecture, videos. (1370327)
turbosquid
$5

Ornament
...urbosquid
royalty free 3d model ornament for download as max on turbosquid: 3d models for games, architecture, videos. (1507987)
3d_export
$10

modern ornaments
...modern ornaments
3dexport
modern ornaments
Christmas
3d_ocean
$3

Christmas bauble
...christmas bauble
3docean
christmas bauble christmas tree merry christmas
christmas bauble
turbosquid
$2
Christmas Ornament Christmas Ornament
... available on turbo squid, the world's leading provider of digital 3d models for visualization, films, television, and games.
3d_ocean
$5
Christmas
...de in 3ds max 2013 3dsmax with vray render included material and light obj file fbx file hope you like it please don’...
3d_export
free
christmas sphere
...christmas sphere
3dexport
christmas sphere to decorate your christmas pine in 3d
3d_export
free
christmas sphere
...christmas sphere
3dexport
christmas sphere to decorate your christmas pine in 3d
3d_export
$5
christmas balls
...christmas balls
3dexport
christmas balls, great decorations for your 3d christmas tree.
3d_ocean
$5
Christmas Ornaments
... ornaments in cinema 4d. it’s very basic, but extremely nice, especially for christmas. this is perfect for your holiday scene...
3d_ocean
$19

Christmas wreath
...christmas wreath
3docean
christmas decoration wreath
high quality christmas wreath with animated lights
turbosquid
$1

christmas
...rbosquid
royalty free 3d model christmas for download as max on turbosquid: 3d models for games, architecture, videos. (1357407)
3d_export
$5

christmas lollipop
...christmas lollipop
3dexport
christmas lollipop.
Wire
design_connected
$11

Wired
...wired
designconnected
wired computer generated 3d model.
design_connected
$11

Wires
...wires
designconnected
wires computer generated 3d model.
design_connected
$11
Wire
...wire
designconnected
ronda design wire computer generated 3d model. designed by roccadadria, luca.
3d_export
$5
wire
...wire
3dexport
wire 180x180 cm arhive rar 3dmax2019. obj. fbx. mat corona
turbosquid
$2
HDMI wire
... 3d model hdmi wire for download as wire, wire, fbx, and wire on turbosquid: 3d models for games, architecture, videos. (1644937)
turbosquid
free
wires
...bosquid
free 3d model wires for download as ma, obj, and fbx on turbosquid: 3d models for games, architecture, videos. (1214233)
3ddd
$1
Wire chair
...wire chair
3ddd
wire chair
turbosquid
$10
wires
... available on turbo squid, the world's leading provider of digital 3d models for visualization, films, television, and games.
turbosquid
$2

Wire
... available on turbo squid, the world's leading provider of digital 3d models for visualization, films, television, and games.
3d_export
$10

wire stripper
...wire stripper
3dexport
wire stripper 5 in 1
El
3ddd
$1

El torrent
...el torrent
3ddd
el torrent
фирма: el torrent il.luminacio-el torrent general catalogue. be 497
3ddd
$1

El Casco
...
el casco , настольные принадлежности
набор настольных принадлежностей компании el casco
turbosquid
$25

El Rey
...
turbosquid
royalty free 3d model el rey for download as max on turbosquid: 3d models for games, architecture, videos. (1261097)
turbosquid
$35

el.3ds
... available on turbo squid, the world's leading provider of digital 3d models for visualization, films, television, and games.
turbosquid
$20

El capitan.max
... available on turbo squid, the world's leading provider of digital 3d models for visualization, films, television, and games.
turbosquid
$20

El capitan.max
... available on turbo squid, the world's leading provider of digital 3d models for visualization, films, television, and games.
turbosquid
free

ELE VILLA
... available on turbo squid, the world's leading provider of digital 3d models for visualization, films, television, and games.
3d_export
$5

El Primo Matreshka
...el primo matreshka
3dexport
3d model el primo from brawl stars. style - toy matreshka. vertices: 4584 faces: 4762
3d_export
$15

El camino 3D Model
...el
3dexport
el camino 69 chevrolet automobile car pickup detailed custom high poly truck
el camino 3d model buncic 58908 3dexport
turbosquid
$50

3D EL Guitar
... available on turbo squid, the world's leading provider of digital 3d models for visualization, films, television, and games.