Thingiverse

eGPU Enclosure for Nvidia GTX 1060 and EXP GDC Beast (v8.x) by ZodiusInfuser
by Thingiverse
Last crawled date: 3 years, 1 month ago
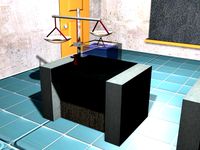
Last year I modified my laptop to support an external graphics card using the EXP GDC Beast (v8.3 in my case) adapter, allowing me to play relatively modern games when away from my main rig. Rather than have the card exposed, I designed an enclosure for it to make it easier transport. After several iterations over a year of using it, I am sharing this final version.
This enclosure was designed for the Gigabyte GTX 1060 6GB (GV-N1060WF2OC-6GD), although I expect any graphics card up to 225mm in length (from the PCI-E bracket) with top mounted power inputs should work. Smaller cards with end power inputs would also be an option. Additional features of it include a 3 port 2.5A USB charger for running peripherals off, and a power override switch to force the beast to stay on in the event of a dodgy connection (something I personally experienced). Oh and it has RGB LEDs and a front mounted controller, along with a connection at the rear to plug in any external RGB lighting, such as my laptop underglow: https://www.thingiverse.com/thing:2974926
The enclosure consists of 7 unique parts:
1x Front (or Front_NoController if LEDs are not wanted)
1x Back
1x Bottom (or Bottom_NoPowerOverride if that option is not wanted)
1x Fan Cover
1x Logo Cover
1x USB Cover
3x Button (Only needed if LEDS are wanted)
(There are also NoExtras versions if you are just after a basic enclosure)
Essential components:
1x EXP GDC Beast (v8 series)
4x Rubber Feet (http://uk.farnell.com/hammond/1421t2cl/feet-stick-on-pk24/dp/1876515)
8x M2.5x6 Screws & M2.5 Nuts to attach the fan and logo covers
4x M3x6 Screws & M2.5 Nuts to attach the front and back
2x M2x6 Screws to attach the USB cover
1x PCI Case Screw & M3 Nut for attaching the GPU
Optional components:
1x Mini Power Switch for override (https://shop.pimoroni.com/products/spdt-mini-power-switch)
1x 5V 2.5A Step-Down Regulator (http://www.hobbytronics.co.uk/d24v22f5-5v-step-down-regulator)
3x USB Type A Socket (http://www.hobbytronics.co.uk/usb-type-a-socket)
1x 2-Way Screw Terminal (either 5mm or 0.2" spacing)
Stripboard, various gauge and colour wire, and some 0.1" headers
LED components:
1x RGB LEDs + Controller Kit (https://www.auraglow.co.uk/colour-changing-50cm-100cm-usb-strip-light-tv-backlight.html)
1x LED Headers (https://coolcomponents.co.uk/products/header-row-socket-female)
4x Clear Zip Ties if the adhesive backing on the LEDs is not strong enough
I have been to multiple events over the past year with this, and other than the occasional issues that come with running an eGPU (hence the power override switch), the enclosure has held up great. The only thing lacking is an indication of how taxed the GPU is, so for that I designed this Mini HDMI Monitor (https://www.thingiverse.com/thing:2974445) that I run GPU-Z and Task Manager on. You can see my setup running DOOM 2016 (which my laptop cannot normally do) in the images above.
Video: https://www.youtube.com/watch?v=nLmP1UIUPW4
Edit: At the request of Lasklo, added a version of the bottom without the cutout for the power override switch.
Edit 2: At the request of a few people, add versions of parts without sections for the USB hub or RGB lighting
Similar models
thingiverse
free

eGPU case for EXP GDC Beast by Way
...igned for cards up to 30cm long.
walls of case was cut from 3mm black plexiglas, to connect every piece of case i used m3 screws.
grabcad
free

EXP GDC Beast GPU dock
... gpu dock so i could make an enclosure around it and the gpu, but no one had any models available for download. so i made my own.
thingiverse
free

eGPU Enclosure for Asus ROG Strix Radeon RX570 and EXP GDC Beast (v8.x)
...it is longer than the gtx 1060.
so, the only thing i had to do, was enlarging the front of the case an adding some venting holes.
thingiverse
free

RGB Underglow for CoolerMaster Notepal U2 Laptop Stand by ZodiusInfuser
... heat shrink
mounting of the parts to the stand is done using zip ties and cutouts that are modelled in to the led_backing strip.
thingiverse
free

Power supply cover by DasK
...ke the ones in the pcs power supplies)
1x rocket switch
1x 5mm led with 1k resistor
2x banana connectors
4x small screws.
thingiverse
free

EXP GDC Case with Asus 750ti eGPU external VGA Notebook by Budiman7x
...njoy
using m3x15 and nuts for combine front case and back case on bottom, side, upper, and handle.
using m3x10 for screw the lid
thingiverse
free

RomTaStick Mini MK I by zippy1978
...l mount
1x hdmi panel mount
1x micro usb a male tu usb a female panel mount
4x m3x6mm screw
12x 3.5mmx19mm screw countersunk head
thingiverse
free

eGPU Case for Nvidia GTX 1050Ti and PE4L v2.1b by honasvocas
...ottom + top),
4x 3x15mm screws to hold the pe4l v2.1 adapter,
1x optional pc screw to hold the graphic card (not really needed).
thingiverse
free

Switch Cover by Modellaner
...you'll also need:
spring (torsion)
1x screw m3 x 22 mm (inbus)
1x nut m3
4x countersunk screw (or double faced adhesive tape)
thingiverse
free

RGB Lighting for Kolink Rocket Push Power Button with Asus Aura
...is used for the power switch cable,
the three drillings off-center for the leds.
if you have further questions, feel free to ask.
Zodiusinfuser
thingiverse
free
RGB Underglow for CoolerMaster Notepal U2 Laptop Stand by ZodiusInfuser
... heat shrink
mounting of the parts to the stand is done using zip ties and cutouts that are modelled in to the led_backing strip.
thingiverse
free

5" Portable HDMI Monitor with Integrated Cover/Stand by ZodiusInfuser
...as been great! being able to quickly fold it up and shove it in a bag has made it a regular addition to my portable gaming setup.
thingiverse
free
eGPU Enclosure for Asus ROG Strix Radeon RX570 and EXP GDC Beast (v8.x)
...nvidia gtx 1060 and exp gdc beast (v8.x) by zodiusinfuserquot;. my asus rog strix radeon rx570 would'nt fit, as...
Egpu
thingiverse
free

eGPU enclosure by hitechdoc
...egpu enclosure by hitechdoc
thingiverse
egpu enclosure
thingiverse
free
eGPU case for EXP GDC Beast by Way
...igned for cards up to 30cm long.
walls of case was cut from 3mm black plexiglas, to connect every piece of case i used m3 screws.
thingiverse
free

Gigabyte Aorus Gaming Box eGPU base plate for length mod by Jownes
... screw holes for the pcb are designed for m3 inserts.
note that you may have to solder an extension to your 24 pin atx connector.
thingiverse
free
eGPU Case for Nvidia GTX 1050Ti and PE4L v2.1b by honasvocas
...ottom + top),
4x 3x15mm screws to hold the pe4l v2.1 adapter,
1x optional pc screw to hold the graphic card (not really needed).
thingiverse
free

Riser for Akitio Node eGPU case by blerghcity
... node fan, which was pressed against the floor. this riser has ventilation holes to allow for (hopefully) better air circulation!
thingiverse
free
eGPU Enclosure for Asus ROG Strix Radeon RX570 and EXP GDC Beast (v8.x)
...it is longer than the gtx 1060.
so, the only thing i had to do, was enlarging the front of the case an adding some venting holes.
thingiverse
free
EXP GDC Case with Asus 750ti eGPU external VGA Notebook by Budiman7x
...njoy
using m3x15 and nuts for combine front case and back case on bottom, side, upper, and handle.
using m3x10 for screw the lid
thingiverse
free

Universal ADT Link R43SL eGPU external GPU enclosure with ATX PSU
...et
m3x15mm case combiner
m3x8mm or 10mm for the lid and adt adapter
m3 nuts
m3.5x8mm for atx psu
printed with st-pla cctree
enjoy
thingiverse
free

GPD WinMax Vertical Stand by hoostveen
...a thunderbolt3 port and can be used with an egpu i thought a vertical stand to give good airflow...
thingiverse
free

Raspberry Pi 4 OMEN Accelerator Case by STIG_
...pi 4 case inspired by the hp omen accelerator egpu pins are not required, they are provided for those...
Gdc
turbosquid
free

GDC FPS Female Maya Rig
...uid
free 3d model gdc fps female maya rig for download as ma on turbosquid: 3d models for games, architecture, videos. (1182229)
thingiverse
free
eGPU case for EXP GDC Beast by Way
...igned for cards up to 30cm long.
walls of case was cut from 3mm black plexiglas, to connect every piece of case i used m3 screws.
thingiverse
free

Cat carrier replacement clip by GDC
...rse
this is a replacement for a broken clip on a cat carrier. it works well on our carrier. i printed it at 80% infill in pla.
thingiverse
free
EXP GDC Case with Asus 750ti eGPU external VGA Notebook by Budiman7x
...njoy
using m3x15 and nuts for combine front case and back case on bottom, side, upper, and handle.
using m3x10 for screw the lid
thingiverse
free
eGPU Enclosure for Asus ROG Strix Radeon RX570 and EXP GDC Beast (v8.x)
...it is longer than the gtx 1060.
so, the only thing i had to do, was enlarging the front of the case an adding some venting holes.
thingiverse
free

EXP GDC v8.0 (mini ITX) case by exco
...n power cable).
you can either use an old atx psu you have lying around - or the dell pa-2 if you need a plug and play solution.
thingiverse
free

External Case for a Mini-ITX GTX 970 and EXP GDC Adapter (v8.0) by ftwelve
... in abs or another high heat filament, i printing mine in standard pla and it started to warp after about a year or two of usage.
renderosity
$5

Dazzle for GCD Tiara Set
...<p class="margin-top-20"> "dazzle for gcd jewelry tiara set"<br /> http://www.renderosity.com/mod/bcs/gdcjewelry-tiara-set/101845<br /> <br /> ******************************<br /> what's included:<br /> <br...
grabcad
free

HD Custom bike by Gdc
...hd custom bike by gdc
grabcad
custom bike .
1060
turbosquid
$15

human-1060
... available on turbo squid, the world's leading provider of digital 3d models for visualization, films, television, and games.
turbosquid
$15

selva 1060 chair
... available on turbo squid, the world's leading provider of digital 3d models for visualization, films, television, and games.
3d_export
$15

Ring PK-1060 3D Model
...ing design jewelry printers
ring pk-1060 3d model download .c4d .max .obj .fbx .ma .lwo .3ds .3dm .stl ritaflower 105268 3dexport
3d_export
$50

3D Home 1060 3D Model
...chair furniture texture table lamp apartment rug carpet restaurant hotel sitting
3d home 1060 3d model richard3015 45145 3dexport
3ddd
$1

Книжный шкаф Oak MG 1060
...книжный шкаф oak mg 1060
3ddd
библиотека , oak
235 см x 217 см x 55 см
3ddd
free

Люстра - Napoleon III - Bronze d-Art Francais Haut De Gamme Du Luminaire 1060/C
...cais haut de gamme du luminaire 1060/c
3ddd
napoleon
люстра - haut de gamme du luminaire 1060/c
совпадение не 100%, делал по фото
3d_export
$14

ornamental plants for landscape design 1060
...lants tropical plants monstera decorative trees in flowerpots olea olive tree pennisetum alopecuroides pennisetum scirpus - reeds
3ddd
$1

Apollo
...apollo 3ddd h=660/d=1060 ...
3ddd
free

NATUZZI brio
...3ddd natuzzi , brio 47 000 полигонов 2180 * 1060 * 720...
3ddd
free

casali art 07016
...casali art 07016 3ddd casali настольный светильник casali размеры: h-1060 ...
Gtx
3d_export
free

Devon GTX
...devon gtx
3dexport
2010 devon gtx
turbosquid
$25

Borbet GTX
...turbosquid
royalty free 3d model borbet gtx for download as on turbosquid: 3d models for games, architecture, videos. (1381574)
turbosquid
$59

Devon GTX
...lty free 3d model devon gtx for download as 3ds, max, and obj on turbosquid: 3d models for games, architecture, videos. (1342982)
3d_export
$49

Devon GTX 3D Model
...devon gtx 3d model
3dexport
devon gtx
devon gtx 3d model dimary3 72294 3dexport
3d_export
$59

Devon GTX 3D Model
...d model
3dexport
devon gtx american sport concept coupe racing car usa mental ray 3ds max
devon gtx 3d model laguf 24559 3dexport
turbosquid
$50

Nvidia gtx series
... available on turbo squid, the world's leading provider of digital 3d models for visualization, films, television, and games.
turbosquid
$5

gtx 1080 graphicscard
... available on turbo squid, the world's leading provider of digital 3d models for visualization, films, television, and games.
3d_export
$20

devon gtx
...e apps.<br>car textures:png - 2k resolution other available formats: obj, 3ds, fbx, max. polycount: 32667 poly / 33667 tris
3d_ocean
$89

Devon GTX 2010
...y, in real units of measurement, qualitatively and maximally close to the original. model formats: - *.max (3ds max 2008 scanl...
cg_studio
$99

Plymouth GTX 19703d model
...cgstudio
.3ds .c4d .fbx .max .obj - plymouth gtx 1970 3d model, royalty free license available, instant download after purchase.
Exp
turbosquid
$800

EXP Banbury 6W1
... available on turbo squid, the world's leading provider of digital 3d models for visualization, films, television, and games.
turbosquid
$20
Superficial Tension Exp. Image.max
... available on turbo squid, the world's leading provider of digital 3d models for visualization, films, television, and games.
3d_export
$39

Bentley EXP 10 Speed 6 Concept
...oncept
3dexport
bentley exp 10 speed 6 concept, year 2015.<br>model with high quality finishing on the outside and inside.
3d_export
$129

Tony Kart Rocky EXP 2014 3D Model
...g japan japanese
tony kart rocky exp 2014 3d model download .c4d .max .obj .fbx .ma .lwo .3ds .3dm .stl humster3d 113606 3dexport
3d_export
$199

Bentley Exp Speed 8 2001 3D Model
...bentley exp speed 8 2001 3d model
3dexport
nurbs bentley poly model tyio
bentley exp speed 8 2001 3d model tyio 1582 3dexport
humster3d
$15

Bentley EXP 9 F 2012 Blueprint
...12 blueprint 3d model in the format you need. all our 3d models was created on real car base and maximally close to the original.
humster3d
$15

Tony Kart Rocky EXP 2014 Blueprint
...14 blueprint 3d model in the format you need. all our 3d models was created on real car base and maximally close to the original.
humster3d
$75

3D model of Bentley EXP 9 F 2012
...etailed 3d model of bentley exp 9 f 2012 in various file formats. all our 3d models were created maximally close to the original.
humster3d
$75

3D model of Tony Kart Rocky EXP 2014
...led 3d model of tony kart rocky exp 2014 in various file formats. all our 3d models were created maximally close to the original.
cg_studio
$199

Bentley EXP Speed 8, 2001, nurbs to poly3d model
...tudio
.max - bentley exp speed 8, 2001, nurbs to poly 3d model, royalty free license available, instant download after purchase.
Nvidia
turbosquid
$30

Nvidia Shield
...bosquid
royalty free 3d model nvidia shield for download as on turbosquid: 3d models for games, architecture, videos. (1216283)
3d_export
$5

nvidia rtx 2080ti
...nvidia rtx 2080ti
3dexport
3d model - nvidia rtx 2080ti
3ddd
$1

Системный блок NVIDIA
...системный блок nvidia
3ddd
системный блок
системный блок nvidia
turbosquid
$49

Nvidia Case
... available on turbo squid, the world's leading provider of digital 3d models for visualization, films, television, and games.
3d_export
$5

Nvidia logo 3D Model
...nvidia logo 3d model
3dexport
nvidia emblem logo badge
nvidia logo 3d model abstract93 75723 3dexport
3d_export
$5

nvidia 2080ti
...nvidia 2080ti
3dexport
not mined!!!<br>new;
3d_ocean
$2

NVIDIA Corporation 3D Logotype
...ype in formats: max , fbx , 3ds and obj. popys count: 1100. archive included of six renders with nvidia 3d-logotype(1920×1080px).
turbosquid
$5

NVidia FT 03
... 3d model nvidia ft 03 for download as 3ds, max, obj, and fbx on turbosquid: 3d models for games, architecture, videos. (1233064)
turbosquid
$50
Nvidia gtx series
... available on turbo squid, the world's leading provider of digital 3d models for visualization, films, television, and games.
3d_export
$7

nvidia geforce rtx 3080
...nvidia geforce rtx 3080
3dexport
formats:
Beast
3d_export
$10
Beast
...beast
3dexport
beast
turbosquid
$15
Beast
...east
turbosquid
royalty free 3d model beast for download as on turbosquid: 3d models for games, architecture, videos. (1508813)
turbosquid
$26

The Beast
...
royalty free 3d model the beast for download as obj and fbx on turbosquid: 3d models for games, architecture, videos. (1296186)
turbosquid
$1

beast
... available on turbo squid, the world's leading provider of digital 3d models for visualization, films, television, and games.
turbosquid
$1

beast
... available on turbo squid, the world's leading provider of digital 3d models for visualization, films, television, and games.
turbosquid
$120

Beast warriour
...osquid
royalty free 3d model beast warriour for download as on turbosquid: 3d models for games, architecture, videos. (1645066)
turbosquid
$5
Beast Spear
...urbosquid
royalty free 3d model beast spear for download as on turbosquid: 3d models for games, architecture, videos. (1279108)
turbosquid
$20

Beast Hunter
...squid
royalty free 3d model beast hunter for download as c4d on turbosquid: 3d models for games, architecture, videos. (1679139)
turbosquid
$49
Cyberpunk beast
...ee 3d model cyberpunk beast for download as max, obj, and fbx on turbosquid: 3d models for games, architecture, videos. (1231057)
turbosquid
$9

The beauty and the beast
...e beauty and the beast for download as 3ds, obj, c4d, and fbx on turbosquid: 3d models for games, architecture, videos. (1511942)
V8
3d_export
$25

v8 - engine
...v8 - engine
3dexport
detailed 3d model engine v8 6.6l - duramax made in 3ds max
turbosquid
free

V8 5.8L
...id
free 3d model v8 5.8l for download as blend, obj, and dae on turbosquid: 3d models for games, architecture, videos. (1687696)
turbosquid
$12

Cupcake V8
... available on turbo squid, the world's leading provider of digital 3d models for visualization, films, television, and games.
turbosquid
free

v8 Engine
... available on turbo squid, the world's leading provider of digital 3d models for visualization, films, television, and games.
3d_export
$80

V8 Engine 3D Model
...v8 engine 3d model
3dexport
engine v8 turbo car part
v8 engine 3d model antonyart 1037 3dexport
3d_export
$99

Fiat V8 3D Model
...fiat v8 3d model
3dexport
car classic v8 fiat sport coupe old
fiat v8 3d model desmonster 51326 3dexport
cg_studio
$199

V8 Engine3d model
...v8 engine3d model
cgstudio
.3ds - v8 engine 3d model, royalty free license available, instant download after purchase.
3d_export
$5

v8-gm-350-turbosnapshot7
...v8-gm-350-turbosnapshot7
3dexport
v8-gm-350-turbo.snapshot.7
3d_export
$8

Bunker Light v8
...bunker light v8
3dexport
3d_export
$10

Peugeot 909 V8 3D Model
...peugeot 909 v8 3d model
3dexport
peugeot v8
peugeot 909 v8 3d model azrim27 21445 3dexport
Enclosure
3d_export
free

electrical enclosure
...l enclosure where electrical devices like (relays, contactors, busbars ) are kept in order to protect from hazardous environment.
turbosquid
$100

GPU Enclosure
...yalty free 3d model gpu enclosure for download as obj and stl on turbosquid: 3d models for games, architecture, videos. (1381061)
3d_export
$5

Electrical Enclosure
...ed. also has tower lights attaced on the top.<br>file format that are available:<br>.step<br>.obj<br>.stl
archive3d
free

Enclosure 3D Model
...closure 3d model
archive3d
shower enclosure-acquarius- 3d model for interior 3d visualization.
archive3d
free

Enclosure 3D Model
...enclosure 3d model
archive3d
shower enclosure-omega- 3d model for interior 3d visualization.
archive3d
free

Enclosure 3D Model
...enclosure 3d model
archive3d
shower enclosure-vega - 3d model for interior 3d visualization.
archive3d
free

Enclosure 3D Model
...enclosure 3d model
archive3d
shower enclosure-zenith - 3d model for interior 3d visualization.
turbosquid
$20

shower enclosure
... available on turbo squid, the world's leading provider of digital 3d models for visualization, films, television, and games.
turbosquid
$14

Dumpster Enclosure
... available on turbo squid, the world's leading provider of digital 3d models for visualization, films, television, and games.
turbosquid
$25

3d printer enclosure
... model 3d printer enclosure for download as ipt, skp, and fbx on turbosquid: 3d models for games, architecture, videos. (1634310)