Thingiverse
Edge Lit 3D Printed Pendant by dj_segfault
by Thingiverse
Last crawled date: 3 years ago
Overview
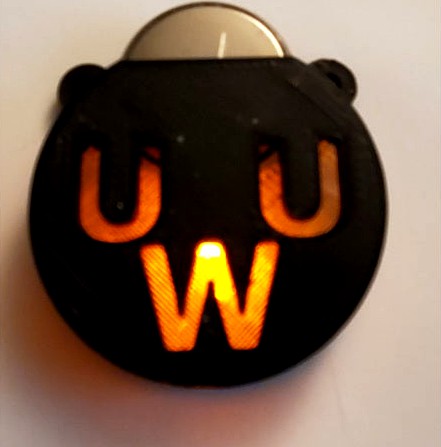
I got the idea for this project from Geek Mom Project's Layered Edge-Lit Pendants project. Her project uses a laser cutter to cut out clear and black plastic layers, and screws them together. But not everyone has access to a laser cutter, so I wanted to see if I could do something similar just using a 3D printer. The front and back are opaque, and instead of clear acrylic in the center to diffuse the light, I used clear PLA filament. The front contains the design in the negative space, letting the light from the center shine through.
Like her project, mine is electrically and mechanically simple, as the design has the battery insert into the top sticking out, so it's easy to turn on and off by inserting or removing the battery.
3D Printed Components
3D printed in three different parts that get glued together:
The back piece: Printed in the opaque color of your choice, any infill will do. This holds the back of the battery in, has loops to hang the pendant on, and also has 2 registration pins sticking up that go through the other pieces to guarantee alignment.
The center piece: Printed in clear PLA filament, diffuses the LED light. There is space for the LED body and leads, and the battery. There are holes straight through for the registration pins for alignment. You may want to play with the infill to get the right diffusion pattern for your design. 15% infill worked for me.
The front piece: Printed in the opaque color of your choice, This has the actual image in negative space for the light to shine through. The back of the front piece has 1mm filleted shallow holes for the ends of the registration pins. I provide two different front designs and either will work. You can make your own on the same design for your pendant. You can even make it 3D instead of just a flat disk. Just make sure it's 35mm in diameter, and holes for the registration pins, 12mm across from center and 8mm up from center, 3mm diameter and 1mm fillet.
Here is a link to my models in OnShape so you can see how they were built
Other Components
The LED. I used 3mm LEDs that take 2.2v or 3.2V and draw 20ma (different colors will have different power requirements).
CR2032 3v battery. In my test, this provides about 70 hours of runtime before significant dimming, and are readily available anywhere.
This may not be necessary, but to make better contact and make the pendant more robust, I cut some thin conductive metal that fits on either side of the battery, and used conductive glue to fasten them to the LED wires, so inserting the battery does not mangle the leads. This may not be required depending on how delicate you are with it.
Assembly
Print the front and back in opaque PLA
Print the center in clear PLA
Apply glue to the back and put the clear center on top of the back, making sure the registration holes go through the holes in the center
Put the LED in the slot in the center piece, making sure the wires are on the back and the front, not the sides. I didn't find it necessary to glue the LED in place, but you might.
Glue the metal pieces on the inside of the LED legs using the conductive glue, if you are using them, so the battery will press against the metal pieces and not the wires
Glue the front piece on top of the center piece, making sure to stay clear of your design.
Here's a video of my prototype in action
Similar models
thingiverse
free

christmas tree lamp by liljjnic
...he back of the battery pack makes it nice and neat and easier to change the batteries
i hope u enjoy making this as much as i did
thingiverse
free

Letters to hold led strips by santa25
... back and front pieces should clip together, i am going to print them with an opaque filament to see how the light shines through
thingiverse
free

Hole keeper 2.5mm holes - van conversion etc by HowardHarks
...s so that the feet are parallel to the bed before printing. i would recommend using prusa slicer as your slicer for this project.
thingiverse
free

battery holder for leds by custom_prints
...ome holes). if this gets downloaded a lot i will revise it and make some holes instead of having to heat up a pin and make a hole
thingiverse
free

LED Star by DanLuc
...i used lots of hot glue with a glue-gun, to both hold everything in place but also to insulate the wires so they don't touch.
thingiverse
free

Protocol Droid eye backing disks by PandaProps
...r with ca glue
the entire assembly can be hot glued over your brass or plastic eyes or held in place with epoxy putty, tape etc.
thingiverse
free

Pentagon Slice Puzzle by JWidmar
...rger center piece in a way where it wont spill out. push pieces together until dry, pushing the pin in.
sticker, paint and enjoy
thingiverse
free

Thales Liberty Programming Cable by joshutt
...ke to use some hot glue to make sure they are secure. then you can glue the pin holder into the connector. the screw is a 6-32.
thingiverse
free

5S 2P 18650 Battery Holder
...ome holes that let you pass cables through for compact assembly.
feel free to make me a small donation if it was useful to you :)
thingiverse
free

Wall-mounted Siva Logo Lamp by Scharrelese
... you can use the push button on the battery pack to turn the lamp on or off by pressing the whole thing against the wall a little
Dj
3ddd
$1

Midj DJ
... кофейный
кофейный столик midj dj 100http://www.midj.com/products/coffee-table/dj-100
3ddd
$1

dj headphones
...dj headphones
3ddd
наушники
dj headphones
3d_ocean
$18

DJ System
...c
highly detailed model of disco equipment with textures, shaders and materials. it is ready to use, just put it into your scene.
3ddd
$1

DJ-контроллер
... микшер
dj-микшерный пульт hercules djcontrol air+
корпус : 45,5 x 26 см.
текстуры не требуются. polys 50604 verts 81973.
turbosquid
$10

Djs table
...
turbosquid
royalty free 3d model djs table for download as on turbosquid: 3d models for games, architecture, videos. (1684940)
turbosquid
$69

Dj Turntable
... available on turbo squid, the world's leading provider of digital 3d models for visualization, films, television, and games.
turbosquid
$49

DJs mixer
... available on turbo squid, the world's leading provider of digital 3d models for visualization, films, television, and games.
turbosquid
$49

DJ Mixer
... available on turbo squid, the world's leading provider of digital 3d models for visualization, films, television, and games.
turbosquid
free

Dj Table
... available on turbo squid, the world's leading provider of digital 3d models for visualization, films, television, and games.
turbosquid
free

dj stuff
... available on turbo squid, the world's leading provider of digital 3d models for visualization, films, television, and games.
Lit
design_connected
$20

Lit Bonaparte
...lit bonaparte
designconnected
moissonnier meubles lit bonaparte computer generated 3d model.
turbosquid
$15

Lit Headphones
... available on turbo squid, the world's leading provider of digital 3d models for visualization, films, television, and games.
turbosquid
$20

Building Lit At Night
...yalty free 3d model building lit at night for download as max on turbosquid: 3d models for games, architecture, videos. (1342208)
turbosquid
$3

Stool Chair Lit
...l chair lit for download as obj, fbx, blend, and unitypackage on turbosquid: 3d models for games, architecture, videos. (1275985)
3ddd
$1

LIT DE REPOS (софа)
...lit de repos (софа)
3ddd
grange ковка
модель построена с мебельного каталога grange
lit de repos (софа)
д.198-в.101-г.86 см
turbosquid
$40

jeep untextured well lit
... available on turbo squid, the world's leading provider of digital 3d models for visualization, films, television, and games.
turbosquid
$22

Owl Lit Up Lamp
... available on turbo squid, the world's leading provider of digital 3d models for visualization, films, television, and games.
3ddd
$1

Varaluz / Lit-Mesh Test 6 Light Chandelier
...p://www.wayfair.com/varaluz-lit-mesh-test-6-light-chandelier-231c06nb-vrz2318.html
23" h x 26" w x 26" d
turbosquid
$39

Antique Candle Holder with Lit Candle
... available on turbo squid, the world's leading provider of digital 3d models for visualization, films, television, and games.
turbosquid
free

Vega - The LED-lit Christmas Star
... available on turbo squid, the world's leading provider of digital 3d models for visualization, films, television, and games.
Edge
3ddd
free

EDGE
... часы
светильник edge
дизайнер: моторный александрhttp://www.djournal.com.ua/?p=2483
3ddd
$1

Edge
...edge
3ddd
edge
кухня-моноблок, без плинтуса, подвешивается на стену.
3ddd
$1

кровать EDGE
...кровать edge
3ddd
edge
кровать и тумбочки от компании edge
полигоны: 181 253
3ddd
free

EDGE светильник
...edge светильник
3ddd
edge , подвес
производитель польша
материал метал
3ddd
$1

Artemide Edge
...artemide edge
3ddd
artemide
люстра artemide edge. сделана по фото.
design_connected
free

Edge pendant
...edge pendant
designconnected
free 3d model of edge pendant by fabbian designed by baldereschi, alessandra.
3ddd
$1

EDGE CHANDELIER
...lier фирмы holly hunt. официальный сайт:https://www.hollyhunt.com/showproduct.aspx?productid=3103&manufacturerid;=1
design_connected
$7
Edge 30
...edge 30
designconnected
artemide edge 30 computer generated 3d model. designed by mendini, alessandro.
3ddd
$1

Edge Seat
... банкетка
om website: beltafrajumar.com
designer: jacob pringiers
formats: 3ds, c4d, fbx, obj
3ddd
$1

бра Fabbian Edge
... edge
бра fabbian, модель edge, артикулы d77 d01 15 и edge d 77 d03 15. маленькое бра сделано более корректно
Printed
design_connected
$27

...print
designconnected
moroso print computer generated 3d model. designed by wanders, marcel.
3ddd
free

Eichholtz Prints
...- eichholtz print central station i
13 - eichholtz print central station ii
14 - eichholtz print marisa
15 - eichholtz print tish
3ddd
$1

Eichholtz Prints
...print abstract - set of 2
10 - eichholtz print orange abstract
11 - eichholtz print buddha right
12 - eichholtz print buddha left
turbosquid
$1

... available on turbo squid, the world's leading provider of digital 3d models for visualization, films, television, and games.
3ddd
free

Eichholtz Prints
...of 4
2 - print dunbar 2 set of 4
3 - print guadeloupe 1 set of 4
4 - print guadeloupe 2 set of 4
5 - print giles
6 - print trett
3ddd
$1

Eichholtz Prints
...nt tutti frutti
3 - eichholtz prints watson - set of 2
4 - eichholtz prints antique nautilus - set of 2
5 - eichholtz print tiara
3d_export
$5

Monster for printing
...monster for printing
3dexport
monster 3d model printing
3ddd
free

printed rug
...printed rug
3ddd
ковер
very creative printed rug
3ddd
free

Eichholtz Prints
...иал: бумага
габариты (вхш): 72 x 62 см
описание: print sweetmeat - постер в деревянной раме.
3 - prints varsity set of 2
арти
3ddd
free

Art Print Posters
...art print posters
3ddd
прованс
art print posters by patrician prints