Thingiverse

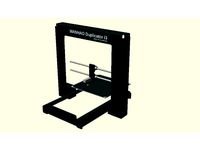
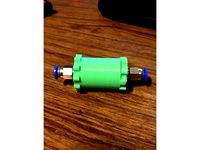
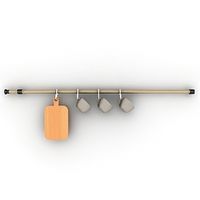
E3D V6 Bowden mount for Wanhao/Monoprice Duplicator i3 or any 45mm rail to rail printer by light_seeker
by Thingiverse
Last crawled date: 3 years, 1 month ago
Summary:
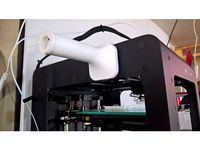
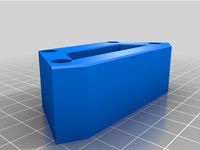
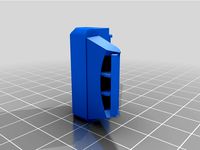
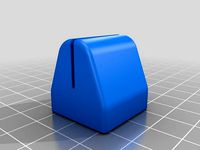
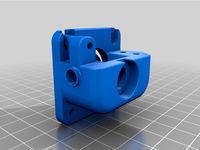
I printed most of the parts with supports to keep the surfaces off the bed. The cooler will need to be printed in something with High heat deflection. The mounting point is close to the heater block and will lose shape if the cooler is not printed in a material that can withstand the heat.
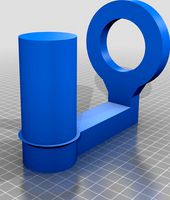
The main body of this design is a remix of CarstenD's bowden mount. The main body of the cooler was drawn from scratch by a friend and was inspired by the Diii. A lot of work was put into the designs that made it possible for me to make this. Hats off to those designers!
Screw lengths:
E3D v6 mount front to E3D v6 main body(.63"). The thin Nyloc is used to hold these together.
Bearing block to E3D v6 main body (.97"). If using my TL Smoother and Board mount(1.2")
Belt attachment screws (.96")
The stock Wanhao screws(M4 x 10mm)work for mounting the plastic bearing block and the lower corner screw to the aluminum block.
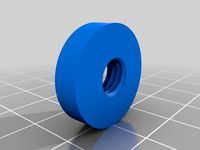
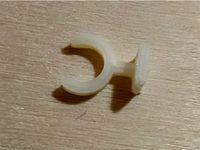
The inserts are for the Bearing block and the thumb screw. You will need a total of three.
Assembly:
The bearing block needs the upper holes drilled out for a 6/32 clearance. I used a 9/64 drill. The block drills out very easy. To save on cost I purchased 1 1/4", 6/32 screws and used the screw cutter on wire strippers to cut them down to size and then file the ends.
The nuts and screws for the belts need to be tight. The screws will need to be put through the belt support first and threaded on till they strip the part out. I made this intentionally tight to ensure no play. Then two of the Narrow hex nuts will need to be threaded on the screws. The two screws will need to be inserted into the holes for the belt attachment at the same time. These holes may need to be opened up a bit to allow the screws to spin freely. The screws will need to hit the wall, spin until the nut is forced backward against the support. then the nuts that were threaded onto the screws can be tightened against the support, sandwiching it. I put a dab of superglue on the nuts closes to the belt to ensure they don't move. Red thread locker will work also.
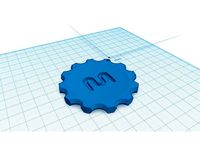
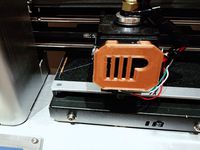
The front cover will need to be put on first before the cover wrap is put on. The cover wrap will need to be at a slight angle to allow it to slip on. There are two small tabs that have mating holes on the main body. These should snap in. If the cover doesn't fit it can be scaled up by 1 or 2%. It should fit without scaling as long as E-steps are correct.
Parts:
18-8 Stainless Steel Narrow Hex Nuthttps://www.mcmaster.com/#92362a120/=1crtv7w
Black-Phosphate Steel Thread-Locking Inserthttps://www.mcmaster.com/#90248a017/=1crtr2b
Button Head Hex Drive Screwhttps://www.mcmaster.com/#91255a155/=1crtvlj
Low-Strength Steel Thin Nylon-Insert Locknuthttps://www.mcmaster.com/#91581a315/=1crtsal
Plastic-Head Thumb Screw with Hex Drivehttps://www.mcmaster.com/#98704a205/=1crtsjj
Rounded Head Blunt Screws for Sheet Metalhttps://www.mcmaster.com/#92525a201/=1cru3qg
Happy printing! Any questions, feel free to ask.
I printed most of the parts with supports to keep the surfaces off the bed. The cooler will need to be printed in something with High heat deflection. The mounting point is close to the heater block and will lose shape if the cooler is not printed in a material that can withstand the heat.
The main body of this design is a remix of CarstenD's bowden mount. The main body of the cooler was drawn from scratch by a friend and was inspired by the Diii. A lot of work was put into the designs that made it possible for me to make this. Hats off to those designers!
Screw lengths:
E3D v6 mount front to E3D v6 main body(.63"). The thin Nyloc is used to hold these together.
Bearing block to E3D v6 main body (.97"). If using my TL Smoother and Board mount(1.2")
Belt attachment screws (.96")
The stock Wanhao screws(M4 x 10mm)work for mounting the plastic bearing block and the lower corner screw to the aluminum block.
The inserts are for the Bearing block and the thumb screw. You will need a total of three.
Assembly:
The bearing block needs the upper holes drilled out for a 6/32 clearance. I used a 9/64 drill. The block drills out very easy. To save on cost I purchased 1 1/4", 6/32 screws and used the screw cutter on wire strippers to cut them down to size and then file the ends.
The nuts and screws for the belts need to be tight. The screws will need to be put through the belt support first and threaded on till they strip the part out. I made this intentionally tight to ensure no play. Then two of the Narrow hex nuts will need to be threaded on the screws. The two screws will need to be inserted into the holes for the belt attachment at the same time. These holes may need to be opened up a bit to allow the screws to spin freely. The screws will need to hit the wall, spin until the nut is forced backward against the support. then the nuts that were threaded onto the screws can be tightened against the support, sandwiching it. I put a dab of superglue on the nuts closes to the belt to ensure they don't move. Red thread locker will work also.
The front cover will need to be put on first before the cover wrap is put on. The cover wrap will need to be at a slight angle to allow it to slip on. There are two small tabs that have mating holes on the main body. These should snap in. If the cover doesn't fit it can be scaled up by 1 or 2%. It should fit without scaling as long as E-steps are correct.
Parts:
18-8 Stainless Steel Narrow Hex Nuthttps://www.mcmaster.com/#92362a120/=1crtv7w
Black-Phosphate Steel Thread-Locking Inserthttps://www.mcmaster.com/#90248a017/=1crtr2b
Button Head Hex Drive Screwhttps://www.mcmaster.com/#91255a155/=1crtvlj
Low-Strength Steel Thin Nylon-Insert Locknuthttps://www.mcmaster.com/#91581a315/=1crtsal
Plastic-Head Thumb Screw with Hex Drivehttps://www.mcmaster.com/#98704a205/=1crtsjj
Rounded Head Blunt Screws for Sheet Metalhttps://www.mcmaster.com/#92525a201/=1cru3qg
Happy printing! Any questions, feel free to ask.
Similar models
thingiverse
free

E3D V6 Volcano bowden mount for Wanhao Duplicator i3 with cooler by Tachion
...t screws
4x m4 10mm socket screws
12x m4 hexnuts
no support required!!!
update 2018.12.18.: better cooler ("cooler v2")
thingiverse
free

Wanhao i3 E3D v6 Bowden Ratchet Tensioner Mount by rXc3NtR1c
... either of these:
wanhao di3 - x-axis ratchet strap tensioner and deflector v1.0 & v2.0
wanhao duplicator i3 x-axis tensioner
thingiverse
free

Bowden X-Carriage Mount for E3D V6 - 40mm fan - SN04 sensor by docrenatoms
...emixed the jackwaterfall's "bowden x-carriage mount for e3d v6".
it's a main body with 40mm fan and sn04 mount.
thingiverse
free

Prusa R3 style part cooler for Ender 3 - E3D V6 + BMG + "The Tank" style mounts.
...tly.
i suggest pre-tapping the hole with an m3 screw before mounting.
this is for the standard e3d v6 (non-volcano) version only.
thingiverse
free

Belt protection for Wanhao Duplicator i3 by ohlinj
...s needed). the holes are however large enough for m4 screws if some one want to thread the bearing blocks.
print with holes down.
thingiverse
free

Bowden extruder mount on Z-Axis support threaded rod by Tech2C
... and nuts to mount the bowden extruder to these blocks.
check my "makes" in my profile for the bowden extruder model.
thingiverse
free

Anet A8 E3D V6 Bowden Mount (With Nut Inserts) by edmogeor
...:2121279
bed level sensor mount: https://www.thingiverse.com/thing:2105275
belt holder: https://www.thingiverse.com/thing:2427494
thingiverse
free

E3D V6 WANHAO DUPLICATOR 6 GANTRY BASE FINISHED by skuibreaker
...ch in the middle of the e3d clamp is on purpose..
i think the bowden tube will need to be 63mm long from titan extruder to e3d v6
thingiverse
free

CTC 3D Bowden motor bracket by juha_j
...6
extruders on pictures: http://www.thingiverse.com/thing:1359438
e3d v6 ctc 3d mount: http://www.thingiverse.com/thing:1655253
thingiverse
free

e3d v6 Block adapter for WANHAO i3 by Pmturiel
...uriel
thingiverse
this is a block for the e3d v6 hot-end. it fits on the wanhao duplicator i3.
it is made to bear flex filaments
Seeker
3d_export
$30

Seeker Missile 3D Model
...issile 3d model
3dexport
missile warhead military seeker ir gyro tech gimbel combat
seeker missile 3d model dogmaf 32149 3dexport
3d_export
$5

Surface Seeker 3D Model
...eeker aliens hadleys hope colonial ripley lv426 acheron industrial vehicles cifi
surface seeker 3d model sanchiesp 93541 3dexport
turbosquid
$30

VIGILENT SEEKER RESEARCHER
... available on turbo squid, the world's leading provider of digital 3d models for visualization, films, television, and games.
turbosquid
$18

Infared heat seeker
... available on turbo squid, the world's leading provider of digital 3d models for visualization, films, television, and games.
cg_studio
$10

Surface Seeker from Aliens3d model
...ure vehicle
.fbx .obj .mb - surface seeker from aliens 3d model, royalty free license available, instant download after purchase.
3d_export
$5

Chill Seeker Sofa
...5 x d120 x h92 cm render : corona 3ds max file 2016(vray & corona) +(fbx(vray & corona), obj, mtl, mat(material library))
3d_export
$20

Metal Detector 3D Model
...detector handheld scanner prospecting treasure archaeology archaeologist site mine seeker bomb gold coin search sensor metaldetector metal detector 3d...
3d_export
$20

agm-114 hellfire
...missile. quad topology, ready for subdivision. stabilizers and laser seeker are separate objects and ready for animation. uv mapped,...
3d_ocean
$35

Missile Collection
...jet long medium missile projectile projection range rocket seek seeker seeking short generic low polygon and well detailed package...
3d_ocean
$14

Long Range Missiles
...jet long medium missile projectile projection range rocket seek seeker seeking short generic low polygon and well detailed package...
Monoprice
thingiverse
free

Display frame for Monoprice MP10
...display frame for monoprice mp10
thingiverse
display frame for monoprice mp10
thingiverse
free

Bridge covers Monoprice MP10
...bridge covers monoprice mp10
thingiverse
bridge covers monoprice mp10
thingiverse
free
Monoprice Coin by Peyton_Guyot
...monoprice coin by peyton_guyot
thingiverse
print this!
thingiverse
free
Voxel Monoprice spool holder by avalero
...voxel monoprice spool holder by avalero
thingiverse
voxel monoprice spool holder
thingiverse
free
Monoprice select mini knob by BramRausch
...monoprice select mini knob by bramrausch
thingiverse
this is a replacement knob for the monoprice select mini.
thingiverse
free

Monoprice 3d printer hook by dmitriyf
...monoprice 3d printer hook by dmitriyf
thingiverse
this is an attachment to monoprice select 3d printer v2
thingiverse
free
monoprice ultimate spool mount by death4u
...older by danmannert to monoprice ultimate 3d printer. it clips into the slot on the top of the printer for the optional enclosue.
thingiverse
free
Monoprice Mini Delta Foot
...a foot for a monoprice mini delta. it helps to increase airflow under the printer. it also helps to reduce the volume of the fan.
thingiverse
free
Monoprice Select Mini Fan Guard
...y fan protection. this is an essential upgrade.
used it on the monoprice select mini pro (from www.3dprinthings.be).
perfect fit!
thingiverse
free

Monoprice Cable Tie Mount
... but had to cut down the straps a bit to make them work. designed a quick mount that fits the full strap, item 6457 on monoprice.
45Mm
3d_export
$10

45mm 3D Model
...45mm 3d model
3dexport
45mm
45mm 3d model alphamodeling 86168 3dexport
3d_ocean
$2

5.56 x 45mm Bullet Cartridge
...3docean
45mm 5.56 bullet cartridge x
5.56×45mm bullet and bullet cartridge. (rendered in v-ray, also include scene without v-ray)
cg_studio
$55

Soviet 45mm Gun 21K3d model
...llet technik
.3ds .fbx .max .obj - soviet 45mm gun 21k 3d model, royalty free license available, instant download after purchase.
3d_export
$29

apple watch series 7 45mm green aluminum case with green leather link
...ax 2014 corona fbx obj textures - polygons: 24,556 - vertex: 43,628 - for any question contact me: **ahmad.ebrahimi67@gmail.com**
3d_export
$30

bracket for laser level
...in construction sites, it can be adjusted vertically by 45mm ...
3d_ocean
$18

Revolver
...revolver 3docean 3d 45mm action antique army bullet colt cowboy engraved firearm gun...
3d_export
$5
puzzle cube
...length is 22mm. cube size at default scale is 45mm ...
3d_export
$20

BRAUN WATCH BC17 WALL CLOCK NO GLASS
...specifications: - height: 300mm - width: 300mm - depth: 45mm you get this .blend files included: - file: model_material...
3d_export
$15

inkwell low-poly version
...694;<br>- triangles: 1388;<br>- dimensions (w x d x h): 45mm x 39.2mm x 31mm;<br>feather:<br>- vertices: 739;<br>- faces: 737;<br>- triangles:...
thingiverse
free

45mm x 45mm extrusion slot nut by markfruhauf
...45mm x 45mm extrusion slot nut by markfruhauf
thingiverse
simple nut that slides into standard 45mm x 45mm extrusion
Wanhao
thingiverse
free
Wanhao Logo Plate / Wanhao Logo Schild by JMDesigns
...wanhao logo plate / wanhao logo schild by jmdesigns
thingiverse
wanhao logo plate / wanhao logo schild
thingiverse
free
Wanhao logo by nebtio
...wanhao logo by nebtio
thingiverse
wanhao logo
thingiverse
free
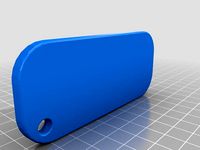
Wanhao keychain by Rein3003
...wanhao keychain by rein3003
thingiverse
a keychain with the logo of wanhao
thingiverse
free
Wanhao Di3 v2 Light / Wanhao Di3 v2 Beleuchtung by JMDesigns
...wanhao di3 v2 light / wanhao di3 v2 beleuchtung by jmdesigns
thingiverse
wanhao di3 v2 light / wanhao di3 v2 beleuchtung
thingiverse
free
TUSH For Wanhao by wtmi1992
...tush for wanhao by wtmi1992
thingiverse
the ultimate spool holder, modified for the top of the wanhao control box. fits snug.
thingiverse
free
fanduct wanhao d12 by theopoilmek
...fanduct wanhao d12 by theopoilmek
thingiverse
fanduct pour wanhao d12
thingiverse
free
Wanhao i3 Marlin by johan21
...wanhao i3 marlin by johan21
thingiverse
marlin for wanhao i3 rampsboard 1.4.
thingiverse
free
Wanhao Duplicator i3 by imagineering4
...wanhao duplicator i3 by imagineering4
thingiverse
these are the stl files for the improvements to the wanhao duplicator i3, v2
thingiverse
free

Wanhao D6 filament guard
...wanhao d6 filament guard
thingiverse
this is a filament guard for wanhao d6 machine to avoid the filament unrolling
thingiverse
free
Wanhao Duplicator i3 Model by Hilde3D
...wanhao duplicator i3 model by hilde3d
thingiverse
wanhao duplicator i3 model
Duplicator
turbosquid
$10

duplicate
...
turbosquid
royalty free 3d model duplicate for download as on turbosquid: 3d models for games, architecture, videos. (1566034)
turbosquid
$20

Wonderful duplicate kids room
...ul duplicate kids room for download as skp, 3ds, fbx, and obj on turbosquid: 3d models for games, architecture, videos. (1609462)
archive3d
free

Copier 3D Model
...hine duplicating machine
copier n160808 - 3d model (*.gsm+*.3ds) for interior 3d visualization.
3d_export
$30
connect four set
...ate objects that can be disassembled. includes one red and one black checker which can be duplicated to the standard 42 checkers.
3ddd
$1
Черепица
...del
- put it in your scene and duplicate
- level of detail can be edited
- open with 3ds max 2010-2013 or import in your program.
3d_export
$27

Dividing Cell / Ovule 3D Model
...al microbe blob ovum fiction science ovule duplication divide dividing
dividing cell / ovule 3d model duchampmodels 9691 3dexport
3d_ocean
$16

Folding Chair
...tubing. designed to be good low poly at a distance and mesh smooth pretty well and light weight for duplicating a lot. package...
3d_export
$8
wooden fence
... one post separate so the fence can be duplicated and extended. created in blender 3.0 file format fbx with texture painted maps.
3d_export
$8
wooden fence
... one post separate so the fence can be duplicated and extended. created in blender 3.0 file format fbx with texture painted maps.
3d_ocean
$2

DNA Strands Of 5 Types
... strands that can be multiplied and can be made long chains by duplicating them and can be easily applied materials and textures.
Bowden
turbosquid
$199
Vintage Ben Bowden Spacelander bike
... available on turbo squid, the world's leading provider of digital 3d models for visualization, films, television, and games.
3ddd
$1

Manooi Artica
...and pendants in various sizes and forms. suspension: galvanized bowden - dia. 1,5 mm. bulb: max 60 w -...
thingiverse
free
Remix Compact Bowden extruder - m6 bowden couplers and bowden tube pass-through
...ouplers and bowden tube pass-through
thingiverse
remix compact bowden extruder - m6 bowden couplers and bowden tube pass-through
thingiverse
free

Bowden Extruder
...bowden extruder
thingiverse
i have created bowden extruder for flsun delta 3d printer.
thingiverse
free

bowden 3mm by spee_D
...bowden 3mm by spee_d
thingiverse
for bowden 3mm
thingiverse
free
Bowden Tube Cutter
...bowden tube cutter
thingiverse
bowden tube cutter
thingiverse
free
Customizable Bowden Clip
...customizable bowden clip
thingiverse
customizable bowden clip
thingiverse
free
Bowden Oiler by fcheshire
...bowden oiler by fcheshire
thingiverse
inline bowden oiler
thingiverse
free

Bowden adapter by helkaroui
...bowden adapter by helkaroui
thingiverse
this is a fixed bowden adapter
thingiverse
free

Adventure3 Bowden Clip
...adventure3 bowden clip
thingiverse
adventure3 bowden clip
E3D
turbosquid
$23

E3D - Google Home
... 3d model e3d - google home for download as max, obj, and c4d on turbosquid: 3d models for games, architecture, videos. (1192509)
cg_studio
free

e3d model
...e3d model
cgstudio
- e 3d model, royalty free license available, instant download after purchase.
turbosquid
$2

Syringe C4D (E3D Ready)
...lty free 3d model syringe c4d (e3d ready) for download as c4d on turbosquid: 3d models for games, architecture, videos. (1336720)
turbosquid
$12

Microphone USB E3D and C4D
...ree 3d model microphone usb e3d & c4d for download as c4d on turbosquid: 3d models for games, architecture, videos. (1568216)
turbosquid
$29

E3D - OnePlus 6 Black
...model e3d - oneplus 6 black for download as max, obj, and c4d on turbosquid: 3d models for games, architecture, videos. (1358534)
turbosquid
$29

E3D - Motorola One 2018
...del e3d - motorola one 2018 for download as max, obj, and c4d on turbosquid: 3d models for games, architecture, videos. (1358533)
turbosquid
$29

E3D - Disney MagicBands 2
...l e3d - disney magicbands 2 for download as max, obj, and c4d on turbosquid: 3d models for games, architecture, videos. (1355515)
turbosquid
$29

E3D - Samsung Z4 Smartphone
...e3d - samsung z4 smartphone for download as max, obj, and c4d on turbosquid: 3d models for games, architecture, videos. (1182179)
turbosquid
$23

E3D - Razer Phone model
...del e3d - razer phone model for download as max, obj, and c4d on turbosquid: 3d models for games, architecture, videos. (1231207)
turbosquid
$23

E3D - Alcatel Idol 5
... model e3d - alcatel idol 5 for download as max, obj, and c4d on turbosquid: 3d models for games, architecture, videos. (1212799)
V6
3d_export
$100

v6 engine
...engine
3dexport
complete v6 engine modeled on solidworks 2017 along with .stl, .sldprt and .sldasm of all th parts and assembly.
3d_export
$10

V6 engine
... the first v6 engines were designed and produced independently by marmon motor car company, deutz gasmotoren fabrik and delahaye.
3d_export
$35

v6 engine
...s a complete model of a v6 engine containing over 400 components. you can contact me for a video of all the components assembling
3d_export
$10

v6 engine
...v6 engine
3dexport
turbosquid
$25

Bed1001-v6
... available on turbo squid, the world's leading provider of digital 3d models for visualization, films, television, and games.
turbosquid
$22

Chair2-v6
... available on turbo squid, the world's leading provider of digital 3d models for visualization, films, television, and games.
turbosquid
$20

V6.mb
... available on turbo squid, the world's leading provider of digital 3d models for visualization, films, television, and games.
3d_export
$20

V6 engine
...rovided in this package is all the parts in sldprt format and assembly in sldasm format. i can also convert the format on demand.
3ddd
$1

Стол V6
...6" в стиле дизельпанк изготовлен из блока двигателя, 4х поршней и 4х шатунов.
столешница изготовлена из стекла толщиной 8мм.
cg_studio
$199

V6 VVTi3d model
...v6 vvti3d model
cgstudio
.3ds - v6 vvti 3d model, royalty free license available, instant download after purchase.
I3
3d_export
$10

suv i3
...suv i3
3dexport
suv i3 2013 series
3d_ocean
$89

BMW i3 2012
...y, in real units of measurement, qualitatively and maximally close to the original. model formats: - *.max (3ds max 2008 scanl...
cg_studio
$99

BMW i3 20143d model
...
cgstudio
.3ds .c4d .fbx .lwo .max .obj - bmw i3 2014 3d model, royalty free license available, instant download after purchase.
cg_studio
$99

BMW i3 20123d model
...tudio
.3ds .c4d .fbx .lwo .max .mb .obj - bmw i3 2012 3d model, royalty free license available, instant download after purchase.
cg_studio
$99

BMW i3 20143d model
...tudio
.3ds .c4d .fbx .lwo .max .mb .obj - bmw i3 2014 3d model, royalty free license available, instant download after purchase.
humster3d
$75

3D model of BMW i3 2014
...
buy a detailed 3d model of bmw i3 2014 in various file formats. all our 3d models were created maximally close to the original.
humster3d
$40

3D model of Kitchen Set I3
...uy a detailed 3d model of kitchen set i3 in various file formats. all our 3d models were created maximally close to the original.
3d_ocean
$30

Kitchen set i3
...ensils oven plates shelves sink table ware
kitchen set i3 include 3d models: cooker, oven, sink, cupboards, table, chair, plates.
3d_ocean
$89

BMW i3 2014
...y, in real units of measurement, qualitatively and maximally close to the original. model formats: - *.max (3ds max 2008 scanl...
cg_studio
$99

BMW i3 Concept 20113d model
...i3
.3ds .c4d .fbx .lwo .max .obj - bmw i3 concept 2011 3d model, royalty free license available, instant download after purchase.
Rail
3d_ocean
$5
rails
...rails
3docean
old rails rails sleepers
old rails
archibase_planet
free
Rail
...chibase planet
rail railing handrail guard-rail
rail forged fence n310814 - 3d model (*.gsm+*.3ds) for exterior 3d visualization.
archibase_planet
free
Rail
...rail
archibase planet
handrail railing guard-rail
rail n220914 - 3d model (*.gsm+*.3ds) for interior 3d visualization.
archibase_planet
free

Rail
...rail
archibase planet
railing hand-rail banisters
rail n130309 - 3d model (*.gsm+*.3ds) for interior 3d visualization.
archibase_planet
free
Rail
...rail
archibase planet
railing hand-rail banisters
rail n270510 - 3d model (*.gsm+*.3ds) for interior 3d visualization.
archibase_planet
free
Railing
...
archibase planet
railing handrail fence guard-rail
railing n140314 - 3d model (*.gsm+*.3ds+*.max) for exterior 3d visualization.
archibase_planet
free

Railing
...railing
archibase planet
railing
railing- 3d model (*.gsm+*.3ds) for interior 3d visualization.
archibase_planet
free
Railing
...railing
archibase planet
railing enclosure barrier
light railing - 3d model for interior 3d visualization.
archibase_planet
free
Rail
...rail
archibase planet
metal railing
rail n280608 - 3d model (*.gsm+*.3ds) for interior 3d visualization.
archibase_planet
free
Railing
...railing
archibase planet
railing kitchen ware
railing 1 - 3d model (*.gsm+*.3ds) for interior 3d visualization.
Printer
archibase_planet
free

Printer
...inter
archibase planet
printer laser printer pc equipment
printer n120614 - 3d model (*.gsm+*.3ds) for interior 3d visualization.
archibase_planet
free

Printer
...rchibase planet
laser printer office equipment computer equipment
printer - 3d model (*.gsm+*.3ds) for interior 3d visualization.
turbosquid
$100

Printer
...er
turbosquid
royalty free 3d model printer for download as on turbosquid: 3d models for games, architecture, videos. (1487819)
turbosquid
$3

Printer
...turbosquid
royalty free 3d model printer for download as max on turbosquid: 3d models for games, architecture, videos. (1670230)
turbosquid
$1

printer
...turbosquid
royalty free 3d model printer for download as max on turbosquid: 3d models for games, architecture, videos. (1595546)
turbosquid
$1

printer
...turbosquid
royalty free 3d model printer for download as max on turbosquid: 3d models for games, architecture, videos. (1595105)
turbosquid
$10

Printer
...id
royalty free 3d model printer for download as max and 3dm on turbosquid: 3d models for games, architecture, videos. (1607146)
turbosquid
$7

Printer
...royalty free 3d model printer for download as ma, ma, and obj on turbosquid: 3d models for games, architecture, videos. (1644580)
turbosquid
$30

Printer
... available on turbo squid, the world's leading provider of digital 3d models for visualization, films, television, and games.
turbosquid
$20

Printer
... available on turbo squid, the world's leading provider of digital 3d models for visualization, films, television, and games.
Mount
3d_export
free

mounting bracket
...mounting plate is the portion of a hinge that attaches to the wood. mounting plates can be used indoors, cabinetry and furniture.
turbosquid
$2

MOUNTING
... available on turbo squid, the world's leading provider of digital 3d models for visualization, films, television, and games.
turbosquid
free

Mounts
... available on turbo squid, the world's leading provider of digital 3d models for visualization, films, television, and games.
turbosquid
free

Mount Fuji
...fuji
turbosquid
free 3d model mount fuji for download as obj on turbosquid: 3d models for games, architecture, videos. (1579977)
3d_export
$5

Headphone mount LR
...headphone mount lr
3dexport
headphone mount l+r
turbosquid
$39

Mount rainier
...quid
royalty free 3d model mount rainier for download as fbx on turbosquid: 3d models for games, architecture, videos. (1492586)
turbosquid
$5

pipe mounting
...quid
royalty free 3d model pipe mounting for download as obj on turbosquid: 3d models for games, architecture, videos. (1293744)
turbosquid
$3

Mounting Tires
...uid
royalty free 3d model mounting tires for download as fbx on turbosquid: 3d models for games, architecture, videos. (1708511)
3d_export
$5

Magnetic GoPro Mount
...pro mount
3dexport
cool magnetic mount for gopro. allows you to mount the camera on flat metal surfaces and get exclusive shots.
turbosquid
$5

Stone Mount
...ty free 3d model stone mount for download as ma, obj, and fbx on turbosquid: 3d models for games, architecture, videos. (1370306)
Light
archibase_planet
free

Light
...light
archibase planet
lamp lighting light
light - s2 - 3d model for interior 3d visualization.
archibase_planet
free

Light
...light
archibase planet
light luminaire lighting
light l0465 - 3d model (*.gsm+*.3ds) for interior 3d visualization.
3d_export
$5

lighting
...lighting
3dexport
lighting
3d_export
$5

lighting
...lighting
3dexport
lighting in livingroom
turbosquid
$3

Lighting Tree with Lights
...d model lighting tree with lights for download as max and 3ds on turbosquid: 3d models for games, architecture, videos. (1585507)
archibase_planet
free

Light
...light
archibase planet
luster lighting solution
light - s - 3d model for interior 3d visualization.
archibase_planet
free

Light
...light
archibase planet
luster lamp lighting
light 1 - 3d model for interior 3d visualization.
archibase_planet
free

Lights
...lights
archibase planet
surgical lights surgical lamp
surgical lights (floor) - 3d model for interior 3d visualization.
archibase_planet
free

Light
...light
archibase planet
lighting luminaire candlelight
light l0463 - 3d model (*.gsm+*.3ds) for interior 3d visualization.
3d_export
$18

street light-lighting-light-xia bing
...
3dexport
street light-lighting-light-xia bing<br>max 2015 v-ray 3 max 2015<br>textures<br>all files in zip...
Any
3ddd
$1

Calligaris / ANY
...calligaris / any
3ddd
calligaris
http://www.calligaris.biz/catalogue/dining/chairs/any/cs-1090
turbosquid
$4

Anis and powder
... model anis and powder for download as lwo, fbx, stl, and obj on turbosquid: 3d models for games, architecture, videos. (1626302)
turbosquid
$15
Any lamp
... available on turbo squid, the world's leading provider of digital 3d models for visualization, films, television, and games.
turbosquid
$10
Any sconce
... available on turbo squid, the world's leading provider of digital 3d models for visualization, films, television, and games.
3ddd
$1

Ani spot
... прожектор
http://bosma.ru/catalogue/product/12
экспозиционный прожектор на шинопроводе
turbosquid
$100

Chibi Anies Bas
...ee 3d model chibi anies bas for download as 3ds, obj, and c4d on turbosquid: 3d models for games, architecture, videos. (1447000)
turbosquid
$29

Cake - for any party
... available on turbo squid, the world's leading provider of digital 3d models for visualization, films, television, and games.
turbosquid
$25
parthanon ani 3_recover
... available on turbo squid, the world's leading provider of digital 3d models for visualization, films, television, and games.
turbosquid
$19

Calligaris Chair ANY
... available on turbo squid, the world's leading provider of digital 3d models for visualization, films, television, and games.
3ddd
free

Коллекция светильников ANI (BOSMA)
...(трековый прожектор)
ani mini spot (трековый прожектор)
файлы .ies к светильникам
трековая система босмаhttp://bosma.ru