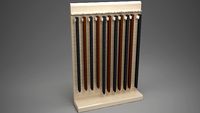
Thingiverse
E3D v6 Belt Driven Extruder (3mm / 1.75mm) for Prusa i3 by MazaaFIN
by Thingiverse
Last crawled date: 3 years ago
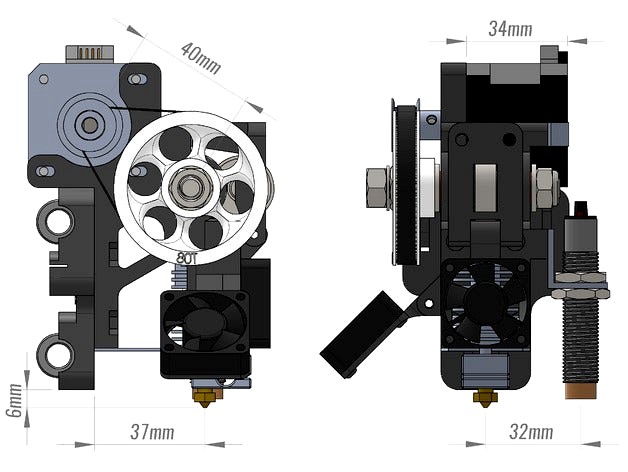
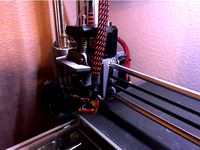
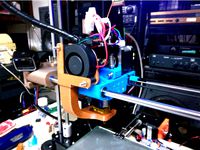
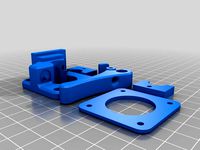
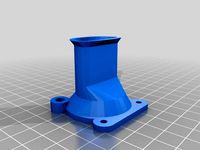
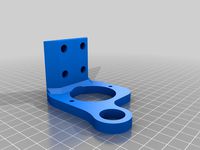
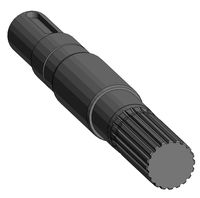
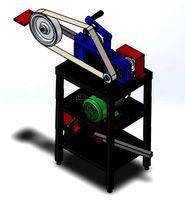
This extruder is designed for E3D v6 3mm Direct Hotend. Lightly modified extruder body and idler were made by request for 1.75mm Universal (Direct) hotend - these parts have not been tested yet. The extruder can be mounted into Prusa i3 Rework -type X-carriage, which is included in the files.
The extruder uses 2mm pitch GT2 belt drive to get rid of backlash and degeneration of 3D-printed gears (got the idea from clough42's 389105). I chose 20:80 pulley-ratio, that will give approximately 600 E-steps/mm with Hobb-Goblin's 7mm effective diameter and 1/16 microstepping (A4988 stepper driver).
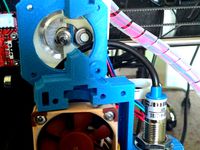
Highly recommended inductive proximity switch is installed approximately 30mm right from the hotend nozzle. 30mm (or 40mm) print cooling fan is mounted without additional duct as it seems to work for ABS printing.
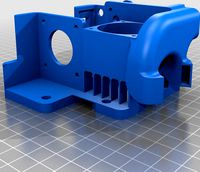
Compared to other extruders I have used (Mak-a-face's 257811 and 725082), the space between hobbed bolt and heatsink's filament entry is narrower and completely open. This makes removal of heatsink easier if filament gets stuck and cannot be pulled away. The center of the mass is also designed to be closer to X-carriage. The trade-off is that the bottom of X-carriage comes closer to print bed, so make sure there's no contact with heated bed cables when print bed moves to the front.
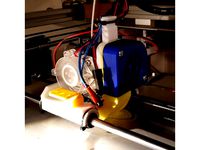
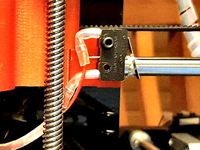
Idler without springs:
I have designed idler to be used without spring load. Just tighten the 35mm long M4 screws to the end and reliable grip to the filament is obtained. Idler's filament guiding arm prevents over tightening. With high-quality ABS I have not had any problems with this mechanism (so far over 260 hours of printing).
Additional metal parts:
The extruder has four small metal parts that should be easy to made with basic tools: hacksaw, tin snips, pliers, metal file and hand drill. Only 3mm and 12mm drill bits are needed. See attached images for reference drawings.
Inductive proximity sensor is mounted by aluminium L-bracket. Cut a piece from 20 x 20 x 2mm L-profile.
Small metal arm for cable's strain relief. Made from sheet metal.
Bottom plate to direct heatsink's cooling blow away from hotend. Made from sheet metal.
Idler's 608ZZ axle is cut from 8mm steel bar, 17-18mm length. Alternatively alum. pipe or M8 threaded rod can be used.
Extruder is designed to work with these parts:
Hotend: E3D v6 3mm Direct or 1.75mm Universal (Direct)
Heatsink cooling fan: 30x30mm E3D fan (2 ball bearings)
Print cooling fan: 30mm or 40mm
Stepper: NEMA17 (34mm long version works fine)
Driver pulley: 20 tooth GT2 pulley
Driven pulley: 3D-printed 80 tooth GT2 pulley (STL included)
Belt: Neoprene Rubber 188-2GT-6 (link to Aliexpress.com)
Hobbed bolt: E3D's Hobb-Goblin
Z-Probe: LJ12A3-4-Z/BX Inductive proximity switch, NPN, normally open (link to Aliexpress.com). Works without any additional electronics.
Assembly hardware:
2 x 688ZZ 8x16x5mm ball bearing (hobbed bolt)
2 x 8x12x1mm copper sealing washer (hobbed bolt)
1 x 608ZZ 8x22x7mm ball bearing (idler)
1 x 8x18mm steel axle / alum. tube / M8 thread bar for 608ZZ bearing (idler)
4 x 20mm M4 socket/machine screw (mount to X-carriage)
4 x M4 hex nut (mount to X-carriage)
3 x 12mm M3 socket/machine screw (stepper)
3 x M3 washer (stepper)
2 x 35mm M4 socket/machine screw (idler)
2 x M4 washer (idler)
2 x M4 hex nut (idler)
1 x Ø3mm 25mm self-tapping screw for plastic OR M3 socket/machine screw (idler's bracket)
2 x Ø3mm 20mm self-tapping screw for plastic (hotend clamp)
1 x Ø3mm 16mm self-tapping screw for plastic (fan arm)
4 x Ø3mm 8mm self-tapping screw for plastic (small metal parts)
1 x 2.5mm zip-tie (cable's strain relief)
The self-tapping screws I used have been salvaged from broken stuff.
https://www.boltdepot.com/fastener-information/type-chart.aspxhttp://de.screwerk.com/en/products/stp/stp32.html
At the bottom of this page can be found the printing parameters I use with this extruder.
The extruder uses 2mm pitch GT2 belt drive to get rid of backlash and degeneration of 3D-printed gears (got the idea from clough42's 389105). I chose 20:80 pulley-ratio, that will give approximately 600 E-steps/mm with Hobb-Goblin's 7mm effective diameter and 1/16 microstepping (A4988 stepper driver).
Highly recommended inductive proximity switch is installed approximately 30mm right from the hotend nozzle. 30mm (or 40mm) print cooling fan is mounted without additional duct as it seems to work for ABS printing.
Compared to other extruders I have used (Mak-a-face's 257811 and 725082), the space between hobbed bolt and heatsink's filament entry is narrower and completely open. This makes removal of heatsink easier if filament gets stuck and cannot be pulled away. The center of the mass is also designed to be closer to X-carriage. The trade-off is that the bottom of X-carriage comes closer to print bed, so make sure there's no contact with heated bed cables when print bed moves to the front.
Idler without springs:
I have designed idler to be used without spring load. Just tighten the 35mm long M4 screws to the end and reliable grip to the filament is obtained. Idler's filament guiding arm prevents over tightening. With high-quality ABS I have not had any problems with this mechanism (so far over 260 hours of printing).
Additional metal parts:
The extruder has four small metal parts that should be easy to made with basic tools: hacksaw, tin snips, pliers, metal file and hand drill. Only 3mm and 12mm drill bits are needed. See attached images for reference drawings.
Inductive proximity sensor is mounted by aluminium L-bracket. Cut a piece from 20 x 20 x 2mm L-profile.
Small metal arm for cable's strain relief. Made from sheet metal.
Bottom plate to direct heatsink's cooling blow away from hotend. Made from sheet metal.
Idler's 608ZZ axle is cut from 8mm steel bar, 17-18mm length. Alternatively alum. pipe or M8 threaded rod can be used.
Extruder is designed to work with these parts:
Hotend: E3D v6 3mm Direct or 1.75mm Universal (Direct)
Heatsink cooling fan: 30x30mm E3D fan (2 ball bearings)
Print cooling fan: 30mm or 40mm
Stepper: NEMA17 (34mm long version works fine)
Driver pulley: 20 tooth GT2 pulley
Driven pulley: 3D-printed 80 tooth GT2 pulley (STL included)
Belt: Neoprene Rubber 188-2GT-6 (link to Aliexpress.com)
Hobbed bolt: E3D's Hobb-Goblin
Z-Probe: LJ12A3-4-Z/BX Inductive proximity switch, NPN, normally open (link to Aliexpress.com). Works without any additional electronics.
Assembly hardware:
2 x 688ZZ 8x16x5mm ball bearing (hobbed bolt)
2 x 8x12x1mm copper sealing washer (hobbed bolt)
1 x 608ZZ 8x22x7mm ball bearing (idler)
1 x 8x18mm steel axle / alum. tube / M8 thread bar for 608ZZ bearing (idler)
4 x 20mm M4 socket/machine screw (mount to X-carriage)
4 x M4 hex nut (mount to X-carriage)
3 x 12mm M3 socket/machine screw (stepper)
3 x M3 washer (stepper)
2 x 35mm M4 socket/machine screw (idler)
2 x M4 washer (idler)
2 x M4 hex nut (idler)
1 x Ø3mm 25mm self-tapping screw for plastic OR M3 socket/machine screw (idler's bracket)
2 x Ø3mm 20mm self-tapping screw for plastic (hotend clamp)
1 x Ø3mm 16mm self-tapping screw for plastic (fan arm)
4 x Ø3mm 8mm self-tapping screw for plastic (small metal parts)
1 x 2.5mm zip-tie (cable's strain relief)
The self-tapping screws I used have been salvaged from broken stuff.
https://www.boltdepot.com/fastener-information/type-chart.aspxhttp://de.screwerk.com/en/products/stp/stp32.html
At the bottom of this page can be found the printing parameters I use with this extruder.
Similar models
thingiverse
free
Direct-drive extruder for E3D v6/v5 with Sensor by Marck80
...
2 x m3 x 20mm
2 x m4 x 3mm (1 fan - 1 support bearing)
nut:
2 x m4 square
working in progress....(second fan duct....) ;)
thingiverse
free
Anycubic Chiron direct drive modification (almost all factory parts: extruder, v5 hotend, 4010 fan, 5015 radial fan)) by ggrzyk
...ble heat block in heatsink
mount pcb board
mount 4010 fan
connect all wires to pcb board
mount 5015 radial fan with two m4 screws
thingiverse
free
Anet A8 Direct Drive mount for E3D V6 by jspeegle
...e extruder spring. (2)m3x18 screws hold the fan mount to the actual carriage and then (2)m3x20 screws mount the fan to the mount.
thingiverse
free
Anet A6 E3D V6 X Carriage Direct Drive and/or Bowden (Final) by chekcian
...d.
for fan duct, new fan bracket and proximity sensor bracket. please get them here :-
https://www.thingiverse.com/thing:2341588
thingiverse
free

A direct drive bowden extruder for 3mm and a MK7 style hobbed pulley (BEARING 608ZZ) by depri51giu
...x8mm.
1 screw 3max30mm.
2 plate aluminum 30x7x3mm
2 thread bars 3max60mm
2 springs 4x15mm
2 nuts 2 blind 3ma
2 flat washers 3.5mm
thingiverse
free

P3Steel X_carriage by hinge
...or the e3d hotend with and without 3mm nuts in.
8) hall sensor mount
all prints with 40% infil, on my reprappro.
please enjoy
thingiverse
free
Flyingbear P902 E3D Titan Aero X Carriage by martinengstrom
...the main carriage and belt clip in petg or similar pla will get mushy if the extruder motor gets...
thingiverse
free
Flexstruder reworked Direct (Improved) by Lucan07
...ot a great deal of pressure on this connection but a little more solid. left both versions available but prefer improved version.
thingiverse
free
E3Dv6 Direct Clamp with 40mm Fan Mount for itesdah's X-carriage by georgeadams
...ge by georgeadams
thingiverse
moded xsinx's combination e3d clamp / fan mount to fit on itesdahl's e3d direct x-carriage
thingiverse
free
b2x x-carriage hotend fan duct by b2x
...erse
this fan duct can be used with greg's x-carriage, or my mirrored x-carriage and a 40mm fan to direct air to the hotend.
Mazaafin
thingiverse
free
O-Ring Sizing Cones by MazaaFIN
...eck the step diameter. i use the following sizing chart as a reference.
http://www.prepol.com/ppe-uploads/oring_sizes_din3771.pdf
thingiverse
free
Bottle Jack Valve Knob by MazaaFIN
...control the lowering speed of the boom - which is needed especially on heavy loads.
leave a comment if you need modified version.
thingiverse
free
Tube Clamp Jaws by MazaaFIN
...cating pins.
there's dimensional drawings to help making customized versions. i'm not familiar with openscad programming.
thingiverse
free
Smooth X-axis for LM10UU by MazaaFIN
...me (could make it 3mm wider for this)
use http://www.thingiverse.com/thing:1270385 to connect rework -type extruder to x-carriage
thingiverse
free
52mm Spindle Holder for MPCNC (IE / 25mm) by MazaaFIN
...t head screws (din912)
moved fixing screws a bit for more solid structure (?)
i'll update the picture when my mpcnc is ready!
thingiverse
free
SMA / RP-SMA connector Finger-Tightening Ring by MazaaFIN
... prints so there's another file with zero clearance
update: with basjohan's remix you can also make a customized version.
thingiverse
free
X550 Quadcopter by MazaaFIN
...in of safe usage time with 1000mah battery
fpv-gear + leds + g-3d 1.0a = 50min
(*) printed with e3d v6 belt driven extruder.
thingiverse
free
Geeetech Prusa i3 X Carriage
...i3 x carriage thingiverse carriage for the design from mazaafin smooth x-axis for prusa i3 with leadscrews...
thingiverse
free
X-Carriage-ENDSTOP by ant0ny
...in smooth x-axis for prusa i3 with leadscrews by mazaafin this is to use the original geeetech prusa i3...
thingiverse
free

Smooth X-axis for Prusa i3 with Leadscrews by MazaaFIN
...s)
2 x m3 10-16mm hex socket screw (tensioner)
2 x m3 nut (tensioner)
1 x m4 20-30mm hex screw (tensioner)
1 x m4 nut (tensioner)
75Mm
cg_studio
$79

75mm Pak 97/383d model
...rld ww2 wwii
.obj .jpg .max .fbx .3ds - 75mm pak 97/38 3d model, royalty free license available, instant download after purchase.
3d_export
$79
75mm Pak 97-38 3D Model
... pak tank war weapon world
75mm pak 97-38 3d model download .c4d .max .obj .fbx .ma .lwo .3ds .3dm .stl graverino 108478 3dexport
3d_ocean
$79
75mm Pak 97/38
...el originally created with 3ds max and rendered with vray the model is easy to modify, the main parts can be easily moved as i...
cg_studio
$149

M4A3 Sherman - 75mm - Mid production3d model
... .c4d .lwo .obj - m4a3 sherman - 75mm - mid production 3d model, royalty free license available, instant download after purchase.
cg_studio
$139
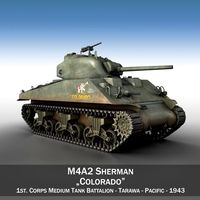
M4A2 Sherman - Colorado3d model
...m4a2 sherman colorado tank us marine corps pacific theatre 75mm m3 l/40 gun .c4d .obj .lwo .fbx .3ds -...
cg_studio
$139

M4A2 Sherman - Destroyer3d model
...m4a2 sherman destroyer tank us marine corps pacific theatre 75mm m3 l/40 gun .c4d .obj .lwo .fbx .3ds -...
cg_studio
$65

Pak 403d model
...pak 403d model cgstudio gun ww2 75mm artillery world war wwii 1943 army 1945 anti tank...
cg_studio
$125
Anti tank guns ww23d model
...anti tank guns ww23d model cgstudio gun ww2 75mm artillery wwii army 1945 antitank projectile weapon shell case...
3ddd
free

Indian vase
...311742 размеры: длинна маленькой вазы - 460mm, ширина - 75mm высота - 130mm длинна большой вазы - 600mm, ширина...
3d_export
$7
facemaskearloopweldingmachine
...the welding of one-time plane mask ear belt with 75mm standard ear band spacing. if you want to weld...
Driven
turbosquid
$50
CHAIN DRIVEN CONVEYOR
... available on turbo squid, the world's leading provider of digital 3d models for visualization, films, television, and games.
3d_export
free
driven shaft of the lump crusher
...driven shaft of the lump crusher
3dexport
3d_export
$27
n95 full servo driven mask printer
...n95 full servo driven mask printer
3dexport
n95 full servo driven mask printer
turbosquid
$16

(Project) Food packing helper machine with holding clamp and press table driven by an actuator
... available on turbo squid, the world's leading provider of digital 3d models for visualization, films, television, and games.
3d_export
$47
the fifth generation of one driven two new mask machine
...ing, lamination, pressing, ear band tapping, ultrasonic, etc. the structure of the model is detailed, including model parameters.
3d_export
$15
industrial belt-driven air cooler
...leaning up necessary, just drop your models into the scene and start rendering/texturing. no special plugin needed to open scene.
3d_export
free

golf cart
...golf cart 3dexport golf cart for golfers to be driven in...
3d_export
$10
design and assembly of pulley
...pulley 3d model which is used for drive and driven ...
archive3d
free

Windmill 3D Model
...windmill 3d model archive3d wind turbine wind-driven powerplant wind-electric set windmill n181208 - 3d model (*.gsm+*.3ds)...
3d_export
$30
Compressed Air Engine 3D Model
...motor flywheel shaft camshaft piston valve block engineering compressed-air driven compressed air engine 3d model zenmunster 92451...
E3D
turbosquid
$23

E3D - Google Home
... 3d model e3d - google home for download as max, obj, and c4d on turbosquid: 3d models for games, architecture, videos. (1192509)
cg_studio
free

e3d model
...e3d model
cgstudio
- e 3d model, royalty free license available, instant download after purchase.
turbosquid
$2

Syringe C4D (E3D Ready)
...lty free 3d model syringe c4d (e3d ready) for download as c4d on turbosquid: 3d models for games, architecture, videos. (1336720)
turbosquid
$12

Microphone USB E3D and C4D
...ree 3d model microphone usb e3d & c4d for download as c4d on turbosquid: 3d models for games, architecture, videos. (1568216)
turbosquid
$29

E3D - OnePlus 6 Black
...model e3d - oneplus 6 black for download as max, obj, and c4d on turbosquid: 3d models for games, architecture, videos. (1358534)
turbosquid
$29

E3D - Motorola One 2018
...del e3d - motorola one 2018 for download as max, obj, and c4d on turbosquid: 3d models for games, architecture, videos. (1358533)
turbosquid
$29

E3D - Disney MagicBands 2
...l e3d - disney magicbands 2 for download as max, obj, and c4d on turbosquid: 3d models for games, architecture, videos. (1355515)
turbosquid
$29

E3D - Samsung Z4 Smartphone
...e3d - samsung z4 smartphone for download as max, obj, and c4d on turbosquid: 3d models for games, architecture, videos. (1182179)
turbosquid
$23

E3D - Razer Phone model
...del e3d - razer phone model for download as max, obj, and c4d on turbosquid: 3d models for games, architecture, videos. (1231207)
turbosquid
$23

E3D - Alcatel Idol 5
... model e3d - alcatel idol 5 for download as max, obj, and c4d on turbosquid: 3d models for games, architecture, videos. (1212799)
V6
3d_export
$100

v6 engine
...engine
3dexport
complete v6 engine modeled on solidworks 2017 along with .stl, .sldprt and .sldasm of all th parts and assembly.
3d_export
$10

V6 engine
... the first v6 engines were designed and produced independently by marmon motor car company, deutz gasmotoren fabrik and delahaye.
3d_export
$35

v6 engine
...s a complete model of a v6 engine containing over 400 components. you can contact me for a video of all the components assembling
3d_export
$10

v6 engine
...v6 engine
3dexport
turbosquid
$25

Bed1001-v6
... available on turbo squid, the world's leading provider of digital 3d models for visualization, films, television, and games.
turbosquid
$22

Chair2-v6
... available on turbo squid, the world's leading provider of digital 3d models for visualization, films, television, and games.
turbosquid
$20

V6.mb
... available on turbo squid, the world's leading provider of digital 3d models for visualization, films, television, and games.
3d_export
$20

V6 engine
...rovided in this package is all the parts in sldprt format and assembly in sldasm format. i can also convert the format on demand.
3ddd
$1

Стол V6
...6" в стиле дизельпанк изготовлен из блока двигателя, 4х поршней и 4х шатунов.
столешница изготовлена из стекла толщиной 8мм.
cg_studio
$199

V6 VVTi3d model
...v6 vvti3d model
cgstudio
.3ds - v6 vvti 3d model, royalty free license available, instant download after purchase.
I3
3d_export
$10

suv i3
...suv i3
3dexport
suv i3 2013 series
3d_ocean
$89

BMW i3 2012
...y, in real units of measurement, qualitatively and maximally close to the original. model formats: - *.max (3ds max 2008 scanl...
cg_studio
$99

BMW i3 20143d model
...
cgstudio
.3ds .c4d .fbx .lwo .max .obj - bmw i3 2014 3d model, royalty free license available, instant download after purchase.
cg_studio
$99

BMW i3 20123d model
...tudio
.3ds .c4d .fbx .lwo .max .mb .obj - bmw i3 2012 3d model, royalty free license available, instant download after purchase.
cg_studio
$99

BMW i3 20143d model
...tudio
.3ds .c4d .fbx .lwo .max .mb .obj - bmw i3 2014 3d model, royalty free license available, instant download after purchase.
humster3d
$75

3D model of BMW i3 2014
...
buy a detailed 3d model of bmw i3 2014 in various file formats. all our 3d models were created maximally close to the original.
humster3d
$40

3D model of Kitchen Set I3
...uy a detailed 3d model of kitchen set i3 in various file formats. all our 3d models were created maximally close to the original.
3d_ocean
$30

Kitchen set i3
...ensils oven plates shelves sink table ware
kitchen set i3 include 3d models: cooker, oven, sink, cupboards, table, chair, plates.
3d_ocean
$89

BMW i3 2014
...y, in real units of measurement, qualitatively and maximally close to the original. model formats: - *.max (3ds max 2008 scanl...
cg_studio
$99

BMW i3 Concept 20113d model
...i3
.3ds .c4d .fbx .lwo .max .obj - bmw i3 concept 2011 3d model, royalty free license available, instant download after purchase.
Prusa
turbosquid
$2

Frame Filament Guide Clip-On for Prusa Mk3
...rame filament guide clip-on for prusa mk3 for download as stl on turbosquid: 3d models for games, architecture, videos. (1634730)
3d_export
free

prusa i3 mk3s laser mount for opt lasers
...to learn more about the blue laser technology that conceived the cutting and engraving laser heads from opt lasers, please visit:
turbosquid
free

Prusa small printer adapter holder
...er for download as ipt, skp, dwg, dxf, fbx, ige, obj, and stl on turbosquid: 3d models for games, architecture, videos. (1642936)
3d_export
$30

geisha by jonathan adler
...** i did a 3d printing test in the prusa software, you can find it among the attached images.<br>exchange:<br>.blend...
thingiverse
free

Prusa without Prusa (rc2) by madless
...prusa without prusa (rc2) by madless
thingiverse
just the main part of prusa rc2 faceshield, without writing.
enjoy :)
thingiverse
free

Prusa by acejbc
...prusa by acejbc
thingiverse
prusa knob info
m3 8mm screw
thingiverse
free

Prusa house
...prusa house
thingiverse
how prusa house could look like...
thingiverse
free

Prusa Mk2 "Fake Prusa" LCD cover by anraf1001
...r by anraf1001
thingiverse
version of prusa's lcd cover with "fake prusa" instead of "original prusa"
thingiverse
free

Prusa stabilizator by gutiueugen
...prusa stabilizator by gutiueugen
thingiverse
prusa stabilizator
thingiverse
free

Keychain Prusa by rbarbalho
...keychain prusa by rbarbalho
thingiverse
keychain with text prusa.
Belt
turbosquid
$9
Belt conveyor belt
...t conveyor belt for download as 3ds, ige, obj, stl, and sldas on turbosquid: 3d models for games, architecture, videos. (1226546)
3d_export
$6
belt
...d then comes off and fastens at the front of the seat. version: 2015 units: millimetres x-form: yes polys: 120 950 verts: 163 944
3d_export
$7
belt grinder
...belt grinder
3dexport
belt grinder
3d_export
$5
Belt conveyor
...belt conveyor
3dexport
belt conveyor
3ddd
$1
column belt
...column belt
3ddd
колонна
column belt
turbosquid
$5
Belt
... available on turbo squid, the world's leading provider of digital 3d models for visualization, films, television, and games.
3d_ocean
$5
Leather Belt
...ather belt is created in 3dsmax 2011 and rendered with vray 1.5 and it has all the texture included with the multiple obj format.
3d_ocean
$5

Belt Ring
...belt ring
3docean
belt jewelry ring
belt ring 3d model. total weight 3.5 gram & 1.1 stone size. 3dm and obj file format.
design_connected
$11
Belt Round
...belt round
designconnected
meridiani belt round computer generated 3d model. designed by parisio, andrea.
design_connected
$11
Belt Oval
...belt oval
designconnected
meridiani belt oval computer generated 3d model. designed by parisio, andrea.
3Mm
turbosquid
$25
Single 3mm Gemstone Flower Gold Ring
... flower gold ring for download as max, obj, 3ds, fbx, and stl on turbosquid: 3d models for games, architecture, videos. (1529737)
3d_export
$5

eternity ring
...ring 3dexport eternity wedding rings for small fingers with 3mm diamonds on it. diameter of this ring is 14.7...
3d_export
$20
ring ak 2
...2 3dexport size 16<br>weight 18к-18,16 / 14к-15,18 / 925-12,71<br>gems 3mm2pcs / 1.1mm-1pc /...
3d_export
$8

case lcd 2004 stl
...dimension: height: 73mm width: 180mm depth: 30mm wall thickness: 3mm ...
3d_export
$5

sapphire and diamond ring
...16.88 and sapphire stones have 3.1mm and diamonds have 3mm diameter. i don't recommend to rescale it you can...
3d_export
$6
pearls ring
...for any inquiries and modifications.<br>editable 3d.<br>ring rail size:52<br>thickness rail: 1.2mm*3mmlt;br>weight gold: 4.6gr silver 925: 3.31...
3d_export
$5
racing drone frame
...drone frame 3dexport fdv racing drone<br>size:152*152mm<br>base plate:4mm<br>side plate : 3mmlt;br>top plate:1.5mm<br>beautiful appearance design,durable in crashing<br>hood engine room design,quick maintenance...
3d_export
$15
generic autopilot master panel for flight simulation
...placed the pushbuttons in position, you have to use 3mm screws to hold them in position. the led must...
3d_export
$5
puzzle cube
...direction to separate. clearance between the parts is around .3mm allowing for smooth movement without binding. since these parts...
3d_export
$50
Knife phoenix
...dimensions:<br>total length - 180mm<br>maximum width - 32mm<br>blade thickness - 3mmlt;br>handle thickness - 6mm<br>multiformat: igs, obj, stl, bip<br>nested 2 obj...
Extruder
3ddd
$1

Extruded Chair
...extruded chair
3ddd
extruded , tom dixon
inspired by tom dixon extruded chair
turbosquid
$15

Extruded Table
... extruded table for download as blend, dae, fbx, obj, and stl on turbosquid: 3d models for games, architecture, videos. (1634137)
turbosquid
$2

3D Printer Extruder
...d
royalty free 3d model 3d printer extruder for download as on turbosquid: 3d models for games, architecture, videos. (1537359)
turbosquid
$1

Zombie extruded text
...oyalty free 3d model zombie extruded text for download as obj on turbosquid: 3d models for games, architecture, videos. (1322198)
turbosquid
$4

Extruder conical screw
...el extruder conical screw for download as sldpr, ige, and stl on turbosquid: 3d models for games, architecture, videos. (1524433)
turbosquid
$50

3d PRINTER - Extruder
... available on turbo squid, the world's leading provider of digital 3d models for visualization, films, television, and games.
turbosquid
$15

Extruded Table 2
...xtruded table 2 for download as blend, dae, fbx, obj, and stl on turbosquid: 3d models for games, architecture, videos. (1621846)
turbosquid
$10

Maya Extrude Tool
... available on turbo squid, the world's leading provider of digital 3d models for visualization, films, television, and games.
3d_export
$5

world earth extrude map
...world earth extrude map
3dexport
3ddd
$1

Simply Elegant Extruded Tree Coffee Table Design
...ble by link studios. the silhouette of a tree is visible at one angle, extruded from the surface to create the support structure.
1
turbosquid
$69

armchairs(1)(1)
... available on turbo squid, the world's leading provider of digital 3d models for visualization, films, television, and games.
turbosquid
$15

ring 1+1
... available on turbo squid, the world's leading provider of digital 3d models for visualization, films, television, and games.
turbosquid
$10

chair(1)(1)
... available on turbo squid, the world's leading provider of digital 3d models for visualization, films, television, and games.
turbosquid
$8

Chair(1)(1)
... available on turbo squid, the world's leading provider of digital 3d models for visualization, films, television, and games.
turbosquid
$2

RING 1(1)
... available on turbo squid, the world's leading provider of digital 3d models for visualization, films, television, and games.
turbosquid
$1

house 1(1)
... available on turbo squid, the world's leading provider of digital 3d models for visualization, films, television, and games.
turbosquid
$1

Table 1(1)
... available on turbo squid, the world's leading provider of digital 3d models for visualization, films, television, and games.
turbosquid
$59

Formula 1(1)
...lty free 3d model formula 1 for download as max, fbx, and obj on turbosquid: 3d models for games, architecture, videos. (1567088)
design_connected
$11

No 1
...no 1
designconnected
sibast no 1 computer generated 3d model. designed by sibast, helge.
turbosquid
$2

desert house(1)(1)
...3d model desert house(1)(1) for download as 3ds, max, and obj on turbosquid: 3d models for games, architecture, videos. (1055095)