GrabCAD

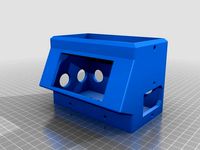
Duet WiFi Case Assembly | CR-10S 3D Printer
by GrabCAD
Last crawled date: 2 years ago
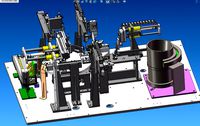
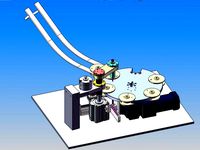
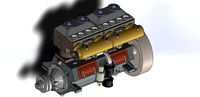
This has been a long work in progress but I have finally finished the first working prototype for my Duet WiFi case. The intent behind this specific design was to be able to enclose the various electronic components that are utilized in my highly modified CR-10S. I was able to wire and contain everything in an organized way by using a combination of flex guard convoluted tubes and zip ties.
**FYI: This build requires almost a full kg of filament depending on slicer settings. So be sure to have a full roll of filament ready and make sure your printer is dialed in before attempting to print these large components.**
This case is designed to contain the following components:
**1X Duet WiFi Control Board**
https://www.filastruder.com/collections/electronics/products/duet-wifi
**1X Solid State Relay**
https://www.amazon.com/gp/product/B0087ZTN08/ref=oh_aui_detailpage_o01_s00?ie=UTF8&psc=1
**1X Heater MOSFET**
https://www.amazon.com/gp/product/B01MU3H01A/ref=oh_aui_detailpage_o03_s00?ie=UTF8&psc=1
**2X Power Switches**
https://www.amazon.com/gp/product/B00NWO68JI/ref=oh_aui_detailpage_o06_s00?ie=UTF8&psc=1
**1X Power Supply**
https://www.amazon.com/gp/product/B00IF93H6W/ref=oh_aui_detailpage_o08_s00?ie=UTF8&psc=1
**2X 40mm Case Fans**
https://www.amazon.com/gp/product/B009NQLT0M/ref=oh_aui_detailpage_o04_s00?ie=UTF8&psc=1
**1X 50mm Case Fan**
https://www.amazon.com/Noiseblocker-NB-BlackSilent-Ultra-Silent-3000rpm/dp/B0083A0CBG/ref=sr_1_1?s=electronics&ie=UTF8&qid=1526523975&sr=1-1&keywords=noiseblocker+fan
I have personally made my own board to handle the 24V to 12V step down for case fans and the inductive sensor using the following transistors(https://www.amazon.com/gp/product/B076R44FS7/ref=oh_aui_detailpage_o02_s00?ie=UTF8&psc=1).
The type of PCB I soldered these too is here: https://www.amazon.com/gp/product/B01M7R5YIB/ref=oh_aui_detailpage_o08_s00?ie=UTF8&psc=1
Hardware Needed for Assembly of components may vary depending if you purchase the earlier mentioned electronics or not, but I used the following below:
**Duet Wifi Board** --> 4X M4x0.7, 6mm lg screws with 4X plastic washers
**SSR** --> 2X M5x0.8, 5mm lg screws
**Case Fans** --> 6X M4x0.7, 14mm lg screws
**Power Switches** --> 4X M4x0.7, 6mm lg screws
**Heater MOSFET** --> 4X M3x0.5, 5mm lg screws
The Duet Wifi Case and PSU case are designed to be mounted onto the CR10 frame with screws and T-Slot nuts so that the unit can be moved without carrying the components individually. However, it is still advised to be CAUTIOUS when moving the assembly as an adequate amount of weight will be cantilevered off the edge of the frame.
**DISCLAIMER**: I claim no responsibility for any damage that may result from assembly and wiring of electronics incorrectly, or drops resulting from inadequate mechanical fastening.
**3D CAD Design Credit**
Duet Wifi_Phil Maddox - GrabCAD
DC Power Supply_Luca - GrabCAD
URBEST Power Switch_Richard Bruning - GrabCAD
Uxcell SSR_Xinchao Song - GrabCAD
Flexible Motor Coupling_Eoghan O'Duffy - GrabCAD
NOCTUA 40mm Fan_Sean - GrabCAD
*Assembly Instructions*
- Fasten the Base Mount and PSU Mounts to the CR-10 frame with machine screws and T-Slot Nuts (Optional).
- Fasten the SSR onto the Base Mount next and make sure to connect all wires to it at this time.
- Fasten the MOSFET board onto the Base Mount and connect all wires to it at this time.
- Fasten the 4 case posts (CAREFULLY) into the Base Mount.
- Fasten the Duet Wifi on the case posts with the plastic washers and machine screws. Be sure to hold each of the case posts while doing this as the external threads on the posts can break if not careful.
- Install and fasten the power switches and case fans onto the Hinged mount
- Install the Hinged Mount to the Base mount. The orientation is specific as this can be installed only one way. Do not force these pieces together.
- Install Power Supply to the PSU Mount and fasten with machine screws.
- Finish all remaining wiring until satisfied and close the case and secure with a zip tie (Optional)
Enjoy the clutterless work area!
Similar models
thingiverse
free

Duet WiFi Case Assembly | CR-10S 3D Printer by MP23Racing
...g - grabcad
uxcell ssr_xinchao song - grabcad
flexible motor coupling_eoghan o'duffy - grabcad
noctua 40mm fan_sean - grabcad
thingiverse
free

Desk Fan by NebNorse
...lpages04?ie=utf8&psc=1
motor control: https://www.amazon.com/gp/product/b01cnl6imc/ref=od_aui_detailpages04?ie=utf8&psc=1
thingiverse
free

MK3 Camera Mount by infocus
..._o04_s00?ie=utf8&psc=1
flex cablehttps://www.amazon.com/gp/product/b00m4daqh8/ref=oh_aui_detailpage_o04_s00?ie=utf8&psc=1
thingiverse
free

Guitar Pickup Winder
...=utf8&psc=1
speed adjustmenthttps://www.amazon.com/gp/product/b07vpnhs5j/ref=ppx_yo_dt_b_asin_title_o02_s01?ie=utf8&psc=1
thingiverse
free

Sonoff Enclosure by JeffLZ
...title_o00_s00?ie=utf8&psc=1
https://www.amazon.com/gp/product/b00qvb6qpu/ref=ox_sc_saved_title_1?smid=atvpdkikx0der&psc=1
thingiverse
free
50A Power Supply Cover W/LCD Display by hkgary_g
...lpage_o06_s01?ie=utf8&psc=1
power socket
www.amazon.com/gp/product/b06xnmt3wl/ref=oh_aui_detailpage_o06_s00?ie=utf8&psc=1
thingiverse
free
Hand Mixer by OM3
...e?ie=utf8&psc=1
power supplyhttps://www.amazon.com/gp/product/b01461mogq/ref=ppx_yo_dt_b_search_asin_title?ie=utf8&psc=1
thingiverse
free
12 Function Deep Dish Button Box by coyoteyz13
..._title_o03_s00?ie=utf8&psc=1
https://www.amazon.com/gp/product/b07vhcb1q4/ref=ppx_yo_dt_b_search_asin_title?ie=utf8&psc=1
thingiverse
free

Tally Light by iotaxiii
...p;psc=1
pcb / solder breadboard: https://www.amazon.com/gp/product/b07zytz48n/ref=ppx_yo_dt_b_search_asin_title?ie=utf8&psc=1
thingiverse
free

Travel/Home Charging Station
...p/product/b006zb30ve/ref=ppx_yo_dt_b_asin_title_o08_s00?ie=utf8&psc=1
power supply: hp hstns-pl14 (generic p/n: 499249-201)
Duet
turbosquid
$10

Duet
... available on turbo squid, the world's leading provider of digital 3d models for visualization, films, television, and games.
3ddd
$1
Orgadoor / Duet
...door , дверь
фабрика: orgadoor
коллекция: organic
модель: duet
сайт: www.orgadoor.com.ua
turbosquid
$47

Duet rally car
...uid
royalty free 3d model duet rally car for download as fbx on turbosquid: 3d models for games, architecture, videos. (1501869)
turbosquid
$39

Duet solid white
...d
royalty free 3d model duet solid white for download as fbx on turbosquid: 3d models for games, architecture, videos. (1236356)
turbosquid
free

Bench with a table Duet
...del bench with a table duet for download as max, obj, and fbx on turbosquid: 3d models for games, architecture, videos. (1655855)
turbosquid
$13

chandelier Lussole Loft Duet
...
royalty free 3d model lussole loft duet for download as 3ds on turbosquid: 3d models for games, architecture, videos. (1180567)
turbosquid
$60

Duet classic car silver
...lty free 3d model duet classic car silver for download as fbx on turbosquid: 3d models for games, architecture, videos. (1489252)
turbosquid
$50

Duet classic car black
...alty free 3d model duet classic car black for download as fbx on turbosquid: 3d models for games, architecture, videos. (1490723)
turbosquid
$49

Duet car white and red
...alty free 3d model duet car white and red for download as fbx on turbosquid: 3d models for games, architecture, videos. (1486820)
turbosquid
$30

Bloom Upholstered Duet Lounge Chair
...model bloom upholstered duet lounge chair for download as max on turbosquid: 3d models for games, architecture, videos. (1503906)
Wifi
turbosquid
$1

Wifi Icon
...rbosquid
royalty free 3d model wifi icon for download as fbx on turbosquid: 3d models for games, architecture, videos. (1546436)
turbosquid
$10

WiFi Camera
... available on turbo squid, the world's leading provider of digital 3d models for visualization, films, television, and games.
design_connected
$4
Wifi Coffee Table
...offee table
designconnected
liv'it wifi coffee table coffee tables computer generated 3d model. designed by stefan schöning.
turbosquid
$2
Wifi Signal Booster
...yalty free 3d model wifi signal booster for download as blend on turbosquid: 3d models for games, architecture, videos. (1281888)
turbosquid
$15

IOT Wifi Switch
...odel iot wifi switch for download as obj, fbx, blend, and dae on turbosquid: 3d models for games, architecture, videos. (1510115)
3d_export
$12
IPod WiFi 3D Model
...ipod wifi 3d model
3dexport
ipod wi-fi
ipod wifi 3d model fau 71186 3dexport
turbosquid
$59

iPad Air WiFi
... available on turbo squid, the world's leading provider of digital 3d models for visualization, films, television, and games.
turbosquid
$5
Nintendo USB WIFI
... available on turbo squid, the world's leading provider of digital 3d models for visualization, films, television, and games.
turbosquid
$2

Wireless WiFi Router
...eless wifi router for download as blend, x, fbx, stl, and obj on turbosquid: 3d models for games, architecture, videos. (1682399)
turbosquid
$7

Wifi internet logo
...nternet logo for download as max, ige, obj, fbx, dwg, and stl on turbosquid: 3d models for games, architecture, videos. (1369275)
Cr
turbosquid
$15
Creazioni CR-673 CR-4461
... available on turbo squid, the world's leading provider of digital 3d models for visualization, films, television, and games.
3ddd
$1
Ravak CR 055.00
...ravak cr 055.00
3ddd
ravak , смеситель
ravak cr 055.00
turbosquid
$100

CR-002
...
turbosquid
royalty free 3d model cr-002 for download as stl on turbosquid: 3d models for games, architecture, videos. (1686037)
3ddd
$1

Ravak CR 012.00
...ravak cr 012.00
3ddd
ravak , смеситель
смеситель ravak cr 012.00
3ddd
free
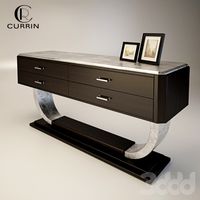
Консоль CR Currin
...ь , cr currin
консоль cr currin
ширина - 1675 мм
глубина - 510 мм
общая высота - 810 мм
3ddd
$1
CR 39444
...0
диаметр: 100
тип патрона: gu5,3 gu10
количество ламп: 1
мощность: 35w
цвет: золото хрусталь
материал: металл хрусталь exclusive
3d_ocean
$89
Honda CR-Z
...www.youtube.com/watch?v=rrbb4d4lypk ` he honda cr-z‘s exterior styling is formed around a “one-motion wedge” concept with a lo...
3ddd
$1

Creazoni / STEFY CR-8901
...creazoni / stefy cr-8901
3ddd
creazoni
creazioni stefy cr-8901
turbosquid
$60

Chain-CR-001
...squid
royalty free 3d model chain-cr-001 for download as stl on turbosquid: 3d models for games, architecture, videos. (1680536)
turbosquid
$99

Honda CR-Z
... available on turbo squid, the world's leading provider of digital 3d models for visualization, films, television, and games.
Assembly
3d_export
$7
Electronic product assembly machine assembly machine
...electronic product assembly machine assembly machine
3dexport
electronic product assembly machine assembly machine
3d_export
$15
generator assembly line
...ced and assembled in the form of module block. it is a demonstration project of generator assembly. welcome to download and learn
3d_export
$10
elevator traction machine assembly line motor assembly process
... traction machine assembly line motor assembly process
3dexport
elevator traction machine assembly line (motor assembly process)
3d_export
$16
pin assembly machine
...pin assembly machine
3dexport
pin assembly machine
3d_export
$7
tower-crane-assembly
...tower-crane-assembly
3dexport
tower-crane-assembly
turbosquid
$100

Engine Assembly
...id
royalty free 3d model engine assembly for download as stl on turbosquid: 3d models for games, architecture, videos. (1658296)
turbosquid
$100
Engine Assembly
...id
royalty free 3d model engine assembly for download as stl on turbosquid: 3d models for games, architecture, videos. (1658291)
turbosquid
$100

Engine Assembly
...id
royalty free 3d model engine assembly for download as stl on turbosquid: 3d models for games, architecture, videos. (1658293)
turbosquid
$75
Platform Assembly
...royalty free 3d model platform assembly for download as blend on turbosquid: 3d models for games, architecture, videos. (1472939)
turbosquid
$15
generator assembly
...y free 3d model generator assembly for download as and sldas on turbosquid: 3d models for games, architecture, videos. (1469469)
Case
3d_export
$1

case
...case
3dexport
case
archibase_planet
free

Case
...case
archibase planet
showcase show-case glass case
glass-case + cakes - 3d model for interior 3d visualization.
archibase_planet
free

Case
...case
archibase planet
showcase show-case glass case
glass-case for chips - 3d model for interior 3d visualization.
archibase_planet
free

Case
...case
archibase planet
case shelving drawer
case - 3d model for interior 3d visualization.
archibase_planet
free

Case
...case
archibase planet
case rack locker
case - 3d model for interior 3d visualization.
archibase_planet
free

Case
...case
archibase planet
case drawer kitchen furniture
case - 3d model for interior 3d visualization.
archibase_planet
free

Case
...case
archibase planet
case cupboard shelving
glass case - 3d model for interior 3d visualization.
archibase_planet
free

Case
...case
archibase planet
case handbag suitcase
case - 3d model (*.gsm+*.3ds) for interior 3d visualization.
archibase_planet
free

Case
...case
archibase planet
case suitcase
case 5 - 3d model (*.gsm+*.3ds) for interior 3d visualization.
archibase_planet
free

Case
...case
archibase planet
locker case dresser
case - 3d model (*.gsm+*.3ds) for interior 3d visualization.
Printer
archibase_planet
free

Printer
...inter
archibase planet
printer laser printer pc equipment
printer n120614 - 3d model (*.gsm+*.3ds) for interior 3d visualization.
archibase_planet
free

Printer
...rchibase planet
laser printer office equipment computer equipment
printer - 3d model (*.gsm+*.3ds) for interior 3d visualization.
turbosquid
$100

Printer
...er
turbosquid
royalty free 3d model printer for download as on turbosquid: 3d models for games, architecture, videos. (1487819)
turbosquid
$3

Printer
...turbosquid
royalty free 3d model printer for download as max on turbosquid: 3d models for games, architecture, videos. (1670230)
turbosquid
$1

printer
...turbosquid
royalty free 3d model printer for download as max on turbosquid: 3d models for games, architecture, videos. (1595546)
turbosquid
$1

printer
...turbosquid
royalty free 3d model printer for download as max on turbosquid: 3d models for games, architecture, videos. (1595105)
turbosquid
$10

Printer
...id
royalty free 3d model printer for download as max and 3dm on turbosquid: 3d models for games, architecture, videos. (1607146)
turbosquid
$7

Printer
...royalty free 3d model printer for download as ma, ma, and obj on turbosquid: 3d models for games, architecture, videos. (1644580)
turbosquid
$30

Printer
... available on turbo squid, the world's leading provider of digital 3d models for visualization, films, television, and games.
turbosquid
$20

Printer
... available on turbo squid, the world's leading provider of digital 3d models for visualization, films, television, and games.
10S
turbosquid
$25

10
... available on turbo squid, the world's leading provider of digital 3d models for visualization, films, television, and games.
turbosquid
$10

a-10
... available on turbo squid, the world's leading provider of digital 3d models for visualization, films, television, and games.
3ddd
$1

EX 10
...ex 10
3ddd
samsung , фотоаппарат
ex 10
3ddd
$1

Bed 10
...bed 10
3ddd
постельное белье
bed 10
evermotion
$25

Scene 10 Archinteriors vol. 10
...dering design interior
take a look at textured and shadered visualization scene ready to be rendered.. evermotion 3d models shop.
3ddd
$1

Curtains 10
...curtains 10
3ddd
curtains 10
3ds max 2011,fbx + textures
polys: 100355
3ddd
free

PLANTS 10
...plants 10
3ddd
цветок , горшок
plants 10,, with 3 different color planter boxes
turbosquid
$24

Chandelier MD 89310-10+10 Osgona
... chandelier md 89310-10+10 osgona for download as max and fbx on turbosquid: 3d models for games, architecture, videos. (1218762)
design_connected
$29

Nuvola 10
...nuvola 10
designconnected
gervasoni nuvola 10 computer generated 3d model. designed by navone, paola.
design_connected
$22

Kilt 10
...kilt 10
designconnected
zanotta kilt 10 computer generated 3d model. designed by progetti, emaf.