Thingiverse
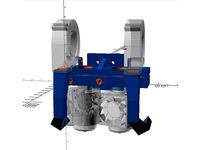
Dual Part Cooling Fan Mount for BunnyScience BNBSX Short Ears MK3S Extruder
by Thingiverse
Last crawled date: 4 years, 2 months ago
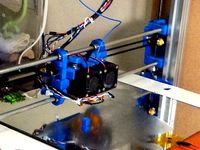
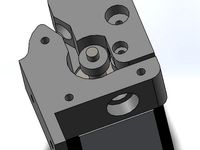
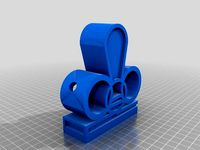
This is a remix of jonathanrswift's clever dual fan mount, but modified to mount on BunnyScience's BNBSX Short Ears MK3S Extruder. All credit goes to jonathanrswift for this highly effective shroud. I appreciate the simulation work that went into this shroud and to be able to see the nozzle is what I always wanted.
02.23.20 - Version 2 (non-lighted) and 3 (Lighted)
[*If you can't download the file(s), go to the 'Thing Files' tab and download from there]
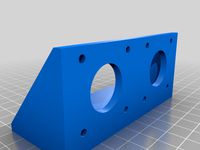
For these versions, I wanted to tweak the outlet nozzle on the right a little. Didn't seem like enough air was coming out as it should and I thought the aim was a skosh off. I did several tests, as evidenced by the multitude of shrouds I'd printed out and tested. This newer version should work better. It turns out, the version I used to modify to a BNBSX extruder was not directly from the original designer, as it was modified to fit a Bunny gear setup on an MK3S extruder with BLTouch (JojoStein), therefore it had previously been modified. I essentially modified the shroud to be closer to the original. Additionally, I restored the 'delta' style bracket as I liked the balanced appearance. I also extended the flange under the left fan to grasp/cup/support the fan's outlet a little more. On the right I raised the flange for the same effect. (I actually broke this off in my final image with the lighted shroud, ironic).
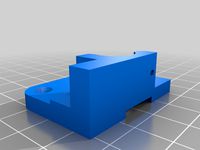
Supports are modeled in. I had a hard time trying to get the right supports, so I modeled the supports in. These break off quite easily. If they don't, as had happened to me, use an Xacto11 hobby knife to score a few times on the break off lines, then work supports free.
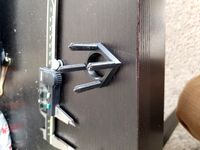
LIGHTED VERSION (3)
After these adjustments, I also realized I was a bit tired of using my torch flashlight to illuminate under the extruder to check the first layer. So, I added a light.
The LED is a 5mm led I pirated out of a key chain fob light. I soldered on a 1000 ohm resistor to the positive side, and attached the leads to the mains on the power supply. The light is on when the printer is on, but you can get fancier than me and add a switch. I believe I'd seen a Prusa control screen bezel with a rocker light switch hole. On the inside of the bucket, I added aluminum foil dryer hose tape, to reflect the light a little more. I actually did the same for the inside to insulate the wires a bit more from the plastic.
To be clear, the light DOES NOT aim right at the nozzle, rather about a cm ahead of it. I might make another pass and aim the LED at the nozzle, but the heat and other factors are a concern. As it is, I don't have to use my torch to check, and it lights up satisfactorily, at least for me, the first layer and whatever area I check as lighted to catch issues for quality control.
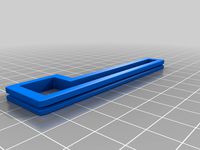
There is a cover that you simply Krazy glue (cyanoacrilate) on to cover the wires. It is the square lid on the build plate once you load the .stl.
NOTE: I'm not sure whats going on with my .stl export, but the support for the light bucket is separated and moved off once imported. Just break the model into parts in Slic3r and translate the box support under the bucket. Under the light bucket, and other areas will be indicated as a bridge, blue, and that's fine. It will still support and slightly fuse, but should separate fairly easily.
11.19.19 - Version 1
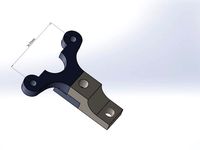
The only modification, besides moving upper mounting points, closing/cleaning open geometry, is that I added a loop to which you can insert a zip tie, and secure the fan wires so that the wires clear the exhaust side of the heat sink, see pictures. I didn't like the 2nd fan wires drooping down, flubbing around in the hot air pushed out from the Sunon extruder fan, and possibly adding turbulence to the exhaust, so I thought it'd be nice to legit secure the wires to the bracket.
02.23.20 - Version 2 (non-lighted) and 3 (Lighted)
[*If you can't download the file(s), go to the 'Thing Files' tab and download from there]
For these versions, I wanted to tweak the outlet nozzle on the right a little. Didn't seem like enough air was coming out as it should and I thought the aim was a skosh off. I did several tests, as evidenced by the multitude of shrouds I'd printed out and tested. This newer version should work better. It turns out, the version I used to modify to a BNBSX extruder was not directly from the original designer, as it was modified to fit a Bunny gear setup on an MK3S extruder with BLTouch (JojoStein), therefore it had previously been modified. I essentially modified the shroud to be closer to the original. Additionally, I restored the 'delta' style bracket as I liked the balanced appearance. I also extended the flange under the left fan to grasp/cup/support the fan's outlet a little more. On the right I raised the flange for the same effect. (I actually broke this off in my final image with the lighted shroud, ironic).
Supports are modeled in. I had a hard time trying to get the right supports, so I modeled the supports in. These break off quite easily. If they don't, as had happened to me, use an Xacto11 hobby knife to score a few times on the break off lines, then work supports free.
LIGHTED VERSION (3)
After these adjustments, I also realized I was a bit tired of using my torch flashlight to illuminate under the extruder to check the first layer. So, I added a light.
The LED is a 5mm led I pirated out of a key chain fob light. I soldered on a 1000 ohm resistor to the positive side, and attached the leads to the mains on the power supply. The light is on when the printer is on, but you can get fancier than me and add a switch. I believe I'd seen a Prusa control screen bezel with a rocker light switch hole. On the inside of the bucket, I added aluminum foil dryer hose tape, to reflect the light a little more. I actually did the same for the inside to insulate the wires a bit more from the plastic.
To be clear, the light DOES NOT aim right at the nozzle, rather about a cm ahead of it. I might make another pass and aim the LED at the nozzle, but the heat and other factors are a concern. As it is, I don't have to use my torch to check, and it lights up satisfactorily, at least for me, the first layer and whatever area I check as lighted to catch issues for quality control.
There is a cover that you simply Krazy glue (cyanoacrilate) on to cover the wires. It is the square lid on the build plate once you load the .stl.
NOTE: I'm not sure whats going on with my .stl export, but the support for the light bucket is separated and moved off once imported. Just break the model into parts in Slic3r and translate the box support under the bucket. Under the light bucket, and other areas will be indicated as a bridge, blue, and that's fine. It will still support and slightly fuse, but should separate fairly easily.
11.19.19 - Version 1
The only modification, besides moving upper mounting points, closing/cleaning open geometry, is that I added a loop to which you can insert a zip tie, and secure the fan wires so that the wires clear the exhaust side of the heat sink, see pictures. I didn't like the 2nd fan wires drooping down, flubbing around in the hot air pushed out from the Sunon extruder fan, and possibly adding turbulence to the exhaust, so I thought it'd be nice to legit secure the wires to the bracket.
Similar models
thingiverse
free

MK3 Fan Shroud for E3D Aero by d412k5t412
...d a remixed model that fits my extruder mount better.
print the mount with supports, but do not use supports for the fan shroud.
thingiverse
free

i3 mk3 extruder cover for i3 mk2 by Wes1180
...sa's site, i've just included it for convenience.
this won't fit the mk2s as the pinda probe will hit the fan shroud
thingiverse
free

MK8 Extruder for 2020 V-slot with Prusa i3 MK3 fans shroud by papi92
...dy.
fans shroud is original from prusa i3 mk3. extruder cover and nozzle shroud are original prusa files without modification.
thingiverse
free
Prusa Nozzle Mk2 Cooling Shroud with 40mm & 20mm fan mounts. by Haroo
...d an equivalent model i made my own! added a simple 40 mm fan mount with a slot aimed at the tip of the nozzle for print cooling.
thingiverse
free

Geeetech MeCreator´s mk8 extruder fan shroud by Lugge
...ng right out of the nozzle
i also included a version of the fan shroud without the sensor mount for those who doesn't use one
thingiverse
free

Bondtech Mosquito MK3 RHD Fan Duct Rev C Remix (orig.from RH_Dreambox) by Argolein
...tend.
and yes, this fan shroud vastly improves overhangs compared to the stock fan shroud that comes with the bondtech extruder.
thingiverse
free

40mm Shroud for MP mini with LED by thumbody
...an shroud that someone adapted for 40mm fan. added an internal led for direct light to the nozzle area. requires full supports.
thingiverse
free

Mk8 Fan Shroud Adjustable by pavel569
...terial. i had to modify it to be able to change the angle of air flow. the nozzle can move now about 25 degrees. it is tight fit.
thingiverse
free

Nozzle shroud MK3 to MK3s
... shroud with mk3s mount.
one is standart mk3 with side holes facing down and one is modified to have side holes facing to nozzle.
thingiverse
free

Fan duct for Mk3/4 extruder quick mount with PEEK cooler for 40mm fan by pyrophreek
... i also added a piece of heat tape to direct flow exclusively to the peek and upper barrel to prevent overcooling of the nozzle.
Bnbsx
thingiverse
free

bnbsx adapter for eryone thinker s by duke66
...bnbsx adapter for eryone thinker s by duke66
thingiverse
adapter for bnbsx extruder for eryone thinker s
thingiverse
free

Custom BLV with BNBSX, MK42 and MMU2+1S by kakou_fr
...and mmu2+1s by kakou_fr
thingiverse
my x carriage adapter (bnbsx, e3d, ...) are here :https://www.thingiverse.com/thing:3862589/
thingiverse
free

BNBSX Motor Plate Gearbox Standard 26 mm B08i5 by MBoon
...captive nut holes which in the original version doesn't print well. there are small gaps so it can be pulled off very easily.
thingiverse
free

Revised X-Axis for Purge Mech by wooby6
...x-axis such as: revised x-axis (prusa i3) by vekoj bnbsx short ears by bunny...
thingiverse
free

Zaribo Geared Extruder Motor
...can also assemble it vertically. we are influenced by bnbsx extruder setup by bunnyscience, however, designed every part from...
Mk3S
thingiverse
free
Nozzle shroud MK3 to MK3s
... shroud with mk3s mount.
one is standart mk3 with side holes facing down and one is modified to have side holes facing to nozzle.
thingiverse
free

Prusa I3 MK3 MK3s Vibration Damper
...prusa i3 mk3 mk3s vibration damper
thingiverse
vibration damper
thingiverse
free

Prusa i3 MK3/MK3S lighting
...stripe with 24v which is connected to the power supply of the printer, optional with an additional switch (in my case with 3000k)
thingiverse
free

Zaribo MK3 / Prusa MK3 Noctua Cover by wschadow
... endstop
more info on zaribo mod under: http://zaribo.org/blog/
facebook group: https://www.facebook.com/groups/284271408664100/
thingiverse
free

Prusa MK3s+ Fan shroud adapted for Mk3s by its-my-right
...ort.stl) that you can download here https://www.prusa3d.com/prusa-i3-printable-parts/ (original prusa i3 mk3/mk3s mk3s+ upgrade)
thingiverse
free

NR Spool holder for Bear upgrade MK3/MK3S by nickrno77
...nstallation of spools.
created a cut-out for sticky back foam to add grip and resistance when feeding.
increased hole size to 6mm
thingiverse
free

Prusa i3 MK3 / MK3S / MK3S+ LCD flat cable clip by jgm1986
... please donate what you think it is worth to my paypal.me:https://paypal.me/jgusmar
help cover the time of design.
thanks, enjoy!
thingiverse
free

Screw base Cam Prusa MK3/MK3s Camera mount by Timandtina
...ced arm to allow for a webcam that has the screw hole base. this will fit on the x-axis stepper motor on the prusa mk3 and mk3s.
thingiverse
free

Filament Sensor MK3 by Merlin2105
...filament sensor mk3 by merlin2105
thingiverse
ein filament sensor für den mk3 extruder
thingiverse
free

Creative Live! Cam Chat HD Webcam Holder for Prusa i3 MK3/MK3S
...creative live! cam chat hd webcam holder for prusa i3 mk3/mk3s
thingiverse
remixed for chat cam hd and mk3
Ears
thingiverse
free

Earrings
...earrings
thingiverse
earrings
thingiverse
free

Earrings
... lightweight earrings, made by printing 3 different parts in differents colors, and then attaching them with some earrings hooks.
thingiverse
free

Earring by lawfool26
...earring by lawfool26
thingiverse
earring
thingiverse
free

Earring 2020
...earring 2020
thingiverse
earring
thingiverse
free

earring by Dzecko
...earring by dzecko
thingiverse
earring
thingiverse
free

Earrings by Mari5Gt
...earrings by mari5gt
thingiverse
earrings
thingiverse
free

earrings by SE3D_workshop
...earrings by se3d_workshop
thingiverse
earrings
thingiverse
free

earring by Mrsanfy07
...earring by mrsanfy07
thingiverse
earring
thingiverse
free

ear by nagato
...ear by nagato
thingiverse
ear
thingiverse
free

earring by hdirim
...earring by hdirim
thingiverse
earring
Dual
thingiverse
free
Dual 4010
...dual 4010
thingiverse
dual fan 4010
thingiverse
free

dual color cone for testing dual extruders by lovethepirk
...dual color cone for testing dual extruders by lovethepirk
thingiverse
dual color cone for testing dual extruders
thingiverse
free

Dual hook by duxdhell
...dual hook by duxdhell
thingiverse
dual hook
thingiverse
free

Headsetholder dual by J3M
...headsetholder dual by j3m
thingiverse
dual headset holder
thingiverse
free
Dual extruder by gustavorpinheiro
...dual extruder by gustavorpinheiro
thingiverse
this is a support for dual extruders.
thingiverse
free

Dual Plate by Jaimemarie
...dual plate by jaimemarie
thingiverse
toggle and dual outlet plate
thingiverse
free
Dual IEC by mrkrash
...dual iec by mrkrash
thingiverse
dual hotend with fine regulation
thingiverse
free

Dual Spinner by AidanSandersSAN
...dual spinner by aidansanderssan
thingiverse
a dual spinner i made in class.
thingiverse
free

Dual Spinner by groman
...dual spinner by groman
thingiverse
a quick remix of the tri spinner. a dual spinner!
thingiverse
free
Dual stepper mount
...dual stepper mount
thingiverse
dual stepper mount. drill mounting holes for printer
Short
thingiverse
free

Finger Short by lucylu362
...finger short by lucylu362
thingiverse
finger short
thingiverse
free

Short trellis by rkxone
...short trellis by rkxone
thingiverse
short trellis
thingiverse
free

Short Sword Pen
...short sword pen
thingiverse
this is a short sword as a pen.
thingiverse
free

Short Sword Pen
...short sword pen
thingiverse
this is a short sword as a pen.
thingiverse
free

short vase by makermaster25
...short vase by makermaster25
thingiverse
a short vase no supports
thingiverse
free

Short Sleeve by Sanj997
...short sleeve by sanj997
thingiverse
short sleeve for quadcopter.
thingiverse
free

Short Doc by Reed96
...short doc by reed96
thingiverse
short little easy doc
thingiverse
free

Short Screwdrive by Rodin1
...short screwdrive by rodin1
thingiverse
short screwdrive for 6.2mm screwdrive head
thingiverse
free

Short hair by mollymillions
...short hair by mollymillions
thingiverse
short hair (hair only). ready to print.
thingiverse
free

Short Radar by jonspencer
...short radar by jonspencer
thingiverse
short radar for the scale model american beauty
Cooling
thingiverse
free

cool
...cool
thingiverse
cool
thingiverse
free

cool by cool128000
...cool by cool128000
thingiverse
cool
thingiverse
free

cool by cool128000
...cool by cool128000
thingiverse
cool
thingiverse
free

cool by GenericStudentss
...cool by genericstudentss
thingiverse
cool
thingiverse
free

School is cool
...school is cool
thingiverse
school is cool
thingiverse
free

cool by Xangar
...cool by xangar
thingiverse
looks cool
thingiverse
free

cool by swag
...cool by swag
thingiverse
cool beans
thingiverse
free

Cooling by GryZZli
...ling by gryzzli
thingiverse
cool on a cooling tunnel. by narrowing the funnel get the rush of air that is dispersed at the exit.
thingiverse
free

suitcase is cool by beonline
...suitcase is cool by beonline
thingiverse
suitcase is cool
suitcase is cool
suitcase is cool
suitcase is cool
suitcase is cool
thingiverse
free

Cool Lamborghini
...cool lamborghini
thingiverse
this is such a cool design!!! please like!
Extruder
thingiverse
free
Extruder
...extruder
thingiverse
extruder for 3dprinter
thingiverse
free

Linear extrude, rotation extrude by jtirado
...linear extrude, rotation extrude by jtirado
thingiverse
linear extrude, rotation extrude
thingiverse
free

extruder by brunoschoofs
...extruder by brunoschoofs
thingiverse
extruder
thingiverse
free
Extruder Catcher/Extruder Holder by Verdandi
...extruder catcher/extruder holder by verdandi
thingiverse
for holding extruder.
thx for clicking
designed on sketch up
thingiverse
free

extruder by nekro
...extruder by nekro
thingiverse
cooler extruder
thingiverse
free

Extruder by DViktor
...extruder by dviktor
thingiverse
extruder with three fans (1 unmanaged extruder and 2 managed to product) fans 20x20x10
thingiverse
free

Extruder Knob
...extruder knob
thingiverse
yet another extruder knob.
thingiverse
free
Extruder by ImHuman
...extruder by imhuman
thingiverse
my first extruder. my design.
thingiverse
free

BMG extruder
...bmg extruder
thingiverse
bmg extruder model : step, wrl, stl
thingiverse
free

Bowden Extruder
...bowden extruder
thingiverse
i have created bowden extruder for flsun delta 3d printer.
Fan
thingiverse
free

Fan Duct 60mm fan
...fan duct 60mm fan
thingiverse
this a 60mm fan adaptor
thingiverse
free

Fan Stand 140mm Fan by Aron84
...fan stand 140mm fan by aron84
thingiverse
fan stand for 140x140x27mm fan
thingiverse
free

Fan wall for 40mm fan by Nule
...fan wall for 40mm fan by nule
thingiverse
fan aislator for 40mm fan with meshmixer support
thingiverse
free

Fan holder 40mm fan for V67
...n for v67
thingiverse
fan holder 40mm fan for v67
fan: https://www.amazon.de/dp/b07vhmv4dz/ref=cm_sw_r_other_apa_i_803cebwt8kvpe
thingiverse
free

Fan cover & fan grill to suit 50mm fan by Phil_Maddox
...fan cover & fan grill to suit 50mm fan by phil_maddox
thingiverse
simple fan cover for 50 x 50 x 10 fan
thingiverse
free

Fan grille for 50mm fan andE3D V6 Fan Duct for 50mm Fan V2 by vitaly12
...for 50mm fan ande3d v6 fan duct for 50mm fan v2https://www.thingiverse.com/thing:4662850
height:3.5mm
40mm fan grille coming soon
thingiverse
free

Fan Grid for 127mm Fan by MasterFX
...fan grid for 127mm fan by masterfx
thingiverse
just a simple fan grid for unusual 127mm fan
thingiverse
free

Fan Showdown fan submission by DAraymond
...fan showdown fan submission by daraymond
thingiverse
this is a fan i submitted for the youtube fan showdown series.
thingiverse
free

Fan Shroud
...fan shroud
thingiverse
this is a fan shroud for a 140mm fan
thingiverse
free

Mosaic Fan on Fan by bwevans
...a fan mount for the second fan that's included in the mosaic kit but is lacking any hardware. really useful for printing pla!
Part
thingiverse
free
part part part by ease
...part part part by ease
thingiverse
part part part
thingiverse
free

part
...part
thingiverse
part
thingiverse
free

part
...part
thingiverse
3d test fan part
thingiverse
free
part
...part
thingiverse
part i made for friend
thingiverse
free

Turbo Part by part by Thellgti
...turbo part by part by thellgti
thingiverse
turbocharger in parts
thingiverse
free
Part Stand Part Holder
...se
this is a part holder i designed for holding small parts for painting can be scaled up or down to suit your individual needs.
thingiverse
free

Part by WizxGamer
...part by wizxgamer
thingiverse
part
thingiverse
free
PART by leonk
...part by leonk
thingiverse
part
thingiverse
free

Part by empirekitchen
...part by empirekitchen
thingiverse
part
thingiverse
free

part by migueljb01
...part by migueljb01
thingiverse
part
Mount
thingiverse
free

Pen Mount on BLTouch mount by jetspot
...pen mount on bltouch mount by jetspot
thingiverse
pen mount on bltouch mount
thingiverse
free

RAM Mount, Mount by seanmclean
...ram mount, mount by seanmclean
thingiverse
bridging plate to attach ram mount to yamaha 242, for chartplotter placement.
thingiverse
free

Mount for mount for Garmin GPS by GNOBLIN
...you can use this mount for prevent rotation simple mount around hendelbars.
d handelbar 31.8mm
use m3 screw and din 16903 plug.
thingiverse
free

Permanent mount for Modular Mounting System by WIR14
...permanent mount for modular mounting system by wir14
thingiverse
permanent mount for modular mounting system.
thingiverse
free

Gopro Mount and antenna mount by SuperYoyo
...gopro mount and antenna mount by superyoyo
thingiverse
cut the carbon platform to pass the gopro mount and enjoy !
thingiverse
free

Hexagon Mount for 50mm Mount (Sparkcube) by Draman
...for 50mm mount (sparkcube) by draman
thingiverse
hexagon mount remix from skimmys hotend-mount for sparkcube or other 50mm-mount
thingiverse
free

mount by gixster
...mount by gixster
thingiverse
custom mount
thingiverse
free

Mount by Matrxi999
...mount by matrxi999
thingiverse
shelf mount
thingiverse
free

Motor mount
...motor mount
thingiverse
motor mount
thingiverse
free

GoPro Mount
...gopro mount
thingiverse
gopro mount