Thingiverse

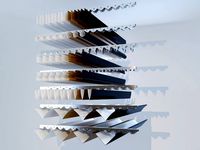
Dual material Y joiner remix by hackwell
by Thingiverse
Last crawled date: 3 years, 1 month ago
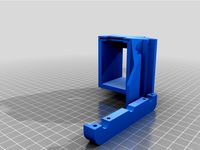
This is a remix from Zemistr's design.
I made this to accept 7mm threaded bowden connectors instead of 10mm
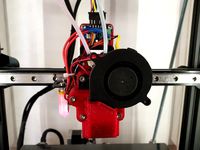
Successfully tested on my Ender 3 with the genuine hot end. No jams nor stringing at all
Retraction set to 7mm at 25mm/s Use relative extrusion Zhop 1mm at layer change.
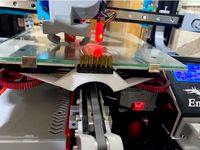
the filament loads on the side of the prime tower to avoid oozing.
Here are the scripts I use in Cura. The filament parking distance is 140 mm.
TODO : add threads and a LED behind to monitor the filament's position through the Y
; Ender 3 Custom Start G-code
; assuming start condition with both filaments retracted at 140 mm
; loads filament 2 the 1 as the print starts with T0
M140 S{material_bed_temperature_layer_0} ; Set Heat Bed temperature
M190 S{material_bed_temperature_layer_0} ; Wait for Heat Bed temperature
M104 S160; start warming extruder to 160
G28 ; Home all axes
M117 Nivellement Auto GO !
G29 ; Auto bed-level (BL-Touch)
M117 loading filament 2
T1 ;extruder 2
M104 S{material_print_temperature_layer_0} ; Set Extruder temperature
M109 S{material_print_temperature_layer_0} ; Wait for Extruder temperature
G92 E0 T1 ; Reset Extruder
G91
G1 E140 ; load filament
G90
G92 E0 T1
G1 Z1.0 F3000 ; move z up little to prevent scratching of surface
G1 X0.1 Y20 Z0.3 F5000.0 ; move to start-line position
G1 X0.1 Y200.0 Z0.3 F1500.0 E15 ; draw 1st line
G1 X0.5 Y200.0 Z0.3 F5000.0 ; move to side a little
G1 X0.5 Y20 Z0.3 F1500.0 E30 ; draw 2nd line
G91
G1 E-140 ; unload filament 2
G90
G92 E0 T1
M117 loading filament 1
T0 ; extrudeur 2
G92 E0 T0; Reset Extruder
G91
G1 E140 ;load filament 2
G90
G92 E0 T0
; code here to load filament on extruder 2
G1 Z1.0 F3000 ; move z up little to prevent scratching of surface
G1 X0.9 Y20 Z0.3 F5000.0 ; move to start-line position
G1 X0.9 Y200.0 Z0.3 F1500.0 E15 ; draw 3rd line
G1 X01.3 Y200.0 Z0.3 F5000.0 ; move to side a little
G1 X01.3 Y20 Z0.3 F1500.0 E30 ; draw 4th line
G1 Z1.0 F3000 ; move z up little to prevent scratching of surface
G92 E0 ; reset extruder
G91
G1 E-140 ;unload filament 2
G90
G92 E0 T0; reset extruder
T0
M117 start printing
; End of custom start GCode
End Gcode :
G91 ;Relative positioning
G1 E-2 F2700 ;Retract a bit
G1 E-2 Z0.2 F2400 ;Retract and raise Z
G1 X5 Y5 F3000 ;Wipe out
G1 Z10 ;Raise Z more
G91
G1 E-140 F3500 ; unload filament
G90 ;Absolute positionning
; start extruder E0 csutom Gcode
G92 T0 E0 ; reset extruder
G91
G1 T0 E140 F3500 ; load filament
G90
G92 T0 E0
; end extruder E0 custom Gcode
G92 E0 T0
G91
G1 T0 E-140 F3500 ; unload filament
G90
G92 E0 T0
G0 X{prime_tower_position_x} Y{prime_tower_position_y}
; start extruder E1 csutom Gcode
G92 T1 E0 ; reset extruder
G91
G1 T1 E140 F3500 ; load filament
G90
G92 T1 E0
; end extruder E1 custom Gcode
G92 E0 T1
G91
G1 T1 E-140 F3500; unload filament
G90
G92 E0 T1
G0 X{prime_tower_position_x} Y{prime_tower_position_y}
I made this to accept 7mm threaded bowden connectors instead of 10mm
Successfully tested on my Ender 3 with the genuine hot end. No jams nor stringing at all
Retraction set to 7mm at 25mm/s Use relative extrusion Zhop 1mm at layer change.
the filament loads on the side of the prime tower to avoid oozing.
Here are the scripts I use in Cura. The filament parking distance is 140 mm.
TODO : add threads and a LED behind to monitor the filament's position through the Y
; Ender 3 Custom Start G-code
; assuming start condition with both filaments retracted at 140 mm
; loads filament 2 the 1 as the print starts with T0
M140 S{material_bed_temperature_layer_0} ; Set Heat Bed temperature
M190 S{material_bed_temperature_layer_0} ; Wait for Heat Bed temperature
M104 S160; start warming extruder to 160
G28 ; Home all axes
M117 Nivellement Auto GO !
G29 ; Auto bed-level (BL-Touch)
M117 loading filament 2
T1 ;extruder 2
M104 S{material_print_temperature_layer_0} ; Set Extruder temperature
M109 S{material_print_temperature_layer_0} ; Wait for Extruder temperature
G92 E0 T1 ; Reset Extruder
G91
G1 E140 ; load filament
G90
G92 E0 T1
G1 Z1.0 F3000 ; move z up little to prevent scratching of surface
G1 X0.1 Y20 Z0.3 F5000.0 ; move to start-line position
G1 X0.1 Y200.0 Z0.3 F1500.0 E15 ; draw 1st line
G1 X0.5 Y200.0 Z0.3 F5000.0 ; move to side a little
G1 X0.5 Y20 Z0.3 F1500.0 E30 ; draw 2nd line
G91
G1 E-140 ; unload filament 2
G90
G92 E0 T1
M117 loading filament 1
T0 ; extrudeur 2
G92 E0 T0; Reset Extruder
G91
G1 E140 ;load filament 2
G90
G92 E0 T0
; code here to load filament on extruder 2
G1 Z1.0 F3000 ; move z up little to prevent scratching of surface
G1 X0.9 Y20 Z0.3 F5000.0 ; move to start-line position
G1 X0.9 Y200.0 Z0.3 F1500.0 E15 ; draw 3rd line
G1 X01.3 Y200.0 Z0.3 F5000.0 ; move to side a little
G1 X01.3 Y20 Z0.3 F1500.0 E30 ; draw 4th line
G1 Z1.0 F3000 ; move z up little to prevent scratching of surface
G92 E0 ; reset extruder
G91
G1 E-140 ;unload filament 2
G90
G92 E0 T0; reset extruder
T0
M117 start printing
; End of custom start GCode
End Gcode :
G91 ;Relative positioning
G1 E-2 F2700 ;Retract a bit
G1 E-2 Z0.2 F2400 ;Retract and raise Z
G1 X5 Y5 F3000 ;Wipe out
G1 Z10 ;Raise Z more
G91
G1 E-140 F3500 ; unload filament
G90 ;Absolute positionning
; start extruder E0 csutom Gcode
G92 T0 E0 ; reset extruder
G91
G1 T0 E140 F3500 ; load filament
G90
G92 T0 E0
; end extruder E0 custom Gcode
G92 E0 T0
G91
G1 T0 E-140 F3500 ; unload filament
G90
G92 E0 T0
G0 X{prime_tower_position_x} Y{prime_tower_position_y}
; start extruder E1 csutom Gcode
G92 T1 E0 ; reset extruder
G91
G1 T1 E140 F3500 ; load filament
G90
G92 T1 E0
; end extruder E1 custom Gcode
G92 E0 T1
G91
G1 T1 E-140 F3500; unload filament
G90
G92 E0 T1
G0 X{prime_tower_position_x} Y{prime_tower_position_y}
Similar models
thingiverse
free

Ender 3 V2 Brush mount by SharpSeer
...ed
g1 x5 y20 z0.3 f5000.0 ; move over to prevent blob squish
lastly, rotate the print till it is flat, i have not altered it yet.
thingiverse
free

E3(Pro) Glass Build Plate Corner Caps by kai_to_makes
... ;move to side a little
g1 x10.4 y20 z0.28 f1500.0 e30 ;draw the second line
g92 e0 ;reset extruder
g1 z2.0 f3000 ;move z axis up
thingiverse
free
Ender 3/Pro Ender5/Pro Bed Nozzle Brush by blindley125
...1 z10.0 f3000 ; move z axis up little to prevent scratching of heat bed
g1 x8 y20 z0.3 f5000.0 ; move over to prevent blob squish
thingiverse
free

CR-10 v3 Hermera + BLTouch + Filament sensor by f3bandit
... ;move to side a little
g1 x10.4 y20 z0.28 f1500.0 e30 ;draw the second line
g92 e0 ;reset extruder
g1 z2.0 f3000 ;move z axis up
thingiverse
free
SVO2 Purge Bucket and GCODE by RedSquirrelHobbies
... positioning on
g1 z-1 f1000 ; lower nozzle by 1mm
g90 ; absolute positioning on
m400 ; wait for finish
thingiverse
free
A20M A10M BigMac MKII 5015 Blower
...
g1 e70 f3000
g92 e0
g1 e30 f200
g92 e0
g4 s3
g0 f10000
; end extruder 2
g92 e0
g1 e-5 f6000
g1 x-10.5 f8000
g1 e-70 f3000
g92 e0
thingiverse
free

Bed Level Ender 3 / Ender 3 Pro by maxwellhau5caffy
...move to side a little
g1 x0.4 y20 z0.3 f1500.0 e30 ; draw the second line
;end purge line
.
..
...
..
.
g1 x0 y235 ;present print
thingiverse
free

Twoo trees Sapphire pro - Skr 1.4 Turbo - Direct drive by blueprintDK
... / skr 1.4 turbo 2209 uart e3d v6 direct drive:https://drive.google.com/file/d/1xq50_ggwqgidpt1ddvhjw7yst9pwj2zd/view?usp=sharing
thingiverse
free

Anet A8 Filament Scraper by DasEimer
... z0
g29 /autolevel
g1 z2 x-20 f9000
g1 y2 f9000
g92 e0
g1 e25 f500 /extrude 25mm
g4 s1
g1 x0 f2000 /wipe
g92 e0
g1 f9000
m117
thingiverse
free

A10M A20M Purge extension (Aibecy hotend) by deakbannok
...91 ; switch from absolute positioning to relative positioning
g1 z-0.4 f800 ;
g90 ; return to absolute
g1 e6.5 f3600.0 ;
g92 e0 ;

Joiner
turbosquid
$5

Joiners mallet
...el joiners mallet for download as 3ds, obj, fbx, 3dm, and skp on turbosquid: 3d models for games, architecture, videos. (1417675)
turbosquid
$2

Electric Joiner Bomb
...alty free 3d model electric joiner bomb for download as blend on turbosquid: 3d models for games, architecture, videos. (1282185)
thingiverse
free

joiner
...joiner
thingiverse
stuff
thingiverse
free

Joiner for kerbs by racerunner
...verse
press fit this joiner to underside of kerb.
this joiner connects adjacent kerbs.
joiner is an alternative to support pier.
3dfindit
free

Joiner Set
...joiner set
3dfind.it
catalog: wilkerson
thingiverse
free

PTFE Joiner by whitefoot
...ptfe joiner by whitefoot
thingiverse
ptfe joiner for join two ptfe tubes with two m6 fittings
thingiverse
free

Beer crate joiner by boredomwontgetus
...erse
a joiner for beer crates!
this is just the upper and lower parts of the joiner. the middle part is made of coated plywood.
3dbaza
$4

Joiner Pouf (20786)
...joiner pouf (20786)
3dbaza
thingiverse
free
IKEA Lillabo joiner by MrBaz
...ikea lillabo joiner by mrbaz
thingiverse
simple plastic joiner to connect the ikea lillabo train set.
thingiverse
free

Lego Male Joiner
...lego male joiner
thingiverse
having fun
Dual
turbosquid
free

Dual Pistols
...ls
turbosquid
free 3d model dual pistols for download as fbx on turbosquid: 3d models for games, architecture, videos. (1320360)
turbosquid
$2

Dual Axe
...urbosquid
royalty free 3d model dual axe for download as fbx on turbosquid: 3d models for games, architecture, videos. (1332372)
turbosquid
$10

Dual Lesaths
... available on turbo squid, the world's leading provider of digital 3d models for visualization, films, television, and games.
3ddd
$1

плитка Dual Bianco (Испания)
...й плитки venis dual (испания). технические качества: устойчивость к стирания, отличная геометрия, отсутствие проблем при укладке.
turbosquid
$35

Dual Mesh Fonts
...ree 3d model dual mesh fonts for download as ma, obj, and fbx on turbosquid: 3d models for games, architecture, videos. (1352989)
turbosquid
$29

Dual Flask with Bungs
...del dual flask with bungs for download as obj, fbx, and blend on turbosquid: 3d models for games, architecture, videos. (1210512)
turbosquid
$19

Dual Socket Plug
...3d model dual socket plug for download as obj, fbx, and blend on turbosquid: 3d models for games, architecture, videos. (1303912)
turbosquid
$13

Dual Adjustable Pulley
... available on turbo squid, the world's leading provider of digital 3d models for visualization, films, television, and games.
turbosquid
$10

Amoi N809 Dual
... available on turbo squid, the world's leading provider of digital 3d models for visualization, films, television, and games.
turbosquid
$5

Dual Turret Tank
... available on turbo squid, the world's leading provider of digital 3d models for visualization, films, television, and games.
Remix
turbosquid
$5

MODA Collection Remix Chair
... available on turbo squid, the world's leading provider of digital 3d models for visualization, films, television, and games.
3d_export
$12

remix yamaha rm1x
...remix yamaha rm1x
3dexport
geometry triangles 15.2k vertices 7.6k pbr no textures 1 materials 1 uv layers yes
3d_ocean
$5

Vray fabric Kvadrat remix green - tileable
...th vray and 3dsmax. high-resolution texture images (2000×2000 px) file included: shader vray 2.40 texture image 3ds max 2011 file
turbosquid
$20

Gerrit Rietveld 1938 Zig Zag Chair Remix
... available on turbo squid, the world's leading provider of digital 3d models for visualization, films, television, and games.
3d_export
$10

multicolored remix parametric table furniture
... fbx, obj, mtl, archive with textures. the model has no glitches. render and materials - vray . without using plugins. good use!
3ddd
$1

Barovier&Toso / Manhattan Remix 7192
... 004293-142405
в коллекции есть люстры 7, 9, 12 рожковые. диаметр соответственный 1000, 1250, 1500 мм.
3ddd
$1

Muuto fiber chair
...grey/grey, dusty green/dusty green, nature/oak, natural white/oak upholstery options remix 183/black, remix 133/grey, remix 643/dusty red leather options black...
3ddd
$1

Barovier&Toso 7190-7195
...7190-7195 3ddd barovier&toso потолочнай люстра фабрики barovier&toso;, коллекция manhattan remix артикул 7190-7195. размеры в inches: 39"...
3d_export
$5

3D Locking Handle Weatherproof Storage Box Container
...handle weatherproof storage box container 3dexport new, improved and remixd! no screws required. print-in-place. weatherproof. parametric. 2 parts. easy...
cg_studio
$49

HTC One Mini 2 Amber Gold3d model
...cell phone mobile cellular super lcd touchscreen touch screen remix amber gold .max .obj .mb .lwo .fbx .c4d .3ds...
Y
turbosquid
$1

Tetera y Galletas y Caf
... available on turbo squid, the world's leading provider of digital 3d models for visualization, films, television, and games.
3ddd
$1

Смеситель Y-CON
...смеситель y-con
3ddd
смеситель , y-con
смеситель y-con
3ddd
$1

Y-Chair
...y-chair
3ddd
tom dixon
y-chair designed by tom dixon,
3ds max + obj, corona
3ddd
$1

Y Chair compilation
....net/products/us/y-chair-sled-base
y chair swivel basehttp://www.tomdixon.net/products/us/y-chair-swivel-base
turbosquid
$190

Y-8
...y-8
turbosquid
royalty free 3d model y-8 for download as max on turbosquid: 3d models for games, architecture, videos. (1658891)
turbosquid
$7

Bench Y
...turbosquid
royalty free 3d model bench y for download as obj on turbosquid: 3d models for games, architecture, videos. (1488746)
turbosquid
$15

bonePile Y
...oyalty free 3d model bonepile y for download as blend and obj on turbosquid: 3d models for games, architecture, videos. (1546374)
turbosquid
$7

Y for Yarn
...d
royalty free 3d model y for yarn model for download as max on turbosquid: 3d models for games, architecture, videos. (1699732)
turbosquid
$2

FONT Y
...quid
royalty free 3d model font y for download as ma and obj on turbosquid: 3d models for games, architecture, videos. (1549457)
3ddd
$1

WOOD-y
...wood-y
3ddd
wooden guy
Material
3d_export
$245
top of the material
...top of the material
3dexport
top of the material,commercial ceiling ceiling material, metal material
3d_ocean
$5

Concrete material
...concrete material
3docean
concrete cover material realistic textures
realistic concrete material
3d_ocean
$3
Grass Material
...grass material
3docean
grass material
include normal map
3d_ocean
$3
Terrain material
...terrain material
3docean
terrain material include normal map
3d_ocean
$3
Wood Material
...wood material
3docean
wood material include normal map
vizpark
$10

Material Manager
...ager
vizpark
the vp material manager is a new innovative tool to manage materials within 3ds max® in ways never possible before.
vizpark
free
Material Manager
...ager
vizpark
the vp material manager is a new innovative tool to manage materials within 3ds max® in ways never possible before.
3d_ocean
$7

R16 Material Kit(50+ Materials!)
...ls -fabrics -automotive materials -architectural materials -a complimentary studio -abstract materials -rocks all for the pric...
3d_ocean
$5
Frozen Materials
...erials the project includes the frozen materials and frosted effect. for the material included diffuse and map normal. thank you!
design_connected
$16

Material Pendant
...material pendant
designconnected
new works material pendant computer generated 3d model. designed by noergaard & kechayas.