Thingiverse
Drop in E3Dv6 mod for DaVinci 1.0 by jakwnd
by Thingiverse
Last crawled date: 3 years ago
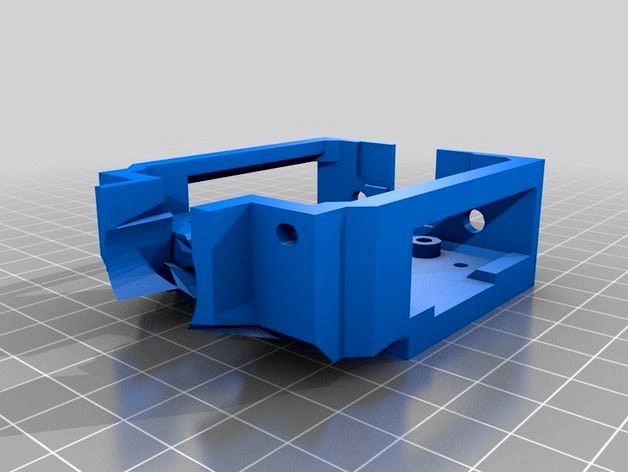
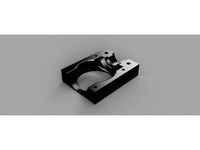
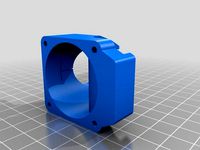
Drop in E3Dv6 mount for XYZ DaVinci 1.0.
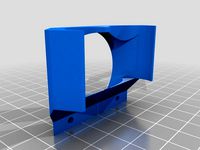
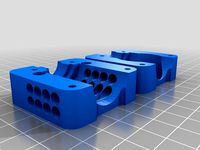
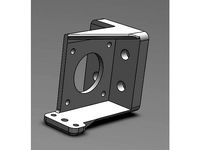
Based off bdwalker1's design for a drop in mod to replace your Davinci printers stock extruder with a E3Dv6. I lowered the mount for the metal and removed 15mm from beneath the bracket. then added a 15mm spacer/backing above the bracket but under the holes for the PCB. I also cut out the back of the bottom to expose more of the heat sink. The bracket had to be adjusted because of a screw head holding the extruder in place. The fan shroud is identical, it could use a redesign though.
I use repetier and I had to set a 24mm z offset. I then aligned the bed from there manually.
Installing:
Main Assembly
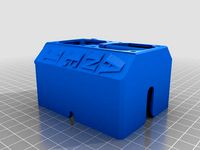
Put the fan, fan shroud and main assembly together, careful to use short screws to leave room for the PCB on the inside. Screw in the PCB and filament sensor, Do not over tighten! Make sure the filament sensor is parallel to the heat sink and directly above it, you have some play on the PCB to get the alignment right.
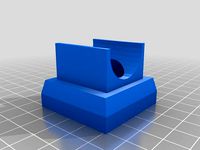
Using the half bracket, secure the heatsink into the brackets. Only the heatsink, do not assemble the hot end and heat block to the heat sink yet.\
Hot End
Assemble the hot end into the heat block like explained here at E3D's site. Cut a piece of bowden tubing so that it comes about a cm above the top of the heat sink (you can screw the entire metal hot end together to do this, but do not apply the heatsink compound yet).
Note: The stock XYZ thermistor does not fit into E3D's heat block due to it being a glass bead. For this reason you should order the thermistor from E3D's site.
Putting it in the Printer.
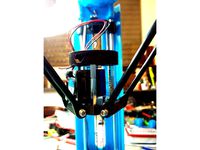
Insert the assembly with just the heat block into the extruder carrier in the printer just like the stock one, make sure it clips down and make sure its straight. Next insert the bowden tubing UP THROUGH the heat sink, its hard to get it in there but once you do make sure it is still sticking out the bottom. Align the neck from the heat block so that the tubing goes into its pocket and start screwing it into the heat sink (You should have applied the compound now).
Looking in from the side you should start to see the bowden tubing coming up towards the gears. I had to push the tubing from the side to get it to go up against the gears. From there you should tighten everything and make sure it feeds correctly, looking in from the side you can see if the filament missed the tubing.
Based off bdwalker1's design for a drop in mod to replace your Davinci printers stock extruder with a E3Dv6. I lowered the mount for the metal and removed 15mm from beneath the bracket. then added a 15mm spacer/backing above the bracket but under the holes for the PCB. I also cut out the back of the bottom to expose more of the heat sink. The bracket had to be adjusted because of a screw head holding the extruder in place. The fan shroud is identical, it could use a redesign though.
I use repetier and I had to set a 24mm z offset. I then aligned the bed from there manually.
Installing:
Main Assembly
Put the fan, fan shroud and main assembly together, careful to use short screws to leave room for the PCB on the inside. Screw in the PCB and filament sensor, Do not over tighten! Make sure the filament sensor is parallel to the heat sink and directly above it, you have some play on the PCB to get the alignment right.
Using the half bracket, secure the heatsink into the brackets. Only the heatsink, do not assemble the hot end and heat block to the heat sink yet.\
Hot End
Assemble the hot end into the heat block like explained here at E3D's site. Cut a piece of bowden tubing so that it comes about a cm above the top of the heat sink (you can screw the entire metal hot end together to do this, but do not apply the heatsink compound yet).
Note: The stock XYZ thermistor does not fit into E3D's heat block due to it being a glass bead. For this reason you should order the thermistor from E3D's site.
Putting it in the Printer.
Insert the assembly with just the heat block into the extruder carrier in the printer just like the stock one, make sure it clips down and make sure its straight. Next insert the bowden tubing UP THROUGH the heat sink, its hard to get it in there but once you do make sure it is still sticking out the bottom. Align the neck from the heat block so that the tubing goes into its pocket and start screwing it into the heat sink (You should have applied the compound now).
Looking in from the side you should start to see the bowden tubing coming up towards the gears. I had to push the tubing from the side to get it to go up against the gears. From there you should tighten everything and make sure it feeds correctly, looking in from the side you can see if the filament missed the tubing.
Similar models
thingiverse
free

XYZ davinci 1.0a E3DV6 Drop in cartridge Remix by celticht32
... shroud to maximize airflow.
the clamp is the standard from the base work.
i used the instructions in the base thing to assemble.
thingiverse
free

fysetc prusa mini clone hot end fix(helps prevent clogs) by Poblopuablo
..., so don't just use my measurement. please follow the instructions, otherwise this will not be effective in preventing clogs.
thingiverse
free

Creatbot Dx Plus E3d V5 bowden hot ends by staalc
...upling to do this but leaving the retaining spring.
the last mod was to put on some bond tech extruders, makes it quite reliable.
thingiverse
free

XYZ da Vinci 1.0 Pro E3D V6 Drop-In Cartridge Mount by bdwalker1
... only also available
i also sell just my replacement pcb for the hot end cartridge. these are also available via my tindie store:
grabcad
free

Ender 3 Hot End
... end
grabcad
ender 3 hot end:
- heater cartridge
- radiator
- bowden pc4m6
- thermistor
- heatbreak
- heating block
- hose pipe
thingiverse
free

Da Vinci 2.0 Bowden Setup Stock Parts by GoingOffRoading
...n e3d or knock-off hot end. the stock thermistor and heater cartridge are reused with the new hot end. more images coming soon.
thingiverse
free

Dual E3D V8 All Metal Hot End Assembly Bracket with Inductive Sensor Holder by shingabiss
...erted in a large soldering iron, both part numbers are at this link:
https://www.mcmaster.com/#standard-threaded-inserts/=163kqj2
thingiverse
free

E3D V6 Adapter for MeCreator 2 by Martin_Printer
...tsink cooler fan with the v6 fan - the tach signal wire can be cut and left open
pop heatsink cooler shroud on from the left side
thingiverse
free

E3D Direct Drive Hot End V5 Bowden Kossel Mount Remix by
...iverse
if you have a e3d direct drive hot end v5 and the bsp type ptfe bowden tube fitting you can use this assembly.
*pics soon
thingiverse
free

E3D Kraken Quad Extruder by mkelly
...tation
note: new v5's have a smaller thermistor for the semitec in a slightly different location. this heat block is the v4
Davinci
3ddd
$1

Torre DaVinci 03W
...: davinci 03w
dimensions:
730mm x 575mm x h770mmhttp://www.torre.it/products/contract/chairs-armchairs/da-vinci-03-112
3ddd
$1

Torre DaVinci 04W
...l: davinci 04
dimensions:
730mm x 575mm x h855mmhttp://www.torre.it/products/contract/chairs-armchairs/da-vinci-04-112
turbosquid
$9

Davinci Coin gold coin
...alty free 3d model davinci coin gold coin for download as max on turbosquid: 3d models for games, architecture, videos. (1495584)
turbosquid
$5

DaVinci Single Coffee Table
...free 3d model davinci single coffee table for download as max on turbosquid: 3d models for games, architecture, videos. (1540607)
3d_export
$10

Italdesign Davinci Asphalt 9
...at your discretion. instead of textures, blender materials are used, and the color of any part can be changed at your discretion.
3ddd
$1

Cattelan Italia / DaVinci
...75 см
глубина: 75 см
ширина: 140 см
схематичное изображениеhttp://www.ib-gallery.ru/off-line/mebel_file/25949/file.png
3d_export
$7

092 armchair davinci
...t includes four balls with different color materials (gray, brown, light brown, natural wood). on the end there is real plywood))
3d_export
$10

davinci machine
...aterials are logically named<br>the main format is in 3ds max 2009.<br>satisfcation garranteed..<br>thank you !
3ddd
free

Настенная мозаика DaVinci
...ерация turbosmooth), и простые кубики с фаской - 9000 полигонов.
габариты модели, шхвхг: 50см*50см*1,5см
размер ячейки: 2см*2см
3d_export
$29
Cryptex New 3D Model
...cryptex new 3d model 3dexport cryptex davinci da vinci code criptex enigma mystery riddle game device...
E3Dv6
thingiverse
free
Dualfan for e3dv6 by CaJI9I
...dualfan for e3dv6 by caji9i
thingiverse
this fan for dual extruder e3dv6. spacing between nozzle 24 mm
thingiverse
free
e3dv6 mount remix by mokash770
...e3dv6 mount remix by mokash770
thingiverse
e3dv6 mount with bigger holes repired
thingiverse
free
E3Dv6 Bowden Clamp by x20011
...e3dv6 bowden clamp by x20011
thingiverse
this is a e3dv6 hotend clamp with an additional 40x40mm fan mount.
thingiverse
free
E3DV6 by makermitch69
...e3dv6 by makermitch69
thingiverse
this includes a custom cover for the anet a8 with a place for 4 leds
thingiverse
free
e3dv6 gran caudal 40mm by jj25000
...e3dv6 gran caudal 40mm by jj25000
thingiverse
e3dv6 ventilador 40x40
thingiverse
free
support e3dv6 + titan + bltouch by nikos1234
...support e3dv6 + titan + bltouch by nikos1234
thingiverse
support e3dv6 + titan + bltouch
thingiverse
free
E3dV6 fan 4040 by andreascarpelli
...040 by andreascarpelli
thingiverse
this is a design to have a single fan on a e3dv6 that fit a 4cm fan for extruder and hot end
thingiverse
free

e3dv6 fan duct by Snorkis
...r this e3dv6 mount https://www.thingiverse.com/thing:2790694?fbclid=iwar19pbsfb39c7m0kvpxb-f_wh3i_uoxl43d5ghoedarbmfezc-vwr01nnia
thingiverse
free

E3Dv6 mount for Renkforce RF500 by Timon_Suhk
...e3dv6 mount for renkforce rf500 by timon_suhk
thingiverse
two piece mount for e3dv6 on renkforce rf500.
thingiverse
free
E3Dv6 for 101 Hero by electrokill
...electrokill
thingiverse
wip
heres a mount for an e3dv6 for a 101 hero
other customizations follow so here is only the first part
Mod
design_connected
$13

MOD. 4233 - MOD. 4234 Table Lamp
...mod. 4233 - mod. 4234 table lamp
designconnected
arcahorn mod. 4233 - mod. 4234 table lamp computer generated 3d model.
design_connected
$11

MOD.1095
...mod.1095
designconnected
mod.1095 computer generated 3d model. designed by sarfatti, gino.
3ddd
$1

fireplaces mod Spec
...fireplaces mod spec
3ddd
камин
fireplaces mod spec 180x90x125h
3ddd
free

Flos Mod. 2129
... mod
фабрика: flos
модель: mod. 2129
описание: подвесной светильник, металл, белый, черный.
сайт: www.flos.com
turbosquid
$34
Mod Lamp.c4d
... available on turbo squid, the world's leading provider of digital 3d models for visualization, films, television, and games.
turbosquid
$32

MOD A 001
... available on turbo squid, the world's leading provider of digital 3d models for visualization, films, television, and games.
turbosquid
$29

Maars Mod
... available on turbo squid, the world's leading provider of digital 3d models for visualization, films, television, and games.
turbosquid
$15

Mod 70..
... available on turbo squid, the world's leading provider of digital 3d models for visualization, films, television, and games.
turbosquid
$10

MOD Sofa
... available on turbo squid, the world's leading provider of digital 3d models for visualization, films, television, and games.
turbosquid
$1

Mod-Lite
... available on turbo squid, the world's leading provider of digital 3d models for visualization, films, television, and games.
Drop
3ddd
$1

Писсуар Drop
...писсуар drop
3ddd
писсуар , drop
писсуар drop
3d_ocean
$1

Water Drop
...g drops fresh liquid rain refresh splash water water drop
3ds max 2010, 3ds max 2013 & obj model of water drop. vray 2.30.01
3ddd
$1

Drop, Faber
... , faber , вытяжка
вытяжка drop, компания faber
turbosquid
$5

Drop
... available on turbo squid, the world's leading provider of digital 3d models for visualization, films, television, and games.
3d_export
$10

cartoon blood drop - water drop - medicine drop
...od drop - water drop - medicine drop
3dexport
texture size:small size number of texture:3 texture format: png 1 texture= 1 model
3d_export
free

Nose Drops
...nose drops
3dexport
nose drops)
3ddd
$1

Mirror Drops
...mirror drops
3ddd
mirror drops 530х410 max2011
3ddd
$1

Зеркало Drops
... drops
зеркало drops 53x41
фабрика : kare design
артикул : 74419
материал : glass, aluminium
3ddd
$1

Acid Drop
... curiousa&curiousa
curiousa&curiousa;
acid drophttp://www.curiousa.co.uk/acid-drops
design_connected
$11
Drop Top
...drop top
designconnected
plumen drop top computer generated 3d model.
0
turbosquid
$12

Calligraphic Digit 0 Number 0
...hic digit 0 number 0 for download as max, obj, fbx, and blend on turbosquid: 3d models for games, architecture, videos. (1389318)
3d_export
$6

set-0
...set-0
3dexport
turbosquid
$6

hedge 0
...yalty free 3d model hedge 0 for download as max, obj, and fbx on turbosquid: 3d models for games, architecture, videos. (1450353)
turbosquid
$5

Nuber 0
...oyalty free 3d model nuber 0 for download as ma, obj, and fbx on turbosquid: 3d models for games, architecture, videos. (1564674)
turbosquid
$22

0.jpg
... available on turbo squid, the world's leading provider of digital 3d models for visualization, films, television, and games.
turbosquid
free

Steam Locomotive Fowler 4F 0-6-0
... available on turbo squid, the world's leading provider of digital 3d models for visualization, films, television, and games.
turbosquid
$10

Liquid Number 0
... model liquid number 0 for download as c4d, 3ds, fbx, and obj on turbosquid: 3d models for games, architecture, videos. (1689919)
turbosquid
$45

Dragon360_perspShape_tmp.0.jpg
... available on turbo squid, the world's leading provider of digital 3d models for visualization, films, television, and games.
turbosquid
$8

Rocks Debris 0
... available on turbo squid, the world's leading provider of digital 3d models for visualization, films, television, and games.
3d_export
$18

wood-guardrail-fence 0
...wood-guardrail-fence 0
3dexport
wood-guardrail-fence 0<br>3ds max 2015
1
turbosquid
$69

armchairs(1)(1)
... available on turbo squid, the world's leading provider of digital 3d models for visualization, films, television, and games.
turbosquid
$15

ring 1+1
... available on turbo squid, the world's leading provider of digital 3d models for visualization, films, television, and games.
turbosquid
$10

chair(1)(1)
... available on turbo squid, the world's leading provider of digital 3d models for visualization, films, television, and games.
turbosquid
$8

Chair(1)(1)
... available on turbo squid, the world's leading provider of digital 3d models for visualization, films, television, and games.
turbosquid
$2

RING 1(1)
... available on turbo squid, the world's leading provider of digital 3d models for visualization, films, television, and games.
turbosquid
$1

house 1(1)
... available on turbo squid, the world's leading provider of digital 3d models for visualization, films, television, and games.
turbosquid
$1

Table 1(1)
... available on turbo squid, the world's leading provider of digital 3d models for visualization, films, television, and games.
turbosquid
$59

Formula 1(1)
...lty free 3d model formula 1 for download as max, fbx, and obj on turbosquid: 3d models for games, architecture, videos. (1567088)
design_connected
$11

No 1
...no 1
designconnected
sibast no 1 computer generated 3d model. designed by sibast, helge.
turbosquid
$2

desert house(1)(1)
...3d model desert house(1)(1) for download as 3ds, max, and obj on turbosquid: 3d models for games, architecture, videos. (1055095)