Thingiverse

Dobsonian Telescope (Go-to or manual) by caain
by Thingiverse
Last crawled date: 3 years, 4 months ago
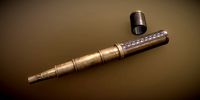
This is a motorized ('go-to') Dobsonian-style telescope constructed mostly from aluminum extrusion and 3D-printed parts. It also makes use of donor parts from a Celestron C8N - specifically, the primary mirror, primary mirror cell, secondary mirror, secondary mirror spider, top 'beauty' ring, and telescope cap. You could easily leave out the 'beauty' ring and cap, and the files could be modified for using a different secondary and/or primary setup. By changing the length of the extrusion, you could also adjust for differing focal lengths. I designed it around C8N parts because that is what I had on hand after being generously given them by a friend. You'll likely want to change the lettering on the focuser plate if you go with a different focal length, however.
I'm posting enough files for two iterations of this telescope - one that is manual-mode only and one that makes use of electronics and the wonderful OnStep software for go-to capability, tracking, and syncing with a smartphone, computer, or tablet. I initially designed this for manual-mode only, so the majority of the 'OnStep upgrade' parts fit over or around the manual configuration for relatively simple upgrading in the future.
The manual version uses a small braking mechanism to adjust friction for the azimuth bearing. Two parts are included in the file list, but you will also need a small pen spring and a knob for the bolt head (I used one I had on hand, and there are plenty on Thingiverse to choose from). Upgrading from the manual version to the OnStep version makes the braking mechanism unnecessary.
The altitude bearing is dampened with strips of vinyl tape and held up well when properly balanced. I tried many materials to find appropriate friction for the altitude bearing. Larger bearings using laminate or FRP on teflon squares would work best, but this design uses smaller bearings. Bare PETG on PETG parts have very little friction, so some kind of modifier material is necessary. It is absolutely required for the manual version and may not be necessary for the OnStep version but I left mine in there. Please note that the altitude bearings also have a center hole that is not used for mounting. Instead, I installed an overlong M5 bolt through this hole that is allowed to spin freely. Attaching a spring to the outside of this bolt with the other side mounted to a bolt in the extrusion beneath allows you to further adjust tension on the altitude bearings (this is similar to some commercially-produced Dobsonians).
Upgrading from the manual version to the OnStep version requires drilling out the center cross bars on the base and installing an M8 bolt for a center pivot. There are special versions of the center pucks that must be installed (where the pucks on the manual version are purely decorative). There is a groundboard bottom-specific puck, groundboard-top puck, and two rocker board pucks. 608ZZ bearings are installed during this process, along with small glue-in bushings. Feel free to remix the rocker pucks and merge them with the glue-in bushings if you like, but it'll probably require supports to print. I found my method a bit easier, but YMMV.
The adjustable feet were tapped with M5 threads and move up and down overlong bolts installed in three locations under the ground board. One is long as it mounts direct to the extrusion bar, the others are slightly shorter as they mount to bolts that pass through brackets. This way they remain level when screwed all the way down. The easiest way to install these is with a headless M5 bolt into a t nut in the extrusion. There are other adjustable feet designs out there though that are likely better.
There are several 'optional' parts in this build I've included. There are snap-in locks for the azimuth and altitude axes (90 and 180 degrees for the latter) that help stabilize the telescope when transporting. There are wire clips that snap into the extrusion and help hold wiring out of the way, as well as a snap-in, sliding cover that protects the USB port of the control board when not in use. I also designed a very small, very basic hand controller for when I didn't want to get my phone, computer, or tablet out. You could also build any number of simple or complex hand controllers from the plans available on the OnStep website. I've also included a Synta-style finder bracket that mounts to the extrusion bars. Lastly, there is a vixen-style dovetail clamp that is designed to attach to one (or both) of the altitude bearings for mounting a small refractor that will move along with the dobsonian when tracking (though I'll admit that alignment will not be perfect).
I don't think I'll ever see this project as 'finished', so I'm guessing it'll get left in the 'work in progress' mode perpetually. All told, it works and tracks well. But it will always be a work in progress to me. I've tried to be as thorough as I can with the parts list but it's possible I've missed some things. More detailed information regarding the build is available at Cloudy Nights or on Imgur.
PARTS
KineOptics HC-2 helical focuser
12" heavy duty lazy susan BBQ bearing (link)
5mm barrel nuts (to extend spider mount into top ribs)
5mm knurled screws (for adjusting secondary spider tension)
M5 button head screws (various lengths between 5mm and 45mm*)
M5 pan head screws (for countersinking the mount to the azimuth bearing)
M5 t nuts
M3 button head screws (for mounting C8N rings, assembling the optional control cube)
Small spring (for optional brake mechanism, I took mine from a pen)
Adhesive-backed felt (for flocking)
(2) NEMA 17 200 step motors with integrated 100:1 planetary gears
(1) MKS Gen L v2.0 3D printer board
(1) WeMos D1 wifi board
(2) TMC2130 stepper motor drivers
(2) 20 tooth GT2 gears
(1) 500 tooth GT2 timing belt
(1) 470 tooth GT2 timing belt
(4) 8mm bearings
(1) 8mm bolt
(1) 8mm locking nut
(1) 24v PSU brick
(4) momentary mini push-buttons (for optional hand controller)
*I assembled this while designing it, so I do not have an exact count list on bolts and t-nuts. I also used printed or purchased washers/spacers where necessary. Note that the gear design is a derivative from here.
The extrusion is 2020 standard profile that uses a 6mm center channel (which allows standard M5 t-nuts). Beware of 2020 profiles from other sellers that uses a more narrow (often 5mm channel), which requires special (and unnecessarily expensive) t nuts. The cut list is very much dependent upon how high you want the OTA mounted, which is also dependent upon balance. I started with these figures and eventually slid the altitude brackets and mid ribs on my OTA down approximately 35mm for balancing purposes. While I could have left the base as-is, I elected to cut the vertical bars on the base down so as to lower the OTA on the base.
Extrusion Cuts
OTA
(4) 921mm
rocker board
(2) 303.5mm
(2) 283.5mm
(2) 180.5mm
(1) 381mm
ground board
(2) 323.5mm
(2) 283.5mm
(2) 180.5mm
(1) 381mm
upper base assembly
(4) 430mm
(2) 80.5mm
(2) 81.5mm
(2) 305mm
(2) 85mm
(1) 283.5mm
OTA - 15 printed parts, 4 extruded bars
Base - 45 printed parts, 13 extruded bars
OnStep - 18 printed parts
Optional add-ons - 14 printed parts
Similar models
3dwarehouse
free

Dobsonian telescope altazimuth mount with elliptical altitude bearings
...ings to standard altitude bearings #altazimuth #amatuer_telescope_making #dobsonian #telescope #telescope_making #telescope_mount
3dwarehouse
free

Trilateral Dobsonian OTA and Mount
...ouse
12.5' f/5.5 newtonian telescope on tri-lateral dobsonian mounting and truss optical assembly #atm #dobsonian #telescope
thingiverse
free

Dobsonian Telescope Altitude Bearing by charlesodonnell
...ange is the configuration of the screw holes. wish i'd done this on the original. it would've made assembly a lot easier.
thingiverse
free

20x20 extrusion mount arm by Baphomet2017
...p part and left it for your own need.
parts:
m5 hummer nut
5x10 mm bolt (extrusion to joint)
5x25 mm bolt (joint to joint)
m5 nut
thingiverse
free

Bigtreetech SKR V1.4 Mount for 2040 Extrusion
...to fit my eryone thinker s but should fit similar style printers as well as long as there is...
thingiverse
free

BTT TFT50 LCD Mount for 3030 extrusions by Threewheelz
...er, then 4 m5 bolts and nuts to attach the cover to the bracket.
the bracket attaches to the extrusion with 2 m6 bolts and t-nuts
thingiverse
free

sony ps3eye adjustable mount for 2020 extrusion by ChrisPV
...i mounted it on my folgertech ft5.
to complete the mount you`ll need 2 m5 screws, 2 m5 t-nuts, a 90mm m5 screw and 2 m5 locknuts.
thingiverse
free

Logitech C920 mount for 2020 extrusion by gregington
...0 webcam for 2020 extrusion. use 2 8mm m5 bolts and t nuts to attach to extrusion and 1/4" unc bolt to attach to the webcam.
thingiverse
free

XL 1/5 1/2" wide timing belt mounts by NothingComplicated
...side uses nylock nuts pressed into the end and m5 bolts to tension the belt. caps that hold the belt in the mounts use m3 bolts.
thingiverse
free

Prusa Bear 2020 Spool Holder with Vslot mount and Bear logo
...arings
2 t nuts m5
2 m5 screws
i've remixed the mount stl of cimo and i added the vslot shape and the bear logo to the mount.

Dobsonian
3ddd
$1

Телескоп SkyWatcher Dobsonian
...осмос , телескоп
модель телескопа - рефлектора на монтировке добсона компании skywatcher
3d_export
$12

Dobsonian telescope 3D Model
...e 3d model
3dexport
3d model telescope reflector dobson sobsonian newtonian
dobsonian telescope 3d model marvin jk 28004 3dexport
archive3d
free

Telescope 3D Model
...3d model archive3d telescope spyglass optical device telescope skywatcher dobsonian n170213 - 3d model (*.gsm+*.3ds) for interior 3d...
3d_sky
free

SkyWatcher A Dobsonian Telescope
...skywatcher a dobsonian telescope
3dsky
model of the telescope-reflector at montirovke company skywatcher dobson
thingiverse
free

12" Dobsonian Finder Mounts by jad889nb
... dobsonian. laser finder mount and mount for celestron 9*50 finder # 51611.
included freecad files for modifications if needed.
thingiverse
free

Sky-Watcher Dobsonian upgrade by zbettenbuk
...(the one that doesn't have the ball bearing), but with a thinner side wall to avoid lifting the ota off of the teflon bearing
thingiverse
free

Laserbeab finder for dobsonian telescope by pgu5787
...laserbeab finder for dobsonian telescope by pgu5787
thingiverse
just a support to adjust a laserbeam as finder on my telescope
3dcadbrowser
free

Telescope SkyWatcher Dobsonian
... to find.this 3d object can be downloaded in .max, .obj, .3ds, .fbx, .dxf, .lwo, .stl, .wrl, .ma, .dae, .x and .asc file formats.
thingiverse
free

Eyepiece Holder 1.25" for Dobsonian Telescope by charlesodonnell
...o different versions, one for my 6" scope and another for my 8" scope. these are very simple to print with no supports.
thingiverse
free
Dobsonian 8Inch 3D Modeling by knoxxr
...1ea , 25cm/1m x 4
25cm bar length is different by primary mirror focus length
this modeling is need to least 20x20cm print stage.
Telescope
archibase_planet
free
Telescope
...telescope
archibase planet
telescope spyglass
telescope n220408 - 3d model (*.gsm+*.3ds) for interior 3d visualization.
3d_export
free

telescope
...telescope
3dexport
telescope 3d model, more files here:
3d_export
free
telescope
...telescope
3dexport
telescope refractor on a tripod. can be used as part of the interior.
3d_ocean
$8

Telescope
...antique binocular glass magnify monocular naval optic optical pirate spy spyglass telescope viewer vision
nice model of telescope
turbosquid
free
telescope
...scope
turbosquid
free 3d model telescope for download as obj on turbosquid: 3d models for games, architecture, videos. (1638257)
turbosquid
$35
Telescope
...rbosquid
royalty free 3d model telescope for download as fbx on turbosquid: 3d models for games, architecture, videos. (1515061)
turbosquid
$6

Telescope
...rbosquid
royalty free 3d model telescope for download as max on turbosquid: 3d models for games, architecture, videos. (1665123)
turbosquid
$5
Telescope
...osquid
royalty free 3d model telescope for download as blend on turbosquid: 3d models for games, architecture, videos. (1603403)
turbosquid
$99

Telescope
...y free 3d model telescope for download as blend, fbx, and obj on turbosquid: 3d models for games, architecture, videos. (1609065)
turbosquid
$30

telescope
...lty free 3d model telescope for download as max, obj, and fbx on turbosquid: 3d models for games, architecture, videos. (1325340)
Manual
turbosquid
$10
manual plow
...e 3d model manual plow for download as max, max, obj, and fbx on turbosquid: 3d models for games, architecture, videos. (1565106)
turbosquid
$40

Candelabrum manuale
... available on turbo squid, the world's leading provider of digital 3d models for visualization, films, television, and games.
turbosquid
$10
manual jack
...anual jack for download as blend, 3ds, dae, fbx, obj, and stl on turbosquid: 3d models for games, architecture, videos. (1674034)
3ddd
$1

manual pull station
...manual pull station
3ddd
safety first
safety first release unit manual pull station
to be used with commercial exhaust hood
3d_export
$20

Manual Drill 3D Model
...nd-cranked cranked mechanical gear wood hole industrial tool workshop woodwork tools
manual drill 3d model firdz3d 84144 3dexport
turbosquid
$1

Manual Coffee Grinder
... 3d model manual coffee grinder for download as blend and fbx on turbosquid: 3d models for games, architecture, videos. (1654673)
turbosquid
$5

Manual Body Massager
...odel manual body massager for download as 3ds, blend, and dae on turbosquid: 3d models for games, architecture, videos. (1358457)
3d_export
$20

manual coffee grinder
...grinder. the 3d model was created on real base. comes with a uv-map and high resolution baked textures. maya 2019. arnold render
3d_export
$29
Manual watches 3D Model
...manual watches 3d model
3dexport
watch accessory
manual watches 3d model reno 89186 3dexport
turbosquid
$15

Manual Hand Drill
... available on turbo squid, the world's leading provider of digital 3d models for visualization, films, television, and games.
Go
turbosquid
$3

Going Merry Go
...e 3d model going merry go for download as blend, fbx, and obj on turbosquid: 3d models for games, architecture, videos. (1669967)
3ddd
$1
GO chair
...go chair
3ddd
go , bernhardt design
stacking chair,
design_connected
$18

Go Chair
...go chair
designconnected
danerka go chair computer generated 3d model. designed by lovegrove, ross.
3ddd
$1

GO IN barista
...ta
3ddd
barista , барный
стул барный go in barista
h112cm, d51cm, w42cm, seatheight 81cm
turbosquid
$40

Pixelbook GO
... free 3d model pixelbook go for download as obj, c4d, and fbx on turbosquid: 3d models for games, architecture, videos. (1473349)
turbosquid
$10

Go boy
...royalty free 3d model go boy for download as ma, obj, and fbx on turbosquid: 3d models for games, architecture, videos. (1292463)
turbosquid
$5

JBL GO
...alty free 3d model jbl go for download as obj, fbx, and blend on turbosquid: 3d models for games, architecture, videos. (1501036)
turbosquid
$1
Go-kart
... free 3d model go-kart for download as jpg, 3ds, obj, and md3 on turbosquid: 3d models for games, architecture, videos. (1501040)
turbosquid
$40

Go Cart.c4d
... available on turbo squid, the world's leading provider of digital 3d models for visualization, films, television, and games.
turbosquid
$35

Go kart
...e 3d model go kart for download as ma, max, obj, c4d, and fbx on turbosquid: 3d models for games, architecture, videos. (1388925)