Thingiverse
DIY high power UV cure box by emaneric
by Thingiverse
Last crawled date: 3 years ago
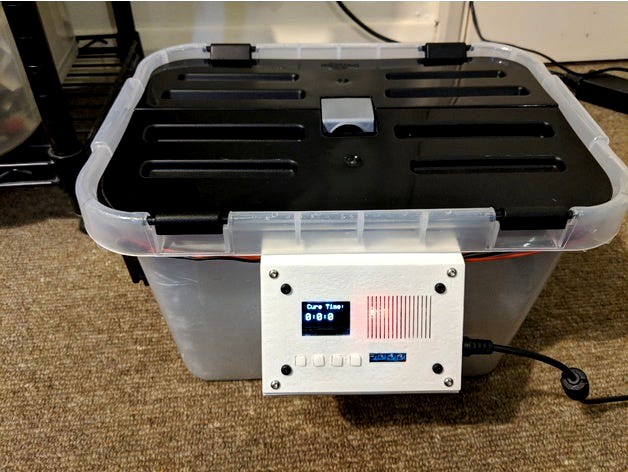
Hi all, I decided to make my own UV cure box for my Wanhao Duplicator 7 printer. It uses two 30W leds to quickly post cure the part from a resin based 3D printer. The cure box uses an Arduino to automate the cure process, so that you can set a time for the cure, and it will automatically shut off the leds when the time runs out. That isnt really necessary though, you could just mount the leds and drivers to the box and turn it off and on manually. I am uploading the files and code I used for this project so people are free to modify it or make one as they please. Also please not that this project and the files are far from perfect, there might be some mistakes, and the tolerances I used might not be right for your printer. There is also a bug in the code I've written which makes the piezo buzzer beep twice if you end a cure early. Not a big deal, but a bit annoying.
Parts used:
Box: I found this "dragon 10L storage box" at my local shop (Wilko in the UK). It is plenty big to fit lots of parts or another plastic container to put water in, if you like to cure in water. To increase reflection and block the light eascaping fromt he box, I used some reflective tape on the inner walls of the box.https://www.ebay.co.uk/itm/Hydroponics-Mylar-Sheet-Alu-Tape-Reflective-Heat-Proof-Self-Adhesive-Grow-Room-/262180134639?hash=item3d0b275eefhttp://www.wilko.com/plastic-storage/dragon-storage-box-10-litre/invt/0447636
Hardware: All the mounting is done with m3 sized hex head bolts/screws and m3 nuts. I used a few different lengths to keep things tidy.
Leds: I used two high power 30W leds I got from Aliexpress. This is definetly the most expensive part of the project, but it is good to spend a bit on low quality, but decent leds, as some you find on Ebay Or Aliexpress are very bad quality. You also need a constant current driver for the leds. The one linked is plenty powerful for the two leds in Parallelhttps://www.aliexpress.com/item/UV-Purple-LED-Ultraviolet-Bulbs-Lamp-Chips-365nm-375nm-380nm-385nm-395nm-400nm-405nm-3W-5W/32836018477.html?spm=a2g0s.9042311.0.0.pnRLq7https://www.ebay.co.uk/itm/DC-Boost-Step-up-Converter-Constant-Current-Power-Supply-LED-Driver-250W-10A/252500569378?epid=867291999&hash=item3aca34ed22:g:Xa0AAOSw2MJZeVZj
Cooling: You will need to cool the leds if you want to run them past a few watts, so I used a cheap cpu cooler from Amazon. I also used a spare 70mm fan to cool the electronics, but it might not be neccesary.
Heatsink, Amazon search B00006B8CO (model: TX3, style: 7/370)
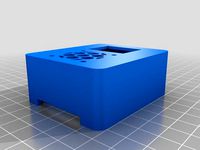
Other Electronics: I used an Arduino nano, 128x64 0.96" i2c OLED, FDD6670A mosfet, and 4 tactile push buttons. You can find these all very easily on Ebay, except for maybe the mosfet. I used the FDD6670A since that is what I had on hand, but you could substitute something different. The circuit I made uses 12v to power the Arduino, which controls the mosfet to switch the 12v to the boost converter and fans. I don't have time to completely explain the circuit so you will need to have some experience with Arduino/electronics.
Parts used:
Box: I found this "dragon 10L storage box" at my local shop (Wilko in the UK). It is plenty big to fit lots of parts or another plastic container to put water in, if you like to cure in water. To increase reflection and block the light eascaping fromt he box, I used some reflective tape on the inner walls of the box.https://www.ebay.co.uk/itm/Hydroponics-Mylar-Sheet-Alu-Tape-Reflective-Heat-Proof-Self-Adhesive-Grow-Room-/262180134639?hash=item3d0b275eefhttp://www.wilko.com/plastic-storage/dragon-storage-box-10-litre/invt/0447636
Hardware: All the mounting is done with m3 sized hex head bolts/screws and m3 nuts. I used a few different lengths to keep things tidy.
Leds: I used two high power 30W leds I got from Aliexpress. This is definetly the most expensive part of the project, but it is good to spend a bit on low quality, but decent leds, as some you find on Ebay Or Aliexpress are very bad quality. You also need a constant current driver for the leds. The one linked is plenty powerful for the two leds in Parallelhttps://www.aliexpress.com/item/UV-Purple-LED-Ultraviolet-Bulbs-Lamp-Chips-365nm-375nm-380nm-385nm-395nm-400nm-405nm-3W-5W/32836018477.html?spm=a2g0s.9042311.0.0.pnRLq7https://www.ebay.co.uk/itm/DC-Boost-Step-up-Converter-Constant-Current-Power-Supply-LED-Driver-250W-10A/252500569378?epid=867291999&hash=item3aca34ed22:g:Xa0AAOSw2MJZeVZj
Cooling: You will need to cool the leds if you want to run them past a few watts, so I used a cheap cpu cooler from Amazon. I also used a spare 70mm fan to cool the electronics, but it might not be neccesary.
Heatsink, Amazon search B00006B8CO (model: TX3, style: 7/370)
Other Electronics: I used an Arduino nano, 128x64 0.96" i2c OLED, FDD6670A mosfet, and 4 tactile push buttons. You can find these all very easily on Ebay, except for maybe the mosfet. I used the FDD6670A since that is what I had on hand, but you could substitute something different. The circuit I made uses 12v to power the Arduino, which controls the mosfet to switch the 12v to the boost converter and fans. I don't have time to completely explain the circuit so you will need to have some experience with Arduino/electronics.
Similar models
thingiverse
free

Arduino Power Monitor by telboy2002
...282687221646.
2mm banana pin connectors: https://www.ebay.co.uk/itm/253128383156 and http://www.ebay.co.uk/itm/282560492859
enjoy
thingiverse
free

Electronics Project Box With Power Supply by Dimwit-Dave
...ecad design files.
the pcb used is https://www.ebay.co.uk/itm/133530666074
breadboard psu https://www.ebay.co.uk/itm/133124571919
thingiverse
free

LED Dimmer DC12-24V 30A 360W ENCLOSURE (BOX)
...sh=item46a5421d6a:g:ywwaaoswcohebbdo
the dimmer fits perfectly in the enclosure. if you find this useful please like and comment.
thingiverse
free
Mosfet Box with 30mm Fan Mount by Thundrfuk
...-power-module-board-high-current-210a-mosfet-upgrade-ramps/112433582882?hash=item1a2d905322:g:htqaaoswjqvznofb.
hope you like it!
thingiverse
free

ESP-01 WS2811 WS2812 Driver Case by Dimwit-Dave
...wled-fastled-no-esp-01/133312610546?hash=item1f0a0d00f2:g:mveaaoswsgfekgrs
schematichttps://www.mottramlabs.com/pdf/sch191059.pdf
thingiverse
free

Picobuck LED Driver Case by DWink
... on how you use the driver. also, i only used one output of the picobuck, so i only made one hole on the output side of the case.
thingiverse
free

18650 charger by pyraohms
...lders and power-jack.
i do not recommend driving the chip at 3a because of heating issues. although 2a should be fine.
enjoy! :)
thingiverse
free

Ender 3, Ender 5 extruder led holder
...mp-1w-cool-white-diy-high-power/143485055470?hash=item21686031ee:m:m7tnwfmokai-ihqwyizausa
for each led i used a 1 kohm resistor.
thingiverse
free

Desktop Synergy - Fingerprint+Power+SD+USB by DROUGA
...r=&hash=item2cadcb4b86:m:mwp5ul8mimdc0rwrpebeixq
tools:
soldering iron
desoldering pump
hot glue gun
wire cutters
crimp tool
thingiverse
free

Arduino Buzzer (Push Button, Dash-Button) Box by RBEPrinter
... or esp8266 and build a small mqtt enabled button.
if you print the case with transparent filament you can place some leds in it.
Emaneric
thingiverse
free

Compact spool holder by emaneric
...holder i designed in sketch up. it is nothing fancy but does the job well and is designed to be mounted to the top of my printer.
thingiverse
free

Rode NT Usb Mic Wall Mount by emaneric
...n to wall mount my rode nt-usb microphone. i am unsure if the hole is the exactly correct diameter, but it should be about right.
thingiverse
free

Print Rite Fan Mount by emaneric
...iage, so for it works well!. to power the cooling fan i ran a 12 volt supply from a fan port in the front control pcb to the fan.
Cure
turbosquid
$80

UV curing oven
...uring oven for download as sldas, max, ige, 3ds, fbx, and obj on turbosquid: 3d models for games, architecture, videos. (1656005)
3d_export
$10

Automatic circuit board UV curing machine
...their ultimate purpose is the same, which is to cure uv paints or uv inks. the uv curing device...
3d_export
$7

display automatic dispensing uv curing line
...display automatic dispensing uv curing line
3dexport
display automatic dispensing, uv curing line
3d_export
$69

plate curing press rubber curing press plate curing press
...pment operation and less maintenance. the temperature is provided by the heating medium (usually steam, heat transfer oil, etc.).
3d_export
$80

uv curing oven
... you can email to me.<br>designed with solidworks 2017, render with keyshot<br>**************************************
3d_export
$15

potion cure life
...nown as the "potions master" ("potions master"). he is one of the main characters in the books in the series.
3ddd
$1
Стул
...options made in italy steel framework, entirely moulded in cold-cure ...
3d_export
$35

Madicaments 3D Model
...model 3dexport medicines tablets capsules pill physic doctor's stuff cure drug medicaments madicaments 3d model 3d.dasha 87130...
3d_export
$26

Salame 3D Model
...salame 3d model 3dexport salami salame cure sausage meat food antipasto dried texture material italian italy...
3d_export
$7

Injection 3D Model
...injection 3d model 3dexport aid cure equipment drug flu health help injection hospital medical pharmacy...
Diy
3d_export
free
DIY 3D Printer
...diy 3d printer
3dexport
diy 3d printer model
turbosquid
$10
Diy tiered
...l diy tiered for download as max, max, max, max, fbx, and obj on turbosquid: 3d models for games, architecture, videos. (1603709)
turbosquid
$3
Diy Desk to Bench
...odel diy desk to bench for download as 3ds, max, obj, and fbx on turbosquid: 3d models for games, architecture, videos. (1506589)
turbosquid
$2

DIY Moon Light
...model diy moon light for download as obj, fbx, blend, and dae on turbosquid: 3d models for games, architecture, videos. (1501170)
3d_export
$8
DIY CNC Router 3D Model
...diy cnc router 3d model
3dexport
cnc; router; diy; homemade
diy cnc router 3d model maikeru86 58463 3dexport
turbosquid
$5
Diy Kitchen Cabinets
...itchen cabinets for download as 3ds, obj, fbx, blend, and dae on turbosquid: 3d models for games, architecture, videos. (1197373)
3d_export
free

Download free Diying Plant 3D Model
...download free diying plant 3d model
3dexport
diying plant blender
diying plant 3d model visitorsama 98607 3dexport
3ddd
$1
DIY coffee table + decor
... рамка для фото
кофейный столик diy 400х350х600(h) мм. моделился по фото. внимание: материалы - corona.
turbosquid
$3
Diy Wire Lamp Shade
...free 3d model diy wire lamp shade for download as 3ds and fbx on turbosquid: 3d models for games, architecture, videos. (1347605)
cg_studio
$12
DIY MONGOLIAN LAMB STOOLS3d model
... hair soft pile white
.max - diy mongolian lamb stools 3d model, royalty free license available, instant download after purchase.
Uv
turbosquid
$16

uv microscope
...free 3d model uv microscope for download as max, obj, and fbx on turbosquid: 3d models for games, architecture, videos. (1469743)
turbosquid
$5

Grenade UV
...ee 3d model grenade uv for download as max, max, obj, and fbx on turbosquid: 3d models for games, architecture, videos. (1674956)
turbosquid
$20

Rug With UVs
... available on turbo squid, the world's leading provider of digital 3d models for visualization, films, television, and games.
turbosquid
$10

Uved Character
... available on turbo squid, the world's leading provider of digital 3d models for visualization, films, television, and games.
turbosquid
$1

Katana with UV
... available on turbo squid, the world's leading provider of digital 3d models for visualization, films, television, and games.
turbosquid
free

UV Spot
... available on turbo squid, the world's leading provider of digital 3d models for visualization, films, television, and games.
turbosquid
$30

UV Lamp
...wnload as max, max, unitypackage, upk, max, obj, fbx, and max on turbosquid: 3d models for games, architecture, videos. (1685958)
3d_export
$5

cracked uv sphere
...cracked uv sphere
3dexport
cracked uv sphere. made in blender 3d.
3d_export
free

UV lamp
...up. subscribe to the telegram channel to keep up to date with all the new products:) link:https://t.me/blog_engineer_designer ♥♥♥
turbosquid
$10

Unrigged Deer with UV
...lty free 3d model unrigged deer with uv for download as blend on turbosquid: 3d models for games, architecture, videos. (1282447)
Power
turbosquid
$100

power
...ower
turbosquid
royalty free 3d model power for download as on turbosquid: 3d models for games, architecture, videos. (1421990)
3d_export
$5

Power
...power
3dexport
3d_export
$5

power outlets
...power outlets
3dexport
power outlets
3ddd
$1

lion power
...lion power
3ddd
лев , статуя
lion power gold sculpture
3ddd
$1

Sea Power
...
компас , море , часы
часы с компасом sea power
3ddd
free

Meridiani / Power
...power
3ddd
meridiani , круглый
стол power производитель meridiani, диаметр 120,высота 67
3d_export
$5

Power Surge
...power surge
3dexport
the power surge is a all mesh carnival ride to lower in game part count and lag
turbosquid
$8

Airport Ground Power Unit (AXA Power )
... available on turbo squid, the world's leading provider of digital 3d models for visualization, films, television, and games.
turbosquid
$50

Power Houser
...rbosquid
royalty free 3d model power houser for download as on turbosquid: 3d models for games, architecture, videos. (1333800)
3d_export
$5

power outlet
...power outlet
3dexport
power outlet<br>format file maya 2018, 3d max 2017, obj, fbx
Box
archibase_planet
free

Box
...box
archibase planet
box carton cardboard box
box 2 - 3d model (*.3ds) for interior 3d visualization.
archibase_planet
free

Box
...box
archibase planet
carton cardboard box box
box 1 - 3d model (*.3ds) for interior 3d visualization.
3d_export
$6

box
...box
3dexport
box
3d_export
$5

Box
...box
3dexport
box
3d_export
$5

box
...box
3dexport
box
3d_export
$5

box
...box
3dexport
box
archibase_planet
free

Box
...box
archibase planet
box box for paper notebook pencil
box - 3d model (*.gsm+*.3ds) for interior 3d visualization.
archibase_planet
free

Box
...box
archibase planet
box carton cardboard box
box n170111 - 3d model (*.gsm+*.3ds) for interior 3d visualization.
archibase_planet
free

Box
...box
archibase planet
box carton cardboard box
box n050411 - 3d model (*.gsm+*.3ds) for interior 3d visualization.
archibase_planet
free

Boxes
...boxes
archibase planet
boxes box case bin
boxes n281213 - 3d model (*.gsm+*.3ds+*.max) for interior 3d visualization.
High
3d_export
$15

ironman high
...ironman high
3dexport
ironman high poly
turbosquid
$49

High Heel Girl (High Poly)
... available on turbo squid, the world's leading provider of digital 3d models for visualization, films, television, and games.
turbosquid
$49

High Heel Girl (High Poly)
... available on turbo squid, the world's leading provider of digital 3d models for visualization, films, television, and games.
turbosquid
$49

High Heel Girl (High Poly)
... available on turbo squid, the world's leading provider of digital 3d models for visualization, films, television, and games.
turbosquid
$49

High Heel Girl (High Poly)
... available on turbo squid, the world's leading provider of digital 3d models for visualization, films, television, and games.
turbosquid
$49

High heel girl (High Poly)
... available on turbo squid, the world's leading provider of digital 3d models for visualization, films, television, and games.
design_connected
$16

Cantu High
...cantu high
designconnected
linbrasil cantu high computer generated 3d model. designed by rodrigues, sergio.
design_connected
$16

Koja high
...koja high
designconnected
blå station koja high computer generated 3d model. designed by mattson, fredrik.
design_connected
$16

Ribbon High
...ribbon high
designconnected
cappellini ribbon high bar stools computer generated 3d model. designed by nendo.
design_connected
$11

Garry High
...garry high
designconnected
ligne roset garry high computer generated 3d model. designed by jourdan, eric.