Thingiverse
Direct drive dual extruder (single-nozzle and single-drive) by BigSteve
by Thingiverse
Last crawled date: 3 years ago
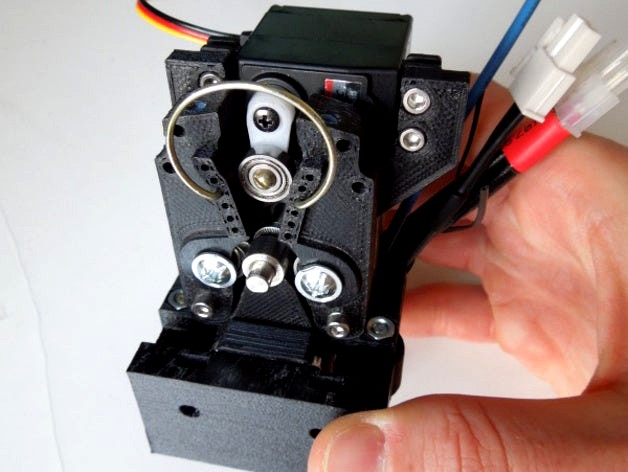
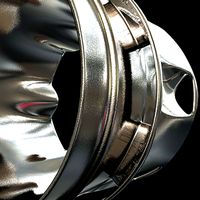
This is a model of a direct drive dual extruder with a single nozzle and a single stepper motor. A switching between extruders (filaments) is done by a servo mechanism. To drive this mechanism, I used a HS-225 mini servo that is as strong as bigger and heavier HS-422 servo. The model is designed for DyzEND-X hotend by Dyze Design.
See video of the first print: https://youtu.be/STZg94co8CI
Advantages:
No filament oozing from the second nozzle.
No nozzle misalignment.
When printing from one filament on almost empty spool, it is possible to schedule switch to the new spool in the middle of the print.
Disadvantages:
Wasted filament by every filament change.
Can print only with temperature compatible filaments.
Needs some retraction calibration before the first use.
I just rarely use the dual printing with this extruder because DyzEND-X hotend has a big melt-zone so there is a lot of wasted filament by switching. It is worth to print just bigger parts with large layer height to minimize the wasted filament ratio. This design would benefit from a hotend with a small melt-zone.
Instructions
Print all the printed parts listed below and clean them by a modelers knife, if needed. The holes for a filament can be also cleaned with a 3mm drill. Cut two PTFE tube (OD 3mm) to fit the length of idler hole and slip it to the hole. Do this for both idlers. The rest of PTFE tube cut in half under 77° angle and the two obtained pieces insert into the body part. The cut faces of the tubes should touch each other. Then take the modelers knife and do final adjustments on the PTFE tubes.
Enlarge the inner dimeter of the PTFE tube (OD 4mm) to 3mm by the drills and cut it into two small tubes of 11mm length. Then insert each tube into one idler.
The rest of the extruder assembly is easy. Just follow the pictures, photos, and the lists of materials.
Screws and nuts
4 M3 x 10mm hex socket head cap screw (servo holding screws)
2 M3 x 5mm hex socket head cap screw (upper stepper holding screws)
4 M3 x 20mm hex socket head cap screw (2 for idler shafts and 2 for hotend)
2 M4 x 10-11mm cross (flat) head screw (ball bearing holding screws)
6 M3 nuts (2 for hotend and 4 for servo)
6 M3 washers (4 for servo and 2 for idler shafts)
2 M4 x 10mm screw (to mount the the body to the holder)
2 M4 screw of proper length (to mount the extruder to a x-carrier)
4 M4 nuts
Mechanical parts
1 623ZZ ball bearing
2 624ZZ ball bearings
1 MK8 filament drive gear
1 traction spring / paper clip spring / peg spring / some rubber bands
Electrical parts
1 mini servo HS-225 or similar with accessories (arms and mounting parts)
1 NEMA17 stepper motor
1 5V DC-DC converter
Other parts
PTFE tube OD 4mm, ID 2mm, length cca 30mm (for idler shafts)
PTFE tube OD 3mm, ID 2mm, length cca 120mm (filament guide)
Printed parts
1 body
2 idler (1 normal + 1 mirrored)
2 washer (1 normal + 1 mirrored)
1 bracket
1 holder
Hotends
1 DyzeEND-X hotend by Dyze Design
Tools used
Modelers knife.
Dremel tool or other drilling machine.
Drills of 2.5mm and 3mm diameter.
Firmware
I used Marlin firmware (Release Candidate -- Marlin 1.1.0-RC7 - 31 July 2016) with the new SINGLENOZZLE feature. I modified this firmware and hardcoded the extruder switching.
I attached the modified Marlin firmware. I changed following files.
Configuration.h - I configured my printer and edited some code:
// For Cyclops or any "multi-extruder" that shares a single nozzle.
#define SINGLENOZZLE
#if ENABLED(SINGLENOZZLE)
#define SINGLESWITCH_EXTRUDER_SERVO_NR 0
#define SINGLESWITCH_EXTRUDER_SERVO_DELAY 700
#define SINGLESWITCH_EXTRUDER_SERVO_ANGLES { 169, 11 } // Angles for E0, E1
#endif
The definition DISABLE_INACTIVE_EXTRUDER has to be false.
Configuration_adv.h - this was changed just because of my high-temperature thermistor at DyzeEND-X hotend. I recommend replacing this file with the original one from the github release.
pins_ULTIMAKER.h - I changed the board configuration. I set both extruder steppers to one driver and I defined the servo pin. You have to change your board configuration file like this.
Marlin_main.cpp - I added/modified some code:
#if ENABLED(SINGLENOZZLE)
inline void move_extruder_servo(uint8_t e) {
const int angles[2] = SINGLESWITCH_EXTRUDER_SERVO_ANGLES;
MOVE_SERVO(SINGLESWITCH_EXTRUDER_SERVO_NR, angles[e]);
delay(SINGLESWITCH_EXTRUDER_SERVO_DELAY);
servo[SINGLESWITCH_EXTRUDER_SERVO_NR].detach();
}
#endif
and this:
#if ENABLED(SINGLENOZZLE)
stepper.synchronize();
move_extruder_servo(tmp_extruder);
#endif
Toolchange scripts
Use this script at your own risk! High max. feedrade value and fast extrusion (instead of retraction) might damage your extruder.
G-code script for switch from filament 1 to filament 2:
M203 E400 ;set maximum feedrate to 400 mm/min
G4 S1 ; wait 1 s
G92 E0 ; reset extruder position (set it to 0)
G1 E-4 F120 ; retract 4mm
G1 E-2.5 F60 ; go slowly back to 2.5mm (push slowly back 1.5mm)
G1 E-39.5 F24000 ; retract fast to 39.5mm
T1 ; switch to the second filament
G1 E0 F1800 ; feed in the second filament
M203 Exxx ;set maximum feedrate back to your default value xxx mm/min
Please note that the max. feedrate defined in the firmware is in mm/s while the M203 command sets the max. feedrate in mm/min! To get the default max. feedrate value for M203 command you have to divide the value from firmware by 60.
To switch from filament 2 to filament 1 just replace the command T1 with T0.
Similar models
thingiverse
free

Bowden dual/quad extrusion extruder (single-nozzle single-drive) for MG995 SERVO by serandre
...ere: https://github.com/spegelius/filaswitch
it prints perfectly, of course you need to fine tune the settings for your hardware.
thingiverse
free

JGAurora A5 direct drive with dual extruder and single nozzle by Hevilp
...pty filament-sensor. the target is an automatic switch to the second extruder if the spool is empty. i will take care of it asap.
thingiverse
free

Switching nozzle mount for Bowden extruders by fixoid
...s { 20, 137 } // angles for e0, e1//#define hotend_offset_z { 0.0, 0.0 } #endif
..#define temp_sensor_1 1
..#define num_servos 1
thingiverse
free

Compact extruder for Prusa i3 and 42YF22GN050R (2engineers) geared motor with shaft support by denisc
... ...300
#define default_retract_acceleration 300
update 13-sep-2014
added long screws, springs, washers, nuts for idler.
thingiverse
free

LulzBot Taz extruder mount for Diabase Flexion by ITWorks
...ble and solid filaments with a single toolhead, and switching between 1.75 and 3mm filament with only a quick swap of ptfe tubes.
thingiverse
free

Adjustable filament sensor with PTFE tube
...ube
thingiverse
filament sensor with ptfe tube for micro roller switch.
sensor is adjustable with min m3x12 screw and 2 m3 nuts.
thingiverse
free

Upgraded Bowden Extruder for flexible filament, nylon and many more by kazam_x1
... hotend.
you need:
4 x m3x10mm
1 x m3x 15mm
1 x m3 nut
1 x 608 bearing
1 x mk7 drive gear
1 x ptfe push fit connector
teflon tube
thingiverse
free

3mm Filament Bowden Adapter for K8200 by B4R
...filament in tube and then put the screws in (the filament prevents the tube from sqeezing on itself).
-remove filament and voila!
thingiverse
free

Compact Bowden Extruder by CaseyJohnson
...der arm
2 m3 x 25mm machine screw if you do not use springs on the extruder arm
1 m6 hex nut
1 bowden push fitting with m6 thread
thingiverse
free

Direct drive dual extruder (single-nozzle and single-drive) by Delarn
... dual extruder (single-nozzle and single-drive) by delarn
thingiverse
for fs5103r servo. added some diameter for the ptfe tube.
Bigsteve
thingiverse
free

Printed lm8uu bearing mount by BigSteve
...s is a holder for printed lm8uu bearing. the displacement between holes is 31mm and the inner diameter for the bearing is 15.3mm.
thingiverse
free

Alzák vykrajovací váleček by BigSteve
...on sponsored by alza.cz in czech republic.
cz: vykrajovací váleček alzáka na vánoční cukroví, perníčky nebo sušenky ku kafe. :-)
thingiverse
free

Trunk cover clip - Suzuki Grand Vitara by BigSteve
...cover clip - suzuki grand vitara by bigsteve
thingiverse
this is a replacement part of trunk cover clip for suzuki grand vitara.
thingiverse
free

Dondolo Pendulum for DyzEND-X hotends by BigSteve
...e
this is the pendulum part of the dondolo extruder for dyzend-x hotends.
video of the first print: https://youtu.be/oy8cmhgkhws
thingiverse
free

Cookie cutter - rolling by BigSteve
...rough thingiverse and other web pages but i could not find any such 3d models. therefore, i modelled and 3d-printed it on my own.
thingiverse
free

Customized Z axis upper holder for Geeetech Prusa i3 by BigSteve
...ingiverse
this is a customized z axis rod holder for geeetech prusa i3. the leading screws are free to prevent z axis wobbling.
thingiverse
free

Mouse wheel for Yenkee Ambush by BigSteve
...height, 3 perimeters, and 60% infill to make it soft. decreasing infill and number of perimeters increases softness of the wheel.
thingiverse
free

Clip MDF P027 for skirting boards by BigSteve
...sion.
there are two versions uploaded, one similar to the original part and the other designed particularly for easy 3d printing.
thingiverse
free

Customized Z axis upper holder for Geeetech Prusa I3 with ball bearings by tbowmo
...bearings in surplus. i have used the original from @bigsteve for awhile, but the z-axis lead screw kept wobbling...
Dual
turbosquid
free

Dual Pistols
...ls
turbosquid
free 3d model dual pistols for download as fbx on turbosquid: 3d models for games, architecture, videos. (1320360)
turbosquid
$2

Dual Axe
...urbosquid
royalty free 3d model dual axe for download as fbx on turbosquid: 3d models for games, architecture, videos. (1332372)
turbosquid
$10

Dual Lesaths
... available on turbo squid, the world's leading provider of digital 3d models for visualization, films, television, and games.
3ddd
$1

плитка Dual Bianco (Испания)
...й плитки venis dual (испания). технические качества: устойчивость к стирания, отличная геометрия, отсутствие проблем при укладке.
turbosquid
$35

Dual Mesh Fonts
...ree 3d model dual mesh fonts for download as ma, obj, and fbx on turbosquid: 3d models for games, architecture, videos. (1352989)
turbosquid
$29

Dual Flask with Bungs
...del dual flask with bungs for download as obj, fbx, and blend on turbosquid: 3d models for games, architecture, videos. (1210512)
turbosquid
$19

Dual Socket Plug
...3d model dual socket plug for download as obj, fbx, and blend on turbosquid: 3d models for games, architecture, videos. (1303912)
turbosquid
$13

Dual Adjustable Pulley
... available on turbo squid, the world's leading provider of digital 3d models for visualization, films, television, and games.
turbosquid
$10

Amoi N809 Dual
... available on turbo squid, the world's leading provider of digital 3d models for visualization, films, television, and games.
turbosquid
$5

Dual Turret Tank
... available on turbo squid, the world's leading provider of digital 3d models for visualization, films, television, and games.
Nozzle
3d_export
$5
nozzle
...nozzle
3dexport
3d_export
$49
fuel nozzles
...fuel nozzles
3dexport
fuel nozzles 3d model. include max, obj, fbx files.
archive3d
free

Nozzle 3D Model
...archive3d
nozzle hair-drier ware
nozzle - 3d model (*.gsm+*.3ds) for interior 3d visualization.
turbosquid
$25

Pirouette Nozzle
... available on turbo squid, the world's leading provider of digital 3d models for visualization, films, television, and games.
turbosquid
$10

Fuel Nozzle
...model fuel nozzle for download as c4d, fbx, obj, 3ds, and stl on turbosquid: 3d models for games, architecture, videos. (1672732)
turbosquid
$8
Aeration Nozzles
... available on turbo squid, the world's leading provider of digital 3d models for visualization, films, television, and games.
3d_export
$10

laval airjet nozzle
...laval airjet nozzle
3dexport
a simple modified laval nozzle (airjet shooter) for sorting purposes.
3d_export
$36

Gas nozzle 3D Model
... 3d model
3dexport
gas pump nozzle dispenser filling station petrol fuel spout tank gun
gas nozzle 3d model tartino 1945 3dexport
turbosquid
$10

Diecast Jet nozzle
... free 3d model diecast jet nozzle for download as obj and stl on turbosquid: 3d models for games, architecture, videos. (1425990)
turbosquid
$39
Rocket nozzle, supressor.
... available on turbo squid, the world's leading provider of digital 3d models for visualization, films, television, and games.
Direct
design_connected
free
Compas Direction
...compas direction
designconnected
free 3d model of compas direction by vitra designed by prouvé, jean.
design_connected
$18
Direction Pivotant
...direction pivotant
designconnected
vitra direction pivotant computer generated 3d model. designed by prouvé, jean.
turbosquid
$6
not direct the front
...oyalty free 3d model not direct the front for download as max on turbosquid: 3d models for games, architecture, videos. (1213034)
turbosquid
$10

Rails Direct
... available on turbo squid, the world's leading provider of digital 3d models for visualization, films, television, and games.
3d_export
$5

Picto toilet directions
...lude 3d files next to rhino6: x3dv, step, igus, obj and stl. double-sided, flipping changes the gender directions to the toilets.
3ddd
$1
fauteuli direction
...d
chair , vitra , fauteuli
fauteuli vitra chair
design_connected
$18

Fauteuil Direction, 1951
...fauteuil direction, 1951
designconnected
vitra fauteuil direction, 1951 computer generated 3d model. designed by prouvé, jean.
3d_export
$5
Directional tactile 3D Model
...tactile 3d model
3dexport
directional tactile braille tile flooring interior
directional tactile 3d model renob000 71068 3dexport
turbosquid
$26

Radio direction finder A
...ty free 3d model radio direction finder a for download as fbx on turbosquid: 3d models for games, architecture, videos. (1212490)
turbosquid
$7
Wooden direction signage
...ty free 3d model wooden direction signage for download as max on turbosquid: 3d models for games, architecture, videos. (1453747)
Drive
turbosquid
$90
Drive
...turbosquid
royalty free 3d model drive for download as blend on turbosquid: 3d models for games, architecture, videos. (1654393)
3d_export
$10

cycloidal drive
...cycloidal drive
3dexport
cycloidal drive
3d_ocean
$5

Flash Drive
...h drive included : – materials – scene ( lighs / room ) – .c4d + .obj for any questions please feel free to contact me thank you.
3d_ocean
$5

Usb drive
...s shaders and a lighting setup. it also has a small animation of it going in and out. i saved it out as both a .blend file and...
3d_ocean
$5

Pen Drive
...est computer drive game model good low poly new pen pen drive textured unwrapped uv very low poly
a very beautiful low poly model
3d_ocean
$10

External hard drive
... is a detailed model of a trekstor external hard drive. you can easily modify the label on the top. simply edit the text objects.
turbosquid
$60

Star Drive
...squid
royalty free 3d model star drive for download as blend on turbosquid: 3d models for games, architecture, videos. (1254314)
turbosquid
$50
Star Drive
...squid
royalty free 3d model star drive for download as blend on turbosquid: 3d models for games, architecture, videos. (1263524)
turbosquid
$45

Star Drive
...squid
royalty free 3d model star drive for download as blend on turbosquid: 3d models for games, architecture, videos. (1287060)
turbosquid
$40
Star Drive
...squid
royalty free 3d model star drive for download as blend on turbosquid: 3d models for games, architecture, videos. (1261902)
Extruder
3ddd
$1

Extruded Chair
...extruded chair
3ddd
extruded , tom dixon
inspired by tom dixon extruded chair
turbosquid
$15

Extruded Table
... extruded table for download as blend, dae, fbx, obj, and stl on turbosquid: 3d models for games, architecture, videos. (1634137)
turbosquid
$2

3D Printer Extruder
...d
royalty free 3d model 3d printer extruder for download as on turbosquid: 3d models for games, architecture, videos. (1537359)
turbosquid
$1

Zombie extruded text
...oyalty free 3d model zombie extruded text for download as obj on turbosquid: 3d models for games, architecture, videos. (1322198)
turbosquid
$4

Extruder conical screw
...el extruder conical screw for download as sldpr, ige, and stl on turbosquid: 3d models for games, architecture, videos. (1524433)
turbosquid
$50

3d PRINTER - Extruder
... available on turbo squid, the world's leading provider of digital 3d models for visualization, films, television, and games.
turbosquid
$15

Extruded Table 2
...xtruded table 2 for download as blend, dae, fbx, obj, and stl on turbosquid: 3d models for games, architecture, videos. (1621846)
turbosquid
$10

Maya Extrude Tool
... available on turbo squid, the world's leading provider of digital 3d models for visualization, films, television, and games.
3d_export
$5

world earth extrude map
...world earth extrude map
3dexport
3ddd
$1

Simply Elegant Extruded Tree Coffee Table Design
...ble by link studios. the silhouette of a tree is visible at one angle, extruded from the surface to create the support structure.
Single
3d_export
$5

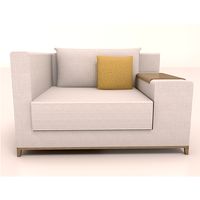
single sofa single chair
...single sofa single chair
3dexport
single sofa single chair 3d model
3d_export
$5

single sofa single chair
...single sofa single chair
3dexport
single sofa single chair 3d model
3d_export
$5

single fastener
...single fastener
3dexport
single fastener
3ddd
$1
Single FLOU
... sofa , трансформер
диван-трансформер single от итальянского производителя flou
3ddd
$1
bed single
...bed single
3ddd
постельное белье
bed single 190cm*90cm
3ddd
$1

Single Flou
...single flou
3ddd
качественная моделька дивана-трансформера single flou.
3d_ocean
$9
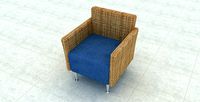
Single sofa
...le sofa
3docean
modern sofa single sofa sofa white sofa.comfortable sofa
single sofa,sofa,modern sofa,white sofa.comfortable sofa
3d_export
free
Single Knife
...single knife
3dexport
a single knife, presumably it was used as one of the throwing knives.
3d_export
free

couch - single
...couch - single
3dexport
low poly single couch with .psd file for personal customization
3d_ocean
$5
Single Sofa
...single sofa
3docean
single sofa made by fabric , wood frame & ss leg