Thingiverse
Darth Vader's Lightsaber Modified
by Thingiverse
Last crawled date: 4 years, 1 month ago
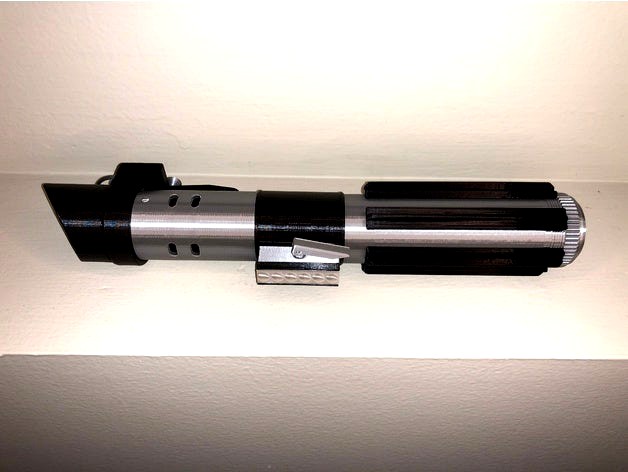
Darth Vader's lightsaber by CaseStudyno8 was the first prop I made after getting a 3D printer, and I recently had the urge to make another one. This time I wanted to make an alternate version since there have been so many changes to the prop between movies. I modified these parts to fit Vader's saber by CaseStudyno8 by referencing various photos online. Because of the variety of the Vader saber prop I just went with details that seemed common among most of them, so not sure which film it would be closest to.
Here's a breakdown of the parts:
Upper chamber outer - repositioned the cutouts and added little screws to look more like the prop. No supports.
Upper chamber inner - core that if painted or printed in black gives contrast to the cutouts. No supports.
Upper chamber whole - complete chamber as an alternate to the outer/inner. No supports.
Emitter - noticed the original prop had some little details on this part that I wanted to capture. Prints the same as the original part, plus tightened the tolerance for the emitter shroud so it's not so loose when assembling. No supports. Note: this model was thrown together fast and has errors, but opens and slices fine in Prusaslicer so let me know if I need to fix it.
Midsection - alternate version I've seen. Use support.
Power block - fits the midsection mod so it sticks out far enough. No support.
Power regulator - made a version that resembles the original prop's clamp lever. no support.
Power casing - made very minor change to give the piece longer side legs to grip the block better. Use brim & no supports.
Upper bolt - flat-top knurled knob option fitting the emitter shroud. No support.
Lower bolt - knob goes on emitter part, may need to be scaled down a few degrees if trouble fitting. No supports.
D-ring - fattened and stabilized from moving side to side. Use supports.
Pommel block - the original grips had sharp edges, so I simply rounded them a little and now they're more comfy. Also tightened the tolerance so they can almost press-fit in place. Make 6, and use supports.
Just added:
Power Switch with support (bubble strip) - for a nicer way to use clear filament on this part, I added a support fin so it could be printed upright. The fin breaks off easily. Use zero infill and 2 walls for good clarity. No supports needed but use brim.
The emitter shroud and pommel have not been modified, are not included, and should be downloaded from CaseStudyno8's design.
The parts do not all open in the orientation they should be printed in, so please rotate accordingly.
Similar models
thingiverse
free

Darth Vader's Lightsaber by CaseStudyno8
... an extra piece designed after his rotj shroud if you prefer that.
be sure to print six of the pommel blocks and two of the bolts
thingiverse
free

Push Fit Shroud & Emmiter for Darth's Light Saber
...ion helped, now prints in two parts. wip (currently 0.7mm shorter than original, in process of printing first model for test fit)
thingiverse
free

Starkiller's Lightsaber by CaseStudyno8
...rsonally i used supports generated in cura on the emitter shroud, upper kyber chamber, back wire and front wire.
happy printing!
thingiverse
free

Darth Maul's Lightsaber by CaseStudyno8
...er and mm lower chamber), but please play around with them and let me know what worked best for you to print those tricky pieces!
thingiverse
free

Leia Lightsaber Emitter for CaseStudyno8's saber. by TibuTangboo
...d replace the parts that were hard to print and inaccurate.
here is the original model: https://www.thingiverse.com/thing:4193911
thingiverse
free

Plo Koon's Lightsaber by CaseStudyno8
...koon's lightsaber by casestudyno8 thingiverse plo koon's lightsaber! strangely similar to darth maul's, this saber was originally attributed to...
thingiverse
free

Yoda's Lightsaber by CaseStudyno8
...re in the orientation i printed them. personally, i printed the upper emitter and middle chamber with supports generated in cura.
thingiverse
free

Jocasta Nu's Lightsaber by CaseStudyno8
...wer) together. the connection is small but it worked out for me, curious to see if it holds true for everyone printing it.
enjoy!
thingiverse
free

Darth Vader's Lightsaber by ReProps
...n there if you want. i'll assembly and painting video for this soon.
be sure to check out my other designed and post a make.
grabcad
free

Darth Vader's light saber (speed run, not great)
...s really fast so the details are less than awesome, but its okay.
as stated by the title it's darth vader's lightsaber.
Darth
3ddd
$1

Darth Vader Lamp
...darth vader lamp
3ddd
darth vader
darth vader lamp.
3d_export
$7

darth vader
...darth vader
3dexport
darth vader 3d model good quality for animation
3d_ocean
$4

Darth Vader LightSaber
...ean
darth darth vader lightsaber red sci-fi star wars vader weapons
this is red colored lightsaber of darth vader from star wars.
3d_ocean
$12

Darth Vader
...poly lebedev low poly model polygonal render star wars starwars
sub-d darth vader,modeled in cinema4d r16.low and high poly model
3d_export
$6

darth vader pot
...darth vader pot
3dexport
darth vader pot 3d model stl file
turbosquid
$10

Darth Maul
...ee 3d model darth maul for download as max, 3ds, fbx, and obj on turbosquid: 3d models for games, architecture, videos. (1612153)
3d_export
$12

pencil stand darth vader
...pencil stand darth vader
3dexport
pencil stand darth vader
3ddd
free

Darth Vader Alarm Clock
... будильник , часы
будильник darth vader alarm clock
стек не свернут.
archive3d
free

Darth Maul 3D Model
...3d
darth maul sith lord maul
darth maul - 3d model (*.gsm+*.3ds) for interior 3d visualization.
turbosquid
$15

Darth Vader Helmet
...squid
royalty free 3d model darth helmet for download as obj on turbosquid: 3d models for games, architecture, videos. (1174643)
Vader
3ddd
$1
Darth Vader Lamp
...darth vader lamp
3ddd
darth vader
darth vader lamp.
3d_export
$7
darth vader
...darth vader
3dexport
darth vader 3d model good quality for animation
3d_ocean
$4
Darth Vader LightSaber
...ean
darth darth vader lightsaber red sci-fi star wars vader weapons
this is red colored lightsaber of darth vader from star wars.
3d_ocean
$12
Darth Vader
...poly lebedev low poly model polygonal render star wars starwars
sub-d darth vader,modeled in cinema4d r16.low and high poly model
3d_export
$6
darth vader pot
...darth vader pot
3dexport
darth vader pot 3d model stl file
turbosquid
$10

Vader Head
...ee 3d model vader head for download as max, 3ds, fbx, and obj on turbosquid: 3d models for games, architecture, videos. (1618545)
3d_export
$12
pencil stand darth vader
...pencil stand darth vader
3dexport
pencil stand darth vader
3ddd
free
Darth Vader Alarm Clock
... будильник , часы
будильник darth vader alarm clock
стек не свернут.
3d_export
$10

Toyota Vader 3D Model
...del
3dexport
toyota corolla tuning tune car auto port vader black dark race mod coupe
toyota vader 3d model daemon 19384 3dexport
3d_export
$5

Darth Vader
...darth vader
3dexport
this model includes textures, materials, scan, skeleton and 3d model
Lightsaber
3d_export
free

lightsaber
...lightsaber
3dexport
the best lightsabers in the galaxy:)
3d_export
$6

lightsaber
...lightsaber
3dexport
lightsaber belonging to an unknown jedi of the old republic.
3d_export
$5

Lightsabers
...lightsabers
3dexport
rusty and clean lightsabers like in star wars
3d_export
$5

lightsaber
...lightsaber
3dexport
i fan star wars and i do my lightsaber
3d_ocean
$4

Simple Lightsaber
...simple lightsaber
3docean
jedi lightsaber starwars
lightsaber model that is ready to be rigged and animated.
turbosquid
$4

Lightsaber
...squid
royalty free 3d model lightsaber for download as blend on turbosquid: 3d models for games, architecture, videos. (1691034)
3d_export
free

lightsaber 3d
...lightsaber 3d
3dexport
the best lightsabers in the galaxy:)
3d_ocean
$10

Lightsaber
...er multi format multiformat skywalker star wars
made a high poly lightsaber from the star wars franchise. this is my own version.
turbosquid
$15

lightsaber
...
royalty free 3d model lightsaber for download as max and obj on turbosquid: 3d models for games, architecture, videos. (1165564)
3d_export
$5

lightsaber
...lightsaber
3dexport
Modified
turbosquid
$5

modify car
...bosquid
royalty free 3d model modify car for download as max on turbosquid: 3d models for games, architecture, videos. (1390511)
turbosquid
$35

Soleste modified
...e 3d model soleste modified for download as 3dm, stl, and jpg on turbosquid: 3d models for games, architecture, videos. (1646606)
turbosquid
$35

Screwdriver-Modified
... available on turbo squid, the world's leading provider of digital 3d models for visualization, films, television, and games.
turbosquid
$20

APS modified
... available on turbo squid, the world's leading provider of digital 3d models for visualization, films, television, and games.
turbosquid
$5

Modified skull
... available on turbo squid, the world's leading provider of digital 3d models for visualization, films, television, and games.
3d_export
$8

Maruti 800 Modified
...obile engineers. this concept will also helpful to modified car enthusiast. this is made in solidworks & rendered in keyshot.
3d_ocean
$5
Spacecraft with Subdivision Modifier
...raft with subdivision modifier
3docean
fantasy spacecraft vehicle
the model was created in blender using the subdivision modifier
turbosquid
$10
Modified 9mm pistol
...royalty free 3d model modified 9mm pistol for download as fbx on turbosquid: 3d models for games, architecture, videos. (1560956)
3d_export
$10
ak-47 modified
...ak-47 modified
3dexport
turbosquid
$10
modified evo x
...ree 3d model modified evo x for download as obj, fbx, and stl on turbosquid: 3d models for games, architecture, videos. (1461606)