Thingiverse
DAILEY 16 by abadgoat
by Thingiverse
Last crawled date: 3 years ago
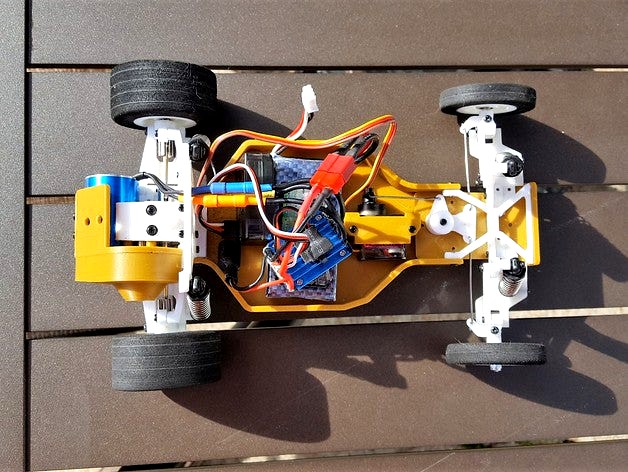
This is the "DAILEY 16", inspired by the R/C 10.
This took about 300 hours to design, I started this project back in March of this year.
I have printed and test driven 2 cars with the parts currently uploaded... this is a complete Kit.
Parts List For The "Dailey 16" R/C Buggy
This Kit Uses Parts From An "ECX 1/18 SMASH" R/C Truck.
1) ECX8326 Front Shock set 1
2) ECX8327 Rear Shock set 1
3) ECX8329 Hinge Pin set 1
4) 2mmX4mm long Screw 30
5) 2mmX6mm long Screw 30
6) 2mmX10mm long screw 20
7) 2mmX12mm long screw 1
8) 2mm Nut 4
9) 4mmX7mmX2.5mm bearings(MR74ZZ) 10
10) ECX ECX8312 Transmission Set 1
11) ECX ECX8321 Spindle, Carrier, & Hub Set 1
12) .5 Mod 16 Tooth Pinion 1
13) ECX8320 Driveshaft & Axle Set: Smash 1
14) 1mm(.039") Piano Wire For Tie Rods And Servo Link. about 8" long.
Shock_Spacers.STL part is for controlling the travel on the FRONT AND REAR shocks.
The spacer slips over shock shaft, INSIDE the shock. The shocks need to be disassembled to install the spacer. Use a paperclip to push out the top retaining pin, and pull off the top of shock. Unscrew the shock shaft with a small Phillips screwdriver. Then slid off the rubber bump stop, slide the Shock Spacer on, and reinstall the bump stop. reassemble the shock in reverse order.
The Dogbones need to be shortened to 28mm pin-to-pin length. Use 2mm ID brass tubing, and silver solder together.
11/9/2016 UPDATED .STL FILES ARE NOW POSTED IN METRIC UNITS
No changes where made to the models.
UPDATE 11/12/2016
Changed the rear body post, and added a front body post.
UPDATE 11/13/2016
Changed rear rims for more thread engagement when using Nylon locking nuts.
Also, use the shock spacers on all 4 shocks for proper stance, and elimination of bump steer on the front suspension.
Similar models
thingiverse
free

traxxas slash a-arm by asciencepotato
... you need to have your printer settings just perfect to get the best layers surrounding those pin holes for the highest strength.
thingiverse
free

ECX Smash rear shock tower by authenticOnion
...he original shock tower and is an easy replacement.
i printed it with 20% infill and it seems to be good enough for some bashing.
thingiverse
free

Losi Mini-T 2.0 rear shock spacer (inside mount)
...he shock tower. it should allow other bodies to fit easier.
six m2 screws are required, these replace the stock hardware.
print 2
thingiverse
free

Tank Track, Double Idler, Arms, Beams by fastmike75
...x complete oil filled front and rear shock absorber set, parts list #'s a949-55, fits all versions of the a959 vehicle".
grabcad
free

Team Associated SC 10 rear shock tower
... shock tower
grabcad
a rear shock tower designed for the sc10 r/c car. this was a student project that we machined for his car.
thingiverse
free

R/C car shock 1/10 scale by Cameron10
...r/c car shock 1/10 scale by cameron10
thingiverse
shock assembly for 1/10 scale rc car
thingiverse
free

Shock Spacers for the Traxxas 1/16 E-Revo/summit/slash by luisfjdesigner3d
...ve the shocks and
install the spacers on to the shocks themselves you should get
the idea on how that is done so enjoy this part.
thingiverse
free

ECX Temper 1/18 Servo Mount for Front or Rear by jammer859
...front or rear by jammer859
thingiverse
printed fine, made this so i can add rear steer to my ecx temper. accepts standard servos
thingiverse
free

ECX Barrage shock tower by tuxstang
...ew a magnet or a plate for velcro.
update : second version with fender. needs to be printed mirrored for other side.
trim to fit.
thingiverse
free

Long travel shock mounts for Axial SCX10 2 by 2JZ_Tacupra
...les will have to be made)
update 5/11/21: add-on body post/mount can be found here:
( https://www.thingiverse.com/thing:4856123 )
Dailey
3dbaza
$3

Dailey Chandelier (109785)
...t;br>xform: no<br>box trick: no<br>model parts: 60<br>render: v-ray<br>formats: 3ds max 2014, obj, fbx
cg_trader
$5

Pigeon tower
...i told you that i do not upload products dailey , and yesterday i visited two places , first...
3dwarehouse
free

Antonia Dailey
...antonia dailey
3dwarehouse
none #antonia
3dwarehouse
free

Jack Dailey Elementary School
... dailey elementary school
3dwarehouse
created with model maker & edited with sketchup 7 #las_vegas #nevada #paradise #school
3dwarehouse
free

Jack Dailey Elementary School, Paradise, NV, USA
...jack dailey elementary school, paradise, nv, usa
3dwarehouse
modeled with building maker.
3dwarehouse
free

Brockway Dining Hall, SUNY Brockport
...brockway is the best dining facility in college. #brockway #dailey ...
3dwarehouse
free

Bone funiture
...3dwarehouse who said we can't use bones in our dailey living? #bem_bem #bone #chair #death #funiture #grandma #grandpa #skeleton...
3dwarehouse
free

Hertz Hall of Music and Morrison Hall
...gray hargrove music library in 2004. #alfred_hertz #cal #department_of_music #gardner_dailey #hertz_hall #may_morrison #morrison_hall #music_library...
3dwarehouse
free

Evans Hall
...in the 1990s to its current colors. #cal #evans_hall #gardner_dailey #griffith_evans #mathematics...
Abadgoat
thingiverse
free

Parts Remover by abadgoat
...parts remover by abadgoat
thingiverse
it's a parts scraper, based off the "xyz printing" design.
thingiverse
free

1:10 Iroc Rims by abadgoat
...ms by abadgoat
thingiverse
1:10 scale 3rd gen(1982-1992) camaro iroc rims.
perfect rims for drifting, bashing, or a shelf queen!
thingiverse
free

22mL Test Tube holder by abadgoat
...holder i made for my wife.
this will hold a standard 16 mm diameter test tube.
could be used for holding pens and things too.
thingiverse
free

Cuda 505 emblem by abadgoat
...eel, and he was impressed.
year one charges $90.00 for a cuda emblem, but you can have this printed from shape-ways for $16.00.
thingiverse
free

1:25 Scale RC Car Chassis by abadgoat
...es are in "inches", scale to 25.4
this chassis is for converting the amt slot car camaro kit (kit # scamt744/12) to rc.
thingiverse
free

FlashForge Rear canopy Plugs by abadgoat
...lear canopy.
i decided to design a set of plugs that would cover the openings, and prevent the cables from getting snagged again.
thingiverse
free

Motherboard VGA Block off by abadgoat
...nue to use the on-board video port.
update
i have made changes for better fit, the block now says "no use" on top.
thingiverse
free

Free Energy Number Wheel by abadgoat
...h sides of the wheels are numbered for double the torque.
print multiple wheels and power your entire neighborhood... forever!
thingiverse
free

Thumb drive orgainizer, with cap tray by abadgoat
...b space.
tray is shown upside down in the preview.
version 2.0 has non-radius under side, and slightly increased pocked size.
thingiverse
free

The "Get Off!" Parts Scraper. by abadgoat
... for those stubborn, hard to remove, stuck on prints.
featuring rounded "safety edges" so you won't hurt your hand.
16
3ddd
$1

Bed 16
...bed 16
3ddd
постельное белье
bed 16.hope you like it.thanks you very much
design_connected
$4

Bolla 16
...bolla 16
designconnected
gervasoni bolla 16 coffee tables computer generated 3d model. designed by michael sodeau.
3d_export
$6

tap-16
...tap-16
3dexport
3d_export
$6

set-16
...set-16
3dexport
3ddd
$1

16 Mobilier ALIXE
... уличная , мебель
производитель: 16 mobilier
модель: alixe
3ddd
$1

Curtains 16
...curtains 16
3ddd
ламбрикен
curtains 16
polys: 350077
other models:http://3ddd.ru/users/brast/models
turbosquid
$199

F-16
...16
turbosquid
royalty free 3d model f-16 for download as max on turbosquid: 3d models for games, architecture, videos. (1188169)
turbosquid
$128

DF-16
...6
turbosquid
royalty free 3d model df-16 for download as max on turbosquid: 3d models for games, architecture, videos. (1660349)
turbosquid
$40

cottage 16
...bosquid
royalty free 3d model cottage 16 for download as max on turbosquid: 3d models for games, architecture, videos. (1377002)
turbosquid
$20

Decor 16
...urbosquid
royalty free 3d model decor 16 for download as stl on turbosquid: 3d models for games, architecture, videos. (1676913)