Thingiverse

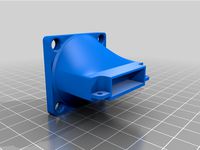
Da Vinci Pro Extruder Fan support by shotgun_banjo
by Thingiverse
Last crawled date: 3 years ago
This is my first THING after 1 year of owning my Da Vinci Pro 1.0 (I got lazy and really did not use my 3D printer as my projects did not require to show a 3D model). Daughter was pushing me to make some Pokemon so I ended up using all of my ABS and I have a box load of PLA so I have no choice but to do the fan mod now.
After looking at various fan mounts and studying them in 3D I decided to make my own as I found that there are a few things that will make the various mounts not work on my machine and the fact that I want to create my own and share it. My reasons are:
Somehow the front end of the extruder holder has 3 screws poking out facing the printer door. All of the mounts I saw did not allow for this.
There are various blower fan designs and sizes that you can buy and the housing is always different. My mount can mount a 50mm down to 30mm or smaller if there is such a fan that small. I also want to be able to adjust it or slide it for better precision on where it is exactly blowing but not directly on the nozzle. There is a mount that I saw that pivots only where you secure the blower fan but it is only for a single fan design.
I want a simpler design so that it will be lighter for the extruder carriage. I also do not want a switch on the extruder as well and I want fan RPM control (my next mod). So right now the only way I can turn the fan on and off is with a JST connector that I took from my RC box.
This is what I did:
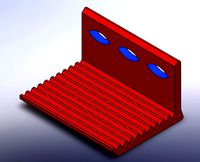
Print the mount to .2mm and at 100% Infill. with supports (low). I just used the XYZ slicer. Took 2.5 hours to print for 2 mounts.
I used 4-40 1" machine screws and nuts with washers to secure the blower fan to the mount.
I bought 2 blower fans similar to this (12V). Why 12v? so that I can use a PC fan controller to control the speed of the fan. Make sure it is not more than 15mm thick or it won't fit on this mount.
http://www.ebay.com/itm/12V-0-14A-Blower-Cooling-Fan-5015-50x50x15mm-RepRap-3D-Printer-Extruder-PLA-50mm-/261816986831?hash=item3cf5822ccf
I used super strong 3M automotive mounting tape to mount it on the extruder housing (no super glue, no zip ties). Put it on the back and bottom of the mount.
https://www.amazon.com/3M-03609-Scotch-Mount-Molding-Tape/dp/B000BO913C/ref=sr_1_1?ie=UTF8&qid=1502165694&sr=8-1&keywords=3m+super+strong+automotive+attachment+tape
Mount it on the extruder housing as per the pictures.
Provide power to the fans (external supplied or from the printer it self).
TIP:
Make sure to heat up the extruder a few times to set the adhesive of the tape. I recommend not to use the printer for 24 hours just to be safe that it wont de-laminate.
Make sure the fan you use is not more than 15mm thick or it will not fit. If your fan is different than what I used and you want to change the angle of the nozzle just use one screw (secure it on the top portion of the fan) then just slide up and down while tilting the blower fan to change the direction of the air flow. Just make sure the bottom of your fan will not be lower than your extruder tip or you will be scraping your fan to your print bed or prints (BE WARNED!)
Make sure to use stranded wires (not solid) when wiring your fans. 22 gauge is more than enough. Stranded wires is recommended when the wires will be moving which is exactly what will happen on the 3D printer. Amazon or Ebay is your friend to find this wire if you do not have a local hobby shop or low voltage shop near by.
Insulate all your splices. Grab a heat shrink wrap and wrap all your exposed wiring connections. Ask experienced people here on what to do and how to do it if you are sourcing your power inside the printer. You do not want a $700 paper weight in the end.
If using this to print PLA do not turn on the fan on the first 2 layers or the PLA won't stick on the print bed.
I want to thank ChatToBrian for the inspiration of this design as I used his fan mount as the basis of my design. Thank you Brian again for the info on the wiring of the Da Vinci Pro.
Fan in action:
https://youtu.be/UlDCoKT0igc
After looking at various fan mounts and studying them in 3D I decided to make my own as I found that there are a few things that will make the various mounts not work on my machine and the fact that I want to create my own and share it. My reasons are:
Somehow the front end of the extruder holder has 3 screws poking out facing the printer door. All of the mounts I saw did not allow for this.
There are various blower fan designs and sizes that you can buy and the housing is always different. My mount can mount a 50mm down to 30mm or smaller if there is such a fan that small. I also want to be able to adjust it or slide it for better precision on where it is exactly blowing but not directly on the nozzle. There is a mount that I saw that pivots only where you secure the blower fan but it is only for a single fan design.
I want a simpler design so that it will be lighter for the extruder carriage. I also do not want a switch on the extruder as well and I want fan RPM control (my next mod). So right now the only way I can turn the fan on and off is with a JST connector that I took from my RC box.
This is what I did:
Print the mount to .2mm and at 100% Infill. with supports (low). I just used the XYZ slicer. Took 2.5 hours to print for 2 mounts.
I used 4-40 1" machine screws and nuts with washers to secure the blower fan to the mount.
I bought 2 blower fans similar to this (12V). Why 12v? so that I can use a PC fan controller to control the speed of the fan. Make sure it is not more than 15mm thick or it won't fit on this mount.
http://www.ebay.com/itm/12V-0-14A-Blower-Cooling-Fan-5015-50x50x15mm-RepRap-3D-Printer-Extruder-PLA-50mm-/261816986831?hash=item3cf5822ccf
I used super strong 3M automotive mounting tape to mount it on the extruder housing (no super glue, no zip ties). Put it on the back and bottom of the mount.
https://www.amazon.com/3M-03609-Scotch-Mount-Molding-Tape/dp/B000BO913C/ref=sr_1_1?ie=UTF8&qid=1502165694&sr=8-1&keywords=3m+super+strong+automotive+attachment+tape
Mount it on the extruder housing as per the pictures.
Provide power to the fans (external supplied or from the printer it self).
TIP:
Make sure to heat up the extruder a few times to set the adhesive of the tape. I recommend not to use the printer for 24 hours just to be safe that it wont de-laminate.
Make sure the fan you use is not more than 15mm thick or it will not fit. If your fan is different than what I used and you want to change the angle of the nozzle just use one screw (secure it on the top portion of the fan) then just slide up and down while tilting the blower fan to change the direction of the air flow. Just make sure the bottom of your fan will not be lower than your extruder tip or you will be scraping your fan to your print bed or prints (BE WARNED!)
Make sure to use stranded wires (not solid) when wiring your fans. 22 gauge is more than enough. Stranded wires is recommended when the wires will be moving which is exactly what will happen on the 3D printer. Amazon or Ebay is your friend to find this wire if you do not have a local hobby shop or low voltage shop near by.
Insulate all your splices. Grab a heat shrink wrap and wrap all your exposed wiring connections. Ask experienced people here on what to do and how to do it if you are sourcing your power inside the printer. You do not want a $700 paper weight in the end.
If using this to print PLA do not turn on the fan on the first 2 layers or the PLA won't stick on the print bed.
I want to thank ChatToBrian for the inspiration of this design as I used his fan mount as the basis of my design. Thank you Brian again for the info on the wiring of the Da Vinci Pro.
Fan in action:
https://youtu.be/UlDCoKT0igc
Similar models
thingiverse
free

Yi Home mount for Da Vinci Pro (inside of printer) by shotgun_banjo
... you permanently stick it on the printer to see if the guide will hit the camera when it is doing the measurements for alignment.
thingiverse
free

MPCNC Universal Mount MK8 Bracket and Fan Holder by jwood2
...://reprapchampion.com/collections/cooling-fans/products/12v-blower-cooling-fan-5020-50x50x20mm-reprap-3d-printer-extruder-for-pla
thingiverse
free

XYZprinting Da Vinci 1.0 50mm Fan Mount V1 for PLA Cooling by sedzen
...is room for improvement. i am working on a similar snap-on design that should offer improved...
thingiverse
free

PrintrBot Chassis Mounted Blower Fan Kit by iplop
... this is a wip; i haven't gotten around to designing the blower fan chassis mount yet (i'm using zip-ties at the moment).
thingiverse
free
bullseye blower to 40mm noctua silent fan conversion bolt in place by passion4paint
...ts in place where the blower fan was using the blower fan screws then just mount your noctua fan to the top and wire in as needed
thingiverse
free

PLA cooling fan mounting bracket by bonmotwang
...15 turbo fan blower, you can find it on aliexpress.
if you don't have one, and printing twisted posts, this is your solution!
thingiverse
free

Exhaust Fan Duct for the XYZPrinting Da Vinci Pro 1.0 & 3-in-1 by ChatToBrian
...la extrusion temperature about 5 degrees higher then you are used to.
see the video for more details:https://youtu.be/jrztfvf7p9e
thingiverse
free

Printrbot Jr Fan Mounts by Shadowengineer
... out great. if you print pla and abs make sure that you print this with abs so that it will withstand the heat from the extruder.
thingiverse
free

Geetech I3 M201 Hotend Blower and cooler by Dj_Garfield
... and add the little blower to cool down the extruded wire to make better bridges for some printed part i did . thanx nelujones :)
thingiverse
free

Blower Fan for MendelMax 2.0 by JohnSL
...
you can find more about my experiments with cooling fans here: http://trains.socha.com/2014/03/a-better-cooling-fan-for-pla.html
Banjo
archive3d
free

Banjo 3D Model
...
banjo musical instrument
banjo n241115 - 3d model (*.gsm+*.3ds) for interior 3d visualization.
turbosquid
$30

Ronson Banjo
...ree 3d model ronson banjo for download as obj, fbx, and blend on turbosquid: 3d models for games, architecture, videos. (1467982)
evermotion
$15

Banjo 10 AM67
...instrument with all textures, shaders and materials. it is ready to use, just put it into your scene.. evermotion 3d models shop.
3d_export
$21

banjo
...ter.<br>polygons: 36892<br>vertices: 18659<br>formats: fbx, obj, stl, dae.<br>i hope you enjoy the model!
3d_export
$29

banjo musical instrument
...x 24.91" x 1.82"<br>- model parts: 17<br>- material count: 3<br>- xform: yes<br>- boxtrick: yes
3d_sky
free

Banjo
...banjo
3dsky
banjo
banjo
sketchfab
$5

Banjo with Stand
... banjo = 31.200p
stand = 4444p - banjo with stand - buy royalty free 3d model by jonas schramme (@jonasschramme)
3d_sky
free

Banjo Fender Leo
...banjo fender leo
3dsky
banjo
banjo fender leo
thingiverse
free

Banjo Final by deedoersch
...banjo final by deedoersch
thingiverse
holder to wall mount a banjo
thingiverse
free

Toy Banjo
... with her when she goes places. kermit plays a banjo, so i made this one in tinkercad. it is very simple and could be improved.
Vinci
3d_export
$9

clcok vinci
...clcok vinci
3dexport
clcok vinci
3ddd
$1
willisau vinci chair
...willisau vinci chair
3ddd
willisau , vinci
vinci chair from willisau ag.
design_connected
$13

Vinci chair
...vinci chair
designconnected
willisau vinci chair computer generated 3d model. designed by ballendat, martin.
3ddd
$1

BOVA-комод-vinci
...bova-комод-vinci
3ddd
bova , комод
bova-комод-vinci
3ddd
$1
leonardo da vinci
...leonardo da vinci
3ddd
всадник , лошадь
leonardo da vinci
3d_export
$25

a - leonardo da vinci
...a - leonardo da vinci
3dexport
a - leonardo da vinci<br>antiquity
turbosquid
$10

Pouf Vinci
...ty free 3d model pouf vinci for download as max, obj, and fbx on turbosquid: 3d models for games, architecture, videos. (1507069)
turbosquid
$30

Da Vinci
... available on turbo squid, the world's leading provider of digital 3d models for visualization, films, television, and games.
3d_export
$25
machine- leonardo da vinci
...machine- leonardo da vinci
3dexport
machine- leonardo da vinci
3d_export
$25

mortar - leonardo da vinci
...mortar - leonardo da vinci
3dexport
mortar - leonardo da vinci
Shotgun
3d_ocean
$12

Shotgun
...shotgun
3docean
lopoly shotgun shotgun weapon
a lowpoly shotgun, fully textured. ready for use in animation or games.
3d_export
$10

Shotgun
...shotgun
3dexport
shotgun shooting rocket, nice.
3d_export
$6

shotgun
...shotgun
3dexport
a simple low poly shotgun
3d_ocean
$16

Shotgun
...docean
3d shotgun game weapon gun guns low poly shotgun pistol rifel weapon
low poly shotgun v-ray rendering high quality texture
3d_ocean
$12

Shotgun
...ells shotgun war weapon
m37 ithaca shotgun lowpoly game ready model 4096x and 2048x textures moving parts shotgun shells included
turbosquid
$16

shotgun
...turbosquid
royalty free 3d model shotgun for download as max on turbosquid: 3d models for games, architecture, videos. (1191810)
turbosquid
$12

Shotgun
...turbosquid
royalty free 3d model shotgun for download as fbx on turbosquid: 3d models for games, architecture, videos. (1189126)
turbosquid
$10

shotgun
...turbosquid
royalty free 3d model shotgun for download as obj on turbosquid: 3d models for games, architecture, videos. (1399433)
turbosquid
$9

shotgun
...turbosquid
royalty free 3d model shotgun for download as c4d on turbosquid: 3d models for games, architecture, videos. (1435310)
turbosquid
$5

Shotgun
...rbosquid
royalty free 3d model shotgun for download as blend on turbosquid: 3d models for games, architecture, videos. (1534294)
Extruder
3ddd
$1

Extruded Chair
...extruded chair
3ddd
extruded , tom dixon
inspired by tom dixon extruded chair
turbosquid
$15

Extruded Table
... extruded table for download as blend, dae, fbx, obj, and stl on turbosquid: 3d models for games, architecture, videos. (1634137)
turbosquid
$2

3D Printer Extruder
...d
royalty free 3d model 3d printer extruder for download as on turbosquid: 3d models for games, architecture, videos. (1537359)
turbosquid
$1

Zombie extruded text
...oyalty free 3d model zombie extruded text for download as obj on turbosquid: 3d models for games, architecture, videos. (1322198)
turbosquid
$4

Extruder conical screw
...el extruder conical screw for download as sldpr, ige, and stl on turbosquid: 3d models for games, architecture, videos. (1524433)
turbosquid
$50

3d PRINTER - Extruder
... available on turbo squid, the world's leading provider of digital 3d models for visualization, films, television, and games.
turbosquid
$15

Extruded Table 2
...xtruded table 2 for download as blend, dae, fbx, obj, and stl on turbosquid: 3d models for games, architecture, videos. (1621846)
turbosquid
$10

Maya Extrude Tool
... available on turbo squid, the world's leading provider of digital 3d models for visualization, films, television, and games.
3d_export
$5

world earth extrude map
...world earth extrude map
3dexport
3ddd
$1

Simply Elegant Extruded Tree Coffee Table Design
...ble by link studios. the silhouette of a tree is visible at one angle, extruded from the surface to create the support structure.
Fan
3d_export
$5

fan
...fan
3dexport
fan 3d model, table fan, fan, electric fan, ventilator
archibase_planet
free

Fan
...fan
archibase planet
fan large fan
fan out n260707 - 3d model for interior 3d visualization.
archibase_planet
free

Fan
...fan
archibase planet
fan ceiling fan ventilator
fan stealth n300615 - 3d model (*.gsm+*.3ds) for interior 3d visualization.
3d_export
$15

fan
...fan
3dexport
is an ancient fan
3ddd
$1

Fan-C-Fan by marco gallegos
...n-c-fan by marco gallegos
3ddd
вентилятор , marco gallegos
fan-c-fan by marco gallegos
3d_export
$10

fan
...fan
3dexport
a detailed fan designed for home or space blowing is now available for only 19.99!
turbosquid
$1

Fan
...fan
turbosquid
free 3d model fan for download as on turbosquid: 3d models for games, architecture, videos. (1427865)
turbosquid
$14

Fan
...fan
turbosquid
royalty free 3d model fan for download as on turbosquid: 3d models for games, architecture, videos. (1415642)
3ddd
$1

Светильник Fan
...светильник fan
3ddd
fan , italamp
светильник fan, производитель italamp
turbosquid
$25

Fan
...fan
turbosquid
royalty free 3d model fan for download as c4d on turbosquid: 3d models for games, architecture, videos. (1483246)
Da
3ddd
$1

Luce da Vivere
...luce da vivere
3ddd
luce da vivere
luce da vivere mary 387/6+3
3ddd
$1

Luce da Vivere
...luce da vivere
3ddd
luce da vivere
luce da vivere
cristalline 494/12 rosso/cromo
turbosquid
$6

Cabinet DA
...ty free 3d model cabinet da for download as max, fbx, and obj on turbosquid: 3d models for games, architecture, videos. (1637312)
turbosquid
$6

Bookcase DA
... free 3d model bookcase da for download as max, fbx, and obj on turbosquid: 3d models for games, architecture, videos. (1639996)
turbosquid
$5
Wardrobe DA
...y free 3d model wardrobe da for download as max, fbx, and obj on turbosquid: 3d models for games, architecture, videos. (1661117)
turbosquid
$5
Partition DA
... free 3d model partition da for download as max, fbx, and obj on turbosquid: 3d models for games, architecture, videos. (1640359)
3ddd
$1

Ecstacity_LAMPADA DA TERRA
...ecstacity_lampada da terra
3ddd
ecstacity
торшер ecstacity_lampada da terra
3ddd
$1
leonardo da vinci
...leonardo da vinci
3ddd
всадник , лошадь
leonardo da vinci
turbosquid
$60

DA-ExoticWeapons
... available on turbo squid, the world's leading provider of digital 3d models for visualization, films, television, and games.
turbosquid
$32
DA-SpikedChainMace
... available on turbo squid, the world's leading provider of digital 3d models for visualization, films, television, and games.
Pro
turbosquid
$29

Pro
...ree 3d model mac pro for download as obj, c4d, fbx, and blend on turbosquid: 3d models for games, architecture, videos. (1505782)
turbosquid
$15

Apple Mac Pro and Pro Display
...ee 3d model apple mac pro and pro display for download as max on turbosquid: 3d models for games, architecture, videos. (1417078)
3d_export
$5

iphone 13 pro max and pro
...3 pro max and 13 pro the model is made in four colors (graphite, gold, silver, and blue), all of which are attached in the files.
3d_export
free

sapphire pro
...sapphire pro
3dexport
sapphire pro 3d printer head mask
3d_export
$4

macbook pro
...macbook pro
3dexport
macbook pro 13" inch 2020 years model
3ddd
free

GentleLase Pro
... syneron , candela
gentlelase pro аппарат для лазерной эпиляции
turbosquid
$25

PRO frame
...rbosquid
royalty free 3d model pro frame for download as max on turbosquid: 3d models for games, architecture, videos. (1148329)
turbosquid
$5

Alien pro
...osquid
royalty free 3d model alien pro for download as blend on turbosquid: 3d models for games, architecture, videos. (1678446)
turbosquid
$5

iphone11 pro
...uid
royalty free 3d model iphone11 pro for download as blend on turbosquid: 3d models for games, architecture, videos. (1562707)
3ddd
$1

Mac Pro (appel)
...mac pro (appel)
3ddd
компьютер , apple
mac pro
Support
turbosquid
$5

Support
... available on turbo squid, the world's leading provider of digital 3d models for visualization, films, television, and games.
3d_export
$8
Support 3D Model
...support 3d model
3dexport
support cantilever console
support 3d model tasal 73900 3dexport
3d_export
$5
phone support
...phone support
3dexport
phone
turbosquid
$12
Support bars
...squid
royalty free 3d model support bars for download as max on turbosquid: 3d models for games, architecture, videos. (1411542)
turbosquid
$8

support weights
...id
royalty free 3d model support weights for download as max on turbosquid: 3d models for games, architecture, videos. (1411538)
turbosquid
$2

headphone support
...royalty free 3d model headphone support for download as sldpr on turbosquid: 3d models for games, architecture, videos. (1357583)
turbosquid
$2

Support for flowers
...royalty free 3d model support for flowers for download as max on turbosquid: 3d models for games, architecture, videos. (1463543)
turbosquid
$14

Flower Support
...alty free 3d model flower support for download as max and obj on turbosquid: 3d models for games, architecture, videos. (1497066)
turbosquid
$5

serum support
...yalty free 3d model serum support for download as c4d and obj on turbosquid: 3d models for games, architecture, videos. (1551267)
3d_export
$10
spyro joystick support
...spyro joystick support
3dexport
joystick support of spyro dragon