Thingiverse
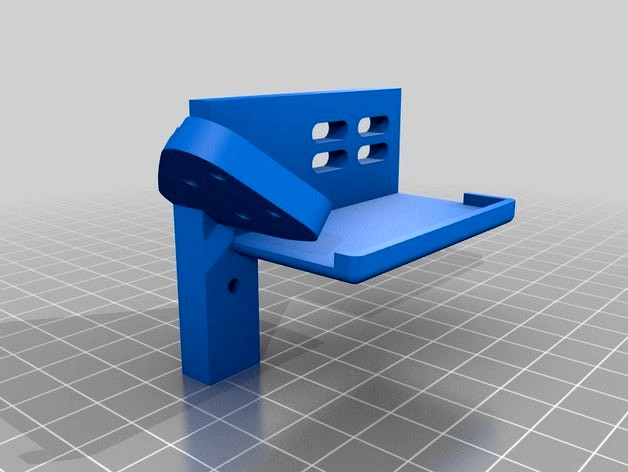
Da Vinci 1.0 AiO MK8 Conversion for PETG by Tdevil50
by Thingiverse
Last crawled date: 3 years ago
Wanted to get the Da Vinci to print more exotic filaments. What a pain in the @33!!! Well I have found a simple setup that works for PLA and PETG. I have successfully printed PETG over the last month with no problems. Going to start trying higher print quality now that I have cleaned up the look of the cables. The video is of the circuit board plate mount being printed. I am using Simplify3D and happy so far, the new update 3.0? is kind of glitchy though. Put a little double stick tape under the circuit board to hold it down. Then added small section of filament into the filament cartridge so the alarm won't go off. :)
I have also moved to Kapton tape for the bed. Haven't used anything else since.
Parts needed:
1x MK8 Extruderhttps://www.amazon.com/gp/product/B01F6LW4MO/ref=oh_aui_detailpage_o07_s00?ie=UTF8&psc=1
1x Extruder Tube:https://www.amazon.com/gp/product/B01I4ZQU6U/ref=oh_aui_detailpage_o01_s00?ie=UTF8&psc=1
Heatsink:https://www.amazon.com/gp/product/B016W7IZLK/ref=oh_aui_detailpage_o02_s00?ie=UTF8&psc=1
Heated Ends:https://www.amazon.com/gp/product/B00L4UXQ42/ref=oh_aui_detailpage_o05_s01?ie=UTF8&psc=1
Heated Block:https://www.amazon.com/gp/product/B0188OLMNS/ref=oh_aui_detailpage_o05_s02?ie=UTF8&psc=1
2x Long Metric bolts:
M3x25 mm bolt for extruder and heat sink.https://www.amazon.com/AXA120-Socket-Button-10-Piece-M3x25mm/dp/B0035XQY4U/ref=sr_1_6?ie=UTF8&qid=1471312056&sr=8-6&keywords=m3x25+mm
2x Cable Chain:https://www.amazon.com/Black-Plastic-Chain-Carrier-Router/dp/B00880AVL2/ref=sr_1_1?s=hi&ie=UTF8&qid=1471300420&sr=1-1&keywords=cable+chain
Kapton Tape:https://www.amazon.com/gp/product/B00U1X3XLY/ref=oh_aui_detailpage_o02_s00?ie=UTF8&psc=1
I bought 100K Ohm Thermistors just incase. Good thing as I needed them. I soldered my own up and used these. You may want to find some premade.https://www.amazon.com/gp/product/B00UFBIRVI/ref=oh_aui_detailpage_o05_s02?ie=UTF8&psc=1
Quick and easy change out. Also allows for quick return to original parts. The toughest part is taking the original pulley off the stepper motor, but even that wasn't difficult. Use a pulley puller or a butane torch with pliers to remove. A quick google search will show you what I mean. If this sounds to difficult you can also just order another stepper motor.
As for under the bed I used some old Ink Jet printer insulation covered in Kapton tape to keep the underside insulated. Pre-heating is fast and stays level during printing. The fan cools everything down for little time in between prints.
Hope someone can get something out of this. Thanks
I DO NOT TAKE ANY RESPONSIBILITY FOR THE MODS YOU DO TO YOUR MACHINE.
Similar models
thingiverse
free
12 Function Deep Dish Button Box by coyoteyz13
..._title_o03_s00?ie=utf8&psc=1
https://www.amazon.com/gp/product/b07vhcb1q4/ref=ppx_yo_dt_b_search_asin_title?ie=utf8&psc=1
thingiverse
free

Y-6 Multicopter Frame by ashkip
...azon.com/gp/product/b00tf8uy9a/ref=oh_aui_detailpage_o00_s01?ie=utf8&psc=1
soldering iron, supplies and a lot of patience :-)
thingiverse
free

Filament Dry Box
...g5ntfgu/ref=ppx_yo_dt_b_asin_title_o02_s00?ie=utf8&psc=1
spool holder is a remix of https://www.thingiverse.com/thing:2047554
thingiverse
free

3 Panel Lithophane by RyanEMoore
...iteboard-multi-use/dp/b078lx554x/ref=sr_1_1_sspa?ie=utf8&qid=1516375131&sr=8-1-spons&keywords=8x1mm+magnets&psc=1
thingiverse
free

40A Power Supply Cover W/LCD Display by hkgary_g
...lpage_o06_s01?ie=utf8&psc=1
power socket
www.amazon.com/gp/product/b06xnmt3wl/ref=oh_aui_detailpage_o06_s00?ie=utf8&psc=1
thingiverse
free

U360gts, small frame
...ectronics&sr=1-1-catcorr
more information about the project:
https://github.com/raul-ortega/u360gts/blob/master/wiki/index.md
thingiverse
free

40mm Oculus Touch-Beat Saber-Darth Maul Controller Mount by Son_of_a_Gun
...safety-tape/dp/b01e7g1au6/ref=sr_1_1_sspa?ie=utf8&qid=1530578786&sr=8-1-spons&keywords=rubberized+grip+tape&psc=1
thingiverse
free
LED Paracord Dog Collar, Rechargeable by DemonicArchr
...utf8&psc=1
18650 charger board - https://www.amazon.com/gp/product/b01lhd9d7e/ref=oh_aui_detailpage_o02_s00?ie=utf8&psc=1
thingiverse
free

Sonoff Enclosure by JeffLZ
...title_o00_s00?ie=utf8&psc=1
https://www.amazon.com/gp/product/b00qvb6qpu/ref=ox_sc_saved_title_1?smid=atvpdkikx0der&psc=1
thingiverse
free

Turntable
...amp;psc=1
m3 screws m3x6 or m3x8https://www.amazon.com/gp/product/b07twz7x38/ref=ppx_yo_dt_b_asin_title_o03_s00?ie=utf8&psc=1
Tdevil50
thingiverse
free

Snowman - Winter Fun by Tdevil50
...and used less materials. thanks to cloudj for the idea. keep the kids busy outside while you drink all the hot chocolate. enjoy!
thingiverse
free

Star Wars Full Size Lightsaber Stand Customizable by Tdevil50
... lightsaber stand customizable by tdevil50
thingiverse
multiple configuration for lightsaber stands. this is a work in progress.
thingiverse
free

Desk Hanger Customizable by Tdevil50
...e platform to be changed to fit a need. feel free to customize as you see fit. i hold no responsibility for the use of this item.
thingiverse
free

Airbrush Paint Bottle Holders by Tdevil50
...n drawer. simple design nothing special here.
the prints themselves are 150mm x 150mm so they can be adapted to most bin systems.
thingiverse
free

Logitech C920 Camera Mount for Da Vinci by Tdevil50
...erse
this is a mount to use on the front of the da vinci door for the logitech c920 camera. may also work with the c910 as well.
thingiverse
free

Dual or Single Spool Filament Holder and Idler by Tdevil50
.../www.thingiverse.com/thing:767317 design. used with https://www.thingiverse.com/thing:736446 rear holder design for the da vinci.
thingiverse
free

Fan Power Box with Pot Control by Tdevil50
... up so the prongs won't need to be cut off to not hit the power switch.
my extruder is having issues with small lettering. :(
thingiverse
free

Mandalorian Risers by agaliarethz
...on "star wars full size lightsaber stand customizable" by tdevil50 there are a custom raises with mandalorian logo and...
thingiverse
free

XYZ Da Vinci Carbon Filter Fan Housing by Tdevil50
...n pad made by aqua globe. it is 10"x30" and can get about 8 pads out of it. i would guess that is equal to over a year.
Aio
turbosquid
$59

eGo Aio
... available on turbo squid, the world's leading provider of digital 3d models for visualization, films, television, and games.
turbosquid
$3

AIO table bench chair
... available on turbo squid, the world's leading provider of digital 3d models for visualization, films, television, and games.
3d_ocean
$59

VRay Building Materials S02 - AIO for C4D
... with vray building materials s02 materials library for cinema 4d. this is all in one material library for my building materia...
3d_ocean
$19

10 x Hi-Res Porcelain Textures - AIO
...f my series of 10 floral porcelain/ceramic textures. all textures are hi-res custom made textures and can be used for ceramic,...
3d_ocean
$19

25 Standard Liquids Materials Pack AIO for C4D
...is all-in-one material library of my series of 2 cinema 4d standard liquid materials series. it contains 25 standard liquid ma...
turbosquid
$39

E3D - HP Elite One 1000 G1 AiO 34 inches model
...1000 g1 aio 34 inches model for download as max, obj, and c4d on turbosquid: 3d models for games, architecture, videos. (1245758)
3d_ocean
$30

121 Standard Ground/Terrain Materials-AIO for C4D
...n: this is all-in-one material library of my series of 8 cinema 4d standard ground/terrain materials series. it contains 121 s...
3d_ocean
$55

Standard Clothes Material Pack-AIO for Cinema 4D
...ll-in-one material library of my series of 6 cinema 4d standard clothes materials libraries. it contains 94 standard cloth mat...
3d_ocean
$89

171 Standard Stone Materials Pack AIO for C4D
...s all-in-one material library of my series of 10 cinema 4d standard stone materials library series. it contains 171 standard s...
3d_ocean
$75

114 Standard FX Materials Pack AIO for Cinema 4D
...ll-in-one material library of my series of 8 cinema 4d standard fx materials series. it contains 114 standard fx materials. i ...
Mk8
3d_export
$99

Mitsubishi Lancer Ralliart sedan 2004 3D Model
...lancer ralliart sedan 2004 3d model 3dexport mitsubishi ralliart mk8 2004 2005 4-door sedan saloon japan japanese eighth generation...
3d_ocean
$89

Mitsubishi Lancer Ralliart sedan 2004
...2004-2005 4-door eighth generation japan japanese mitsubishi mitsubishi ralliart mk8 ralliart saloon sedan the 3d model was created on...
thingiverse
free

MK8 by IsaiRochaSegura
...chasegura
thingiverse
in this thing i share a replace bar for mk8 extruder. i include the solidworks files for any modification.
thingiverse
free

MK8 Duct by ombranova
...mk8 duct by ombranova
thingiverse
duct for extruder mount mk8 on prusa i3
thingiverse
free

MK8 Flex Guide by loganjkd
...mk8 flex guide by loganjkd
thingiverse
just an inset for the mk8
thingiverse
free

MK7 / MK8 Mold by JMDesigns
...mk7 / mk8 mold by jmdesigns
thingiverse
mk7 / mk8 mold
thingiverse
free

Support extruder MK8 by rickshaolin
...support extruder mk8 by rickshaolin
thingiverse
support extruder mk8
thingiverse
free

MK8 Fan bracket by rocktang2003
...mk8 fan bracket by rocktang2003
thingiverse
mk8 fan bracket
thingiverse
free

HyperCube Mk8 mount by machala737
...hypercube mk8 mount by machala737
thingiverse
remix hypercube mk8 mount
thingiverse
free

mk8 fan holder by everythingother
...mk8 fan holder by everythingother
thingiverse
this is mk8 amazing fan holder
Vinci
3d_export
$9

clcok vinci
...clcok vinci
3dexport
clcok vinci
3ddd
$1
willisau vinci chair
...willisau vinci chair
3ddd
willisau , vinci
vinci chair from willisau ag.
design_connected
$13

Vinci chair
...vinci chair
designconnected
willisau vinci chair computer generated 3d model. designed by ballendat, martin.
3ddd
$1

BOVA-комод-vinci
...bova-комод-vinci
3ddd
bova , комод
bova-комод-vinci
3ddd
$1
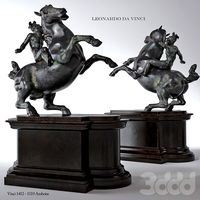
leonardo da vinci
...leonardo da vinci
3ddd
всадник , лошадь
leonardo da vinci
3d_export
$25

a - leonardo da vinci
...a - leonardo da vinci
3dexport
a - leonardo da vinci<br>antiquity
turbosquid
$10

Pouf Vinci
...ty free 3d model pouf vinci for download as max, obj, and fbx on turbosquid: 3d models for games, architecture, videos. (1507069)
turbosquid
$30
Da Vinci
... available on turbo squid, the world's leading provider of digital 3d models for visualization, films, television, and games.
3d_export
$25
machine- leonardo da vinci
...machine- leonardo da vinci
3dexport
machine- leonardo da vinci
3d_export
$25

mortar - leonardo da vinci
...mortar - leonardo da vinci
3dexport
mortar - leonardo da vinci
Petg
turbosquid
$9

Chandra rugs T-PETG
... available on turbo squid, the world's leading provider of digital 3d models for visualization, films, television, and games.
3d_export
$6

Makita lawn mower motor cover
...makita lawn mower motor cover for print . plastic petg carbon or...
3d_export
$5

snorkel connector snorkel bracket snorkel holder
...free to comment or cantact me via dm. pla, petg and abs should be fine for printing although i...
3d_export
$8

mounting of a front wing of the bicycle for a fork rockshox
...20 mm. 3d printing settings plastic - nylon / petg rafts - yes. supports - yes. resolution - 0.16...
3d_export
$15

E30 tweeter pods speaker mounts
...plastic, interlayer adhesion is poor, i want to try petg ...
3d_export
free

danish lunch
...made in thindercad and printed on ender3 max,<br>i used petg filament and have painted with vajjejo model paint.<br>this is...
3d_export
$21

stock adapter grand power stribog
...from cyma zhukov and install stock on new adapter. petg settings 0,10 - 0,15, infill 100%, supports everywhere, brim....
3d_export
$7

shimano xt-slx brake level piston guide right top
...with printed parts: i recommend: plastic - nylon / petg rafts - yes. supports - yes. resolution - 0.16....
3d_export
$7

shimano xt-slx brake level piston guide left top
...with printed parts: i recommend: plastic - nylon / petg rafts - yes. supports - yes. resolution - 0.16....
3d_export
$29

cup holder b m w e90-91-92-93
...cup holder b m w e90-91-92-93 3dexport printed with petglt;br>infil 20-40%<br>speed: 50mm/s<br>i make this design for people who don't...
Conversion
3ddd
$1

Conversation Seat
...шетка
the conversation seat made in englandhttp://www.squintlimited.com/products/the_conversation_seat/gold
+ max 2011
3d_export
$10

Converse 3D Model
...converse 3d model
3dexport
converse shoe pc unix mac
converse 3d model electropainter17075 38067 3dexport
turbosquid
$100

converse-shoe
...quid
royalty free 3d model converse-shoe for download as c4d on turbosquid: 3d models for games, architecture, videos. (1398427)
turbosquid
$10

Conversation Furniture
... available on turbo squid, the world's leading provider of digital 3d models for visualization, films, television, and games.
turbosquid
$7

Converse Allstars
... available on turbo squid, the world's leading provider of digital 3d models for visualization, films, television, and games.
design_connected
$16

Conversation Club Chair
...conversation club chair
designconnected
donghia conversation club chair chairs computer generated 3d model. designed by n/a.
design_connected
$27

Hemicycle Conversation Chair
...rsation chair
designconnected
ligne roset hemicycle conversation chair computer generated 3d model. designed by nigro, philippe.
3d_export
$24

Converse keds 3D Model
...converse keds 3d model
3dexport
converse all star ked shoe clothes sports
converse keds 3d model vermi1ion 26201 3dexport
3ddd
$1

Converse All-Star Shoes
...converse all-star shoes
3ddd
кеды , обувь
converse all-star shoes
design_connected
$18

CONVERSE Jack Purcell Sneakers
...converse jack purcell sneakers
designconnected
converse jack purcell sneakers computer generated 3d model.
0
turbosquid
$12

Calligraphic Digit 0 Number 0
...hic digit 0 number 0 for download as max, obj, fbx, and blend on turbosquid: 3d models for games, architecture, videos. (1389318)
3d_export
$6

set-0
...set-0
3dexport
turbosquid
$6

hedge 0
...yalty free 3d model hedge 0 for download as max, obj, and fbx on turbosquid: 3d models for games, architecture, videos. (1450353)
turbosquid
$5

Nuber 0
...oyalty free 3d model nuber 0 for download as ma, obj, and fbx on turbosquid: 3d models for games, architecture, videos. (1564674)
turbosquid
$22

0.jpg
... available on turbo squid, the world's leading provider of digital 3d models for visualization, films, television, and games.
turbosquid
free

Steam Locomotive Fowler 4F 0-6-0
... available on turbo squid, the world's leading provider of digital 3d models for visualization, films, television, and games.
turbosquid
$10

Liquid Number 0
... model liquid number 0 for download as c4d, 3ds, fbx, and obj on turbosquid: 3d models for games, architecture, videos. (1689919)
turbosquid
$45

Dragon360_perspShape_tmp.0.jpg
... available on turbo squid, the world's leading provider of digital 3d models for visualization, films, television, and games.
turbosquid
$8

Rocks Debris 0
... available on turbo squid, the world's leading provider of digital 3d models for visualization, films, television, and games.
3d_export
$18

wood-guardrail-fence 0
...wood-guardrail-fence 0
3dexport
wood-guardrail-fence 0<br>3ds max 2015
Da
3ddd
$1

Luce da Vivere
...luce da vivere
3ddd
luce da vivere
luce da vivere mary 387/6+3
3ddd
$1

Luce da Vivere
...luce da vivere
3ddd
luce da vivere
luce da vivere
cristalline 494/12 rosso/cromo
turbosquid
$6

Cabinet DA
...ty free 3d model cabinet da for download as max, fbx, and obj on turbosquid: 3d models for games, architecture, videos. (1637312)
turbosquid
$6

Bookcase DA
... free 3d model bookcase da for download as max, fbx, and obj on turbosquid: 3d models for games, architecture, videos. (1639996)
turbosquid
$5
Wardrobe DA
...y free 3d model wardrobe da for download as max, fbx, and obj on turbosquid: 3d models for games, architecture, videos. (1661117)
turbosquid
$5

Partition DA
... free 3d model partition da for download as max, fbx, and obj on turbosquid: 3d models for games, architecture, videos. (1640359)
3ddd
$1
Ecstacity_LAMPADA DA TERRA
...ecstacity_lampada da terra
3ddd
ecstacity
торшер ecstacity_lampada da terra
3ddd
$1
leonardo da vinci
...leonardo da vinci
3ddd
всадник , лошадь
leonardo da vinci
turbosquid
$60

DA-ExoticWeapons
... available on turbo squid, the world's leading provider of digital 3d models for visualization, films, television, and games.
turbosquid
$32
DA-SpikedChainMace
... available on turbo squid, the world's leading provider of digital 3d models for visualization, films, television, and games.
1
turbosquid
$69

armchairs(1)(1)
... available on turbo squid, the world's leading provider of digital 3d models for visualization, films, television, and games.
turbosquid
$15

ring 1+1
... available on turbo squid, the world's leading provider of digital 3d models for visualization, films, television, and games.
turbosquid
$10

chair(1)(1)
... available on turbo squid, the world's leading provider of digital 3d models for visualization, films, television, and games.
turbosquid
$8

Chair(1)(1)
... available on turbo squid, the world's leading provider of digital 3d models for visualization, films, television, and games.
turbosquid
$2

RING 1(1)
... available on turbo squid, the world's leading provider of digital 3d models for visualization, films, television, and games.
turbosquid
$1

house 1(1)
... available on turbo squid, the world's leading provider of digital 3d models for visualization, films, television, and games.
turbosquid
$1

Table 1(1)
... available on turbo squid, the world's leading provider of digital 3d models for visualization, films, television, and games.
turbosquid
$59

Formula 1(1)
...lty free 3d model formula 1 for download as max, fbx, and obj on turbosquid: 3d models for games, architecture, videos. (1567088)
design_connected
$11

No 1
...no 1
designconnected
sibast no 1 computer generated 3d model. designed by sibast, helge.
turbosquid
$2

desert house(1)(1)
...3d model desert house(1)(1) for download as 3ds, max, and obj on turbosquid: 3d models for games, architecture, videos. (1055095)