Thingiverse
CXY-MSv1 CoreXY 3D Printer by stephenrc
by Thingiverse
Last crawled date: 3 years ago
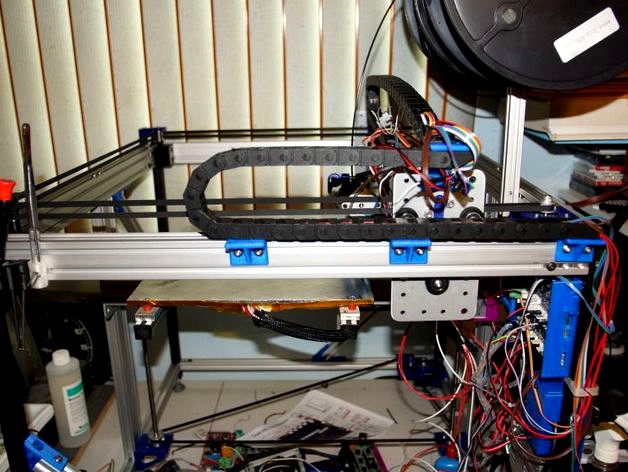
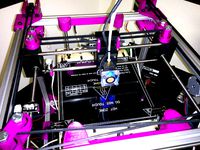
A corexy printer using Makerslide and a DuetWifi on 24vdc. Please ignore the messy wiring. :-)
https://youtu.be/llArYEVT2ow
9/18/16 - Changed to a double plate x-carriage, corexy-x-carriage.scad has mounts for BLTouch and dc42's ir sensor. Proximity sensor version is for 19mm diameter.
9/23/16 - Added photos of the rear of the x-carriage.
10/1/16 - Added mount for E3D's Titan Extruder with a E3DV6 hotend, posted stl has mounting for the ir bracket to use DC42's ir sensor. Proximity & BLTouch is available in the scad file.
10/15/16 - Updated blower.scad for the blower mounts for the Titan extruder mount.
11/7/16 - Added idlers to the z bearing mounts to have the belt wrap around the leadscrew pulley more. Also included a stl that just has two of the bearing mounts for just printing replacements for them.
11/26/16 - Added clips to hold a led strip to the bottom of the x axiz makerslide.
2/15/17 - Uploaded changes since last update.
8/10/18 - cleaned up the code and added the use of corner-tools.scad. CXY-MSv1.rar has the all of the scad files and the CXY-MSv1 STL.rar has all the stls.
The github repository is updated more often: https://github.com/StephenRC/CXY-MSv1
All the horizontal 2020/2040, and the vertical & horizontal makerslide ends are tapped for 5mm.
Vertical 2020 is drilled with a 5.5mm bit for access to the screws that hold everything together. Four in the top and two in the bottom. Use drillguide.stl for drilling the holes.
Corexy-x-carriage-extruder-drillguide.stl has a drill guide if you want to use 1/8" Aluminum in place of the printed extruder plate.
Additional information can be found in the scad files. Include files are expected to be in a folder called inc in the folder with the printer's scad files.
Incomplete BOM for a printer that covers about x400 y400 z270:
2 650mm 2040 (front & rear) Can use makerslide
2 598mm Makerslide (y-axis - left and right)
1 631mm Makerslide (x-axis)
2 470mm Makerslide (z-axis)
4 550mm 2020 (for the four corners)
2 650mm 2020 (bottom front & rear)
2 598mm 2020 (bottom left & right)
2 580mm 2040 for a basic bed holder between z-axis plates
4 300mm 2020 for diagonal side supports
4 Makerslide carriage plates
14 Makerslide wheel kits
6 Eccentric spacers
5x30mm screws
5x35mm screws
24 M5x7mm screws (holds the extrusions together)
18 M5x6mm screws for the motor mounts & bearing brackets
2 M5x50 for front bearing brackets
4 M5x40mm for the corexy-xy.stls
M5 nuts
16 F625Z bearings & 12 5mm washers
4.8m GT2 belt
2 GT2 20 tooth pulleys
2 400mm TR8-8 leadscrews with flanged nut
For Z Axis belt drive, uses one stepper motor
1 1524mm GT2 closed loop belt
1 GT2 20 tooth pulley
2 GT2 40 tooth pulleys with 8mm hole for TR8 leadscrews
2 608 bearings
4 F625Z bearings
2 M3 set screws
2 M5x35mm screws
4 M5 washers
2 M5 nuts
In the top extrusions, I put 8 tnuts in each channel, the rest four in each. Use a short screw in a unused one to hold them to one side to quiet the rattle they can make while printing.
Spool holder: 300mm 2020 with two screw access holes in the bottom to mount it on the top rear 4020 and a 8mm hole in the top for a 8mm threaded rod long enough to hold a spool on each side. Using http://www.thingiverse.com/thing:1647748 to hold the spools.
On the bearing brackets from the top: M5x50, bearing support, washer, 2xF625Z,2x washers,2x F625Z, M5 nut.
If you use metal couplers for the z-axis, use a 4mm ball bearing in between the TR8 and stepper motor shaft inside the coupler. The bearing will allow tilt without changing the length.
The Litemount.stl holds a 70mm LED ring in http://www.thingiverse.com/thing:8211 I used a LM2596 buck convertor to get the 12vdc to power the ring.
Alternate lighting method is to use a 5050 LED light string stuck to the bottom of the y axis makerslide.
Blower.scad uses http://www.thingiverse.com/thing:387301
The feet: http://www.thingiverse.com/thing:15880
The 400mm x 300mm 1/4" MIC-6 AL plate bed uses three short 2020 to support the bed, they're attached just like rest of the extrusions. I used three 45mm x 25mm x 9mm 6061 with a 5mm hole for the extrusion mount and tapped a 3mm hole to hold the bed. I used some silicon tubing for the bed spacers. I used two keenovo 200x300 600w 110vac silicon heaters, using the thermistor in the center and wired the ac in parallel to a SSR. The printer uses 11.28 amps until PID kicks in, while printing it uses about 5 amps.
Cover for the SSR: http://www.thingiverse.com/thing:1001385
Fans are 24vdc 5015 blowers.
FancapL.stl is for the power supply fan to make it blow to the side.
Similar models
thingiverse
free

Vertical X or Makerslide X Carriage by stephenrc
...e mounting holes can be used for a fan or my auto-bed leveling servo mount.
3/10/16 - added using a btouch on the extruder plate.
thingiverse
free

support Tr8 screw on Z axis by Dainis
...the open end of tr8 leadscrew for z axis on 3d printer. the adaptor is made to place 608 (22mm od) bearing in 620 (32mm od) hole.
thingiverse
free

X5S Single Z motor by simonvez
...earing up top
2 x 500m 8mm threaded rods
optional but recommended for regidity:
z brace.stl
middel 2020 brace.stl
2020 brace.stl
thingiverse
free

Redesigned parts for Vulcanus V1 - Leadscrew and Belt Tensioner by MacNite
...is, so i altered the mount to accept an tr8 leadscrew.
i also changed the design of the belt tensioner mounted to the x carriage.
thingiverse
free
Belt driven Z upgrade by MarcusVoss
...idlers)
-two m5x8mm screws and two m5 nuts to mount the kfl008 bearing.
my rod holders: https://www.thingiverse.com/thing:2851231
thingiverse
free

Tevo Tarantula Z axis belt drive by realadry
...e to adjust the design!!)
-) small zip ties
-) mounting materials: 10* m4 t-nuts and m4 8mm screws
please note instructions below
grabcad
free

Prusa X axis end brackets with flanged nut for TR8.
...ified to use tr8 leadscrews. also i don't like cantilever supported idle bearings so i added a support for the idle bearing.
thingiverse
free

Dual GT2 Belt Driven Z Axis for Hypercube by n9jcv
...or placement of pulleys (i just printed plastic washers not critical).
again i am 100% happy with the performance of the z now.
thingiverse
free

CoreXY Z Axis Top for 8mm lead screw by Sean_c_roberts
...provides a way to remove the z-axis 6mm rods (for maintenance or whatever) without having to remove the top plate from the frame.
thingiverse
free

BD's Tarantula X-Axis Motor and Idler Mounts by bdwalker1
... to adjust your z-carriages or drill new holes in the acrylic if the holes don't line up perfectly for your particular build.

Cxy


Stephenrc
thingiverse
free

Another SD card holder by stephenrc
...r sd card holder by stephenrc
thingiverse
something to hold a few sd cards on the printer. mounts onto a 2020 misumi extrusion.
thingiverse
free

X-ends for Makerslide by stephenrc
...rslide on the z and x. they use four wheels each, and one idler.
designed to be used with http://www.thingiverse.com/thing:87415
thingiverse
free

Another tool holder by stephenrc
...ers that keep getting misplaced. :-)
5mm screw hole for attaching it 2020 misumi extrusions.
4/15/14 - added a double version
thingiverse
free

Vertical X axis by stephenrc
...eadscrew mtssr8 nut and self-aligning bronze bearings or makerslide.
for a x-carriage see http://www.thingiverse.com/thing:245688
thingiverse
free

Glue Stick Holder by stephenrc
... glue stick on the printer, so it doesn't get lost. :-)
7/15/16 - added 40g purple glue stick holder, with a 25.5mm bottom.
thingiverse
free

Cold cathode light mounting kit by stephenrc
...ting kit by stephenrc
thingiverse
a set of clips to mount cold cathode lights, the switch and something to hold the power supply
thingiverse
free

Bracket for a PanelDue by stephenrc
...ne for the 4.3" and in the scad file there is a version with a tab on one end for mounting above or below a horizontal 2020.
thingiverse
free

Reel clips by stephenrc
...d fall off the side of the reel and it prevented the filament feeding properly. with these clips it doesn't do that anymore.
thingiverse
free

Darbee projector mount by stephenrc
...#39;s 5" long also.
it uses the hdmi cables to hold the darblet in place and one screw & nut onto the projector mount.
thingiverse
free

Adjustable Z endstop holder by stephenrc
...under the bottom of the z motor on the z rod to keep it out the z coupling area, where on my printer there isn't room to fit.
Corexy
thingiverse
free

CoreXY by Kaz_tech
...corexy by kaz_tech
thingiverse
this is the model of corexy platform. i separately put the parts on this place.
thingiverse
free

corexy plotter by tjwan
...corexy plotter by tjwan
thingiverse
parts for corexy mill inspired by http://der-frickler.net/technik/corexyportal
thingiverse
free
ScribbleJ CoreXY Beta by ScribbleJ
...j/corexy-v1https://github.com/scribblej/corexy-v1#corexy-beta
full gallery of development photos here: http://imgur.com/a/donun
thingiverse
free
CoreXY Emblem by emkajot
...by emkajot
thingiverse
an emblem for your corexy printer.
size: 100mm x 38mm x 2mm.
update: added a version with a proper mount.
thingiverse
free

SolidCore CoreXY Carriage by shanehooper
...olidcore 3d printer. this design could be used in other corexy 3d printers.
also see:https://3ddistributed.com/corexy-3d-printer/
thingiverse
free
CoreXY 3D Printer Model by ReginaFabricam
...bricam
thingiverse
this is an original design of a corexy printer.https://www.tinkercad.com/things/jggr9qk4s4p-3d-printer-corexy
thingiverse
free

coreXY Upper structure Left
...corexy upper structure left
thingiverse
my customized corexy 3d printer upper left parts
thingiverse
free
CoreXY by frankie
...ing machines, etc. the design is described in greater detail at http://www.corexy.com . a video is at http://vimeo.com/40914530 .
thingiverse
free

Endstop block for CoreXY carriage by svkeulen
...endstop block for corexy carriage by svkeulen
thingiverse
endstop for corexy carriage
thingiverse
free
X carriage for the CoreXY MGN12 by hackerbijay
...x carriage for the corexy mgn12 by hackerbijay
thingiverse
x carriage for the corexy frame
Printer
archibase_planet
free

Printer
...inter
archibase planet
printer laser printer pc equipment
printer n120614 - 3d model (*.gsm+*.3ds) for interior 3d visualization.
archibase_planet
free

Printer
...rchibase planet
laser printer office equipment computer equipment
printer - 3d model (*.gsm+*.3ds) for interior 3d visualization.
turbosquid
$100

Printer
...er
turbosquid
royalty free 3d model printer for download as on turbosquid: 3d models for games, architecture, videos. (1487819)
turbosquid
$3

Printer
...turbosquid
royalty free 3d model printer for download as max on turbosquid: 3d models for games, architecture, videos. (1670230)
turbosquid
$1

printer
...turbosquid
royalty free 3d model printer for download as max on turbosquid: 3d models for games, architecture, videos. (1595546)
turbosquid
$1

printer
...turbosquid
royalty free 3d model printer for download as max on turbosquid: 3d models for games, architecture, videos. (1595105)
turbosquid
$10

Printer
...id
royalty free 3d model printer for download as max and 3dm on turbosquid: 3d models for games, architecture, videos. (1607146)
turbosquid
$7

Printer
...royalty free 3d model printer for download as ma, ma, and obj on turbosquid: 3d models for games, architecture, videos. (1644580)
turbosquid
$30

Printer
... available on turbo squid, the world's leading provider of digital 3d models for visualization, films, television, and games.
turbosquid
$20

Printer
... available on turbo squid, the world's leading provider of digital 3d models for visualization, films, television, and games.