Thingiverse
Creative3D Elf Upgrade Parts
by Thingiverse
Last crawled date: 4 years, 3 months ago
I've been modding my Creative3D Elf and here are two pieces I've made.
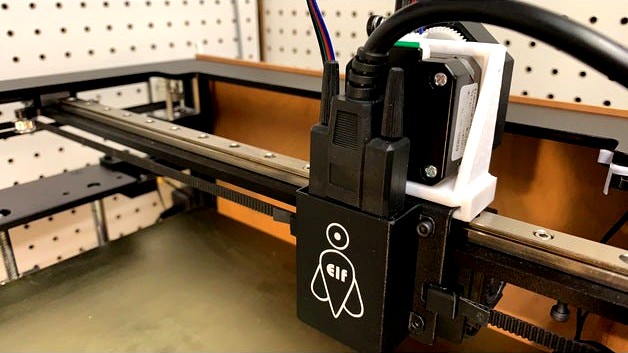
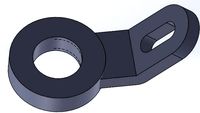
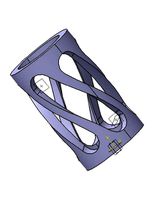
The Direct Drive mount is for a Pancake Stepper and BMG. It brings the BMG output in line with the hot end instead of in front of it. It will not fit a full sized stepper, use their model if you have the original stepper motor.
I suggest printing with the end that hooks over the carriage on the bed with supports on bed only. There are minimal supports this way and the hook keeps the mount from bouncing.
Adapter:
Hardware needed per adapter, so double for a printer
4xM3x6/8 (short 8s)
2xM5x12 socket heads (button won't fit)
Brass Anti-backlash nut
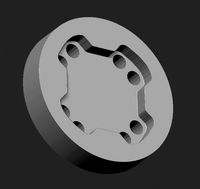
The adapter plate was to allow trying normal brass anti-backlash nuts with the spring instead of the original POM nuts. This won't be necessary for customers in 2020 or later as they have gone to a new design, but for those with the cutout in their bed mounting plates, this fills the cutout and gives a mounting point for the nut. I print this vertically, with the flat end on the bed. Technically you should add supports to the holes, but the few strings I get don't cause any problems with the part so I don't bother. I do need to take a utility knife and make one or two passes at the top of the large bottom hole to make clearance for the spring, this takes just a moment.
PLA is plenty strong, there isn't that much load on the part. You will need short M3 screws for this. The socket heads I used were 10.75mm end to end with about 3mm of that being the socket and they JUST fit. Otherwise add washers.
This piece is VERY snug on the bed plate by design. If it has any give in the Z direction, it can't do it's job. I used a block of wood and hammer to tap it into place and M5 Socket heads to attach it to the plate (I only attached one, the other hasn't moved at all without the screws).
Z-Shim:
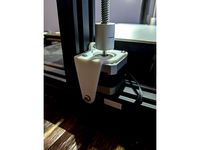
This is a 4mm shim which is slightly tall. I suggest scaling it down to 90%. Use this if you don't use your glass bed, either with a Spring Steel sheet or just buildtak on the aluminum, otherwise your nozzle will never reach. 4mm will likely cause your Z stops to top out and grind, either shim them or just cut this shim down slightly.
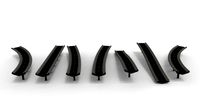
210mm Extrusions: Put two together to make a 420mm extrusion which can span your X axis and be attached with T-Nuts (there are several good printable T-Nuts) and 5-6mm M3 bolts to stiffen the X-Axis. This isn't cheaper than buying Aluminum 4020 extrusion, but it doesn't have to be cut to length and is a pretty easy print if you do it standing up. Standing up should be strong enough since the loads are compressive. If you lay it down, it will need supports so keep that in mind. Standing up needs none.
The Direct Drive mount is for a Pancake Stepper and BMG. It brings the BMG output in line with the hot end instead of in front of it. It will not fit a full sized stepper, use their model if you have the original stepper motor.
I suggest printing with the end that hooks over the carriage on the bed with supports on bed only. There are minimal supports this way and the hook keeps the mount from bouncing.
Adapter:
Hardware needed per adapter, so double for a printer
4xM3x6/8 (short 8s)
2xM5x12 socket heads (button won't fit)
Brass Anti-backlash nut
The adapter plate was to allow trying normal brass anti-backlash nuts with the spring instead of the original POM nuts. This won't be necessary for customers in 2020 or later as they have gone to a new design, but for those with the cutout in their bed mounting plates, this fills the cutout and gives a mounting point for the nut. I print this vertically, with the flat end on the bed. Technically you should add supports to the holes, but the few strings I get don't cause any problems with the part so I don't bother. I do need to take a utility knife and make one or two passes at the top of the large bottom hole to make clearance for the spring, this takes just a moment.
PLA is plenty strong, there isn't that much load on the part. You will need short M3 screws for this. The socket heads I used were 10.75mm end to end with about 3mm of that being the socket and they JUST fit. Otherwise add washers.
This piece is VERY snug on the bed plate by design. If it has any give in the Z direction, it can't do it's job. I used a block of wood and hammer to tap it into place and M5 Socket heads to attach it to the plate (I only attached one, the other hasn't moved at all without the screws).
Z-Shim:
This is a 4mm shim which is slightly tall. I suggest scaling it down to 90%. Use this if you don't use your glass bed, either with a Spring Steel sheet or just buildtak on the aluminum, otherwise your nozzle will never reach. 4mm will likely cause your Z stops to top out and grind, either shim them or just cut this shim down slightly.
210mm Extrusions: Put two together to make a 420mm extrusion which can span your X axis and be attached with T-Nuts (there are several good printable T-Nuts) and 5-6mm M3 bolts to stiffen the X-Axis. This isn't cheaper than buying Aluminum 4020 extrusion, but it doesn't have to be cut to length and is a pretty easy print if you do it standing up. Standing up should be strong enough since the loads are compressive. If you lay it down, it will need supports so keep that in mind. Standing up needs none.
Similar models
thingiverse
free

MakerFarm i3v Anti Z Wobble & Backlash Mount Remix - No Supports by DustinWoods
...#39;t have to. this remix is designed so you don't need supports to print it.
haven't printed it yet, but i will shortly.
thingiverse
free

2040 Extrusion Mount for 37mm Anti Backlash Nut by kwirky
...axis leadscrew nut for my dbot. the original d-bot part doesn't work for the 37mm version so i designed this using openscad.
thingiverse
free

Pancake stepper motor and BMG mount for Creativity ELF printer by B-Cup
... printer with a pancake style stepper motor. i used a 17hs4023 from amazon. this mount aligns the bmg extruder with the hotend.
thingiverse
free

Shorter Bondtech BMG Extruder Adapter for Hero Me Gen5 by akmalznal
...to use this remix, you need to have:
-printermods mdd v1.3 adapter
-bmg extruder, bondtech or clone
-pancake nema17 stepper motor
thingiverse
free

NEMA 17 Stepper motor end mount for 2020 Extrusion
... plenty of surface area for mounting limit switches as well. i will be posting an h-bot machine soon that is using this assembly.
thingiverse
free
Sovol SV01 Adjustable Z Axis Stepper Mount by shagbag913
... used digital calipers to make everything as lined up as possible, then tightened everything down (including the lead screw nut).
thingiverse
free

Anti backlash nut adapter for the Ender 3 by MyStoopidStuff
...v6 design is updated with holes spaced at 18mm to match the dimensions of the ender3 better. the step file is also now included.
thingiverse
free

Anycubic Kossel Plus Adjustable Heatbed Mount by bartigas
... the mount. springs can be sourced from home depot, amazon, ebay, etc.
thanks to themanmall and originally guco for the concept.
thingiverse
free

DPX Direct drive extruder and stepper mount (Hieha and Dmscreate)
...uder or another direct drive extruder.
fan ring: www.thingiverse.com/thing:3899915
v6 fan mount:www.thingiverse.com/thing:3899900
thingiverse
free

Creative3D ELF BLtouch
...ount for bltouch on creative3d elf.
nut m3 x4
screw m3x12 x2
screw m3x10 x2
offset marlin nozzle_to_probe_offset { 0, 20, -0.80 }
Creative3D
thingiverse
free
Creative3D ELF BLtouch
...ount for bltouch on creative3d elf.
nut m3 x4
screw m3x12 x2
screw m3x10 x2
offset marlin nozzle_to_probe_offset { 0, 20, -0.80 }
thingiverse
free

Creative3d elf tool holder
...creative3d elf tool holder
thingiverse
tool holder
thingiverse
free

Creative3D ELF Belt Tensioner by Majix007
...5zz bearings on amazon.ca here: https://www.amazon.ca/gp/product/b07dzdznjm/ref=ox_sc_saved_title_1?smid=a3c2jsbnbijbg5&psc=1
thingiverse
free

Creative3d Elf Bowden(Remote) to DirectDrive(Short) Adapter
...r for the creative3d elf printer.
the tube goes down very straight and the gab is very narrow at xmax position but it works well.
thingiverse
free

Creative3D ELF CoreXY 3D Printer Titan E3DV6 Short extruder DIY Plugin
...sion, modified using the e3dv6 extrusion hot end.
elf buy link:https://bit.ly/2mi5py7https://bit.ly/2ltgiiphttps://bit.ly/2ltgsgx
thingiverse
free

Creative3D Mickey Mouse bumper car, a real car model for the amusement toy industry
...:
www.creative3dprinter.comhttps://bit.ly/2mi5py7https://bit.ly/2ltgiiphttps://bit.ly/2ltgsgxhttps://www.amazon.com/dp/b07vndpd1g
thingiverse
free

Creative3D jingle cat bumper car, a real car model for the amusement toy industry
...prototyping.
elf buy link:https://bit.ly/2mi5py7https://bit.ly/2ltgiiphttps://bit.ly/2ltgsgxhttps://www.amazon.com/dp/b07vndpd1g
thingiverse
free

Creative3D Pig Bajie bumper car, a real car model for the amusement toy industry
...:
www.creative3dprinter.comhttps://bit.ly/2mi5py7https://bit.ly/2ltgiiphttps://bit.ly/2ltgsgxhttps://www.amazon.com/dp/b07vndpd1g
thingiverse
free

Creative3D CoreXY ELF 3D Printer PLA/ABS filament support for Aluminum 2020/2040 cnc Parts
...ent support.
elf buy link:
https://bit.ly/2mi5py7https://bit.ly/2ltgiiphttps://bit.ly/2ltgsgxhttps://www.amazon.com/dp/b07vndpd1g
thingiverse
free

E3D Bowden Mount for Creative3D Elf
...the fan ducts eventually), 0.20 layer height, with 100% infill, and supports where indicated.
i hope you enjoy this e3d mount !!
Elf
3d_export
$10

Elf
...elf
3dexport
elf archer
3d_export
$15

elf girl
...elf girl
3dexport
elf girl
turbosquid
$1

elf
...f
turbosquid
royalty free 3d model elf for download as blend on turbosquid: 3d models for games, architecture, videos. (1277697)
3d_export
$10

forest elf
...forest elf
3dexport
the charming elf of the green forest
turbosquid
$17

Elf
...
royalty free 3d model elf for download as max, obj, and stl on turbosquid: 3d models for games, architecture, videos. (1346575)
turbosquid
$35

Elf
... available on turbo squid, the world's leading provider of digital 3d models for visualization, films, television, and games.
turbosquid
free

Elf
... available on turbo squid, the world's leading provider of digital 3d models for visualization, films, television, and games.
3d_ocean
$19

character elf girl
...character elf girl
3docean
character elf girl human woman
a model of the girl elf with armour.
3d_export
$17

Elf 3D Model
...elf 3d model
3dexport
elf guitar fantasy
elf 3d model skulptor 15863 3dexport
3d_export
$99

Night Elf
...night elf
3dexport
night elf model that is game ready and can be imported to game engines for furthur use.
Upgrade
turbosquid
$15

Upgraded Glock
...e 3d model upgraded glock for download as obj, fbx, and blend on turbosquid: 3d models for games, architecture, videos. (1185950)
3ddd
$1

Calligaris / UPGRADE
...calligaris / upgrade
3ddd
calligaris
c материалом
3d_export
free

cz upgrade
...cz upgrade
3dexport
https://www.buymeacoffee.com/mestrezen3d https://linktr.ee/mestrezen3
turbosquid
$80

Custer Tank upgrade
... available on turbo squid, the world's leading provider of digital 3d models for visualization, films, television, and games.
turbosquid
$39

Domestos 1 upgrade
... available on turbo squid, the world's leading provider of digital 3d models for visualization, films, television, and games.
3d_export
$10

Upgraded tea cup
...upgraded tea cup
3dexport
a cup with an unusual design and a unique shape for a more enjoyable tea experience
3d_export
$8

dixy outlander classic style upgraded poplar wood lounge chair
...utlander classic style upgraded poplar wood lounge chair
3dexport
dixy outlander classic style upgraded poplar wood lounge chair
turbosquid
free

AK-12 + Upgrades low-poly 3D model
...ow-poly 3d model for download as fbx, blend, and unitypackage on turbosquid: 3d models for games, architecture, videos. (1501145)
evermotion
$700

Upgrade from V-ray 1.5 to 3.5 for 3ds max
...here is no need to purchase a new dongle - your current dongles will be reprogrammed to carry v-ray 3. evermotion 3d models shop.
evermotion
$300

Upgrade from V-Ray 2.0 to V-ray 3.5 for 3ds Max
... interface (gui) for editing settings on one machine and one render node for rendering on one machine. evermotion 3d models shop.
Parts
3d_export
$5
Parts
...parts
3dexport
parts
3d_export
$5
Part
...part
3dexport
part
3d_export
$5

Part
...part
3dexport
machine part
3d_export
$65

Part
...part
3dexport
simple rendering of the scene file
3d_export
$65

Part
...part
3dexport
simple rendering of the scene file
3d_export
$30

fan part
...fan part
3dexport
this is a part of fan of pedastal
3d_export
$10
machine parts
...machine parts
3dexport
3d part modeling work ,contact for 3d work
turbosquid
$59

Mechanical Part
...id
royalty free 3d model mechanical part for download as c4d on turbosquid: 3d models for games, architecture, videos. (1410833)
turbosquid
$17
Road parts
...bosquid
royalty free 3d model road parts for download as 3ds on turbosquid: 3d models for games, architecture, videos. (1192967)
turbosquid
$9

Cutter Parts
...squid
royalty free 3d model cutter parts for download as stl on turbosquid: 3d models for games, architecture, videos. (1220010)