Thingiverse

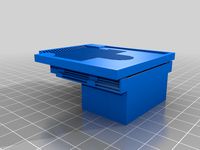
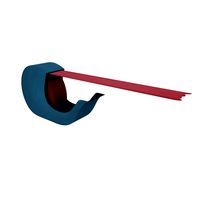
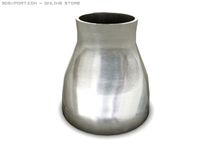
Creality CR 6 SE Hotend Fan Duct Adapter 40mm by RichardRobinson
by Thingiverse
Last crawled date: 3 years, 4 months ago
Edit 2020-10-06:
v1.2 is now up. This provides a worthwhile improvement in noise and fan holding from v1.0, but will take a little longer to print. You will also now need 4 off M3 x 12 screws.
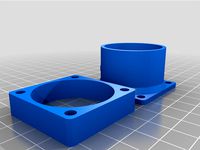
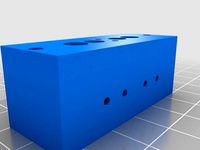
This is a mod for the new Creality CR6SE to replace the stock (noisy!) 30mm hotend fan with a larger (and quieter) 40 x 10mm fan. The supply is 24V.
This is still being prototyped and developed, but this version will work and I've printed about 20 hours with it fitted so far with no issues.
I suggest that it should be printed in something more temperature resistant than PLA for long term use, but mine is printed and will be developed in PLA.
I will take and post pictures when I fit the next prototype.
To ensure it actually reduces the sound level you should try and find the slowest 40mm fan you can, as most of the noise is generated by the blades passing parts under the guard, and air being pushed over the hotend. The 30mm fan does not move that much air.
It may be necessary to shorten the leads of a 40mm fan, or change the connector if it's not suitable already. Creality uses JST XH connectors. Google/ebay/amazon will find you a selection and a crimping tool if you feel inclined.
You will also need:
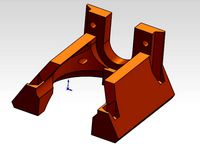
This thing!
1 off quiet 40 x 10mm 24V fan.
2 off M3 x 8 cap or pan head screws.
2 off M3 x 12 cap or pan head screws.
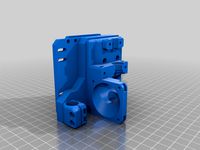
How to install:
Remove supports (carefully!) and tap inner holes M3.
It should work fine to just wind an M3 screw in.
Remove guard from printer.
Undo 2 screws holding the fan in.
Carefully unplug existing fan connector, peeling away hot glue as necessary.
Be very careful here not to damage the thermistor wires leading to the heater block.
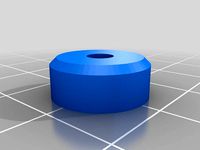
Remove fan and spacer beneath it.
Screw in new printed part with 2 off M3 x 8 screws.
Plug in fan.
Screw fan to adapter with 4 off M3 x 12.
Replace guard.
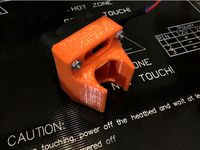
Take care to ensure that wires being put back do not push the hotend or pull on anything. If you push the hotend then this will trigger the ABL sensor, which will then mean it always thinks the nozzle is touching the bed. It may help to put this back on with the power on so you can see if the blue light comes on when the sensor is triggered.
v1.2 is now up. This provides a worthwhile improvement in noise and fan holding from v1.0, but will take a little longer to print. You will also now need 4 off M3 x 12 screws.
This is a mod for the new Creality CR6SE to replace the stock (noisy!) 30mm hotend fan with a larger (and quieter) 40 x 10mm fan. The supply is 24V.
This is still being prototyped and developed, but this version will work and I've printed about 20 hours with it fitted so far with no issues.
I suggest that it should be printed in something more temperature resistant than PLA for long term use, but mine is printed and will be developed in PLA.
I will take and post pictures when I fit the next prototype.
To ensure it actually reduces the sound level you should try and find the slowest 40mm fan you can, as most of the noise is generated by the blades passing parts under the guard, and air being pushed over the hotend. The 30mm fan does not move that much air.
It may be necessary to shorten the leads of a 40mm fan, or change the connector if it's not suitable already. Creality uses JST XH connectors. Google/ebay/amazon will find you a selection and a crimping tool if you feel inclined.
You will also need:
This thing!
1 off quiet 40 x 10mm 24V fan.
2 off M3 x 8 cap or pan head screws.
2 off M3 x 12 cap or pan head screws.
How to install:
Remove supports (carefully!) and tap inner holes M3.
It should work fine to just wind an M3 screw in.
Remove guard from printer.
Undo 2 screws holding the fan in.
Carefully unplug existing fan connector, peeling away hot glue as necessary.
Be very careful here not to damage the thermistor wires leading to the heater block.
Remove fan and spacer beneath it.
Screw in new printed part with 2 off M3 x 8 screws.
Plug in fan.
Screw fan to adapter with 4 off M3 x 12.
Replace guard.
Take care to ensure that wires being put back do not push the hotend or pull on anything. If you push the hotend then this will trigger the ABL sensor, which will then mean it always thinks the nozzle is touching the bed. It may help to put this back on with the power on so you can see if the blue light comes on when the sensor is triggered.
Similar models
thingiverse
free

Tevo Tornado E3D V6 30mm & 40mm All in One Fan Duct & Clamp by DemolitionX
...he 40mm version though.
i've also added a picture of a stress test done with the fan duct to show what its like at bridging .
grabcad
free

Anet Et5x, Et5 Pro Mini satsana + hotend holder
...
materials:
m3 screw 13mm x 1
m3 screw 16mm x 1
m3 screw 25mm x 2
anet hotend stock fan
anet layer stock fan
creality 24v hotend
grabcad
free

Anet Et5x, Et5 Pro Mini satsana + hotend holder
...
materials:
m3 screw 13mm x 1
m3 screw 16mm x 1
m3 screw 25mm x 2
anet hotend stock fan
anet layer stock fan
creality 24v hotend
thingiverse
free
CCR Liberty SideMount Counterlungs Dryer by _iw0gz_
...- usb driven
2) 40mm fan guard (often supplied with the fan)
3) 4 off m3 x 30mm long steel screws
4) 4 off m3 standard steel nuts
thingiverse
free

Creality CR 6 SE Hotend Fan Duct Adapter for quiet 40mm fan by hej2010
...rh2s1ep6uk7
gudie on how to install it and the fans: https://arcto3d.se/guides/installing-our-silent-fan-kit-on-creality-cr-6-se/
thingiverse
free
E3D v6 40mm Fan Shroud by superwoodle
...r your e3d v6!
for the noctua 40mm fan and no guard, you will need:
2 x 25mm m3
2 x ~12mm m3
2 x m3 nuts
print without supports.
thingiverse
free

Jellyfish Mount (RigidBot Dual E3Dv6) by walter
...2 - m3x16)
clamps (4 - m3x10, 4 - m3x25, 4 - m3x16)
duct (2 - m3x20, 1 - m3x10)
example dualstrusion prints from nervoussystem.
thingiverse
free

Creality CR-10 easy-print hotend fan housing /fangs for axial fans (40mm, 50mm) by stevenfayers
...esigns:
a) 40mm fan for hotend cooling and 40mm fan for part cooling
b) 50mm fan for hotend cooling and 40mm fan for part cooling
thingiverse
free

Ultimaker 2 Cooling board Fan Duct by jeracom
...e schrauben.
passend für 40mm lüfter
der 24v ist angeschlossen an den j20 stecker( 19-24v ) auf dem um2 bord.
rev.1 (horizontal)
thingiverse
free

Sovol SV01 Fan Duct for V6 Hotend by HUGA
... head screw m3 x 16 mm (din en iso 4762) <= screw-on ventilator shaft
additional stl file:
cover for the 30x10x30mm hotend fan

Creality
turbosquid
$7

filament roller single print creality
...del filament roller single print creality for download as stl on turbosquid: 3d models for games, architecture, videos. (1619309)
3d_export
free

Creality ender enclosure webcam mount
...e creality enclosure. sure is better than a tripod. change it up if it helps. i printed pla with 50% infill on my dd ender 3 pro.
3d_export
free

ender 3 frame cavity covers
...3 inserts,<br>made these inserts for the framework of the creality ender 3 - makes it look a bit more...
3d_export
$42

excavator
...width is the original size. 0.12 mm printing surface creality ender-5...
3d_export
free

ender 3 3d print bed clips
...glass bed + normal aluminium bed frame of the creality ender 3 = 6mm (b) these clips are designed...
3d_export
free

ender 3 enclosure corners
...that i could build my enclosure frame for my creality ender 3 - so i printed them in a...
thingiverse
free

Toolbox Creality
...ingiverse
this is a toolbox for tools that comes with creality printers, with a guide to cut capricorn ptfe with a cutter blade.
thingiverse
free

Creality Hotend Plate
... from creality themselves as the ender 3 is open source. this means i did not create this design and all credit goes to creality.
thingiverse
free
Creality Cat by alexander125
...creality cat by alexander125
thingiverse
this is the cat that comes on the sd card for all creality 3d printers.
thingiverse
free

Creality Dog by alexander125
...creality dog by alexander125
thingiverse
this is the dog that comes on the sd card for all creality 3d printers.
Cr
turbosquid
$15
Creazioni CR-673 CR-4461
... available on turbo squid, the world's leading provider of digital 3d models for visualization, films, television, and games.
3ddd
$1

Ravak CR 055.00
...ravak cr 055.00
3ddd
ravak , смеситель
ravak cr 055.00
turbosquid
$100

CR-002
...
turbosquid
royalty free 3d model cr-002 for download as stl on turbosquid: 3d models for games, architecture, videos. (1686037)
3ddd
$1

Ravak CR 012.00
...ravak cr 012.00
3ddd
ravak , смеситель
смеситель ravak cr 012.00
3ddd
free

Консоль CR Currin
...ь , cr currin
консоль cr currin
ширина - 1675 мм
глубина - 510 мм
общая высота - 810 мм
3ddd
$1

CR 39444
...0
диаметр: 100
тип патрона: gu5,3 gu10
количество ламп: 1
мощность: 35w
цвет: золото хрусталь
материал: металл хрусталь exclusive
3d_ocean
$89

Honda CR-Z
...www.youtube.com/watch?v=rrbb4d4lypk ` he honda cr-z‘s exterior styling is formed around a “one-motion wedge” concept with a lo...
3ddd
$1

Creazoni / STEFY CR-8901
...creazoni / stefy cr-8901
3ddd
creazoni
creazioni stefy cr-8901
turbosquid
$60

Chain-CR-001
...squid
royalty free 3d model chain-cr-001 for download as stl on turbosquid: 3d models for games, architecture, videos. (1680536)
turbosquid
$99

Honda CR-Z
... available on turbo squid, the world's leading provider of digital 3d models for visualization, films, television, and games.
Hotend
thingiverse
free
hotend by fablab_lueneburg
...hotend by fablab_lueneburg
thingiverse
hotend model
thingiverse
free
Hotend for Graber
...hotend for graber
thingiverse
hotend complement pastes for graber printerhttps://youtu.be/0koxhnsuhdy
thingiverse
free
Hotend adapter by antaviana
...hotend adapter by antaviana
thingiverse
hotend adapter
thingiverse
free
hotend fan by mming1106
...hotend fan by mming1106
thingiverse
hotend fan
thingiverse
free

Hotend schema by ione
...hotend schema by ione
thingiverse
hotend project schema
thingiverse
free
Fabtotum XY Hotend holder for E3D Hotend
...s with integrated supports.
more for the project you can see here: https://kf-designs.com/2019/09/07/fabtotum-printer-conversion/
thingiverse
free
HotEnd Stand by onepointdiy
...tend, when you make your new hotend or repair your j-head or mg-plus hotend.
the hole of 16mm, please adjust using a reamer, etc.
thingiverse
free

fast magnetic hotend changer for Chimera Hotend by Draman
...chimera hotend !
and new basis (the hole from original is to small)
it is a remix form skimmy's fast magnetic hotend changer
thingiverse
free

Hotend Fan Adapter for MicroSwiss All Metal Hotend by jo_schi_man
...
thingiverse
little change for the hotend fan adapter to hold the microswiss all metal hotend (slightly longer and sharp edges).
thingiverse
free
Merlin Hotend by Alejanson
...merlin hotend by alejanson
thingiverse
this is a 1:1 drawing of the classic merlin hotend.
Duct
turbosquid
$19
Duct Set
...d
royalty free 3d model duct set for download as max and fbx on turbosquid: 3d models for games, architecture, videos. (1145038)
turbosquid
$10
Duct Tape
...id
royalty free 3d model duct tape for download as ma and ma on turbosquid: 3d models for games, architecture, videos. (1580351)
turbosquid
free
Duct Tape
...
free 3d model duct tape for download as obj, fbx, and blend on turbosquid: 3d models for games, architecture, videos. (1486518)
3d_ocean
$7
Air-duct
... ventilation
high quality industrial air duct ventilation model. created in cinema 4d but comes in various other formats as well.
turbosquid
$20
Air ducts
...lty free 3d model air ducts for download as max, obj, and fbx on turbosquid: 3d models for games, architecture, videos. (1262476)
3d_export
$10

Supply air duct
...supply air duct
3dexport
supply air duct with two axial fans and hangers
turbosquid
$2
Duct Tape
...e 3d model duct tape for download as obj, fbx, blend, and dae on turbosquid: 3d models for games, architecture, videos. (1473972)
turbosquid
free

Duct Tape
... available on turbo squid, the world's leading provider of digital 3d models for visualization, films, television, and games.
3d_ocean
$3
Duct tape
...polys. includes: cinema 4d project. model in 3 formats (obj, fbx, 3ds). 6 .tga texture maps (albedo, ambient occlusion, diffus...
turbosquid
$40
Ventilation Duct PACK
...tion duct pack for download as ma, obj, fbx, and unitypackage on turbosquid: 3d models for games, architecture, videos. (1287068)
40Mm
turbosquid
$10

40MM Bullet
... available on turbo squid, the world's leading provider of digital 3d models for visualization, films, television, and games.
turbosquid
$49
40mm Vickers-Terni
... free 3d model 40mm vickers-terni for download as lwo and obj on turbosquid: 3d models for games, architecture, videos. (1260063)
turbosquid
$3
40mm grenade M9XX
...y free 3d model 40mm grenade m9xx for download as obj and fbx on turbosquid: 3d models for games, architecture, videos. (1408150)
turbosquid
$3

40mm grenade M3XX
...y free 3d model 40mm grenade m3xx for download as obj and fbx on turbosquid: 3d models for games, architecture, videos. (1408145)
turbosquid
$3
40mm grenade M1XX
...y free 3d model 40mm grenade m1xx for download as obj and fbx on turbosquid: 3d models for games, architecture, videos. (1408144)
turbosquid
$8

40mm Smith & Wesson
... available on turbo squid, the world's leading provider of digital 3d models for visualization, films, television, and games.
turbosquid
free
Free 40mm grenade M433
...e 3d model free 40mm grenade m433 for download as obj and fbx on turbosquid: 3d models for games, architecture, videos. (1404768)
turbosquid
$98

40mm 6G30 grenade launcher
... available on turbo squid, the world's leading provider of digital 3d models for visualization, films, television, and games.
turbosquid
$10

Famas G2 M203 40mm.
... available on turbo squid, the world's leading provider of digital 3d models for visualization, films, television, and games.
turbosquid
free
40mm Bofors TNT-11606
... available on turbo squid, the world's leading provider of digital 3d models for visualization, films, television, and games.
Adapter
3d_export
$10
Adapter 3D Model
...adapter 3d model
3dexport
adapter
adapter 3d model mur 20260 3dexport
archive3d
free
Adapter socket 3D Model
...dapter socket adapter
adapter socket n090211 - 3d model (*.3ds) for interior 3d visualization.
turbosquid
$400

cell adaptation
...
royalty free 3d model cell adaptation for download as blend on turbosquid: 3d models for games, architecture, videos. (1701655)
archive3d
free
Adapter 3D Model
...ups pc equipment
adapter extron n180813 - 3d model (*.gsm+*.3ds) for interior 3d visualization.
turbosquid
$5

usb adapter
...royalty free 3d model usb adapter for download as ige and stl on turbosquid: 3d models for games, architecture, videos. (1582234)
turbosquid
$15
Power adapter
...free 3d model power adapter for download as max, obj, and fbx on turbosquid: 3d models for games, architecture, videos. (1510024)
turbosquid
$8

USB adapter
...e 3d model usb adapter for download as max, fbx, obj, and dwg on turbosquid: 3d models for games, architecture, videos. (1713542)
turbosquid
$30

adapter.3ds
... available on turbo squid, the world's leading provider of digital 3d models for visualization, films, television, and games.
turbosquid
$15

Nokia Adapter
... available on turbo squid, the world's leading provider of digital 3d models for visualization, films, television, and games.
turbosquid
$15
Universal adapter
... available on turbo squid, the world's leading provider of digital 3d models for visualization, films, television, and games.
Fan
3d_export
$5

fan
...fan
3dexport
fan 3d model, table fan, fan, electric fan, ventilator
archibase_planet
free

Fan
...fan
archibase planet
fan large fan
fan out n260707 - 3d model for interior 3d visualization.
archibase_planet
free

Fan
...fan
archibase planet
fan ceiling fan ventilator
fan stealth n300615 - 3d model (*.gsm+*.3ds) for interior 3d visualization.
3d_export
$15

fan
...fan
3dexport
is an ancient fan
3ddd
$1

Fan-C-Fan by marco gallegos
...n-c-fan by marco gallegos
3ddd
вентилятор , marco gallegos
fan-c-fan by marco gallegos
3d_export
$10

fan
...fan
3dexport
a detailed fan designed for home or space blowing is now available for only 19.99!
turbosquid
$1

Fan
...fan
turbosquid
free 3d model fan for download as on turbosquid: 3d models for games, architecture, videos. (1427865)
turbosquid
$14

Fan
...fan
turbosquid
royalty free 3d model fan for download as on turbosquid: 3d models for games, architecture, videos. (1415642)
3ddd
$1

Светильник Fan
...светильник fan
3ddd
fan , italamp
светильник fan, производитель italamp
turbosquid
$25

Fan
...fan
turbosquid
royalty free 3d model fan for download as c4d on turbosquid: 3d models for games, architecture, videos. (1483246)
6
3d_export
$18

tulip 6
...tulip 6
3dexport
tulip 6
3d_export
$5
hinge 6
...hinge 6
3dexport
hinge 6
3ddd
$1

MASIERO / FLASHWOOD STL 6 + 6
...6
3ddd
masiero
торшер flashwood stl 6 + 6 фабрики masiero
http://www.masierogroup.com/c87_697/it/flashwood%20stl%206%20+%206.ashx
turbosquid
$110

Atmos Cannon 2000 6*6
...yalty free 3d model atmos cannon 2000 6*6 for download as skp on turbosquid: 3d models for games, architecture, videos. (1528591)
turbosquid
$1

ae 6 6 electric locomotive
... free 3d model ae 6 6 electric locomotive for download as obj on turbosquid: 3d models for games, architecture, videos. (1707537)
turbosquid
$39

A-6
... available on turbo squid, the world's leading provider of digital 3d models for visualization, films, television, and games.
3ddd
$1
6 ковров
...6 ковров
3ddd
ковры , ковер
6 ковров
turbosquid
$12

Calligraphic Digit 6 Number 6
...hic digit 6 number 6 for download as max, obj, fbx, and blend on turbosquid: 3d models for games, architecture, videos. (1389336)
turbosquid
$19

Case For Phone 6 Girl 6
... available on turbo squid, the world's leading provider of digital 3d models for visualization, films, television, and games.
turbosquid
$35

Iphone 6 & 6 Plus All
... available on turbo squid, the world's leading provider of digital 3d models for visualization, films, television, and games.