Thingiverse
Creality CR-10S Z axis stop extender - very small by Cymen
by Thingiverse
Last crawled date: 4 years, 5 months ago
This is a remix of the part from mdiez -- on my CR-10S, the right hand side carriage was barely touching the right hand z-axis servo motor top mount. I shaved off a bunch of material so that there is only a little bit of increase in the bed height.
I think this needed when using Ikea mirror tiles on the bed (named LOTS -- 4 in a package) instead of the glass that comes with the printer. The mirrors from Ikea are not as tall. Might be useful for other situations too.
Original description:
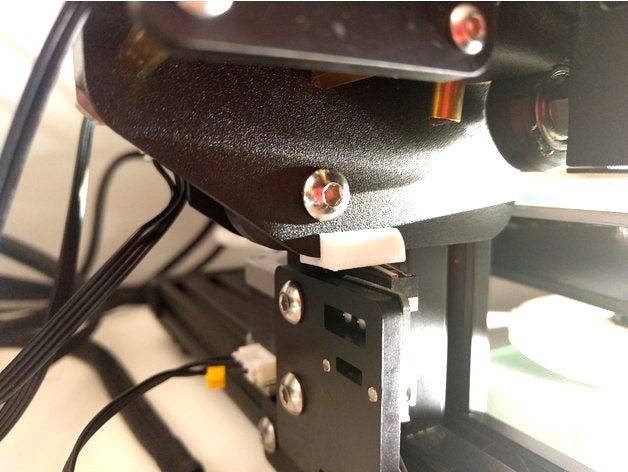
This little yet cleverly designed piece, slips in the lower edge of the left vertical carriage to make it meet the end stop switch to bring a few millimeters extra of clearance.
This solves the problem some CR-10S and upgraded CR-10 have: when the Z axe slides the X beam downwards, the right carriage lower edge ends up resting against the second motor support just a tad before the left carriage lower edge triggers the Z end switch, thus slightly tilting the X beam, such that it loses its horizon in part of its Z axis trajectory. This tiny piece triggers the switch at an higher height, preventing the unwanted contact in the right side.
To install, slide the notch under the carriage plate, right above the switch. Notice the shape, trimmed to prevent the contact against the vertical post, and ensure the matching of this trimming. You may need to add some blue tape inside the notch to make it fit more tightly.
UPDATE
If you need this, your x axis bar (the bar that the extruder head runs on) is likely not aligned correctly. Odds are it is drooping on the right hand side.
You need to loosen the two screws holding the z-axis gantry to the x-axis bar (this is the gantry on the right hand side of the printer). Those screws are accessed from the rear of the gantry or the thing that goes up and down on the right hand side on the z-axis (it has the wheels on it).
So you loosen up those two wheels and then use something to adjust the height on the right hand side to match the left hand side. You might have to tweak it up a tiny bit. I suggest doing this when the printer is auto homed. You can use my leveling tool to do this. That is what I did. Once you have it right, tighten it down and check that the sides are equally high! If not, do it again. It may take 2-3 tries but once you've got it right on, it is smooth sailing from there on out! Problem solved! This was an extremely annoying problem to have but the fix is fairly simple.
I think this needed when using Ikea mirror tiles on the bed (named LOTS -- 4 in a package) instead of the glass that comes with the printer. The mirrors from Ikea are not as tall. Might be useful for other situations too.
Original description:
This little yet cleverly designed piece, slips in the lower edge of the left vertical carriage to make it meet the end stop switch to bring a few millimeters extra of clearance.
This solves the problem some CR-10S and upgraded CR-10 have: when the Z axe slides the X beam downwards, the right carriage lower edge ends up resting against the second motor support just a tad before the left carriage lower edge triggers the Z end switch, thus slightly tilting the X beam, such that it loses its horizon in part of its Z axis trajectory. This tiny piece triggers the switch at an higher height, preventing the unwanted contact in the right side.
To install, slide the notch under the carriage plate, right above the switch. Notice the shape, trimmed to prevent the contact against the vertical post, and ensure the matching of this trimming. You may need to add some blue tape inside the notch to make it fit more tightly.
UPDATE
If you need this, your x axis bar (the bar that the extruder head runs on) is likely not aligned correctly. Odds are it is drooping on the right hand side.
You need to loosen the two screws holding the z-axis gantry to the x-axis bar (this is the gantry on the right hand side of the printer). Those screws are accessed from the rear of the gantry or the thing that goes up and down on the right hand side on the z-axis (it has the wheels on it).
So you loosen up those two wheels and then use something to adjust the height on the right hand side to match the left hand side. You might have to tweak it up a tiny bit. I suggest doing this when the printer is auto homed. You can use my leveling tool to do this. That is what I did. Once you have it right, tighten it down and check that the sides are equally high! If not, do it again. It may take 2-3 tries but once you've got it right on, it is smooth sailing from there on out! Problem solved! This was an extremely annoying problem to have but the fix is fairly simple.