Thingiverse

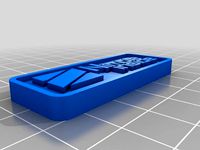
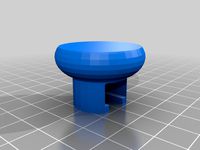
Crabby Cap Zesty Nimble SeeMeCNC HE280/Accelerometer Mount by slonold
by Thingiverse
Last crawled date: 3 years, 1 month ago
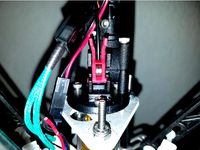
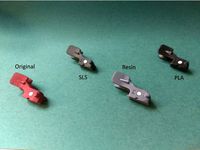
Update 18 Aug 2017: System has been working well. Have put about two rolls of filament (Ninjaflex, PETG, ABS and a little PLA) through it without any problems or jams. The Nimble seems to hold the PTFE tube firmly in the bottom of the barrel (PTC is loose).Printing without a Bowden tube is a whole new world!!!
For more detail (with photos) on installation see the Nimble Adapter section of the Prometheus variant of this adapter
Note: - this is a prototype. I have only put a little NinjaFlex through it so there are likely to be changes over the next couple of weeks but so far, so good...
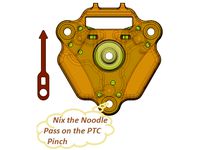
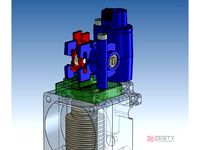
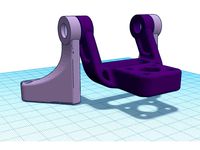
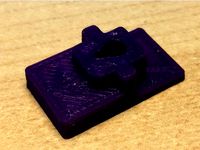
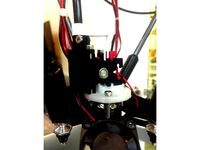
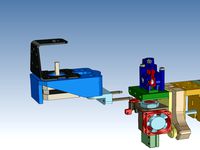
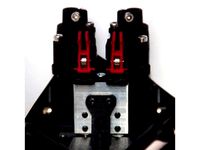
Crabby Cap is an adapter to mount the Zesty Nimble Direct Drive Extruder on the SeeMeCNC HE280 (see also Turpinator's solution) for SeeMeCNC Accelerometer Plate equipped with fan headers and plugs.
Required Parts and Tools:
3 of M3x16 to 20mm Bolts are used to mount the cap
3mm or 1/8" drill to size cap mounting holes
2.4mm or 3/32" drill to size Nimble mounting holes prior to tapping
M3x0.5 Tap to tap Nimble mounting holes
~ 60mm 4mmOD x 1.8 to 2.0mmID PTFE tubing
Drill bit (4mm+/-) to slightly oversize Guide Bushing bore to suit your PTFE tube size
A half inch or similar half round file for finishing and sizing
Sharp knife or razor to trim PTFE tubing
Metal Saw to cut M3 Bolt
Method of measuring hot end barrel depth
Instructions:
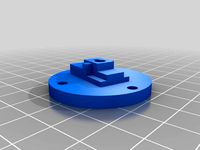
Cap best printed upside down. Recommend PETG. Size centre hole to 16mm. Size cap retention holes to 3mm. Size the two Nimble mounting holes to 2.4mm and tap.
Guide Bushing should have a total length of 9mm. Smaller diameter 8.5mm, larger diameter just under 16mm. ABS recommended.
Straps can be printed in Ninjaflex after you get your new direct drive extruder up and running!
Trim ONE of the 40mm bolts that come with the Nimble to 35-37mm.
Trim any soldered wires and ensure the fan wiring is arranged to be less than 2.5mm above the board.
Ensure that the Guide Bushing passes freely through the centre hole of the cap
Square one end of the PTFE tube and chamfer the OD slightly.
Drill out the bore of the guide bushing so that your PTFE tube passes smoothly through it
Measure the depth of the barrel in the hot end and the length of the PTFE tube.
Insert the squared and tapered end of the PTFE tube into the hot end barrel and seat it firmly.
Measure amount of PTFE tube protruding and verify tube is fully seated in the bottom of the hotend barrel.
Install the cap with the M3x16-20mm bolts. They will self tap.
Place the Guide Bushing over the PTFE tubing and seat it on top of the hot end.
Trim the PTFE tubing so that it just slightly protrudes above the top of the Guide Bushing (0.3mm or about the width of a razor blade).
Place the Nimble Groove Mount Adapter over the Guide Bushing, it should lay flat against the cap top, shorten Guide Bushing if necessary.
Mount the Nimble. Use the 40mm bolt with the Sleeve Clamp (or a 3mm spacer for fit testing without the drive cable) to avoid damaging the board.
Gentle tightening of the extruder bolts should cause the Nimble to seat squarely on the Groove Mount Adapter and the PTFE tube should contact the bottom of the filament guide on centre without distortion. Re-trim the PTFE tube if necessary.
For more detail (with photos) on installation see the Nimble Adapter section of the Prometheus variant of this adapter
Note: - this is a prototype. I have only put a little NinjaFlex through it so there are likely to be changes over the next couple of weeks but so far, so good...
Crabby Cap is an adapter to mount the Zesty Nimble Direct Drive Extruder on the SeeMeCNC HE280 (see also Turpinator's solution) for SeeMeCNC Accelerometer Plate equipped with fan headers and plugs.
Required Parts and Tools:
3 of M3x16 to 20mm Bolts are used to mount the cap
3mm or 1/8" drill to size cap mounting holes
2.4mm or 3/32" drill to size Nimble mounting holes prior to tapping
M3x0.5 Tap to tap Nimble mounting holes
~ 60mm 4mmOD x 1.8 to 2.0mmID PTFE tubing
Drill bit (4mm+/-) to slightly oversize Guide Bushing bore to suit your PTFE tube size
A half inch or similar half round file for finishing and sizing
Sharp knife or razor to trim PTFE tubing
Metal Saw to cut M3 Bolt
Method of measuring hot end barrel depth
Instructions:
Cap best printed upside down. Recommend PETG. Size centre hole to 16mm. Size cap retention holes to 3mm. Size the two Nimble mounting holes to 2.4mm and tap.
Guide Bushing should have a total length of 9mm. Smaller diameter 8.5mm, larger diameter just under 16mm. ABS recommended.
Straps can be printed in Ninjaflex after you get your new direct drive extruder up and running!
Trim ONE of the 40mm bolts that come with the Nimble to 35-37mm.
Trim any soldered wires and ensure the fan wiring is arranged to be less than 2.5mm above the board.
Ensure that the Guide Bushing passes freely through the centre hole of the cap
Square one end of the PTFE tube and chamfer the OD slightly.
Drill out the bore of the guide bushing so that your PTFE tube passes smoothly through it
Measure the depth of the barrel in the hot end and the length of the PTFE tube.
Insert the squared and tapered end of the PTFE tube into the hot end barrel and seat it firmly.
Measure amount of PTFE tube protruding and verify tube is fully seated in the bottom of the hotend barrel.
Install the cap with the M3x16-20mm bolts. They will self tap.
Place the Guide Bushing over the PTFE tubing and seat it on top of the hot end.
Trim the PTFE tubing so that it just slightly protrudes above the top of the Guide Bushing (0.3mm or about the width of a razor blade).
Place the Nimble Groove Mount Adapter over the Guide Bushing, it should lay flat against the cap top, shorten Guide Bushing if necessary.
Mount the Nimble. Use the 40mm bolt with the Sleeve Clamp (or a 3mm spacer for fit testing without the drive cable) to avoid damaging the board.
Gentle tightening of the extruder bolts should cause the Nimble to seat squarely on the Groove Mount Adapter and the PTFE tube should contact the bottom of the filament guide on centre without distortion. Re-trim the PTFE tube if necessary.
Similar models
thingiverse
free
Nimble Gnu - System to Adapt the Zesty Nimble Extruder to a Prometheus V2 Hotend Mounted to a SeeMeCNC Balljoint Effector Platform with Accelerometer Probe PCB by slonold
...slots to fit hot end a half inch or similar half round file for finishing and sizing sharp knife...
thingiverse
free
Nimble V1 Basic Adapter by ZestyTech
...uder you can buy, it has ample torque and is installable in multiple orientations.
the nimble is available at: https://zesty.tech
thingiverse
free
Ormerod 2 Adapter to fit a Nimble V1 by ZestyTech
...uder you can buy, it has ample torque and can be mounted in multiple orientations.
the nimble is available from zesty technology.
thingiverse
free

Zesty Nimble and E3D v6 hotend mount for RailCore II 3D printer
...imble and e3d v6 hotend mount for the railcore ii 3d printer. it has guides for the nimble drive cable and teflon filament tube.
thingiverse
free

Zesty Nimble 2.85mm PTFE Clamp
... than the 1.75mm tube and looks nice too.
what you need
2 m3 screws, at least 6mm long (preferably 8mm)
2 m3 nylon locking nuts.
thingiverse
free

Metal Max adapter for the Nimble V1.1 by ZestyTech
...uder you can buy, it has ample torque and can be mounted in multiple orientations.
the nimble is available from zesty technology.
thingiverse
free

d bot - v6 clone direct to bowden adapter by portablesheep
...should bolt right up to the d bot x carriage front plate, and work as expected. just bolt it down and then screw in your adapter.
thingiverse
free
Zesty Nimble adapter for TrickLaser Rostock groove mount by Schlauncha
... in the prints). single biggest improvement in performance i've seen out of any of the upgrades i've done to my rostock.
thingiverse
free

Groove mount adapter by ZestyTech
...uder you can buy, it has ample torque and can be mounted in multiple orientations.
the nimble is available from zesty technology.
thingiverse
free

Mount block for 4 Nimbles V1 on a Kraken by ZestyTech
...uder you can buy, it has ample torque and can be mounted in multiple orientations.
the nimble is available from zesty technology.
Slonold
thingiverse
free
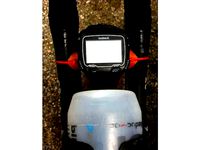
Garmin 910XT 22mm Aerobar Extension Mount by slonold
...nt watch - note that strap does not have to be tight - spare your spring pins
adjust angle and fix by gently snugging set screws.
thingiverse
free
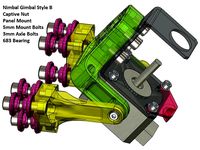
Nimble Gimbal - Gimbaling Extruder Motor Mount for Zesty Nimble by slonold
...?). with the x60 i went with a 0.3mm nozzle and 0.2mm extrusion width, 3 perimeters, 0.125 layer height and 5 top/bottom layers.
thingiverse
free
Prometheus Mount for SeeMeCNC Rostock Ball Joint Platform +/- Accelerometer Option by slonold
...ive to the clamp plate like a clam shell.
be sure to seat bowden tube and insert ptc retainer before mounting accelerometer board
thingiverse
free

PanelDue 5" and Duet 2 Mounts for SeeMeCNC Rostock Max V2 by slonold
...phery of the onyx bed. some tape to hold the bed and template down will be your friend whilst you outline the bed plate cut out.
thingiverse
free

Belt Tension Adjust Truck for SeeMeCNC Ball Joint System and 1"x1" Extrusion by slonold
...ion truck at top, check tension at middle against fixed distance reference. tension at will!! gently snug screws when finished.
thingiverse
free
Nimble Gimbal For 2020 Delta Frame by quadcells
...i saw slonold's nimble gimbal and liked the idea. slonold did a great job on his design. i needed...
thingiverse
free
Nimble Gnu - System to Adapt the Zesty Nimble Extruder to a Prometheus V2 Hotend Mounted to a SeeMeCNC Balljoint Effector Platform with Accelerometer Probe PCB by slonold
...ter, strap down the whip.
remember to revisit your slicer retraction settings. it is a whole new world without the bowden tube.
thingiverse
free
Zesty Nimble V2 Breech Replica by kulfuerst
...p3 - bearing offset by 0.3 mm i like slonold#39;s naming system and adapted it here. i have not...
Crabby
thingiverse
free

Crabby Coaster by 1ggy
...crabby coaster by 1ggy
thingiverse
a crabby coaster
thingiverse
free

Crabby Vox by tvance929
...crabby vox by tvance929
thingiverse
crabby vox - 'crossy road' style voxel animal
thingiverse
free

Crabby Halfling
...se
crab clawed halfling
you can find me on facebook at:https://www.facebook.com/tjhenry3d/
i am also on patreon:become a patron!
thingiverse
free

Crabby Pants - A Scribble Crab
...i included a sweet scribble key chain tutorial that can get you rolling in your scribble creativity. https://youtu.be/aetw1_5bnhi
thingiverse
free

Tiny Crabby Stabby things by KJdidit
..., stabby canopeners, suitable for an epically-scaled necrotic army. best suited for resin printing.
remixed from a thing by pen2.
thingiverse
free

Crabby (inspired by the rockster from Creativerse) by sciamop
...s my first sculpt using only zbrushcore. my usual workflow is autodesk 123d sculpt+ to sculptris. dynamesh is an amazing feature.
thingiverse
free

Axial AR60 vertical servo mount for low cog crabby steering by MotorforwardRC
...n or use hotracing heavy duty servo saver or lock it using a hole drilled through the hr logo on the servo saver at your own risk
thingiverse
free

DNX MGRIP CRABBY for GPD-WIN1 by Deen0X
...goo.gl/fkz7ag
si quieres unirte a nuestro grupo de nuevas consolas windows:
portable master racehttps://t.me/gpdwinhispano
deen0x
thingiverse
free

Jabba's Rancor by Geoffro
...have taken the files down so people don't get crabby when they print it and he hasn't got any...
He280
thingiverse
free

He280 Plug Holder with Window by SgrA8
...
thingiverse
this is a remix of rinaldi94's he280 plug holder. i added a window so the leds can be seen through the holder.
thingiverse
free

HE280 fan shroud, The best EVER!! by Protea_Design
...the best fan shroud youll find for your he280. its super lightweight, clips securely to the three fan holders and actually works!
thingiverse
free

Plug Holder for HE280 Hot End by Rinaldi94
...nd. this clip is used to keep the plug secured. i had problems with the plug coming loose so i designed this to fix that problem.
thingiverse
free

HE280 cable locking clip by mattster98
...llides with a few small components on the board, but it doesn't appear to be an issue yet. might resolve in a later version.
thingiverse
free

Rostock Max Fan 25mm Shroud for HE280 by EhisforAdam
...l screws to attach it the the platform and wired everything based on the standard instructions with zip ties for wire management.
thingiverse
free

HE280 LED Ring Mount by wagnermark52
...duct/b01c85pvee/ref=oh_aui_detailpage_o06_s00?ie=utf8&th=1
i hope you all like this simple mod for the he280 as much as i do!
thingiverse
free

HE280 Fan Shroud by JMargush10
... could make an enclosure. there is no need to buy any more screws because this uses the screws from the injection molded shrouds.
thingiverse
free

HE280 Silicone Mold by Turpinator
...s centered in the mold, without making going to a multiple piece mold and stuff. but then again... ive already got 2+core as is.
thingiverse
free

Fan Shroud for HE280 Hot End by IdeaBeansNZ
...upgrades. i've designed them for my own rmv2 so i can get more localised cooling on the smaller prints with tricky overhangs.
thingiverse
free

Rostock Max Dual HE280 by Turpinator
...ogress. any and all comments appreciated, this probably wont go any further, but it was a fun couple hours spent playing around.
Accelerometer
thingiverse
free

Accelerometer Case by lakephall
...celerometer sensor face-down. the tabs on the side are meant to allow for half-inch hook and loop straps to hold down the sensor.
thingiverse
free
WIMUv3 Accelerometer Calibration Fixture by M_G
... be placed in a known position on the test apparatus to aid in the repeatable calibration of said accelerometer containing device
thingiverse
free
U-Bracket for GDX Accelerometer by vernier
...ernier
thingiverse
this bracket is used with the gdx accelerometer.
this bracket is designed to be used with a 1/4-20 screw/nut.
thingiverse
free
3D printed MEMS accelerometer by adamweld
... the device was envisioned to be simple and easy to understand while using the same operating principles as a mems accelerometer.
thingiverse
free

Tube Plate for GDX accelerometer by vernier
...be plate is used to mount the gdx accelerometer.
this plate (and the accompanying bracket) are designed around 1/4-20 fasteners.
thingiverse
free
Gyroscope / Accelerometer Mount by dgngdn
...ace by two nuts. the end is flexible so as to allow the mount to clip on a cylindrical object with outside diameter of about 8mm.
thingiverse
free

Box for gyro accelerometer board by robsteele
...by andy mark. it will require tapping 4 holes for #4 screws. the top parts has a hold for a 10-24 screw for holding the box down.
thingiverse
free
Donkeycar GY-521 accelerometer and gyro support
...his one:https://fr.aliexpress.com/item/1028067742.html
probably not the best. need a super quiet (stable with no spike) power in.
thingiverse
free

Circular Motion Platform: Accelerometer Device 3D housing by SidiVerse
...erse
this is the 3d housing for an accelerometer device (powered by arduino) that is used for a stem project on circular motion.
thingiverse
free

Accelerometer mount for bicycle by Nigel
...cceleration measurement of up to 6g.
the only thing missing is a sturdy bracket to mount the accelerometer to the bike frame...
Zesty
thingiverse
free

Zesty Nimble Mount for Tevo Tarantula
...esty nimble mount for tevo tarantula
thingiverse
this is my zesty nimble mount for the tevo tarantula which i used in our video.
thingiverse
free
Zesty Nimble Gimbal 3030
...zesty nimble gimbal 3030
thingiverse
remix for extrusion 3030
thingiverse
free
Gimble for Zesty Nimble on RailCoreII by Atalon
...coreii by atalon
thingiverse
i remixed this zesty nimble extruder motor gimble mount to fit kraeger's railcoreii 3d printer.
thingiverse
free
Zesty Nimble Mini Base by profdryoman
... zesty nimble.
see pictures for more info.
matches 3 mm outer / 2 mm inner ptfe.
second stl matches 4 mm outer / 2 mm inner ptfe.
thingiverse
free

Zesty Sidewinder stepper bracket mount 90 degrees
...ees bracket for mounting the stepper bracket for the zesty sidewinder on the original stepper mount on printers like the ender 3.
thingiverse
free

Hypercube Mount for Zesty Nimble v2 and Orion Piezo
...ion for the zesty nimble v2 and the orion piezo.
all other needed parts are from here https://www.thingiverse.com/thing:2617424.
thingiverse
free
Railcore Zesty Nimble Motor Mount
...lon locking nuts to hold it together. that is your choice. supports will help the holes to turn out better, but are not required.
thingiverse
free
Zesty Nimble and E3D v6 hotend mount for RailCore II 3D printer
...imble and e3d v6 hotend mount for the railcore ii 3d printer. it has guides for the nimble drive cable and teflon filament tube.
thingiverse
free
Zesty Adapter for Blue Eagle Labs Metal Delta by thystonius
...s are valid. also i highly recommend double checking your steps_per_mm. please do let me know if you find some better settings.
thingiverse
free
V-Core Pro Carriage for Zesty Nimble v2 and e3d threaded v6 heatsink by oliof
... mount for ratrigs v-core pro kit for using a zesty nimble v2. it uses the threaded e3dv6 heatsink because i dislike groovemount.
Nimble
thingiverse
free
Nimble Inside by ZestyTech
...uder you can buy, it has ample torque and can be mounted in multiple orientations.
the nimble is available from zesty technology.
thingiverse
free
Nimble V1 and Nimble V2 on the E3D Toolchanger
...uder you can buy, it has ample torque and can be mounted in multiple orientations.
the nimble is available from zesty technology.
thingiverse
free
Mockup of the Dual Nimble aka Nimble C/C by ZestyTech
...uder you can buy, it has ample torque and can be mounted in multiple orientations.
the nimble is available from zesty technology.
thingiverse
free
Nimble V2 mount for Tevo TLM
...uder you can buy, it has ample torque and can be mounted in multiple orientations.
the nimble is available from zesty technology.
thingiverse
free
HevoRT Nimble V2 + Kryo mount
...hevort nimble v2 + kryo mount
thingiverse
this is a remix of miragec caridge to accommodate the nimble v2 and kryo
thingiverse
free

Nimble V2 mount for the BLV Cube
...uder you can buy, it has ample torque and can be mounted in multiple orientations.
the nimble is available from zesty technology.
thingiverse
free

Nimble Sidewinder V1.1 on a HEVO by ZestyTech
...er you can buy, it has ample torque and can be mounted in multiple orientations.
the nimbles are available from zesty technology.
thingiverse
free

Nimble V2 mount for the Artemis effector
...uder you can buy, it has ample torque and can be mounted in multiple orientations.
the nimble is available from zesty technology.
thingiverse
free
Zesty Nimble Mount for Tevo Tarantula
...esty nimble mount for tevo tarantula
thingiverse
this is my zesty nimble mount for the tevo tarantula which i used in our video.
thingiverse
free

Nimble v2 Bowden mount
... the front screw mount is not a perfect alignment but it works.
i recommend to get it sls printed. i do not recommend shapeways.
Seemecnc
thingiverse
free

Rostock hotend seemecnc by Wrangler
...rostock hotend seemecnc by wrangler
thingiverse
this thing was made to connect hotend seemecnc to rostock platform.
thingiverse
free

SeeMeCNC Keychain by johnoly99
...seemecnc keychain by johnoly99
thingiverse
no mas!
thingiverse
free

SeeMeCNC Rocket by johnoly99
...seemecnc rocket by johnoly99
thingiverse
no mas!
thingiverse
free
SeeMeCNC 3D Printer Model by ReginaFabricam
...seemecnc 3d printer model by reginafabricam
thingiverse
this is a model of the seemecnc orion delta 3d printer
thingiverse
free
SeeMeCNC H2 NamePlate (Blank) by CapperLabs
...seemecnc h2 nameplate (blank) by capperlabs
thingiverse
seemecnc h2 nameplate without any lettering autocad drawing and .stl
thingiverse
free

SeeMeCNC Plastic Bearings by johnoly99
...seemecnc plastic bearings by johnoly99
thingiverse
no mas!
thingiverse
free

Mosquito for SeeMeCNC Artemis by emoser
...and some rostock printeres.
you will need https://www.sliceengineering.com/collections/accessories/products/threaded-stem-adapter
thingiverse
free
SeeMeCNC EZstruder cooler by Disconnector
...r on my seemecnc rostock max was running very hot (like burn my hand hot!) so i designed a dual 40mm fan mount. all cool now :-)
thingiverse
free

SeeMeCNC H-1 90 Degree Clamp by johnoly99
...seemecnc h-1 90 degree clamp by johnoly99
thingiverse
seemecnc h-1 90 degree clamp
thingiverse
free

SeeMeCNC H-1 Table by johnoly99
...seemecnc h-1 table by johnoly99
thingiverse
no mas!
Cap
thingiverse
free

CAP
...cap
thingiverse
cap antenna base
thingiverse
free

1" Cap cap by Doz1971
...1" cap cap by doz1971
thingiverse
a cap to assist in re-stuffing electrolytic capacitor cans in vintage electronics.
thingiverse
free
TINKER CAP
...tinker cap
thingiverse
cap
thingiverse
free

caps by mjk2203
...caps by mjk2203
thingiverse
caps
thingiverse
free

cap by Artformer
...cap by artformer
thingiverse
cap
thingiverse
free

cap
...cap
thingiverse
9
thingiverse
free

Snapback Cap
...snapback cap
thingiverse
snapback cap, for different headsizes just scale the cap up or down.
thingiverse
free

capped by cheeba
...capped by cheeba
thingiverse
just a cap
thingiverse
free

RJ45 Cap
...rj45 cap
thingiverse
this is a rj45 cap
thingiverse
free

oil cap
...oil cap
thingiverse
oil cap
Mount
thingiverse
free

Pen Mount on BLTouch mount by jetspot
...pen mount on bltouch mount by jetspot
thingiverse
pen mount on bltouch mount
thingiverse
free

RAM Mount, Mount by seanmclean
...ram mount, mount by seanmclean
thingiverse
bridging plate to attach ram mount to yamaha 242, for chartplotter placement.
thingiverse
free

Mount for mount for Garmin GPS by GNOBLIN
...you can use this mount for prevent rotation simple mount around hendelbars.
d handelbar 31.8mm
use m3 screw and din 16903 plug.
thingiverse
free

Permanent mount for Modular Mounting System by WIR14
...permanent mount for modular mounting system by wir14
thingiverse
permanent mount for modular mounting system.
thingiverse
free

Gopro Mount and antenna mount by SuperYoyo
...gopro mount and antenna mount by superyoyo
thingiverse
cut the carbon platform to pass the gopro mount and enjoy !
thingiverse
free

Hexagon Mount for 50mm Mount (Sparkcube) by Draman
...for 50mm mount (sparkcube) by draman
thingiverse
hexagon mount remix from skimmys hotend-mount for sparkcube or other 50mm-mount
thingiverse
free

mount by gixster
...mount by gixster
thingiverse
custom mount
thingiverse
free

Mount by Matrxi999
...mount by matrxi999
thingiverse
shelf mount
thingiverse
free

Motor mount
...motor mount
thingiverse
motor mount
thingiverse
free

GoPro Mount
...gopro mount
thingiverse
gopro mount