Thingiverse
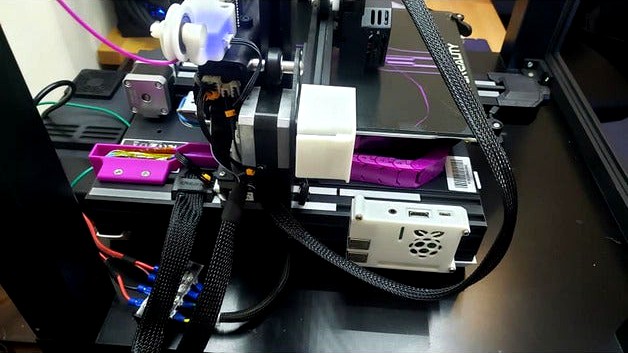
CR-6 SE Bed Cable Chain by AntFJ
by Thingiverse
Last crawled date: 4 years, 6 months ago
Hello, I hope you enjoy this design. Please provide feedback.
Some recommendations:
You must use supports for the majority of the prints. Align the support so that it is easy to remove... use 0 walls on your supports and ensure "connect supports" is NOT selected in your slicer settings.
EDIT: I added some parts that use XT60 and MR60 connectors. This is optional.
Chain: Print 15 links and 15 covers. Use .1mm layer height. Clean up parts with an exacto knife as required so that they rotate smoothly when connected.
Bed Clamp - this installs on the heated bed and must be ABS or PETG at 100% infill. If you have threaded inserts you can use a M3x6mmx5mm insert. If you don't have inserts... print the on with threaded holes.
Installation: You must print ALL pieces before you are ready to install them. You will be able to revert to the stock setup if required but it is less than ideal to switch back and forth as the installation process can be lengthy.
Wiring: the stock wiring is 16ga highly flexible silicon coated wiring. I used an extension cord that contained high quality 16ga wires and removed them from the thick outer coating of the extension cord. Longer is better here… you will cut to length at the end of the install.
Uplug the printer and carefully flip it over to access the cover that connects to the motherboard. Remove the cover plate (note: there is a tiny screw on the top side that must be removed as well)
a. Unscrew the terminal clamps holding down the bed wires. Unwrap the harness to remove the bed wires from the loom. Save the tape.
b. Unplug the thermistor wiring (JST connector) from the motherboard (very thin black wires).
Remove the power supply cover and slide the factory bed cable out of the grommet in the back of the printer. You will need to unscrew the mains grounding wire (green/yellow).
a. Tin the ends of your wire 16ga wire and screw them in the proper terminals on the motherboard. Crimp a ring terminal to your mains grounding wire and screw it down to the sheet metal.
b. Connect the new JST connector for the temperature probe. I used one of these and then spliced it into the factor thermistor wiring later on. https://www.amazon.com/SIMAX-3D-Thermistors-Creality-Printer/dp/B07TX3SMQ2/ref=sr_1_1_sspa?dchild=1&keywords=100k+thermistor+with+1+meter+wiring&qid=1613199641&s=industrial&sr=1-1-spons&psc=1&spLa=ZW5jcnlwdGVkUXVhbGlmaWVyPUFDRFFYRUVHQ1lGQVQmZW5jcnlwdGVkSWQ9QTA3Nzk2MTEzN1pIQzRPV0hWN0tFJmVuY3J5cHRlZEFkSWQ9QTA0MjMwMTU2TDdBMzU5NlFCTFkmd2lkZ2V0TmFtZT1zcF9hdGYmYWN0aW9uPWNsaWNrUmVkaXJlY3QmZG9Ob3RMb2dDbGljaz10cnVI
c. Route your wiring back into the loom (re-tape the loom for protection) and slide the wiring out the back of the grommet.
Remove the heated bed by unscrewing it from the carriage. Set aside.
Remove the back plastic cover on the 4040-aluminum extrusion. Route the new wiring through the “Cable holder for routing slide in version.stl” and slide the bracket into the aluminum extrusion. Replace the plastic cap.
Secure the wiring using the “Wire Clamp Top.stl”
Route the wiring through the 15 chains.
Slide “Bed Bracket Complete.stl” and “Cable Routing Bracket.stl” onto the carriage. Connect cable and route wiring as appropriate. Before securing the cable… ensure there is enough slack/length for the chain to flex throughout its movement.
Remove old cable from heated bed. The thermistor wiring is heatshrinked at the factor connection point. You can cut the wires here as you will need to splice in your new thermistor wiring. The mains grounding wire ring terminal needs to be unscrewed from the bed. The 24V+ and DC GND wires will a lot of heat. I set my soldering iron at 450C and needed to add solder to the joint and be patient to release to the wires
Slide adhesive-lined heat shrink and wires through “Bed Clamp Bottom (ABS or PETG)” but do not heat shrink over the part yet.
Solder the wires to the bed/thermistor wiring.
Install the “Bed Clamp Top (ABS or PETG).stl” with the original screws and then secure everything with the heatshrink.
Screw the bed back down. IF the brackets on the carriage do not line up perfectly, use an exacto knife to enlarge the holes in the correct direction so that the spacer is aligned with the threaded hole in the carriage. DO NOT strip the screws or the carriage because you are trying to force them in.
GO SLOW. Take your time. This is not a quick and easy install. Feedback Welcome
If you would like to buy me a coffee in support that would be greatly appreciated.https://ko-fi.com/antfj
Enjoy!!
-Ant
P.S. I can't get thingiverse to properly show that the chain is a remix. The Chain is from johnnywhisky https://www.thingiverse.com/thing:2920060. I didn't like how the chain had no curve to it so I created a new "cover" for the chain that forces the chain to follow a constant arc.