Thingiverse
CR-10 Enclosure by JesseGills
by Thingiverse
Last crawled date: 2 years, 11 months ago
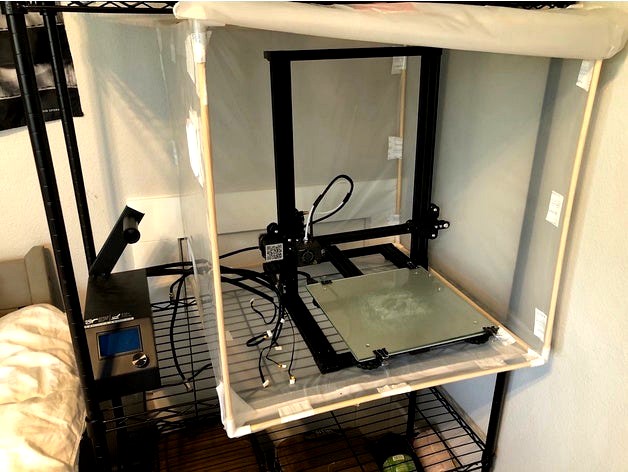
Hey guys, this is a printable enclosure that I designed for use with my CR-10. I did a fair amount of searching and wasn't satisfied with the cost or design of several of the enclosures available for the CR-10 and other larger printers, so I decided to design my own. This enclosure is fully-customizable and can be scaled up or down to your desired size simply by using longer or shorter wooden dowels. I will add support brackets in the near-future to make larger enclosures feasible.
This design in total cost me under $50 to build and prints relatively quick (about 6 hrs). It uses materials easily acquired from Home Depot or other hardware stores, and best of all, it's fun to build. At the bottom I will include detailed building instructions as well as a list of required and optional materials I used to construct the enclosure. If you have any questions, feel free to comment and I'll do my best to answer them promptly.
The design uses 3/8" wooden dowels available at most hardware stores and Home Depot. The corner brackets and dowels create a frame structure that can then be covered by a multitude of different materials.
I opted to use 4 mil thick plastic sheeting as the covering as it was semi-transparent and provided a means to keep the heat in. Any heat-resistant material will do though, and I may experiment with additional materials in the future.
The 4 mil sheeting that I chose is available at Home Depot for around $12.00. I secured the sheeting in the desired shape around the frame using seaming tape designed for the plastic sheeting. Any tape will do. In addition, for the doors I used a zipper designed for the same sheeting which allows easy access to the print bed.
There are several additional parts that I created that can be affixed to the enclosure. I designed a vent that I would highly suggest using to release excess heat from the enclosure. I designed them to be mounted to the top of the enclosure and to use either one or two depending on the size of enclosure desired.
I also created a thermometer holder that is designed for the Acurite Humidity Monitor available at Home Depot. This will allow you to monitor the internal temperature and humidity level of the enclosure as needed, and will also allow you to fine-tune the vents for desired internal atmoshpere. See below for detailed assembly instructions.
There is also a filament inlet that can be used in any location that allows the spool to be mounted external to the enclosure if desired. There is also a port for the wires and harnesses so that the power supply unit can remain outside the enclosure. Keeping the power supply unit outside the enclosure is highly recommended due to the strain from high-heat that it will encounter if left inside the enclosure during printing.
If you can think of any other accessories that would be helpful on this enclosure, please let me know.
Required Materials:
(8) Corner Brackets
(12) 3/8" Wooden Dowels (Cut to desired length)
(1) 4 mil Plastic Sheeting (Other materials can be used)
(1) Roll of Seaming Tape (Other tape can be used)
Optional Materials:
(1) Tarp Zipper (Very Helpful)
(2) Vents (I highly recommend using the provided vents to let off excess heat during printing)
(1) Acurite Humidity Monitor (Great tool for monitoring internal temp. and humidity)
(2) 1/4 x 1/4 x 0.1" Neodymium magnet (To secure the thermometer in place)
(1) Spray Paint for desired color
Building Instructions:
(1) Print all required and Optional Parts for your enclosure.
(2) Measure out the desired size for your enclosure.
(3) Aquire the non-printable required and additional parts as needed.
(4) Measure out and cut the wooden dowels to desired length.
(5) Create the frame by putting the wooden dowels into the corner brackets.
(6) If creating a large enclosure and sagging of the dowels is noted, use support brackets as needed.
(7) Place your printer inside the frame and evaluate for proper fitment.
(8) Once proper fitment is achieved Measure out the needed lengths of plastic sheeting (or other material) that will be affixed to the frame. There are two options at this point. The easier option is to place the sheeting outside the frame and cover the frame. The other, and more aesthetically pleasing option would be to mount the plastic sheeting inside the frame and secure it to the frame with loops of tape or clasps (I may design clasps in the future for this purpose.
(9) Cut the plastic sheeting to the desired length and tape the pieces together forming a box that will fit your frame.
(10) Mark out and cut the holes for the vents, thermometer, filament port, and wiring port as needed. Note that these are designed with a lip that will sit on the outside of the enclosure so that they can be secured through the cut holes in the plastic sheeting. Your plastic sheeting should be snug enough that these parts don't sag.
(11) Using glue or tape, affix the vents, thermometer mount, filament port, and wiring port into the cut holes.
(12) Once the additional parts are installed on the plastic sheeting mount the plastic sheeting to the frame.
(13) If desired, mount the zipper and cut as instructed on zipper package.
(14) At this point, the enclosure is complete and you can move your printer inside and begin to route the wires and filament was desired.
(15) You will need to ensure that no part of the printer is touching the frame or the plastic sheeting for safety.
(16) You will also want to mess with the vents to see if you need them open all the way or partially closed to maintain optimum internal temp.
I hope this proves helpful and happy printing!
Once again, feel free to reach out with any questions.
Links and Cost Analysis
3/8" Wooden Dowel: $1.29 eahttps://www.homedepot.com/p/3-8-in-x-48-in-Raw-Wood-Round-Dowel-HDDH3848/204354371
Acurite Humidity Monitor: $12.00https://www.homedepot.com/p/AcuRite-Digital-Humidity-and-Temperature-Comfort-Monitor-00619HD/202260980?
HDX 4 mil Plastic Sheeting: $12.98https://www.homedepot.com/p/HDX-3-ft-x-50-ft-Clear-4-mil-Plastic-Sheeting-RSHD403-50C/204711656
Homax Tarp Zipper: $10.27https://www.homedepot.com/p/Homax-7-ft-Clear-Tarp-Zipper-Door-3142/206526231
Dolphin Seaming Tape: $6.47https://www.homedepot.com/p/Linzer-2-36-in-x-30-yds-Blue-Dolphin-Polyhanging-Tape-TP-POLY-SEAM-0236/308569556
Total Materials Cost: $49.46
3D Printer Enclosures can be dangerous and/or a fire hazard if not used correctly. Build/ use at your own risk.
Similar models
thingiverse
free

Vent Cover Air Diverter by SCHMENKE
...
simple air diverter for heat vent
uses thin plastic sheet
i cut up an empty plastic container from cable ties (~ 0.4mm thick).
thingiverse
free

Simple Delta 3D Printer Enclosure by Verohomie
...by notches and tape. use a box cutter or similar and cut through only one side of each corrugated...
thingiverse
free

Thermometer & Humidity gauge Holder - Krabooz
... the inside temperature and humidity of my print chamber.
originally this thermometer was from the krabooz hermit crab enclosure.
thingiverse
free

Stupid simple enclosure by bradley547
...that way with 3/4 inch countersunk wood screws.
this is not my best work. its just the simplest (cheapest) solution to a problem.
thingiverse
free

Thermometer case for IKEA lack enclosure by AzlanDK
...display-temperature-humidity-meter-cordless-thermometer-hygrometer-p-1465229.html
but it can be purchased on many other websited.
thingiverse
free

AcuRite 00619HD Humidity Sensor Clear Drybox Mount by cinnabuns
...nly post-processing i did was to sand down the face that would be taped to the box so that the tape would adhere a little better.
thingiverse
free

Laser Cut Filament Spool Holder by GurtDotCom
... to use a 20mm diameter dowel, but it can accept smaller sizes as well.
with my k-40 laser, i shoot it with 50% power at 8mm/sec.
thingiverse
free

HEATED Cheap PVC and plastic 3D printer enclosure by brotherchris
...for cords. this adds heat to the enclosure.
results video: https://youtu.be/m1einuzvwpk
build video: https://youtu.be/627iw0vmgx8
thingiverse
free

Electronics Enclosure Vent
...s, i used a 120mm pc fan filter that i cut into strips and the fan version has space for the fan cables to be routed out of site.
thingiverse
free

Super easy Laser cut acrylic box / candle holder / pen holder by alexzogh
...0282591
i don't recommend using the lexan sheets, as lexan / polycarbonate absorbs ir, and gives off a horrible noxious odor.
Cr
turbosquid
$15
Creazioni CR-673 CR-4461
... available on turbo squid, the world's leading provider of digital 3d models for visualization, films, television, and games.
3ddd
$1
Ravak CR 055.00
...ravak cr 055.00
3ddd
ravak , смеситель
ravak cr 055.00
turbosquid
$100

CR-002
...
turbosquid
royalty free 3d model cr-002 for download as stl on turbosquid: 3d models for games, architecture, videos. (1686037)
3ddd
$1

Ravak CR 012.00
...ravak cr 012.00
3ddd
ravak , смеситель
смеситель ravak cr 012.00
3ddd
free
Консоль CR Currin
...ь , cr currin
консоль cr currin
ширина - 1675 мм
глубина - 510 мм
общая высота - 810 мм
3ddd
$1
CR 39444
...0
диаметр: 100
тип патрона: gu5,3 gu10
количество ламп: 1
мощность: 35w
цвет: золото хрусталь
материал: металл хрусталь exclusive
3d_ocean
$89

Honda CR-Z
...www.youtube.com/watch?v=rrbb4d4lypk ` he honda cr-z‘s exterior styling is formed around a “one-motion wedge” concept with a lo...
3ddd
$1

Creazoni / STEFY CR-8901
...creazoni / stefy cr-8901
3ddd
creazoni
creazioni stefy cr-8901
turbosquid
$60

Chain-CR-001
...squid
royalty free 3d model chain-cr-001 for download as stl on turbosquid: 3d models for games, architecture, videos. (1680536)
turbosquid
$99

Honda CR-Z
... available on turbo squid, the world's leading provider of digital 3d models for visualization, films, television, and games.
Enclosure
3d_export
free

electrical enclosure
...l enclosure where electrical devices like (relays, contactors, busbars ) are kept in order to protect from hazardous environment.
turbosquid
$100

GPU Enclosure
...yalty free 3d model gpu enclosure for download as obj and stl on turbosquid: 3d models for games, architecture, videos. (1381061)
3d_export
$5

Electrical Enclosure
...ed. also has tower lights attaced on the top.<br>file format that are available:<br>.step<br>.obj<br>.stl
archive3d
free

Enclosure 3D Model
...closure 3d model
archive3d
shower enclosure-acquarius- 3d model for interior 3d visualization.
archive3d
free

Enclosure 3D Model
...enclosure 3d model
archive3d
shower enclosure-omega- 3d model for interior 3d visualization.
archive3d
free

Enclosure 3D Model
...enclosure 3d model
archive3d
shower enclosure-vega - 3d model for interior 3d visualization.
archive3d
free

Enclosure 3D Model
...enclosure 3d model
archive3d
shower enclosure-zenith - 3d model for interior 3d visualization.
turbosquid
$20

shower enclosure
... available on turbo squid, the world's leading provider of digital 3d models for visualization, films, television, and games.
turbosquid
$14

Dumpster Enclosure
... available on turbo squid, the world's leading provider of digital 3d models for visualization, films, television, and games.
turbosquid
$25

3d printer enclosure
... model 3d printer enclosure for download as ipt, skp, and fbx on turbosquid: 3d models for games, architecture, videos. (1634310)
10
turbosquid
$25

10
... available on turbo squid, the world's leading provider of digital 3d models for visualization, films, television, and games.
turbosquid
$10

a-10
... available on turbo squid, the world's leading provider of digital 3d models for visualization, films, television, and games.
3ddd
$1

EX 10
...ex 10
3ddd
samsung , фотоаппарат
ex 10
3ddd
$1

Bed 10
...bed 10
3ddd
постельное белье
bed 10
evermotion
$25

Scene 10 Archinteriors vol. 10
...dering design interior
take a look at textured and shadered visualization scene ready to be rendered.. evermotion 3d models shop.
3ddd
$1

Curtains 10
...curtains 10
3ddd
curtains 10
3ds max 2011,fbx + textures
polys: 100355
3ddd
free

PLANTS 10
...plants 10
3ddd
цветок , горшок
plants 10,, with 3 different color planter boxes
turbosquid
$24

Chandelier MD 89310-10+10 Osgona
... chandelier md 89310-10+10 osgona for download as max and fbx on turbosquid: 3d models for games, architecture, videos. (1218762)
design_connected
$29

Nuvola 10
...nuvola 10
designconnected
gervasoni nuvola 10 computer generated 3d model. designed by navone, paola.
design_connected
$22

Kilt 10
...kilt 10
designconnected
zanotta kilt 10 computer generated 3d model. designed by progetti, emaf.