Thingiverse
COVID-19 Lightweight 3D Printable Face Shield by V4HE
by Thingiverse
Last crawled date: 4 years, 1 month ago
UPDATE (03/04/2020): The models have been modified to lower the profile of the arms by 4mm, saving around 0.4m of filament.
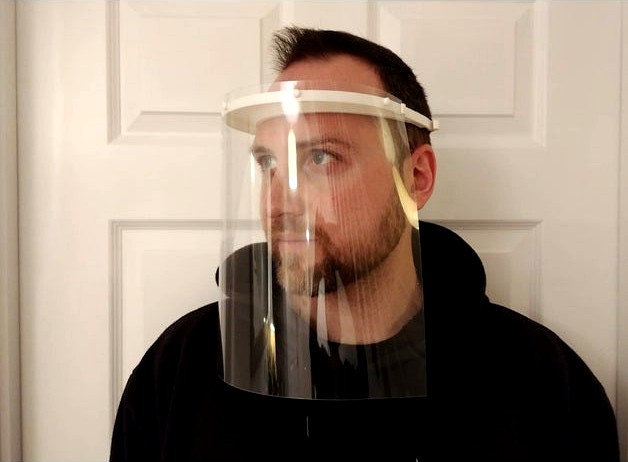
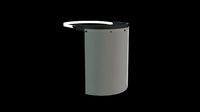
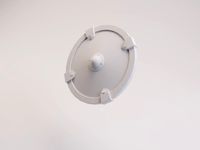
This simple face shield combines advantages from numerous innovative designs that I've seen recently. There are four versions of the frame; narrow and wide brow each with either 3 or 4 locating pins. The pins are spaced for standard A4 3-hole or 4-hole punches. Retaining arms on either side of the frame ensure that the visor stays firmly attached, and the 297mm (arc length) visor provides protection all the way to the temples. An elastic band is all that is needed for a strap, and self-adhesive foam provides comfort.
The shield has been designed to provide a close fit to a European head shape (intermediate cephalic index), optimized for 55-57cm head circumference (average female and male respectively, UK). By design, the maximum head circumference that can be accomodated without foam padding is 60cm. With an extra layer of foam, a head circumference as small as 53cm may be accomodated.
The narrow brow frame can be printed in under 3 hours, does not require any supports and uses 9.5m of 1.75mm filament. The wide brow frame takes a little longer and requires 10.75m of filament. The single-piece print fits on a 200mm x 200mm print bed (actual size approx. 184mm x 177mm). Comfort is provided via draught excluder foam, which is readily available online and is very cheap. The visor is made from a single piece of A3 acetate, although the frame itself can hold thicker material if you would rather use something different, such as PET. The design is flat so it should be relatively straightforward to CNC or laser cut, with only the pins needing to be either modified or post-processed.WARNING: No claims are made about the accuracy and/or safety of this device. Make and/or use at your own risk.Required Hardware
A3 clear acetate sheet, 240 - 300 micron.
9mmx5mm self-adhesive foam weather strip
Elastic band (elastic cord, woven elastic and rubber strip would also work well)
2-hole punch (3-hole or 4-hole preferred for speed and accuracy).
A4 paper, 1 piece (required if you have a 2-hole punch)
3-pin or 4-pin 3d printed frame, depending on the type of punch you have
Scissors, tape measure and pencil. Additionally scalpel, steel rule and cutting boardBuild Guidance (please also refer to the pictures provided)
Measure and cut the self-adhesive foam. 190mm is sufficient to cover the brow, 280mm will wrap around the frame to give a snug fit for small heads. The wide design has an 18mm lip so can take 2 rows of foam. I found 190mm of foam sufficient with the wide design. My head is 55cm.
Sit the 3d printed frame on a clean, flat surface such as a cutting board or table. Peel the backing off the foam and stick it to the interior curved edge. Use the flat surface to help line up the foam with the frame. Omit this step if you have a big head, rinse and repeat if you've got a small head. One layer of foam worked fine for me.
IF YOU HAVE A 3-HOLE or 4-HOLE PUNCH: Set the guide to A4, and punch the narrow side of the A3 acetate (which is A4 size). You now have your holes.
IF YOU HAVE A 2-HOLE PUNCH: Fold the piece of A4 paper in half to find the centre and draw a line on the crease to make it visible. Measure and draw a line 80mm in each direction from the centre. Line the length of the A4 paper along the width of the A3 acetate, with the lines on the outer edge. The static should hold the paper in place. You need to punch twice, lining the centre of the punch with each outer line. You now have your 4 holes.
You now need to trim the visor to length. I personally found 250mm to be adequate. Measure 250mm down from the side with the holes. Use a pair of scissors, or a scalpel to cut it to size. It may also be a good idea to put a radius on the bottom corners to prevent them snagging on things. I used a CD as a template (r = 60mm).
Attach the visor to the frame. The hollow part of the frame should not be visible from the outside. start by placing the edge of the acetate into one of the retaining arms. Now work around the frame from one side to the other, pushing the pins into the holes one at a time. I found it easier to slot the edge of the acetate into the other retaining arm before locating the final pin.
Add the strap to the back.
Similar models
thingiverse
free

Visor frames PPE easy & fast print. Nested/single item. COVID-19 Coronavirus by rgproduct
...much more information at my blog: please read
https://rgproduct.blogspot.com/2020/03/simple-face-mask-shrek-frame-and-filter.html
thingiverse
free

Hole punch jig for 3dVerkstans visor to fit A4 laminate paper (Swedish) by MrTengil
...aminate paper size: 303x216 mm
please note!
your paper and hole punch may vary! please try on a sacrificial laminate paper first!
thingiverse
free

Simple Visor by AAH_3
...g with appropriate holes cut in it, although rubber bands works fine. i printed it with default pla settings on my print utility.
thingiverse
free

3 Holes visor shield (US binder size) by Piper3D
...eld (no laser cutting). this is improved version of visor from: https://3dverkstan.se/protective-visor/protective-visor-versions/
thingiverse
free

NHS Face Shield for use with A4 Acetate by Y_Dewin_Du
... 200'c
bed temp. - 60'c
the shield is comprised of an a4 acetate sheet (100 micron) with holes punched on the a6 setting.
thingiverse
free

PRUSA Remix RC2 w/ HEX HOLES by oisincoyle123
...prusa remix rc2 w/ hex holes by oisincoyle123
thingiverse
to be used with an a4 acetate sheet, with a6 hole punches
3d_export
$5

visera para pantalla protectora covid19
..., office elastics ...<br>the use of the visor for commercial purposes is not allowed. for the sale of the visor contact us.
thingiverse
free

Protectal PVisor 8-6 - Face Visor Holder (A4 2 hole punch) by Mmoore5509
...supplied to the nhs & various other front line organisations in the uk.
please contact me if further information is required.
grabcad
free

Dji phantom Wrap adesive
...nd the adhesive paper and cut out, are already mirrored. framed in the design of two a4 sheets. immediately tested on my phantom!
grabcad
free

Papers stationery tray (A4, A3) / Papierfach (A4, A3)
...papers stationery tray (a4, a3) / papierfach (a4, a3)
grabcad
papers stationery tray (a4, a3). papierfach (a4, a3).
V4He
thingiverse
free

Batarang (Double-edged Blades) by V4HE
...e double-edged. the solidworks files were provided so i passed them to my colleague who kindly mirrored the blade profile for me.
thingiverse
free

Mini 16 Button MIDI Controller by V4HE
...ary switch
1x 16 button keypad
1x arduino pro micro
1x micro usb cable (approx 4mm diameter)
4x 3x16mm wood screws (for the base)
thingiverse
free

Micro Marblerun by crashdebug
...fit a 9.5mm (3/8") ball bearing - thanks to v4he for mentioning this in his...
Covid
turbosquid
$6

covid
...d
turbosquid
royalty free 3d model covid for download as max on turbosquid: 3d models for games, architecture, videos. (1667862)
3d_export
$50

covid-19
...covid-19
3dexport
3d obj model. covid-19
3d_export
$11

covid-19
...covid-19
3dexport
this is 3d model about covid-19 virus
3d_export
$10
covid 3d mask
...covid 3d mask
3dexport
3d covid mask for 3d avatars to implement in covid information projects
3d_export
$5
covid-19 korona
...covid-19 korona
3dexport
covid-19
3d_export
$8

coronavirus covid-19
...coronavirus covid-19
3dexport
coronavirus covid-19
3d_export
$5

covid mask black
...covid mask black
3dexport
black covid mask
3d_export
$5
coronavirus covid-19
...coronavirus covid-19
3dexport
coronavirus covid-19
turbosquid
$29

Covid Collection
...quid
royalty free 3d model covid collection for download as on turbosquid: 3d models for games, architecture, videos. (1682309)
3d_export
$5
mask covid-19
...mask covid-19
3dexport
covid-19 virus protection mask
Lightweight
design_connected
$11

Lightweight
...lightweight
designconnected
foscarini lightweight pendant lights computer generated 3d model. designed by tom dixon.
turbosquid
$15

Lightweight
...y free 3d model lightweight for download as max, obj, and fbx on turbosquid: 3d models for games, architecture, videos. (1361264)
turbosquid
$2

Lightweight Shield
... available on turbo squid, the world's leading provider of digital 3d models for visualization, films, television, and games.
turbosquid
$29

Lightweight Pine Chair
... available on turbo squid, the world's leading provider of digital 3d models for visualization, films, television, and games.
turbosquid
$20

Lightweight Task Chair
... available on turbo squid, the world's leading provider of digital 3d models for visualization, films, television, and games.
turbosquid
$20

Chandelier Lightweight Foscarini
... available on turbo squid, the world's leading provider of digital 3d models for visualization, films, television, and games.
turbosquid
$2

futuristic lightweight wheel
... available on turbo squid, the world's leading provider of digital 3d models for visualization, films, television, and games.
3d_export
free

Lightweight structure system animated
...lightweight structure system animated
3dexport
https://www.dock4all.com/
turbosquid
$15

03 LIGHTWEIGHT PATTERN WALL
...ghtweight pattern wall for download as 3ds, max, obj, and fbx on turbosquid: 3d models for games, architecture, videos. (1504846)
turbosquid
$15

02 LIGHTWEIGHT PATTERN WALL
...ghtweight pattern wall for download as 3ds, max, obj, and fbx on turbosquid: 3d models for games, architecture, videos. (1504842)
Shield
3d_export
$5
shield
...shield
3dexport
shield
3d_export
$5
Shield
...shield
3dexport
shield and a spear
3d_ocean
$6
Shield
...shield
3docean
game shield low polygon mei evil shild old shield shield
2048 texture obj,fbx,blend game ready.
3d_export
$5
Shield
...shield
3dexport
a shield that hasn't been made of materials will be available to everyone
3d_ocean
$4
Round Shield
...round shield
3docean
ancient battle fantasy knight medieval shield shields warrior
nice model of round shield.
3d_export
free
metal shield
...metal shield
3dexport
russian metal shield - anti-riot shield.
3d_export
$5

shield
...shield
3dexport
old shield, damaged and covered in mold. every file have a zip folder in with textures.
turbosquid
free

Shield
...shield
turbosquid
free 3d model shield for download as c4d on turbosquid: 3d models for games, architecture, videos. (1164800)
3d_export
$5

fire shield
...fire shield
3dexport
fire shield
turbosquid
$10

SHIELD
...
turbosquid
royalty free 3d model shield for download as obj on turbosquid: 3d models for games, architecture, videos. (1273553)
19
3d_export
$15

rocks 19
...rocks 19
3dexport
rocks 3d model 19
3d_export
$50
covid-19
...covid-19
3dexport
3d obj model. covid-19
3ddd
$1

PLANTS 19
...plants 19
3ddd
цветок , горшок
plants 19.. enjoy
3d_export
$11
covid-19
...covid-19
3dexport
this is 3d model about covid-19 virus
turbosquid
$25

COVID-19 coronavirus-19 virus microorganism
...virus-19 virus microorganism for download as ma, fbx, and obj on turbosquid: 3d models for games, architecture, videos. (1598091)
3ddd
$1

Curtains 19
...curtains 19
3ddd
ламбрекен
curtains 19
other models:http://3ddd.ru/users/brast/models
3d_export
$5
covid-19 korona
...covid-19 korona
3dexport
covid-19
3d_export
$6

tap-19
...tap-19
3dexport
3d_export
$8
coronavirus covid-19
...coronavirus covid-19
3dexport
coronavirus covid-19
3d_export
$5
coronavirus covid-19
...coronavirus covid-19
3dexport
coronavirus covid-19
Face
turbosquid
$100
face a face
... available on turbo squid, the world's leading provider of digital 3d models for visualization, films, television, and games.
turbosquid
$6
Face To Face Swing
... available on turbo squid, the world's leading provider of digital 3d models for visualization, films, television, and games.
3ddd
$1
Almerich Face to Face
... гибкостью материала, прозрачностью и тактом, чтобы создавать игры со светом и тенью.
размеры: 48 x 48 x 155 см
полигоны: 39 376
design_connected
$11
Face
...face
designconnected
montis face chairs computer generated 3d model. designed by gerard van den berg.
turbosquid
$15
Face
...ce
turbosquid
royalty free 3d model face for download as mud on turbosquid: 3d models for games, architecture, videos. (1178369)
turbosquid
$6
Face
...ce
turbosquid
royalty free 3d model face for download as max on turbosquid: 3d models for games, architecture, videos. (1409756)
turbosquid
$1
Face
...uid
royalty free 3d model face for download as obj and blend on turbosquid: 3d models for games, architecture, videos. (1288500)
turbosquid
$150

Face
... available on turbo squid, the world's leading provider of digital 3d models for visualization, films, television, and games.
turbosquid
$50

face
... available on turbo squid, the world's leading provider of digital 3d models for visualization, films, television, and games.
turbosquid
$15
Face
... available on turbo squid, the world's leading provider of digital 3d models for visualization, films, television, and games.
Printable
turbosquid
$5
printable giraffe
...uid
royalty free 3d model printable giraffe for download as on turbosquid: 3d models for games, architecture, videos. (1504825)
turbosquid
$49

Longhorn Printable
...
royalty free 3d model longhorn printable for download as stl on turbosquid: 3d models for games, architecture, videos. (1712930)
3d_export
$2
printable audi car
...printable audi car
3dexport
printable audi car
turbosquid
$40
Fox printable
...lty free 3d model fox printable for download as blend and stl on turbosquid: 3d models for games, architecture, videos. (1507558)
turbosquid
$23

Printable Statue
...ty free 3d model printable statue for download as obj and stl on turbosquid: 3d models for games, architecture, videos. (1415137)
turbosquid
$3
Ear Printable
...yalty free 3d model ear printable for download as obj and stl on turbosquid: 3d models for games, architecture, videos. (1671689)
turbosquid
$1

heart printable
...y free 3d model heart printable for download as stl and sldpr on turbosquid: 3d models for games, architecture, videos. (1209566)
turbosquid
$1
Printable Hook
...
royalty free 3d model 3d printable hook for download as stl on turbosquid: 3d models for games, architecture, videos. (1413683)
turbosquid
$30
Printable support
... model 3d printable support for download as max, 3ds, and stl on turbosquid: 3d models for games, architecture, videos. (1689342)
turbosquid
$24

Printable Dolphin
...el printable dolphin for download as , dae, fbx, obj, and stl on turbosquid: 3d models for games, architecture, videos. (1602353)