Thingiverse
COVID-19 Face Mask by YottaGreg
by Thingiverse
Last crawled date: 5 years, 5 months ago
Introduction:
This is a "remix" design of lafactoria3d's Covid-19-mask https://www.thingiverse.com/thing:4225667 where you can find the face mask STL file. I made some changes to make it easier to manufacture and faster to print. I eliminated the Cap and Grid and made some "retainers" to hold the filters in place.
This mask seems to be the best solution that I've come across so far, it fits comfortably on the face, is easy to breathe, and the filter is optimum. However, Copper3D HackThePandemic has a new filter design that looks like it is worth trying.
There are a lot of comments about how porous the masks are and about the limitations of the filters but these are better than nothing in my opinion, and in my Doctor's opinion. My doctor has tried these masks and she said they are better than the ones she gets from the hospital.
Key features:
I use a flexible PLA from Solutech to construct this mask which makes the mask easier to fit on the face and comfortable to wear. If you are printing with regular PLA, the mask can be molded for a better fit using hot water or a heat gun/hair dryer. Also, with regular PLA you will want to use some sort of adhesive backed foam, like window sealing foam, around the edges for a comfortable fit. I don't have scaled versions for different head sizes at this time.
The filter for this mask is made using cotton cloth over a tin foil electrostatic filter over a CPAP machine pollen filter and can include a magnet. This filter design is untested but based on my research about filtering seems to make a decent balance between particle size and breathe-ability.
The elastic straps are tie wrapped to the mask and adjustable by pulling on them
The mask is simple and is made with readily available parts (except the CPAP filters which can be hard to get. I understand that furnace filter material would also work.) I have had to redesign the filter parts several times to accommodate new CPAP filters that are available.
Disclaimer:
This filter is for mechanical protection only and is not intended to replace an N95 mask.
Materials:
Solutech Flexible PLA (you can use regular PLA but it is harder to fit the mask)
Regular PLA for the filter brackets
8mm x 3mm refrigerator magnets (optional)
CPAP filters: supported filters are Resmed Airsense 10 CPAP filters or Respironics Dreamstation CPAP filters. If you find a different filter and need a new bracket design, let me know.
5.Tin foil (for the electrostatic filter). You will need to print a fixture to punch holes in the tin foil, there are two STL files for the tin foil punch fixture. Print in regular PLA.
A cotton cloth to cover the filter and make the mask "less scary". About 60mm x 60mm square. You can cut this from tee shirts or golf shirts.
Wire ties (for attaching the elastic bands to the mask)
Elastic bands, such as children hair bands. Two pieces per mask, each 17" long.
Instructions:
Print and touch up the mask. See photos: Clean up the excess plastic and bumps using a soldering iron and a rotary tool so that the mask is soft and comfortable around the edges where it meets the face. Sometimes there is a problem when printing the nose area (see pictures). Use a soldering iron and some plastic from the reel to seal up the areas that did not print well.
Set out the filters and the brackets for the filters. The brackets are custom designed for different CPAP filters. There are two models of CPAP filters that I could obtain: Resmed Airsense 10 CPAP filters and Respironics Dreamstation CPAP filters. The STL file names will indicate whether the file is for the Resmed or Respir CPAP filters. See pictures.
If you want to insert a magnet, insert it as shown in the pictures. For the Resmed filter, it should snap in place; you may need to widen the opening a bit with a knife.
Place the filters as shown in the pictures and push the inner bracket(s) so that the filter is pressed into place. For the Respironics filters, the little inner brackets should snap into place. Make sure there is a good seal around the CPAP filter and the bracket.
Make a tin foil electrostatic filter using the fixture as shown in the pictures. Wrap the tin foil filter around the front of the CPAP filter assembly.
Place the 3D printed mask face down and lay the cotton filter over the filter opening of the mask. Place the filter assembly with the tin foil filter face down over the cotton filter and push it into the mask opening (this is also easier if you can use flexible PLA). Make sure there is a good seal around the filter assembly.
Insert wire ties and loosely tighten. (See pictures)
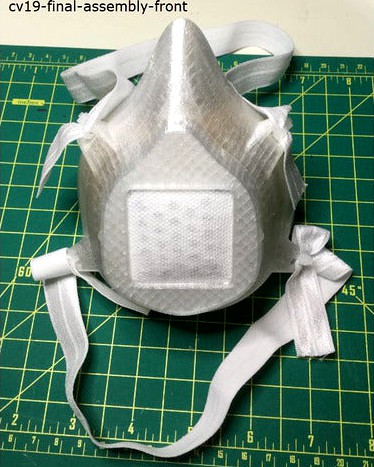
Insert the ends of the elastic bands through the wire ties and tighten as show in the pictures. Test the elastic band to see if it can pull back and forth so that a person can adjust the tightness on their head.
This is a "remix" design of lafactoria3d's Covid-19-mask https://www.thingiverse.com/thing:4225667 where you can find the face mask STL file. I made some changes to make it easier to manufacture and faster to print. I eliminated the Cap and Grid and made some "retainers" to hold the filters in place.
This mask seems to be the best solution that I've come across so far, it fits comfortably on the face, is easy to breathe, and the filter is optimum. However, Copper3D HackThePandemic has a new filter design that looks like it is worth trying.
There are a lot of comments about how porous the masks are and about the limitations of the filters but these are better than nothing in my opinion, and in my Doctor's opinion. My doctor has tried these masks and she said they are better than the ones she gets from the hospital.
Key features:
I use a flexible PLA from Solutech to construct this mask which makes the mask easier to fit on the face and comfortable to wear. If you are printing with regular PLA, the mask can be molded for a better fit using hot water or a heat gun/hair dryer. Also, with regular PLA you will want to use some sort of adhesive backed foam, like window sealing foam, around the edges for a comfortable fit. I don't have scaled versions for different head sizes at this time.
The filter for this mask is made using cotton cloth over a tin foil electrostatic filter over a CPAP machine pollen filter and can include a magnet. This filter design is untested but based on my research about filtering seems to make a decent balance between particle size and breathe-ability.
The elastic straps are tie wrapped to the mask and adjustable by pulling on them
The mask is simple and is made with readily available parts (except the CPAP filters which can be hard to get. I understand that furnace filter material would also work.) I have had to redesign the filter parts several times to accommodate new CPAP filters that are available.
Disclaimer:
This filter is for mechanical protection only and is not intended to replace an N95 mask.
Materials:
Solutech Flexible PLA (you can use regular PLA but it is harder to fit the mask)
Regular PLA for the filter brackets
8mm x 3mm refrigerator magnets (optional)
CPAP filters: supported filters are Resmed Airsense 10 CPAP filters or Respironics Dreamstation CPAP filters. If you find a different filter and need a new bracket design, let me know.
5.Tin foil (for the electrostatic filter). You will need to print a fixture to punch holes in the tin foil, there are two STL files for the tin foil punch fixture. Print in regular PLA.
A cotton cloth to cover the filter and make the mask "less scary". About 60mm x 60mm square. You can cut this from tee shirts or golf shirts.
Wire ties (for attaching the elastic bands to the mask)
Elastic bands, such as children hair bands. Two pieces per mask, each 17" long.
Instructions:
Print and touch up the mask. See photos: Clean up the excess plastic and bumps using a soldering iron and a rotary tool so that the mask is soft and comfortable around the edges where it meets the face. Sometimes there is a problem when printing the nose area (see pictures). Use a soldering iron and some plastic from the reel to seal up the areas that did not print well.
Set out the filters and the brackets for the filters. The brackets are custom designed for different CPAP filters. There are two models of CPAP filters that I could obtain: Resmed Airsense 10 CPAP filters and Respironics Dreamstation CPAP filters. The STL file names will indicate whether the file is for the Resmed or Respir CPAP filters. See pictures.
If you want to insert a magnet, insert it as shown in the pictures. For the Resmed filter, it should snap in place; you may need to widen the opening a bit with a knife.
Place the filters as shown in the pictures and push the inner bracket(s) so that the filter is pressed into place. For the Respironics filters, the little inner brackets should snap into place. Make sure there is a good seal around the CPAP filter and the bracket.
Make a tin foil electrostatic filter using the fixture as shown in the pictures. Wrap the tin foil filter around the front of the CPAP filter assembly.
Place the 3D printed mask face down and lay the cotton filter over the filter opening of the mask. Place the filter assembly with the tin foil filter face down over the cotton filter and push it into the mask opening (this is also easier if you can use flexible PLA). Make sure there is a good seal around the filter assembly.
Insert wire ties and loosely tighten. (See pictures)
Insert the ends of the elastic bands through the wire ties and tighten as show in the pictures. Test the elastic band to see if it can pull back and forth so that a person can adjust the tightness on their head.