Thingiverse
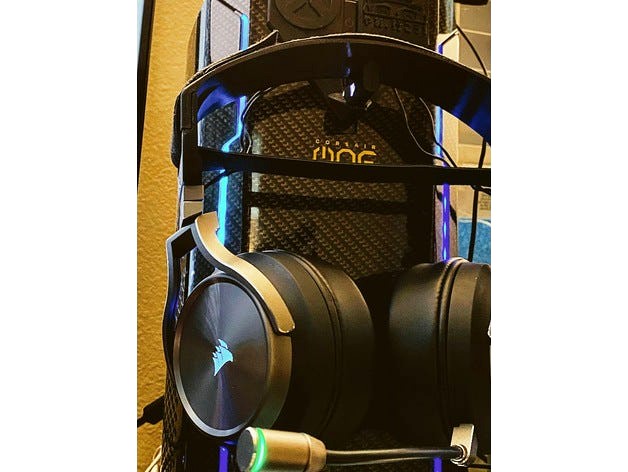
Corsair Virtuoso Suspension Headband by yaikou
by Thingiverse
Last crawled date: 2 years, 10 months ago
Corsair's Virtuoso headset is an amazing piece of kit, and the microphone is one of, if not the, best on the market for a headset. While I love most things about the Corsair Virtuoso headset, there are a couple minor things I wanted changed: earpads and headband.
For the earpads, I picked some up from a third-party on Amazon - https://www.amazon.com/gp/product/B08HXVD5RJ
For the headband, it's much more involved, and requires some irreversible destruction to the cloth and padding. Because I don't want to be held liable for any damage done to your headset, I will omit the process of disassembly. Do this mod at your own risk!
I printed this in polycarbonate, but any filament with strong layer adhesion will work, such as PETG or PCTG.
Supports for the earcup mount will need to be printed, and you'll need to be patient with clearing out the supports.
The mounting tabs are the weak points in this design, so if you have an extremely large head, this may not work for you. please understand the risks involved before proceeding with this modification. A stiffer material like PLA could be suitable, but I worry about the brittle nature of that. Thus far, everything has been printed in PC and is working well.
BOM:
1x Corsair Virtuoso (Base or SE)
1x SteelSeries Arctis 7 elastic band (https://www.amazon.com/gp/product/B08RHK2ZMK)
8x 4mm M3 countersunk screws
2x 6mm M3 countersunk screws
10x M3 nuts
1x hook and loop cable tie, cut to between 25-30mm
Printing:
Use supports for all components (everywhere)
Print headband on its sid
Print earcup mount with the single hex deboss flat on the bed
Print tab with flat side on bed
Assembly:
Screw tab to earcup with original headset screws
Lay wires in tab channel
Slide cover over tab and exposed mounting hardware and affix with original screws
Slide opposing cover over the other side of the tab, carefully pulling the wires through with it
Insert tab in earcup mount
Affix with 6mm M3 screw and nut
Affix headband to that assembly with four (4) M3 screws and nuts
Repeat process for other side
Using the hook and loop cable tie, attach headset wires to the holes in the top-middle band
Thread elastic headband through and connect it to itself
ENJOY! :)
Changes I may make in the future:
Simpler, easier to post-process design
Add various widths of headband
Modify design to use original metal earcup tabs
Similar models
thingiverse
free

Spacer Fot Corsair Virtuoso Headset by Glamrist1
...put between your headset body and teh earpad on the vituoso hesdset.
it helps to reduce pressure from the headset against the ear
grabcad
free

Coronavirus Mask ( Countersunk Screw Design)
...u can 3d print it and use it to protect yourself. all you need is m3 * 10mm countersunk screws and m3 nut and an elastic strip.
thingiverse
free

Headband part for Creative Aurvana Live! by GigaBajcior
...one side:
2x m3x6mm hex screw (x8mm will be good too)
1x m3x14mm flat screw
1x m3 nut
optional: thread glue, m3 plastic washer.
thingiverse
free

Z Stop Adjuster
...itch to affix new bracket.
other items required.
1x m3 x 25-30mm bolt
1x m3 nut
2x m3 bolts or grub screws to affix upper bracket
thingiverse
free

Prusa MK3S Extruder for Tevo Tornado/CR-10/Ender... by reczul01
...screw for blower spacer mount
1x m3 square nut for blower spacer mount
1x m3x22 screw for blower mount
1x m3 nut for blower mount
thingiverse
free

Tronxy X5 X Belt Tensioner by Galvit
...tronxy x5 x belt tensioner by galvit
thingiverse
you will also need:
1x m3 nuts
1x 20mm m3 countersunk screw
thingiverse
free

Hacksaw handle by NitroXpress
... glue in the needed nuts.
you need:
8x countersunk screw m3x8mm + m3 nuts
1x countersunk screw m4x8mm + m4 nut
have fun !
thingiverse
free

Corsair Virtuoso Headset Ear pad Adapters by LeonardS
... added the slit to help add the ear pads. this allows you to only print this part twice and have everything work without glueing.
thingiverse
free

Wall-mount spool holder with quick release fastener by loco
...unk screws 4mm diameter
3x m8 nuts
1x m8 threaded rod
2x 608 ball bearing
1x m3x20 screw
1x m3 nut (nyloc nut or loctite)
thingiverse
free

Mount for Titan, BMG Extruders for Ender 3 by Mike_Toff
...or ender 3 by mike_toff
thingiverse
additionally you will need:
4x m3 nuts
4x 6-8mm m3 screws
1x zip tie for the extruder cables
Yaikou
thingiverse
free

Opto-Isolated Relay Module Housing by yaikou
... themselves.
for use with these:https://www.amazon.com/gp/product/b07wp7c8zd/ref=ppx_yo_dt_b_asin_title_o05_s00?ie=utf8&psc=1
thingiverse
free

Spherical Bowden Filament Guide by yaikou
...sign that doesn't need a base and instead can be inserted into the v-slot rails, then rotated 90 degrees to lock it in place.
thingiverse
free

Adjustable 40mm Fan BL Touch Mount by yaikou
...er adjuster screw. by printing and using this mount, you are doing so your own risk... just don't channel your inner hulk. :)
Virtuoso
3ddd
$1

Twelve Light Bowl Pendant
...3ddd minka group minka group® metropolitan® lighting fixture co. virtuoso collection n3612-bp width:59"; height:61"; weight:...
3ddd
$1

NuAge 2 Poltrona bed
...careful craftsmanship and the authentic expression of the artisan virtuoso that has always been associated with the name poltrona...
3ddd
$1

Metallux IMPOSSIBLE PENDANT LAMP
...delicate venetian-style light effect is echoed by graceful and virtuoso textures, smooth and light silhouettes, magically suspended like bright...
3d_sky
free

Floor Lamp "VIRTUOSO"
...floor lamp "virtuoso"
3dsky
textures are present.
thingiverse
free

Headphone hanger Corsair Virtuoso - IKEA BEKANT by LeonardS
...one hanger for the corsair virtuoso headphones to mount them to the ikea bekant table top (or any table top with 17mm thickness).
thingiverse
free

Corsair Virtuoso Microphone Plug by Teranolist
...g ugly because i had to sand down the edges a bit.
i adjusted the uploaded file accordingly so it fits properly without doing so.
thingiverse
free

Baratza Virtuoso Single Dose Hopper by tommydadog
...he pop corning at the end of the grind.
this should fit some of the other baratza grinders like the encore but i have not tested.
thingiverse
free
Corsair Virtuoso Headset Ear pad Adapters by LeonardS
... added the slit to help add the ear pads. this allows you to only print this part twice and have everything work without glueing.
thingiverse
free
Spacer Fot Corsair Virtuoso Headset by Glamrist1
...put between your headset body and teh earpad on the vituoso hesdset.
it helps to reduce pressure from the headset against the ear
thingiverse
free

Corsair Virtuoso to hyper X ear pad adapters by Jerkiperki
...ach other and when you asseble the adapters its good to use a smal bit of glue.
any questions will be anwserd as fast as possible
Corsair
3ddd
$1

Corsair Dominator GT
...corsair dominator gt
3ddd
corsair , ddr3
corsair dominator gt ddr3
3d_export
$52

Corsair 3D Model
...corsair 3d model
3dexport
pirat corsair
corsair 3d model inter-game 1500 3dexport
3d_export
$17

Vought F4U Corsair
...vought f4u corsair
3dexport
vought f4u corsair
turbosquid
$15

Corsair Headset
... 3d model corsair headset for download as obj, blend, and dae on turbosquid: 3d models for games, architecture, videos. (1446274)
turbosquid
$80

F4U4 Corsair
... available on turbo squid, the world's leading provider of digital 3d models for visualization, films, television, and games.
turbosquid
$79

Corsair Knife
... available on turbo squid, the world's leading provider of digital 3d models for visualization, films, television, and games.
turbosquid
$50

corsaire a7v
... available on turbo squid, the world's leading provider of digital 3d models for visualization, films, television, and games.
turbosquid
free

F4U Corsair
... available on turbo squid, the world's leading provider of digital 3d models for visualization, films, television, and games.
3d_export
$10

Corsair dominator GT 3D Model
...corsair dominator gt 3d model
3dexport
corsair dominator gt
corsair dominator gt ddr
turbosquid
$32

F4U-1A Corsair
...uid
royalty free 3d model f4u-1a corsair for download as max on turbosquid: 3d models for games, architecture, videos. (1280883)
Headband
3d_export
$15

RAZER headband
...razer headband
3dexport
razer headband
turbosquid
$12

Pearl Headband
...ree 3d model pearl headband for download as max, obj, and fbx on turbosquid: 3d models for games, architecture, videos. (1513345)
turbosquid
$2

Seers Headband 4
... available on turbo squid, the world's leading provider of digital 3d models for visualization, films, television, and games.
turbosquid
free

Three Moon Headband
... available on turbo squid, the world's leading provider of digital 3d models for visualization, films, television, and games.
3d_export
$14

Holiday Headband 3D Model
...tume plush holiday accessories vray texture material mouse dot dots pink black
holiday headband 3d model trinity23 34204 3dexport
3d_export
$7

headband of konoha- naruto
...headband of konoha- naruto
3dexport
.blend, .fbx, .obj in the .rar
turbosquid
$20

Arm cuffs and headband of Wiccan
...d headband of wiccan for download as sldas, ige, obj, and stl on turbosquid: 3d models for games, architecture, videos. (1632904)
turbosquid
free

Single Crescent Silver Headband
... available on turbo squid, the world's leading provider of digital 3d models for visualization, films, television, and games.
3d_export
$5

ninja headband anime naruto shinobi
...adband with high and reflected materials. ready for render has a 3 formats fbx with materials and better thank you and good luck)
3d_export
$15

Christmas Reindeer Antler Headband 3D Model
...iday accessories head wear santa claus vray texture material
christmas reindeer antler headband 3d model trinity23 33358 3dexport
Suspension
3ddd
free

Circolo Suspension
...circolo suspension
3ddd
circolo , suspension
this is the circolo led suspension
3d_export
$20

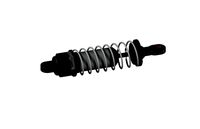
suspension
...pension
3dexport
suspension it is used in bicycle, motorcycle; and many more object<br>rendering is done in photo view 360
3ddd
$1
Fieltebek suspension
...fieltebek suspension
3ddd
fieltebek , suspension
fieltebek
3d_export
free
suspension
...suspension
3dexport
3ddd
$1
Botti Suspension
...botti suspension
3ddd
botti
люстра botti suspension
turbosquid
$25

suspension
... available on turbo squid, the world's leading provider of digital 3d models for visualization, films, television, and games.
turbosquid
$8

suspension
... available on turbo squid, the world's leading provider of digital 3d models for visualization, films, television, and games.
turbosquid
$1
SUSPENSION
... available on turbo squid, the world's leading provider of digital 3d models for visualization, films, television, and games.
3ddd
$1
DELIGHTFULL MATHENY | SUSPENSION
... matheny , suspension
delightfull matheny | suspension
design_connected
$16
Vaeder Suspension
...vaeder suspension
designconnected
modular lighting instruments vaeder suspension computer generated 3d model.