Thingiverse

CoreXY Power Carriage by merlinds
by Thingiverse
Last crawled date: 3 years, 1 month ago
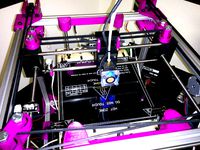
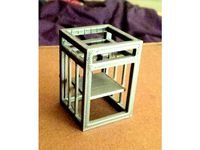
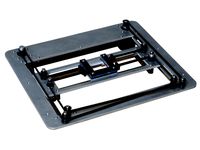
This is the carriage I designed for my custom coreXY printer. It features a compact design, aimed to take advantage of HIP´s high temperature melting point to minimize the spacing between the block and the carriage plate thus allowing me to use an original vulcano block and heat break from e3d combined with a regular mk8 direct drive, and achiving very similar performance as my original titan aero that I have in my other printer.
Notice the following, the spacing between the smooth rods is 59mm from center to center, that can be adjusted in Fusion 360.
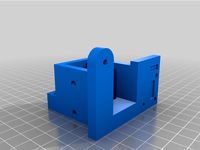
If you want to use a clone heat break, notice that you will need to print "Lower Guide For Clone Barrel.stl" to match the 6mm end.
If you are using an original e3d heat break, you may need to expad your mk8 aluminum plate threaded hole from 6mm to 7mm, this can be achieved with a 6mm drill bit and a 7mm male hole maker (dunno the name in english). Either way, you should make some small dents in the upper part of the thread to stop the heat break from going through.
Basically you put the tip of a philips screw drive right next to the top end of the threaded hole and hit it carefully with a hammer to deform the end of the screw and block the heat break. (see Captura.png)
Measure the nema 17 body to match the one i´m using, or edit the brace, it is important to get a tigh fit there.
If you can match the convo of hobb and iddler i´m using, you will get great performance for flex filaments.
Vitamins required:
1 mk8 direct drive (6 or 7mm thread for heat break) with heatsink and fan
1 vulcano heat break with thermistor and catridge
1 e3d heat break
1 nema 17 medium torque
3 lmu8 bearings
1 bltouch
1 centrifugal fan
2 m3 screws with nuts and a few washers
3 m2 or less tiny screws to hold the bracket to the plate
1 big wood screw to hold the cables from the cable holders, get creative here
some teflon tube to fill the lower guidem upper guide and filler screw
Some Amazon items I found that match what I´m using:https://www.amazon.com/Widewing-Geeetech-Extruder-Aluminum-for1-75mm/dp/B07D3TH2Y8/ref=sr_1_1_sspa?ie=UTF8&qid=1528074107&sr=8-1-spons&keywords=mk8+geeetech&psc=1
https://www.amazon.com/SoundOriginal-Humidifier-Aromatherapy-Appliances-Replacement/dp/B071WMHNG5/ref=pd_sim_328_3?_encoding=UTF8&pd_rd_i=B071WMHNG5&pd_rd_r=B8JP879177YK2B8F2C5P&pd_rd_w=6N2kN&pd_rd_wg=TFiwh&psc=1&refRID=B8JP879177YK2B8F2C5P&dpID=51cWTBpsDFL&preST=_SY300_QL70_&dpSrc=detail
https://www.amazon.com/dp/B0773MW3X7/ref=sspa_dk_detail_9?psc=1&pd_rd_i=B0773MW3X7&pd_rd_wg=MqDMU&pd_rd_r=5CG148HWSR9PHYDWBW93&pd_rd_w=2mxV1
If you want to replace the original hub for this one you will need to file the idler a bit so the filament gets squished, once you do the extruder will work great with flex.https://www.amazon.com/Gulfcoast-Robotics-Filament-Printer-Extruder/dp/B07BSR9FWH/ref=sr_1_3?s=industrial&ie=UTF8&qid=1527594418&sr=1-3&keywords=3d+printer+hobbed+gear
https://www.amazon.com/Genuine-Heat-Break-1-75mm-V6-175-BREAK/dp/B077Y2MHW8/ref=sr_1_5?ie=UTF8&qid=1527594748&sr=8-5&keywords=e3d+heatbreak
https://www.amazon.com/Genuine-E3D-Volcano-Block-Heater/dp/B07BFYL3KN/ref=sr_1_10?ie=UTF8&qid=1527594389&sr=8-10&keywords=e3d+volcano
https://www.amazon.com/Hobby-Hangar-NEMA-Stepper-Motor/dp/B079S6JGG3/ref=sr_1_22?s=industrial&ie=UTF8&qid=1527594487&sr=1-22&keywords=nema+17
Notice the following, the spacing between the smooth rods is 59mm from center to center, that can be adjusted in Fusion 360.
If you want to use a clone heat break, notice that you will need to print "Lower Guide For Clone Barrel.stl" to match the 6mm end.
If you are using an original e3d heat break, you may need to expad your mk8 aluminum plate threaded hole from 6mm to 7mm, this can be achieved with a 6mm drill bit and a 7mm male hole maker (dunno the name in english). Either way, you should make some small dents in the upper part of the thread to stop the heat break from going through.
Basically you put the tip of a philips screw drive right next to the top end of the threaded hole and hit it carefully with a hammer to deform the end of the screw and block the heat break. (see Captura.png)
Measure the nema 17 body to match the one i´m using, or edit the brace, it is important to get a tigh fit there.
If you can match the convo of hobb and iddler i´m using, you will get great performance for flex filaments.
Vitamins required:
1 mk8 direct drive (6 or 7mm thread for heat break) with heatsink and fan
1 vulcano heat break with thermistor and catridge
1 e3d heat break
1 nema 17 medium torque
3 lmu8 bearings
1 bltouch
1 centrifugal fan
2 m3 screws with nuts and a few washers
3 m2 or less tiny screws to hold the bracket to the plate
1 big wood screw to hold the cables from the cable holders, get creative here
some teflon tube to fill the lower guidem upper guide and filler screw
Some Amazon items I found that match what I´m using:https://www.amazon.com/Widewing-Geeetech-Extruder-Aluminum-for1-75mm/dp/B07D3TH2Y8/ref=sr_1_1_sspa?ie=UTF8&qid=1528074107&sr=8-1-spons&keywords=mk8+geeetech&psc=1
https://www.amazon.com/SoundOriginal-Humidifier-Aromatherapy-Appliances-Replacement/dp/B071WMHNG5/ref=pd_sim_328_3?_encoding=UTF8&pd_rd_i=B071WMHNG5&pd_rd_r=B8JP879177YK2B8F2C5P&pd_rd_w=6N2kN&pd_rd_wg=TFiwh&psc=1&refRID=B8JP879177YK2B8F2C5P&dpID=51cWTBpsDFL&preST=_SY300_QL70_&dpSrc=detail
https://www.amazon.com/dp/B0773MW3X7/ref=sspa_dk_detail_9?psc=1&pd_rd_i=B0773MW3X7&pd_rd_wg=MqDMU&pd_rd_r=5CG148HWSR9PHYDWBW93&pd_rd_w=2mxV1
If you want to replace the original hub for this one you will need to file the idler a bit so the filament gets squished, once you do the extruder will work great with flex.https://www.amazon.com/Gulfcoast-Robotics-Filament-Printer-Extruder/dp/B07BSR9FWH/ref=sr_1_3?s=industrial&ie=UTF8&qid=1527594418&sr=1-3&keywords=3d+printer+hobbed+gear
https://www.amazon.com/Genuine-Heat-Break-1-75mm-V6-175-BREAK/dp/B077Y2MHW8/ref=sr_1_5?ie=UTF8&qid=1527594748&sr=8-5&keywords=e3d+heatbreak
https://www.amazon.com/Genuine-E3D-Volcano-Block-Heater/dp/B07BFYL3KN/ref=sr_1_10?ie=UTF8&qid=1527594389&sr=8-10&keywords=e3d+volcano
https://www.amazon.com/Hobby-Hangar-NEMA-Stepper-Motor/dp/B079S6JGG3/ref=sr_1_22?s=industrial&ie=UTF8&qid=1527594487&sr=1-22&keywords=nema+17
Similar models
thingiverse
free

gMax, 80/20 frame parts for mods, hacks, and addons by Spudwheelie
...pport-terminal-rocker-toggle-switch/dp/b00zwwyucu/ref=sr_1_15?ie=utf8&qid=1464391427&sr=8-15&keywords=switch+spst#ask
thingiverse
free

Rgb Light Strip Lamp by Ratakis
...lament-dimensional-accuracy/dp/b00mb3cv6k/ref=sr_1_1?ie=utf8&qid=1524145120&sr=8-1&keywords=clear+pla+filament+1.75mm
thingiverse
free

3D Printable 3D Printer by TheJadeRabbit
...r_1_4?ie=utf8&qid=1530916900&sr=8-4&keywords=3d+printer+hotend
code(marlin): https://github.com/marlinfirmware/marlin
thingiverse
free

The Cube Mini Fridge by thewatchmakerfl
...ref=sr_1_2?ie=utf8&qid=1436833279&sr=8-2&keywords=potentiometer&pebp=1436833322445&perid=0pmtmyyyy6vn4mzst3fx
thingiverse
free
Speaker box by Ratakis
...-4ft/dp/b01kstsv76/ref=sr_1_1_sspa?s=electronics&ie=utf8&qid=1521518432&sr=1-1-spons&keywords=aux+cable&psc=1
thingiverse
free
MacBook Pro with Retina Display Vertical Dock by TomExplorador
...er/dp/b008ala6dw/ref=sr_1_3?s=electronics&ie=utf8&qid=1517752168&sr=1-3&keywords=macbook+ethernet+adapter+thunder
thingiverse
free

40A Power Supply Cover W/LCD Display by hkgary_g
...lpage_o06_s01?ie=utf8&psc=1
power socket
www.amazon.com/gp/product/b06xnmt3wl/ref=oh_aui_detailpage_o06_s00?ie=utf8&psc=1
thingiverse
free

TRAXXTRUDER Compact geared extruder by liu_d
...1&keywords=48p+13t
more details are coming! the prototype is waiting on some hardware and photos/video will be uploaded asap.
thingiverse
free

Drones and Droids 2017 by SLForney
...sb li-po charger 300mahttps://www.amazon.com/gp/product/b00ddtl5t0/ref=ox_sc_act_title_1?ie=utf8&psc=1&smid=atvpdkikx0der
thingiverse
free

Laser DL-44 by Dinoman217
...tubing-eventronic/dp/b072pcq2lw/ref=sr_1_5?s=industrial&ie=utf8&qid=1527956002&sr=1-5&keywords=heat+shrink+tubing
Merlinds
thingiverse
free

Eraser and Marker Holder by merlinds
...y merlinds
thingiverse
used some double sided tape to stick it to the bottom of the board in my university. professors loved it.
thingiverse
free

Love Spinner by merlinds
...or my gf, still haven´t printed it, will upload pictures when i do.
i made it for a 22mm bearing and m6 nuts with a .2 clearence.
thingiverse
free

Moto g5 + Spell Book Case by merlinds
...moto g5 + spell book case by merlinds
thingiverse
this is a phone case i made for a friend.
thingiverse
free

Peppa Pig For easy print by merlinds
...hingiverse
just modified the original stl, to make it easier for printing. just put arms and tail flat surface on bed, and print
thingiverse
free

Organic Monitor Stand by merlinds
... monitor. it uses all the space available in a 20x20 bed and is really stable. also you can pass cables or store things under it.
thingiverse
free

Feline Skull by merlinds
...es to him.https://www.youtube.com/watch?v=comsn10azhk&lc=z23bvhlgjymqfjitracdp4342r3vrbspkiirkut4cn1w03c010c.1513420050131187
thingiverse
free

Utility Hexa Tile Durable by merlinds
... designed this one in a way that the little arms are printed layed down on the bed, also i med the whole frame more to my liking.
thingiverse
free

Philips OneBlade 2521 All in one holder by merlinds
...to hold the few accesories for my shaver. ended up mixing two existing designs.
printed with support only below the charger hole.
thingiverse
free

Titan Aero Double Layer Fan by merlinds
..., seriously this pumps some serious cooling, the silicon shell is a must for your heat block.
take a look: http://a360.co/2bbwl2r
thingiverse
free

Filament Spool Rack by merlinds
...unt it in.
in the pictures you will se an actual bearing, that is from an older version that proved to be useless so i remove it.
Corexy
thingiverse
free

CoreXY by Kaz_tech
...corexy by kaz_tech
thingiverse
this is the model of corexy platform. i separately put the parts on this place.
thingiverse
free

corexy plotter by tjwan
...corexy plotter by tjwan
thingiverse
parts for corexy mill inspired by http://der-frickler.net/technik/corexyportal
thingiverse
free
ScribbleJ CoreXY Beta by ScribbleJ
...j/corexy-v1https://github.com/scribblej/corexy-v1#corexy-beta
full gallery of development photos here: http://imgur.com/a/donun
thingiverse
free
CoreXY Emblem by emkajot
...by emkajot
thingiverse
an emblem for your corexy printer.
size: 100mm x 38mm x 2mm.
update: added a version with a proper mount.
thingiverse
free

SolidCore CoreXY Carriage by shanehooper
...olidcore 3d printer. this design could be used in other corexy 3d printers.
also see:https://3ddistributed.com/corexy-3d-printer/
thingiverse
free
CoreXY 3D Printer Model by ReginaFabricam
...bricam
thingiverse
this is an original design of a corexy printer.https://www.tinkercad.com/things/jggr9qk4s4p-3d-printer-corexy
thingiverse
free

coreXY Upper structure Left
...corexy upper structure left
thingiverse
my customized corexy 3d printer upper left parts
thingiverse
free
CoreXY by frankie
...ing machines, etc. the design is described in greater detail at http://www.corexy.com . a video is at http://vimeo.com/40914530 .
thingiverse
free

Endstop block for CoreXY carriage by svkeulen
...endstop block for corexy carriage by svkeulen
thingiverse
endstop for corexy carriage
thingiverse
free
X carriage for the CoreXY MGN12 by hackerbijay
...x carriage for the corexy mgn12 by hackerbijay
thingiverse
x carriage for the corexy frame
Carriage
archibase_planet
free

Carriage
...arriage
archibase planet
perambulator baby carriage pram
carriage n250908 - 3d model (*.gsm+*.3ds) for interior 3d visualization.
3d_export
free

carriage
...carriage
3dexport
old fashion carriage model, more files here:
turbosquid
$140

Carriage
...urbosquid
royalty free 3d model carriage for download as max on turbosquid: 3d models for games, architecture, videos. (1482052)
turbosquid
$25

Carriage
...urbosquid
royalty free 3d model carriage for download as max on turbosquid: 3d models for games, architecture, videos. (1285944)
3d_export
free

carriage
...carriage
3dexport
game cart
3d_ocean
$15

Barrel Carriage
...ieval oak old transport wheels wine wood
this model contains a barrel and a carriage. it is a medieval type of wood oak carriage.
turbosquid
$40

Carriage
...ty free 3d model carriage for download as obj, fbx, and blend on turbosquid: 3d models for games, architecture, videos. (1290094)
turbosquid
free

Carriage
...yalty free 3d model carriage for download as ma, obj, and fbx on turbosquid: 3d models for games, architecture, videos. (1239157)
3d_export
$5

Medieval carriage
...medieval carriage
3dexport
medieval carriage in fairy style
turbosquid
$58

Carriage
...d model carriage with scene for download as max, obj, and fbx on turbosquid: 3d models for games, architecture, videos. (1276262)
Power
turbosquid
$100

power
...ower
turbosquid
royalty free 3d model power for download as on turbosquid: 3d models for games, architecture, videos. (1421990)
3d_export
$5

Power
...power
3dexport
3d_export
$5

power outlets
...power outlets
3dexport
power outlets
3ddd
$1

lion power
...lion power
3ddd
лев , статуя
lion power gold sculpture
3ddd
$1

Sea Power
...
компас , море , часы
часы с компасом sea power
3ddd
free

Meridiani / Power
...power
3ddd
meridiani , круглый
стол power производитель meridiani, диаметр 120,высота 67
3d_export
$5

Power Surge
...power surge
3dexport
the power surge is a all mesh carnival ride to lower in game part count and lag
turbosquid
$8

Airport Ground Power Unit (AXA Power )
... available on turbo squid, the world's leading provider of digital 3d models for visualization, films, television, and games.
turbosquid
$50

Power Houser
...rbosquid
royalty free 3d model power houser for download as on turbosquid: 3d models for games, architecture, videos. (1333800)
3d_export
$5

power outlet
...power outlet
3dexport
power outlet<br>format file maya 2018, 3d max 2017, obj, fbx