Thingiverse

Copertura Bobina parapolvere e paraumidità Et4 by acerissimo
by Thingiverse
Last crawled date: 3 years, 4 months ago
Le foto che ho pubblicato sono leggermente diverse dai file stl.
Questi stl sono migliorati rispetto alla mia copertura in foto. Non ho ristampato perché tra le varie prove ho consumato molto materiale.
l'unico problema che ci potrebbe essere è dato dalla lunghezza della chiusura che magari non serri bene. File "cermiera1.stl " facilmente modificabile allungandolo o accorciandolo.
Tengo a precisare che la chiusura è un remix di una trovata su thingiverse di cui pero non ritrovo il link
Questa copertura tolto il logo e modificando il basamento è adattabile ad altre macchine
IMPORTANTE:
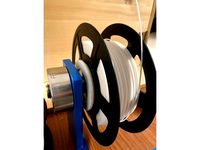
DIMENSIONE BOBINE MAX 200 X 65
Spero vi sia utile
ps:
si possono mettere anche bustine di silica gel dessiccanti all'interno delle bobine.
materiali utilizzati:
nr 6 viti m4x10 svasate e relativi dadi per fissaggio cerniera alle due meta inferiore e superiore
nr 2 viti m6x20 svasate per fissaggio meta inferiore al basamento et4
nr 2 viti m5x30 svasate in sostituzione di quelle originali per fissare il basamento et4 alla macchina
nr 6 viti m3x20 svasate (da ritagliare poi) e relativi dadi per il fissaggio della chiusura alle due meta inferiore e superiore
nr 4 cuscinetti 608 (22x8x7)
nr 1 vite m4x70 (barra filettata tagliata a misura) per unione cerniere inferiore e superiore
ho realizzato i telai finestra e relativa sagoma per chi volesse mettere o meno il vetro di controllo.consumo materiale
i pezzi della chiusura vanno stampati al 100% di riempimento per una maggiore solidità
ho aggiunto il centratore asse z al basamento et4 per chi ancora non lo avesse da utilizzare con un cuscinetto 608
Summary
The photos I have posted are slightly different from the stl files.
These are better than my coverage in the photo. I have not reprinted because between the various tests I consumed a lot of material.
the only problem that could be given by the length of the closure that maybe does not tighten well. File "cermiera1.stl" easily editable by lengthening or shortening it.
I would like to clarify that the closure is a remix of a gimmick on thingiverse of which, however, I do not find the link
This cover removed the logo and modifying the base is adaptable to other machines
IMPORTANT:
MAX SPOOL SIZE 200 X 65
I hope you find it useful
ps:
sachets of desiccant silica gel can also be placed inside the coils.
used materials:
6 m4x10 countersunk screws and relative nuts for fixing the hinge to the two lower and upper halves
2 countersunk screws m6x20 for fixing the lower half to the base et4
2 countersunk screws m5x30 to replace the original ones to fix the base et4 to the machine
6 m3x20 countersunk screws (to be cut later) and relative nuts for fastening the closure to the two lower and upper halves
4 bearings 608 (22x8x7)
1 screw m4x70 (threaded bar cut to size) for joining the lower and upper hinges
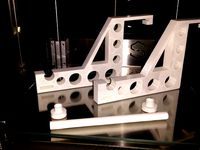
I made the window frames and relative shape for those who want to put the control glass or not. material consumption
closure pieces are molded at 100% fill for added strength
I added the z axis centering device to the et4 base for those who still would not have to use it with a 608 bearing
Print settings
Rafts:
No
Supports:
No
Resolution:
0.2
Filling:
30
Filament_brand:
Sunlu
Filament_color:
black
Material_filament:
pla plus
Note :
if you have any doubts about the assembly, please ask Greetings to all
How I designed it
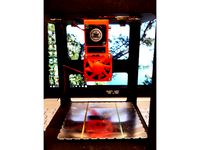
I was looking for a reel cover on thinghiverse to prevent the material in use from getting dirty or damp but having little space available I wanted one to be placed on top of the machine. The mesh containers were too large and all table or wall mounted so I designed one for my needs to "measure" the coils usually used: Sunlu and eSun in my case.
Questi stl sono migliorati rispetto alla mia copertura in foto. Non ho ristampato perché tra le varie prove ho consumato molto materiale.
l'unico problema che ci potrebbe essere è dato dalla lunghezza della chiusura che magari non serri bene. File "cermiera1.stl " facilmente modificabile allungandolo o accorciandolo.
Tengo a precisare che la chiusura è un remix di una trovata su thingiverse di cui pero non ritrovo il link
Questa copertura tolto il logo e modificando il basamento è adattabile ad altre macchine
IMPORTANTE:
DIMENSIONE BOBINE MAX 200 X 65
Spero vi sia utile
ps:
si possono mettere anche bustine di silica gel dessiccanti all'interno delle bobine.
materiali utilizzati:
nr 6 viti m4x10 svasate e relativi dadi per fissaggio cerniera alle due meta inferiore e superiore
nr 2 viti m6x20 svasate per fissaggio meta inferiore al basamento et4
nr 2 viti m5x30 svasate in sostituzione di quelle originali per fissare il basamento et4 alla macchina
nr 6 viti m3x20 svasate (da ritagliare poi) e relativi dadi per il fissaggio della chiusura alle due meta inferiore e superiore
nr 4 cuscinetti 608 (22x8x7)
nr 1 vite m4x70 (barra filettata tagliata a misura) per unione cerniere inferiore e superiore
ho realizzato i telai finestra e relativa sagoma per chi volesse mettere o meno il vetro di controllo.consumo materiale
i pezzi della chiusura vanno stampati al 100% di riempimento per una maggiore solidità
ho aggiunto il centratore asse z al basamento et4 per chi ancora non lo avesse da utilizzare con un cuscinetto 608
Summary
The photos I have posted are slightly different from the stl files.
These are better than my coverage in the photo. I have not reprinted because between the various tests I consumed a lot of material.
the only problem that could be given by the length of the closure that maybe does not tighten well. File "cermiera1.stl" easily editable by lengthening or shortening it.
I would like to clarify that the closure is a remix of a gimmick on thingiverse of which, however, I do not find the link
This cover removed the logo and modifying the base is adaptable to other machines
IMPORTANT:
MAX SPOOL SIZE 200 X 65
I hope you find it useful
ps:
sachets of desiccant silica gel can also be placed inside the coils.
used materials:
6 m4x10 countersunk screws and relative nuts for fixing the hinge to the two lower and upper halves
2 countersunk screws m6x20 for fixing the lower half to the base et4
2 countersunk screws m5x30 to replace the original ones to fix the base et4 to the machine
6 m3x20 countersunk screws (to be cut later) and relative nuts for fastening the closure to the two lower and upper halves
4 bearings 608 (22x8x7)
1 screw m4x70 (threaded bar cut to size) for joining the lower and upper hinges
I made the window frames and relative shape for those who want to put the control glass or not. material consumption
closure pieces are molded at 100% fill for added strength
I added the z axis centering device to the et4 base for those who still would not have to use it with a 608 bearing
Print settings
Rafts:
No
Supports:
No
Resolution:
0.2
Filling:
30
Filament_brand:
Sunlu
Filament_color:
black
Material_filament:
pla plus
Note :
if you have any doubts about the assembly, please ask Greetings to all
How I designed it
I was looking for a reel cover on thinghiverse to prevent the material in use from getting dirty or damp but having little space available I wanted one to be placed on top of the machine. The mesh containers were too large and all table or wall mounted so I designed one for my needs to "measure" the coils usually used: Sunlu and eSun in my case.
Similar models
thingiverse
free

arduinomega base by imagecar
...duino mega;
richiede 4 viti autofilettanti da 2 mm per il fissaggio della scheda,
4 viti da 3mm per il fissaggio della basetta.
3dwarehouse
free

Cerniera per porte
...niera in acciaio e rondella di ottone ad ali rotanti corredata di finte viti in ottone per il fissaggio #acciaio #cerniera #porta
3dwarehouse
free

Telo in PVC di copertura per struttura in legno , fissaggio corda e bottoni
...tto il nostro telone in pvc prodotto su misura . il telone ha il fissaggio con corda elastica e bottoni avvitati alla struttura .
thingiverse
free

Tripod GoPro to logitech by ermejopeggio
...giverse.com/thing:2038801
così come la vite di bloccaggio viene da "glenchung" https://www.thingiverse.com/thing:278871
thingiverse
free
Mini laser engraver supercarver mod by pulcepulce
...con il diametro delle pale di circa 23mm.
laltra versione ha il foro della ventola da 20mm, valutate voi quale fa al caso vostro.
grabcad
free

Intel Realsense D435 Case
... parti stampate, le altre due viti servono per il fissaggio dell'assieme.
se interessati ad eventuali modifiche contattatemi.
thingiverse
free

Lattepanda Bottom case by Smilzomv
...conda versione che riduce altezza del case inferiore che rende tutto più sottile e idoneo per lo spazio che ho disponibile
grazie
thingiverse
free

Bugs2 Mini Flame Wheel Style by MR01
...preciso sulla base quindi posizionatelo con cura, avrei voluto allargare o allungare la base ma non ho le capacità 3d necessarie.
thingiverse
free

Cr10s support by Smilzomv
... filettatura.
per le aste 4 viti m5.
dadi t-slot m5.
aggiungo file stp se ritenete di apportare modifiche per la vostra stampante
thingiverse
free

blocca tappetini opel vivaro by bigioman
...erlo resistente alle alte temperature che si raggiungono d'estate nell'abitacolo di un auto ho deciso di stamparlo in abs


Et4
3d_export
$200

Modern Vespa Collection 3D Model
...modern contemporary scooter motorcycle 200 rally p150x 150 125 et4 lx 1972 1978 1996 2005 2010 italian european vintage...
thingiverse
free

ET4 fanduct modified
...et4 fanduct modified
thingiverse
anet et4
thingiverse
free

et4 by zaris299
...et4 by zaris299
thingiverse
thingiverse
free

Anet Et4 Box
...anet et4 box
thingiverse
tool box for anet et4
thingiverse
free

Box for Anet ET4
...box for anet et4
thingiverse
this is a simple box for tool of anet et4
thingiverse
free

Anet ET4+ Nozzle Fan by Tronicpixel
...anet et4+ nozzle fan by tronicpixel
thingiverse
anet et4+! fan duct upgrade. not sure if it fits to normal et4 and et4 pro
thingiverse
free

Anet ET4 senzor holder
...anet et4 senzor holder
thingiverse
anet et4 senzor holder
thingiverse
free

Anet ET4 Light mount
...anet et4 light mount
thingiverse
anet et4 light mount
thingiverse
free

Anet ET4 Nozzle Nut
...anet et4 nozzle nut
thingiverse
anet et4 nozzle touch sensor nut
thingiverse
free

ET4 Cooler by raymans2
...raymans2
thingiverse
was having deformation issues with my other et4 cooler (printing @ 230-240), so i came up with this one....
Copertura
3d_export
$20

Tetto in coppo 3D Model
...tetto in coppo 3d model 3dexport tetto copertura architettura esterno costruzioni edilizia materiale tetto in coppo 3d...
thingiverse
free

key cover - copertura per chiavi by bobosquicci
...key cover - copertura per chiavi by bobosquicci
thingiverse
key cover - copertura per chiavi
sketchfab
$99

Modello per copertura e intorno
...lo per copertura e intorno
sketchfab
modello per copertura e intorno - buy royalty free 3d model by gallareto55 (@epochemoderne)
thingiverse
free

Copertura voltometro KOSO by AlexGRP
...copertura voltometro koso by alexgrp
thingiverse
involucro protezione voltometro koso
thingiverse
free

motorcycle radiator cover (Copertura radiatore) by TeoN2o
...a wr 125 2001 motorcycle radiator cover, protects the radiator allowing the motorcycle to reach temperature safely even in winter
thingiverse
free

Terminale di copertura profilo alluminio porta pavimento calpestabile - by Stebo
... "blindato" by effepi srl -
fb - codi 3d :https://www.facebook.com/pages/codi-calcolatori/265254070350876?ref=bookmarks
thingiverse
free

cover x8r s800 by danielebenini
...cover x8r s800 by danielebenini thingiverse copertura ricevente frsky x8r , x9r l8r l9r su s800...
thingiverse
free

Cover pulley axis y ender 3 pro by Maker3D_82
...pulley axis y ender 3 pro by maker3d_82 thingiverse copertura per puleggia asse y montaggio ad...
thingiverse
free

Copertina sx per asse Z . Artillery X1 / Copertura sinistra per l'asse Z. Artiglieria X1 by Deku83
...joy it.
happy printing and have fun
and if you want to offer a coffee for this job, i am grateful to you.
www.paypal.me/123dmania
thingiverse
free

Coperchio per scheda di azionamento Hictop 3DP12 by Enugenio
...di azionamento hictop 3dp12 by enugenio thingiverse cover di copertura per scheda di azionamento stampante hictop...
Bobina
turbosquid
$3

soporte 3dup bobina 1000g
... available on turbo squid, the world's leading provider of digital 3d models for visualization, films, television, and games.
thingiverse
free

Bobina
...bobina
thingiverse
ach jo
thingiverse
free

PORTA BOBINA by Salvatore77
...porta bobina by salvatore77
thingiverse
porta bobina
thingiverse
free
Adattatore bobina by andrea00
...adattatore bobina by andrea00
thingiverse
adattatore per bobina stampante 3d
thingiverse
free
PORTA BOBINA by mtc
...porta bobina by mtc
thingiverse
porta bobina per stampante sharebot ng
thingiverse
free

Soporte Bobinas COLIDO3D para bobinas estrechas by Mr_Rope
...e un soporte de bobinas de filamento para la impresora colido, pudiendo soportar bobinas de agujero más estrecho, como las de bq.
thingiverse
free

Centrador Bobina by StzMakers
...a by stzmakers
thingiverse
centrador de bobina para que al girar la bobina esta no gire a trompicones y ruede de forma sencilla.
thingiverse
free

supporto bobina by corrado-tusa
...supporto bobina by corrado-tusa
thingiverse
supporto per la bobina.
thingiverse
free

Soportes de Bobinas by ldmaroto
...te-a.stl : diametro de bobina = 57.2 mm
soporte-b.stl : diámetro de bobina = 51.8 mm
soporte-c.stl : diámetro de bobina = 38.4 mm
thingiverse
free

Suporte de bobina para eletroímã
...suporte de bobina para eletroímã
thingiverse
bobina
E
3ddd
$1
WALL-E
...wall-e
3ddd
wall-e , робот
wall-e
3d_export
$100

e-rickshaw
...e-rickshaw
3dexport
e-rickshaw- it have 3d model of passenger e-rickshaw
3d_ocean
$12
Wall E
...wall e
3docean
character robot wall e
its a 3d model of wall e….
turbosquid
$68
Model-E Droids 2-E Q-E Star Wars
... available on turbo squid, the world's leading provider of digital 3d models for visualization, films, television, and games.
cg_studio
$45

Model-E Droids 2-E Q-E Star Wars3d model
....3ds .c4d .obj .vue - model-e droids 2-e q-e star wars 3d model, royalty free license available, instant download after purchase.
3d_export
$100
e-rickshaw
...e-rickshaw
3dexport
e-rickshaw design for passenger it have all mechanical component
design_connected
$7
Cone E
...cone e
designconnected
bonaldo cone e computer generated 3d model. designed by pasini, ennio.
3ddd
$1

Wall-E NEW
...wall-e new
3ddd
wall-e , робот
wall-e
design_connected
$29

Extrasoft E
...extrasoft e
designconnected
living divani extrasoft e computer generated 3d model. designed by lissoni, piero.
3ddd
$1

E-Turn
... скамейка
современная скамейка фирмы kundalini.
модель e-turn.
дизайнер brodie neil.
размеры: h 42 cm l 185 cm w 54 cm