Thingiverse
Cooling Fan/Shroud with 5cm Blower and Sensor for Wanhao D6/Ultimate by Empiricus
by Thingiverse
Last crawled date: 3 years ago
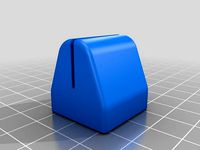
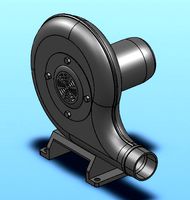
Finally as much cooling air flow as you want thanks to the EBM-PAPST RLF35-8/14N blower.
Version 11 M12 with stronger attachments on the left side.
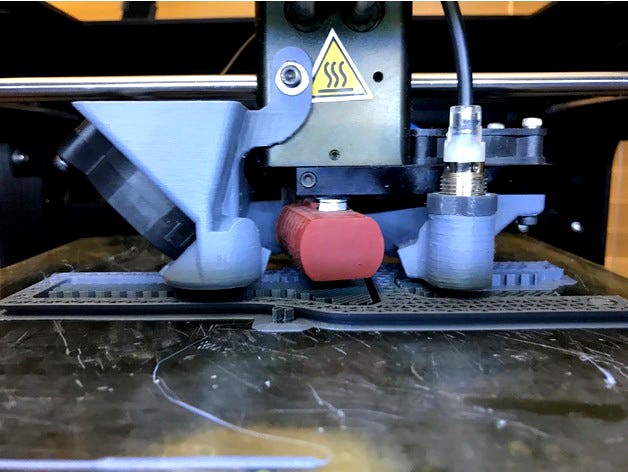
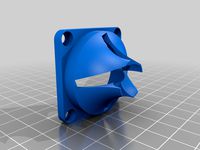
Version 10 M12 has an internal fin to direct more air out of the middle nozzle. This version has three larger nozzles and larger duct volume that extends to the back. To optimize the distance between the nozzles and the heatblock (shown with silicone boot) and air flow to the front turn the heat block as shown by about 25 degree.Thanks to Reflector for exploring the space behind the print head assembly. I was conservative there as I don't want to impede on the print area as I use every mm of it.
Version 6 and 7 have 4 nozzles. Version 7 has areas removed that might not be necessary and to expose the cooling block more to airflow. Otherwise it is the same as Version 6. I used the 4 nozzle version for months without issues so this is a safe bet.
Version 7 M12 5015 may fit other 5cm blowers. Although you may have to shorten the funnel to get it to fit in the available space on the printer.
This is designed to be printed from the bottom up with little support, across the blower entry, the left fixtures and right attachment sites. The nozzles print fine without support with the 4 nozzle version but need support for the three nozzle version,
This shroud will not extend beyond the printer dimensions nor limit the print area. You need 3x 20mm M3 (the original screws), 2x 5mm M3, 2x 10mm M3 and one M3 nut. I just tapped the back hole for the M3 screw to fix the EBM-PAPST RLF35-8/14N Blower in place. Also it snaps into the shroud.
I use a silicone boot and no heating problems at 250C and 100% fan power. Not sure how that would work out without insulation on the heat block.
I printed this in PETG 0.150 mm resolution. ABS will be fine as well. If you print with ABS for extra heat resilience the thread for the probe maybe very tight. Screwing the probe in and out repeatedly before installing the shroud will slowly widen the thread.
M12x1mm screw in mount for a M12 proximity sensor. Same position as in 1bigpig's probe mount http://www.thingiverse.com/thing:2081168. Install and setup instructions can be found there. Also included is a M12x1mm nut just because the printer can print it perfectly now.
The probe is the Omron Manufacturer Part #: E2B-M12KN08-WP-B1 2M which is PNP and it works flawlessly with a 7805 to reduce voltage down to 5V and the PNP Configuration.h of the Marlin duplicator 6 firmware. This probe has a working distance of 8mm in a M12 form factor. That translates into about 4-5mm for aluminium it appears.
I first tried with an NPN probe but couldn't get it to work and after checking into this I also don't understand how an NPN could possibly work with a 7805 wired as shown in thing 2081168. But all these induction probes have their own integrated circuits that may make a difference. Make sure you have that circuit schematics if you try something different. Also detection distance of these is given in relation to detecting iron. Al is much less conductive so distance is about half. That is why you want the Omrons with the double distance detection.
Screw the probe in so that it is flush with the bottom of the shroud as a starting point. Instead of setting Z offsets I just adjust the probe distance by turning it in the thread. This setup works nicely with a 1mm PEI sheet glued on the build plate. There should be enough space for a 3mm glass plate if anyone uses those.
The fan on the cooling block is a EBM PAPST 414F AXIAL FAN, 40MM, 24VDC - no vibrations anymore.
Added version 11 without the probe mount.
Version 11 M12 with stronger attachments on the left side.
Version 10 M12 has an internal fin to direct more air out of the middle nozzle. This version has three larger nozzles and larger duct volume that extends to the back. To optimize the distance between the nozzles and the heatblock (shown with silicone boot) and air flow to the front turn the heat block as shown by about 25 degree.Thanks to Reflector for exploring the space behind the print head assembly. I was conservative there as I don't want to impede on the print area as I use every mm of it.
Version 6 and 7 have 4 nozzles. Version 7 has areas removed that might not be necessary and to expose the cooling block more to airflow. Otherwise it is the same as Version 6. I used the 4 nozzle version for months without issues so this is a safe bet.
Version 7 M12 5015 may fit other 5cm blowers. Although you may have to shorten the funnel to get it to fit in the available space on the printer.
This is designed to be printed from the bottom up with little support, across the blower entry, the left fixtures and right attachment sites. The nozzles print fine without support with the 4 nozzle version but need support for the three nozzle version,
This shroud will not extend beyond the printer dimensions nor limit the print area. You need 3x 20mm M3 (the original screws), 2x 5mm M3, 2x 10mm M3 and one M3 nut. I just tapped the back hole for the M3 screw to fix the EBM-PAPST RLF35-8/14N Blower in place. Also it snaps into the shroud.
I use a silicone boot and no heating problems at 250C and 100% fan power. Not sure how that would work out without insulation on the heat block.
I printed this in PETG 0.150 mm resolution. ABS will be fine as well. If you print with ABS for extra heat resilience the thread for the probe maybe very tight. Screwing the probe in and out repeatedly before installing the shroud will slowly widen the thread.
M12x1mm screw in mount for a M12 proximity sensor. Same position as in 1bigpig's probe mount http://www.thingiverse.com/thing:2081168. Install and setup instructions can be found there. Also included is a M12x1mm nut just because the printer can print it perfectly now.
The probe is the Omron Manufacturer Part #: E2B-M12KN08-WP-B1 2M which is PNP and it works flawlessly with a 7805 to reduce voltage down to 5V and the PNP Configuration.h of the Marlin duplicator 6 firmware. This probe has a working distance of 8mm in a M12 form factor. That translates into about 4-5mm for aluminium it appears.
I first tried with an NPN probe but couldn't get it to work and after checking into this I also don't understand how an NPN could possibly work with a 7805 wired as shown in thing 2081168. But all these induction probes have their own integrated circuits that may make a difference. Make sure you have that circuit schematics if you try something different. Also detection distance of these is given in relation to detecting iron. Al is much less conductive so distance is about half. That is why you want the Omrons with the double distance detection.
Screw the probe in so that it is flush with the bottom of the shroud as a starting point. Instead of setting Z offsets I just adjust the probe distance by turning it in the thread. This setup works nicely with a 1mm PEI sheet glued on the build plate. There should be enough space for a 3mm glass plate if anyone uses those.
The fan on the cooling block is a EBM PAPST 414F AXIAL FAN, 40MM, 24VDC - no vibrations anymore.
Added version 11 without the probe mount.
Similar models
thingiverse
free

Another Hemera mount for Railcore by Empiricus
...t 30x30 cm xy
support only around the opening for the blower.
new blower shroud as the thread for the omron probe was too tight.
thingiverse
free

Hemera mount for Railcore II by Empiricus
...t for using the e3d hemera and volcano hot end on a railcore.
uses
ebm-papst rlf35-8/14n 5cm blower.
omron e2b-m12kn08-wp-c1 2m
thingiverse
free

Cooling Fan/Shroud with 4cm Blower and Sensor for Wanhao D6/Ultimate by Empiricus
...bigpig's probe mount http://www.thingiverse.com/thing:2081168 where you also find the description on how to set up the probe.
thingiverse
free

Ultimaker 2 Fan Shroud Mount Blower Fan by iopplm
...ans. 2 x washer on the left as when mount so that there is a small gap between the fan shroud and the nozzle heatsink.
thank you.
thingiverse
free

AM8/E3D Hemera Rear Mount Part 5015 Cooling Fan - Mount and Duct
...hat doesn't block the fan.
the pillow block will likely need to be tapped to fit the screw that you use. i used an m4 screw.
thingiverse
free

Lulzbot Taz Nozzle Cooling Fan Shroud by Scuttlebot
...rolled by the gcode and adjusts to your print.
this model is still in beta and being tweaked. stay tuned for the final version.
thingiverse
free

Blowie Mk1 | custom cooling for |Alfawise U30 & U20|Longer lk4 pro| by DonJon99
...(optional))
4 m3/20mm (heat sink fan)
2 m3/6mm (plate screws)
2 m3/17mm (bltouch)
4 m4/22mm (blower fans)
nut
14 m3
4 m4
grabcad
free

ebm papst fan
...ebm papst fan
grabcad
ebm-papst w2e142-bb fan
150 x 172 x 38mm
ventilatore assiale
thingiverse
free

Prusa i3 Gear Extruder Redesign for E3D hotend with blower cooling by beyondwind
... mount with 40mm fan shroud and blower nozzle.
added cable guide on top for split loom tubing.
gear 45t and 11t herringbone
grabcad
free

EBM Papst Centrifugal Fan
...ebm papst centrifugal fan
grabcad
ebm papst centrifugal fan 165 x 162 x 146mm
designed with solidworks 2020
Empiricus
thingiverse
free

Starfish model by Empiricus
...nic looking surface. was meant to replace dried sea stars as props. glue both parts together. printed with 0.2 mm nozzle in petg.
thingiverse
free

Ear sore relief for masks by Empiricus
...empiricus
thingiverse
relief to prevent ear sores from elastics of masks. you can use a hairdryer or hot water to bend in shape.
thingiverse
free

Mavic Pro Legs by Empiricus
...milar to the original part.
version 2 and 3 legs have thicker attachment plates.
printed this carbon fiber petg and regular petg.
thingiverse
free

GoPro Quick Release Mount by Empiricus
...o 3 plus with or with out weather case. included are some extensions to adjust the mount.
fits www.thingiverse.com/thing:2450904
thingiverse
free

Prusa face shield RC3 text removed by Empiricus
...ield rc3 text removed by empiricus
thingiverse
prusa rc3 text removed for faster printing. saves 30 minutes on a print of four.
thingiverse
free

BMG-X2 Empiricus BLTouch shroud and thicker bridge.
...ce the ducts properly from the nozzles, and the left shroud is modified to fit a bltouch at the right height from the nozzle tip.
thingiverse
free
Hemera mount for Railcore II by Empiricus
...t for using the e3d hemera and volcano hot end on a railcore.
uses
ebm-papst rlf35-8/14n 5cm blower.
omron e2b-m12kn08-wp-c1 2m
thingiverse
free

Camera attachment for Rode Microphone Wireless Go by Empiricus
...e wireless go by empiricus
thingiverse
camera attachment for rode microphone wireless go with 1/4 inch thread. printed in petg.
thingiverse
free

Camera Utility Shoe Mounts by Empiricus
... mounts with an m2 screw to secure the microphone/light/flash to the mount.
three versions:
1/4 screw
1/4-20 thread
3/8-16 thread
thingiverse
free

Small Monitor VESA Mount and Stand by Empiricus
...e
small stand with vesa 75mm mount for 7-8 inch monitors. needs a 3cm m6 screw, washers and nut. 4x m4 8mm to mount the monitor.
D6
turbosquid
$60

Fokker D6
...rbosquid
royalty free 3d model fokker d6 for download as 3ds on turbosquid: 3d models for games, architecture, videos. (1157724)
turbosquid
$2

Generic D6
... available on turbo squid, the world's leading provider of digital 3d models for visualization, films, television, and games.
3d_export
$10

dnd dice d6
...xport
d6 dice model, low poly and 3d printable<br>for further questions, information or requests, feel free to contact me.
turbosquid
$16

Current Front Door D6
...model current front door d6 for download as max, c4d, and fbx on turbosquid: 3d models for games, architecture, videos. (1294332)
3d_export
$2

dice d6 game ready pbr
...lent detail. 5 textures in a box. 2k and 512 resolution textures . included mesh: 2k resolution textures include: included files:
3d_export
$12

industrial desk lamp d6
... real object. 3. lights and cameras are included in the scenes renders using vray * renders are made in 3ds max 2018 using vray 5
3d_export
$209

volvo penta d6 - 330 -
... in this model, please do not hesitate to contact us, we are looking forward to continuously dealing with you.<br>markos 3d
3d_export
$209

penta d6 400 engine
... in this model, please do not hesitate to contact us, we are looking forward to continuously dealing with you.<br>markos 3d
3d_export
$209

Airbus engine tp400-d6
... in this model, please do not hesitate to contact us, we are looking forward to continuously dealing with you.<br>markos 3d
3ddd
$1

Arredamenti Amadeus art.1623
...итальянской фабрики arredamenti, коллекция amadeus, арт. 1623 размеры: l96 d6 ...
5Cm
3ddd
$1

Люстра Osgona
...osgona , lightstar люстра osgona 790031, bronze d27 h58-158 (+-5cm ...
3d_export
$15

zip fastener for outerwear with 5cm teeth rows
... mesh has the same number of polygons as the original mesh, therefore its resolution may be insufficient for quality 3d printing.
3ddd
$1

Anna G. Miniature Corkscrew
...chrome-plated zamak designed by alessandro mendini dimensions: 9.7cm x 5cm x...
3ddd
$1

clock karlsson discrete
...environment will be come a statement. diameter 36cm height 5cm design by chantal...
3d_export
$9

electric plug
...general model is built to real-world scale dimensions: width: 5cm depth: 3,6 cm height: 5cm pin diameter: 0,48cm size...
3d_export
$5

walkie talkie
...consists of 14666 faces and 15715 vertices. -model dimensions: 5cm x 3.8cm x 24.2cm -units in all formats:...
3d_export
$19

slim beverage can ending with lid
...dimension mm: 50mm x 50mm x 6mm<br>- dimension cm: 5cm x 5cm x 0.6cm<br>- dimension inches: 1.96" x 1.96"...
3d_export
$14

microwave
...width: 50cm depth: 38cm height: 27cm plug dimensions: width: 5cm depth: 3,6 cm height: 5cm pin diameter: 0,48cm size...
3d_export
$13

electric teapot
...width: 21cm depth: 16cm height: 26cm plug dimensions: width: 5cm depth: 3,6 cm height: 5cm pin diameter: 0,48cm size...
3d_export
$19

Spray bottle 01
...5 edges: 0<br>object:<br>- dimension cm: 5cm x 5cm x 19.5cmlt;br>- dimension inches: 1.95" x 1.95" x 7.69"<br>- model parts:...
Wanhao
thingiverse
free
Wanhao Logo Plate / Wanhao Logo Schild by JMDesigns
...wanhao logo plate / wanhao logo schild by jmdesigns
thingiverse
wanhao logo plate / wanhao logo schild
thingiverse
free
Wanhao logo by nebtio
...wanhao logo by nebtio
thingiverse
wanhao logo
thingiverse
free
Wanhao keychain by Rein3003
...wanhao keychain by rein3003
thingiverse
a keychain with the logo of wanhao
thingiverse
free
Wanhao Di3 v2 Light / Wanhao Di3 v2 Beleuchtung by JMDesigns
...wanhao di3 v2 light / wanhao di3 v2 beleuchtung by jmdesigns
thingiverse
wanhao di3 v2 light / wanhao di3 v2 beleuchtung
thingiverse
free
TUSH For Wanhao by wtmi1992
...tush for wanhao by wtmi1992
thingiverse
the ultimate spool holder, modified for the top of the wanhao control box. fits snug.
thingiverse
free
fanduct wanhao d12 by theopoilmek
...fanduct wanhao d12 by theopoilmek
thingiverse
fanduct pour wanhao d12
thingiverse
free
Wanhao i3 Marlin by johan21
...wanhao i3 marlin by johan21
thingiverse
marlin for wanhao i3 rampsboard 1.4.
thingiverse
free
Wanhao Duplicator i3 by imagineering4
...wanhao duplicator i3 by imagineering4
thingiverse
these are the stl files for the improvements to the wanhao duplicator i3, v2
thingiverse
free

Wanhao D6 filament guard
...wanhao d6 filament guard
thingiverse
this is a filament guard for wanhao d6 machine to avoid the filament unrolling
thingiverse
free
Wanhao Duplicator i3 Model by Hilde3D
...wanhao duplicator i3 model by hilde3d
thingiverse
wanhao duplicator i3 model
Shroud
3d_export
$500

Centrifugal pump volute casing with impeller
...casing with impeller 3dexport volute casing with impeller and shroud ...
3d_export
$35

The Holy Face base relief 3D Model
...the holy face base relief 3d model 3dexport shroud turin veronica veronica's veil gospel ikon jesus holy face...
3d_export
$20
present car cloth presentation transport transportation shape concepts show celebration cover showro
...transportation shape concepts show celebration cover showroom covered revealin shroudd cover covering tarp draped fabric cloth showroom reveal revealing...
3d_export
$5

Lockheed F-117 Nighthawk lowpoly stealth bomber
...initial operating capability status in 1983. the aircraft was shroudd in secrecy until it was revealed to the public...
3d_export
$49
kriss vector gen 2 sub-d
...rear flip sight.<br>- vector ejection port.<br>- vector crb square shroud / 16"" sliencer.<br>- ds150 stock.<br>- .ma (maya 2020 ascii)<br>-...
3d_export
$10

vichy dining table
...in oak, sycamore and walnut marquetry.<br>even if the restaurant shroud the vichy in a long table cloth, two slender...
3d_export
$500

us navy pcu sterett ddg-104 arleigh burke class destroyer flight iia max
...the position has been shifted.<br>q. where are the exhaust shroud for the stacks?<br>a. since ddg-89, the exhaust system was...
thingiverse
free

shroud by samshay317
...shroud by samshay317
thingiverse
shroud
thingiverse
free

Fan Shroud
...fan shroud
thingiverse
this is a fan shroud for a 140mm fan
thingiverse
free
40mm fan shroud
...40mm fan shroud
thingiverse
40mm fan shroud
Blower
3d_export
$5
ball blower
...ball blower
3dexport
ball blower
3d_export
$10
engine blower assambly
...engine blower assambly
3dexport
engine blower assambly
3d_export
$5
air pipe blower
...air pipe blower
3dexport
air pipe blower
3d_export
$5
air hand blower
...air hand blower
3dexport
air hand blower
3d_export
$5
Blower Boom 3D Model
...blower boom 3d model
3dexport
boom blower
blower boom 3d model bkl1989 63079 3dexport
turbosquid
$44
blower-dxf
... available on turbo squid, the world's leading provider of digital 3d models for visualization, films, television, and games.
turbosquid
$39

Old Blower
...l old blower for download as ma, max, gltf, fbx, obj, and stl on turbosquid: 3d models for games, architecture, videos. (1638848)
3d_export
$7
zy series centrifugal blower
...zy series centrifugal blower
3dexport
zy series centrifugal blower
3d_export
$5
root blower compressor
...oot blower compressor
3dexport
you will get both .stl and .sldprt format of root blower compressor from here at very cheap rate.
turbosquid
$5
V8 engine with blower
... available on turbo squid, the world's leading provider of digital 3d models for visualization, films, television, and games.
Ultimate
turbosquid
$3

Ultimate Grave
...model ultimate grave for download as blend, obj, stl, and fbx on turbosquid: 3d models for games, architecture, videos. (1636144)
turbosquid
$79

ULTIMATE GIRAFFE
... available on turbo squid, the world's leading provider of digital 3d models for visualization, films, television, and games.
turbosquid
$5
The Ultimate Bowl
... available on turbo squid, the world's leading provider of digital 3d models for visualization, films, television, and games.
turbosquid
$1

Ultimate Revolver
... available on turbo squid, the world's leading provider of digital 3d models for visualization, films, television, and games.
3ddd
$1

Kimera Ultimate DVD System
...kimera ultimate dvd system
3ddd
dvd
schneider kimera ultimate dvd system
cg_studio
$49

The Ultimate Lioness3d model
... model
cgstudio
.max .obj .fbx - the ultimate lioness 3d model, royalty free license available, instant download after purchase.
turbosquid
$5

Ultimate Brick Castle
...yalty free 3d model ultimate brick castle for download as fbx on turbosquid: 3d models for games, architecture, videos. (1335247)
turbosquid
$31

Zombie Ultimate pack
... available on turbo squid, the world's leading provider of digital 3d models for visualization, films, television, and games.
turbosquid
$8

Barrels Ultimate Pack
...ls ultimate pack for download as ma, max, obj, fbx, and blend on turbosquid: 3d models for games, architecture, videos. (1353281)
turbosquid
$25

Ultimate "F" Bomb
... available on turbo squid, the world's leading provider of digital 3d models for visualization, films, television, and games.
Sensor
3d_export
free

parking sensor
...parking sensor
3dexport
car parking sensor
turbosquid
$1

Sensor
... available on turbo squid, the world's leading provider of digital 3d models for visualization, films, television, and games.
3d_export
$5

Smoke sensor
...port
smoke sensor, can be an impressive element for your projects. easy to use, realistic image, low polygon, quality materials.
3d_export
$5

Air Quality Sensor v1
...air quality sensor v1
3dexport
air quality sensor v1
3d_export
$15

float sensor
...e up render. - all parts and materials are logically named. other formats ================= - collada (.dae) - autodesk fbx - obj
turbosquid
$26

Wind sensor C
...free 3d model wind sensor c for download as 3ds, obj, and fbx on turbosquid: 3d models for games, architecture, videos. (1328943)
turbosquid
$26

Wind sensor B
...free 3d model wind sensor b for download as 3ds, obj, and fbx on turbosquid: 3d models for games, architecture, videos. (1328168)
3d_export
$5

ultrasound sensor
...ivers convert ultrasound into electrical signals, and transceivers can both transmit and receive ultrasound. export in: -obj -fbx
3ddd
free

Вытяжка Shindo pallada sensor
... вытяжка
вытяжка shindo pallada sensor. в двух размерах - 600 и 900. текстуры в комплекте.
turbosquid
$52

Wind sensor A B C
...
royalty free 3d model wind sensor a b c for download as fbx on turbosquid: 3d models for games, architecture, videos. (1408406)
Fan
3d_export
$5

fan
...fan
3dexport
fan 3d model, table fan, fan, electric fan, ventilator
archibase_planet
free

Fan
...fan
archibase planet
fan large fan
fan out n260707 - 3d model for interior 3d visualization.
archibase_planet
free

Fan
...fan
archibase planet
fan ceiling fan ventilator
fan stealth n300615 - 3d model (*.gsm+*.3ds) for interior 3d visualization.
3d_export
$15

fan
...fan
3dexport
is an ancient fan
3ddd
$1

Fan-C-Fan by marco gallegos
...n-c-fan by marco gallegos
3ddd
вентилятор , marco gallegos
fan-c-fan by marco gallegos
3d_export
$10

fan
...fan
3dexport
a detailed fan designed for home or space blowing is now available for only 19.99!
turbosquid
$1

Fan
...fan
turbosquid
free 3d model fan for download as on turbosquid: 3d models for games, architecture, videos. (1427865)
turbosquid
$14

Fan
...fan
turbosquid
royalty free 3d model fan for download as on turbosquid: 3d models for games, architecture, videos. (1415642)
3ddd
$1

Светильник Fan
...светильник fan
3ddd
fan , italamp
светильник fan, производитель italamp
turbosquid
$25

Fan
...fan
turbosquid
royalty free 3d model fan for download as c4d on turbosquid: 3d models for games, architecture, videos. (1483246)
Cooling
turbosquid
free
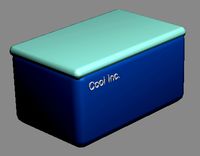
Cool Inc. Cool Box
... available on turbo squid, the world's leading provider of digital 3d models for visualization, films, television, and games.
3d_export
$5

cool penguin
...cool penguin
3dexport
cool penguin
turbosquid
$1
cooling
... available on turbo squid, the world's leading provider of digital 3d models for visualization, films, television, and games.
3d_export
$26
cooling tower
...ers.<br>model with full detail in real size. all nodes and bolted connections are built. it was designed for nuclear power.
3ddd
$1
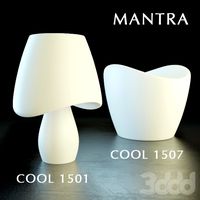
Mantra Cool
...14 версиях и obj-файл, а также материал для включенного и для выключенного светильника. turbosmooth/meshsmooth при необходимости.
3d_export
$5
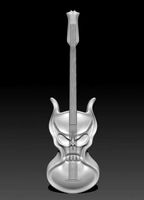
cool electric guitar
...cool electric guitar
3dexport
cool electric guitar
turbosquid
$5

Cooling glass
...quid
royalty free 3d model cooling glass for download as obj on turbosquid: 3d models for games, architecture, videos. (1193829)
turbosquid
$30

CPU Cooling
...royalty free 3d model cpu cooling for download as max and fbx on turbosquid: 3d models for games, architecture, videos. (1386263)
turbosquid
$5

Cool CLoud
...
royalty free 3d model cool cloud for download as ma and obj on turbosquid: 3d models for games, architecture, videos. (1572300)
3d_export
$5
table cooling fan
...table cooling fan
3dexport
table cooling fan made of black plastic. individual small size cooling fan for office desk.