Thingiverse

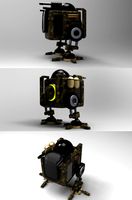
Contact Machine by bobcap1957
by Thingiverse
Last crawled date: 3 years, 4 months ago
This is my version of the machine from the movie Contact. I love the movie and always thought it'd be cool to make one, So I did! It's still a little work in progress with the finishing touches but I thought I'd share it anyway.
I printed it on my Creality CR-6 SE printer. It doesn't show as an option.
The machine was printed without supports but the rings I added custom supports under the axles. I used 5x10x4mm bearings in all places that move. I bought the bearings off of Ebay. I needed to use a "W" drill bit to clearance the holes so all the bearings would fit tight. Be VERY careful drilling out the holes!! Slow speed and a steady hand. The Motor tower is designed to have a 5mm brass shaft run through it if you'd like to make it operational. The one problem I had with the brass is I needed to sand down the outside to get it to fit into the bearings. It was slightly oversized.
In the motor tower there is a bearing on the bottom and the top. There's 1 bearing where the ring axle comes into it. On the Support tower there are 2 bearings in there. One pushed to the back and one at the edge. If you want to make it a static model you will still need to add the bearings in the rings and the towers BUT you don't need to put the 5mm shaft in or the gears. If you do want to make it run, the gears need to have a hole drilled and tapped for a 4-40 set screw. I then put the gear on the shaft and fed it through from the top. Then I inserted the ring axle and placed the gear on it as I pushed it in. once all the way in I pushed the 5mm shaft up to engage the gears together.
The rings have the same bearings in them. I drilled them out with the "W" drill bit and inserted the bearing. Then I cut the ends of the axles off of each ring so they would just fit inside the bearings without going past the outer edges. I then covered the bearings with little cut pieces of 10mm Plastructs plastic. You can spread the rings to get them into each other. If you do it right they will spin wildly when you hold the #4 ring and spin it.
There is a bar on the Support arms that you could put a wire through to make them go up and down from a solenoid underneath. The motor I used is a 30 RPM motor with a 5mm shaft from Ebay. I tried to up load a video but can't seem to make it small enough to upload. :( I painted it with a Stainless Steel Rustoleum spray paint. Being careful to tape off all the bearings.
It was a fun project. I hope to completely automate it with the Support arms releasing first and then the machine start to spin. This will end up on my HO train layout in the near future.
Similar models
grabcad
free

motor housing for geared motor with shaft.
...motor housing for geared motor with shaft.
grabcad
motor housing with bearing support to take up to prevent load to motor shaft
thingiverse
free

Bead chain gear for stepper motors with 5mm shaft, e.g. for Polargraph plotter by rincey12
...printer the 5mm hole was a bit too tight, a bit of work with a 5mm drill fixed this. the m3 makes its own thread when screwed in.
thingiverse
free

Pool Motor Starter by mikeaj
... not, resist the urge to stick any part of your body in there to pop it off. smart money has you buying a new pool motor pronto.
thingiverse
free

Axial Capra Internal Winch by crazyatvn
...n a real capra. someone please let me know if it will work.
v2 winch file i fixed the holes to be through holes on the gear end.
thingiverse
free

Base plate and axle for Triple gear by henryseg
...mooth. possibly some improvements could be made to the shape of the baseplate and/or axle and/or triple gear to make it smoother.
thingiverse
free

B-Struder - Bowden extruder with MK7 gear + 623ZZ bearing for 1.75mm filament by Barrocas
...ted with an extra 2x m3 large washers, between them and the motor mount (pictured in red), to compensate for the taller mk7 gear.
thingiverse
free

Planetary Gear for 24v motor by yoyitorojo
... added some superglue in the main shaft, and in the smaller ones, i hope its useful for someone!
pd: the gear relation is 3,2 : 1
thingiverse
free

Tank updated Gear Cases for Kyosho RF006 worm gear set by fastmike75
...the 6mm axles and bearings. use the old cases if you drill out your worm to 1/4" shaft and use 1/4"x5/8" bearings.
thingiverse
free

4 mm to 5 mm motor shaft / axle adapter
...o i searched for an adapter to connect a 4mm shaft to a 5mm axle. i could not find anything so i finaly decided to design my own.
thingiverse
free

Planetary gear motor by Branez
...ies the axis.
the shaft is 6mm thick (such bearings i had). on this axis is not a problem to install a wheel or something else
Bobcap1957
thingiverse
free

Modified Chep SD card holder by bobcap1957
...you think.
i printed it flat and used supports for the top. you could probably print it standing on end and not use the supports.
thingiverse
free

beam compass by bobcap1957
...elf. i used supports "touching build plate" and a "raft" because of how the screw prints.
hope you enjoy it!
Machine
archibase_planet
free

Machine
...machine
archibase planet
sewing-machine sewing machine equipment
singer machine- 3d model for interior 3d visualization.
archibase_planet
free

Machine
...hine
archibase planet
percolator equipment coffee-machine
machine n230708 - 3d model (*.gsm+*.3ds) for interior 3d visualization.
archibase_planet
free

Machine
...chibase planet
percolator coffee-machine kitchen equipment
coffee machine - 3d model (*.gsm+*.3ds) for interior 3d visualization.
archibase_planet
free

Slot machine
...ase planet
slot machine slot-machine playing machine
slot machine n260311 - 3d model (*.gsm+*.3ds) for interior 3d visualization.
turbosquid
$7

Machine
...ne
turbosquid
royalty free 3d model machine for download as on turbosquid: 3d models for games, architecture, videos. (1391792)
3d_ocean
$10
War machine
...war machine
3docean
camuflage machine robot war war machine
war machine created in 3dmax 2009 15.497-poly count
turbosquid
$7

machine
...turbosquid
royalty free 3d model machine for download as obj on turbosquid: 3d models for games, architecture, videos. (1452674)
3d_ocean
$12
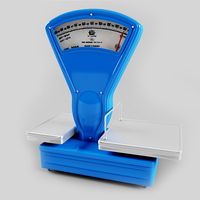
Weighing-machine
...weighing-machine
3docean
market shop weighing-machine
3d model weighing-machine
archibase_planet
free

Sewing machine
...ine
archibase planet
sewing machine sewing-machine
sewing machine n080311 - 3d model (*.gsm+*.3ds) for interior 3d visualization.
archibase_planet
free
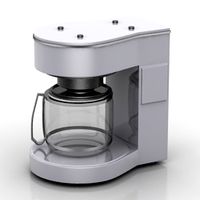
Coffee machine
...se planet
coffee machine percolator coffee-machine
coffee machine n010715 - 3d model (*.gsm+*.3ds) for interior 3d visualization.
Contact
3ddd
$1

contact stool
...red at 0,0,0.
-all object are named.
-all materials are named.
-no unnecessary objects.
detailed enough for close-up renders.
turbosquid
$10

12 Pin Contact
...d model 12 pin contact for download as max, max, fbx, and obj on turbosquid: 3d models for games, architecture, videos. (1678783)
turbosquid
$10

6 Pin Contact
...3d model 6 pin contact for download as max, max, obj, and fbx on turbosquid: 3d models for games, architecture, videos. (1678780)
turbosquid
$10

N-14 Contact
... 3d model n-14 contact for download as max, max, fbx, and obj on turbosquid: 3d models for games, architecture, videos. (1678789)
turbosquid
$30

contact lense holder.max
... available on turbo squid, the world's leading provider of digital 3d models for visualization, films, television, and games.
turbosquid
$25

Contact Lenses & Case
...ct lenses & case for download as obj, fbx, blend, and stl on turbosquid: 3d models for games, architecture, videos. (1358056)
cg_studio
$24

Contact Lens Canister3d model
...medicine vision
.max .3ds .obj - contact lens canister 3d model, royalty free license available, instant download after purchase.
turbosquid
$10

N-8 Contact Support
...el n-8 contact support for download as max, max, fbx, and obj on turbosquid: 3d models for games, architecture, videos. (1678786)
turbosquid
$29

Non-contact infrared thermometer
...ontact infrared thermometer for download as max, fbx, and obj on turbosquid: 3d models for games, architecture, videos. (1580810)
turbosquid
$10

Contact Cast Iron Stool
...cast iron stool for download as 3ds, obj, fbx, blend, and dae on turbosquid: 3d models for games, architecture, videos. (1220615)