Thingiverse

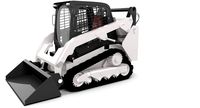
Compact Wade's extruder and X Carriage. by raldrich
by Thingiverse
Last crawled date: 3 years ago
This is not the extruder you're looking for. If you're looking for the extruder referenced in Josef Prusa's i3 design, see http://www.thingiverse.com/thing:24219
After installing http://www.thingiverse.com/thing:12538 , with the extruder tangential to the x-axis, I found that I had caused quite a problem with the Z axis - the drive motor would collide with the printer's frame when Z > 30, and X < 10.
So, it was back to the drawing board - same goals as last time:
1) It had to support LM8UU linear bearings.
2) It had to allow the extruder to be mounted tangentially to the x-axis, so that I could recover the print area that was currently being taken up by the extruder stepper.
3) It had to allow easy adjustment of the belt tension.
4) It had to have a place to mount an optical end-stop flag.
5) It had to provide good clearance for the hot-end.
6) It had to be as narrow as possible, so that it wouldn't reduce my print area.
With three additional goals.
7) The hot-end should be easy to remove, without removing other parts from the printer.
8) The height of the entire assembly (from top of drive gear to nozzle) should be as short as possible.
I ended up sacrificing a bit on point 5, because this is a combined carriage/extruder design, and because the hot-end is mounted higher inside the extruder body than in other designs.
I think I succeeded quite well on points 6 and 8 - it's 89mm long, and 95mm high when assembled.
If you have trouble getting keeping the carriage stuck to the printbed, you can enable the "Anchors" in the .scad. The anchors end up attached at the ends of the carriage, and help keep it all stuck down.
Note: This is a bit of a tricky print, because it uses a lot of bridges to avoid having to use supports. Make sure you have highly calibrated bridge settings, or you'll get a lot of droopy mess
Thanks to Wade Bortz, Josef Prusa, and Greg Frost, who's designs inspired this.
Similar models
thingiverse
free

Sunhokey Prusa i3 - X-axis Carriage (Hot-end Mount) by Knifa
...s a replacement hot-end mount for the x-axis carriage of the sunhokey prusa i3. mine snapped and was crappy so i made a new one.
thingiverse
free

LM8UU X Carriage with Belt Clamps for Prusa Mendel by raldrich
...beltcliptest.stl before committing to the entire object.
thanks to josef prusa, and greg frost, who's designs inspired this.
thingiverse
free

Ron's Dual Extruder by raldrich
..., so that the point where the extruder is mounted to the carriage is separated from where the hot end is mounted to the extruder.
thingiverse
free

Prusa Mount for Makerbot mk7 Extruder by BenJackson
...ravel too far up the barrel. it extruded fine as long as you kept going but if you stopped for a while it would get very sticky.
thingiverse
free

Prusa i3 X Carriage Adapter for Greg's Wade Extruder by Cyrrus
...ured image are for display only and were taken from:http://www.thingiverse.com/thing:27054http://www.thingiverse.com/thing:341689
thingiverse
free

J-Head version of Gyrobot's micro dual extruder by Xander779
...dard mounts on the prusa mendel i2 x-carriage.
i haven't had time to test this design yet, so i can't guarantee it works
thingiverse
free

Greg's Wade Reloaded extruder to standard Prusa i3 X carriage adapter plate. by JadedJak
...ount holes. the extruder uses m4 and the carriage uses m3. i have added holes for a 40mm fan as well and they are spaced at 32mm.
thingiverse
free

Prusa i3 'Rework' EZStruder Mount by AnthonyB
...ter from 3 to 1.75 and the hotend nozzle from 0.5 to 0.3mm, so the extruder may not have been the only contributor to my problem)
cults
free

x-carriage tensioner for greg's wade extruder
...n: http://www.thingiverse.com/thing:798169
i added and universal version for many extruders.
hope it will be useful for others.
thingiverse
free

wade-e3Dv5 base for micro x-carriage by rj11
... extruder paired with an e3dv5 hot-end. it also has a fan shroud that can be mounted on a 40mm fan for cooling the heatsink fins.
Raldrich
thingiverse
free

Reindeer ornament by raldrich
...reindeer ornament by raldrich
thingiverse
a somewhat understated addition to your christmas tree.
thingiverse
free

Gargoyle Pencil Topper by raldrich
...;s goyle, and noticed that with a bit of tweaking, it would make a great halloween giveaway, so i made a pencil topper out of it.
thingiverse
free

Needle Gauge by raldrich
...t it can be used with a "greg's wade" style extruder.
it fits (as shown) on an ordbot, and should fit a prusa i3.
thingiverse
free

Large calibration square by raldrich
....stl - so here it is.
a 100 x 100 x 1 mm hollow square, for calibrating your x and y axis steps/mm, and for squaring your y axis.
thingiverse
free

Stubby Screwdriver by raldrich
...for use in an electric drill.
with a printed handle, and some tiny magnets, i now have exactly the screwdriver i was looking for.
thingiverse
free

Direct drive Wade extruder for Raldrich planetary gearbox by RomanST
...ided to reinvent the wheel once again and design an extruder to use with that gearbox.
not tested yet, will see how good it is.
thingiverse
free

Reprap Teardrop Shot Glass by raldrich
...
i decided i wanted something reprap related, so i designed a shot glass in the shape of a hollowed out, tapered reprap teardrop.
thingiverse
free

Felt LM8UU Surrogate by raldrich
...
this is the same arrangement of bearing surfaces as was used in the original sells mendel design, written small and inexpensive.
thingiverse
free

Akimbo Spool cradle by raldrich
...th ultimachine spools - some adjustment will be needed for spools with different widths, or with a different size of center hole.
thingiverse
free
Ron's Dual Extruder by raldrich
..., so that the point where the extruder is mounted to the carriage is separated from where the hot end is mounted to the extruder.
Wade
3ddd
$1

Wade Tivoli
...wade tivoli
3ddd
tivoli , wade
диван wade tivoli 3dsmax2009 vray
3ddd
$1

Сервант Wade
...сервант wade
3ddd
wade , сервант
сделано по фотографии в corona.
3ddd
$1

Диван Farnham Wade
...диван farnham wade
3ddd
farnham , wade
диван farnham, wade (англия)
turbosquid
$17

WADE BENCH
... available on turbo squid, the world's leading provider of digital 3d models for visualization, films, television, and games.
turbosquid
$199

Wallace Wade Stadium
...ree 3d model wallace wade stadium for download as 3ds and skp on turbosquid: 3d models for games, architecture, videos. (1315361)
turbosquid
$8

Wade Floor Lamp
... available on turbo squid, the world's leading provider of digital 3d models for visualization, films, television, and games.
cg_studio
$139

M4A1 Sherman - Deep wading gear3d model
...
.3ds .c4d .lwo .obj - m4a1 sherman - deep wading gear 3d model, royalty free license available, instant download after purchase.
turbosquid
$6

Ronin LED Table Lamp by Wade Logan
...amp by wade logan for download as mat, 3ds, max, obj, and fbx on turbosquid: 3d models for games, architecture, videos. (1513289)
cg_studio
$99

M4A1 Sherman with Deep wading gear3d model
...wo .c4d .3ds .obj - m4a1 sherman with deep wading gear 3d model, royalty free license available, instant download after purchase.
turbosquid
$6

Cael 31cm LED Table Lamp by Wade Logan
...amp by wade logan for download as mat, 3ds, max, obj, and fbx on turbosquid: 3d models for games, architecture, videos. (1512497)
Carriage
archibase_planet
free

Carriage
...arriage
archibase planet
perambulator baby carriage pram
carriage n250908 - 3d model (*.gsm+*.3ds) for interior 3d visualization.
3d_export
free

carriage
...carriage
3dexport
old fashion carriage model, more files here:
turbosquid
$140

Carriage
...urbosquid
royalty free 3d model carriage for download as max on turbosquid: 3d models for games, architecture, videos. (1482052)
turbosquid
$25

Carriage
...urbosquid
royalty free 3d model carriage for download as max on turbosquid: 3d models for games, architecture, videos. (1285944)
3d_export
free

carriage
...carriage
3dexport
game cart
3d_ocean
$15

Barrel Carriage
...ieval oak old transport wheels wine wood
this model contains a barrel and a carriage. it is a medieval type of wood oak carriage.
turbosquid
$40

Carriage
...ty free 3d model carriage for download as obj, fbx, and blend on turbosquid: 3d models for games, architecture, videos. (1290094)
turbosquid
free

Carriage
...yalty free 3d model carriage for download as ma, obj, and fbx on turbosquid: 3d models for games, architecture, videos. (1239157)
3d_export
$5

Medieval carriage
...medieval carriage
3dexport
medieval carriage in fairy style
turbosquid
$58

Carriage
...d model carriage with scene for download as max, obj, and fbx on turbosquid: 3d models for games, architecture, videos. (1276262)
Compact
3d_export
$5

compact freezer
...compact freezer
3dexport
the compact freezer is product about refrigeration machine
3d_ocean
$8
Compact Cassette
...
80s album analog audio cartridge cassette compact digital electronics lp mp3 music play record sound tape vinyl
compact cassette
design_connected
$20
Eames Compact
...eames compact
designconnected
herman miller eames compact computer generated 3d model. designed by eames, charles.
3d_ocean
$2

Compact Disc
...compact disc
3docean
album audio cd compact disc dvd laser disc movie music
a cd
3d_export
$10

land compacter
...land compacter
3dexport
turbosquid
$1

Compact knife
...quid
royalty free 3d model compact knife for download as obj on turbosquid: 3d models for games, architecture, videos. (1557900)
3d_export
$12
compact rotary broach
...compact rotary broach
3dexport
compact tool for drilling hexagonal holes in lathes!
turbosquid
free
Lada Compact
... 3d model lada compact for download as max, max, max, and fbx on turbosquid: 3d models for games, architecture, videos. (1623122)
turbosquid
$59
Compact Truck
... available on turbo squid, the world's leading provider of digital 3d models for visualization, films, television, and games.
turbosquid
$50
Compact kitchen
... available on turbo squid, the world's leading provider of digital 3d models for visualization, films, television, and games.
Extruder
3ddd
$1

Extruded Chair
...extruded chair
3ddd
extruded , tom dixon
inspired by tom dixon extruded chair
turbosquid
$15

Extruded Table
... extruded table for download as blend, dae, fbx, obj, and stl on turbosquid: 3d models for games, architecture, videos. (1634137)
turbosquid
$2

3D Printer Extruder
...d
royalty free 3d model 3d printer extruder for download as on turbosquid: 3d models for games, architecture, videos. (1537359)
turbosquid
$1

Zombie extruded text
...oyalty free 3d model zombie extruded text for download as obj on turbosquid: 3d models for games, architecture, videos. (1322198)
turbosquid
$4

Extruder conical screw
...el extruder conical screw for download as sldpr, ige, and stl on turbosquid: 3d models for games, architecture, videos. (1524433)
turbosquid
$50

3d PRINTER - Extruder
... available on turbo squid, the world's leading provider of digital 3d models for visualization, films, television, and games.
turbosquid
$15

Extruded Table 2
...xtruded table 2 for download as blend, dae, fbx, obj, and stl on turbosquid: 3d models for games, architecture, videos. (1621846)
turbosquid
$10

Maya Extrude Tool
... available on turbo squid, the world's leading provider of digital 3d models for visualization, films, television, and games.
3d_export
$5

world earth extrude map
...world earth extrude map
3dexport
3ddd
$1

Simply Elegant Extruded Tree Coffee Table Design
...ble by link studios. the silhouette of a tree is visible at one angle, extruded from the surface to create the support structure.