Thingiverse
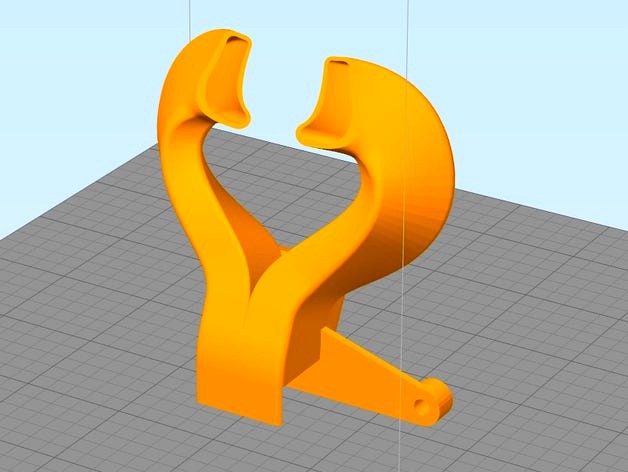
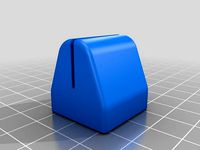
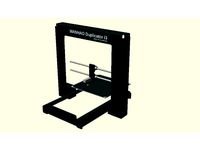
Cobra - Rear mounted cooler for Wanhao Duplicator i3. by tahustvedt
by Thingiverse
Last crawled date: 3 years ago
EDIT - 20.12.2016
This cooler is still popular. I have changed the licence to let others adapt it to new printer designs.
EDIT2 - 29.11.2015
Updated again. More volume in the ducts and wider spacing between the exhaust openings. I hope it still performs like the old one.
EDIT - 29.11.2015
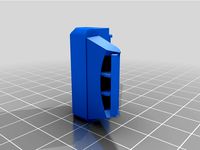
New design with a new blower orientation to clear obstacles better. Also has supports for the openings. I am printing it now myself. It doesn't need as much support to print. The walls are slightly thicker than before, but not quite as thick as the previous "fat" version.
EDIT - 31.10.2015
Added a duct with thicker walls. Only choose this if you have problems with printing the other one.
EDIT - 27.10.2015:
I added a picture of my own 70-80° overhang test which tests around all four sides, and it does equally well on all four sides. Also uploaded a duct with a slightly offset mounting hole to better align with the nozzle.
EDIT - 26.10.2015:
New and improved version with smoother ducts and more airflow directed towards the rear. The airflow feels very centered around the nozzle now. It performs better than any other I have tried on the Atom 80° Overhang test now.
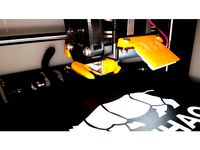
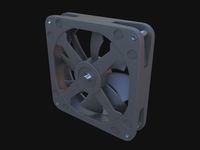
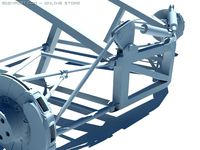
A powerful cooler for 50x15mm blower fans. Being rear mounted means there's nothing obstructing the view of the print. The ducts are shaped to deliver a powerful blast from two sides without cooling the hot end too much, and a strong air flow can be felt all around the nozzle.
It mounts in the lower left hole of the lower bearing block. I recommend printing my plastic bearing blocks ( http://www.thingiverse.com/thing:1172838 ) and replacing the aluminum ones with them, because it lightens the printer considerably.
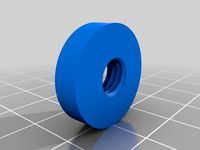
If you want to use the stock bearings, the hole might need to be tapped with a regular M4 tap, though you might get away with just threading in the screw if you use a shorter 10 mm screw. There is no need to remove the block to tap the hole, as there should be no screw in the hole originally. If you feel the flow is not centered around the nozzle try printing the little spacer to move the duct back a little.
Mounting it is not rocket science, and if you need to make some mods to adapt it to your printer because your printer isn't 100% equal to mine then deal with it. Just do it.
Requires:
12V 50x50x15 mm blower fan. I use a cheap bushing fan with 0.18A rated current draw.
Here's a very cheap one that should work fine:https://www.banggood.com/DC-12V-2-Pin-0_13A-50mm-Brushless-Turbine-Blower-Cooling-Fan-for-3D-Printer-p-1146208.html?p=HD240528697332015103
1x M4x10 mm to 12 mm screw for mounting the duct to the printer.
1x M4x20 mm screw for mounting the blower to the duct.
Here's a handy assortment for this and more projects:https://www.banggood.com/Suleve-M4CH1-M4-Carbon-Steel-Hex-Socket-Cap-Screws-Bolts-Nuts-Assortment-Kit-250Pcs-p-1210779.html?p=HD240528697332015103
This cooler is still popular. I have changed the licence to let others adapt it to new printer designs.
EDIT2 - 29.11.2015
Updated again. More volume in the ducts and wider spacing between the exhaust openings. I hope it still performs like the old one.
EDIT - 29.11.2015
New design with a new blower orientation to clear obstacles better. Also has supports for the openings. I am printing it now myself. It doesn't need as much support to print. The walls are slightly thicker than before, but not quite as thick as the previous "fat" version.
EDIT - 31.10.2015
Added a duct with thicker walls. Only choose this if you have problems with printing the other one.
EDIT - 27.10.2015:
I added a picture of my own 70-80° overhang test which tests around all four sides, and it does equally well on all four sides. Also uploaded a duct with a slightly offset mounting hole to better align with the nozzle.
EDIT - 26.10.2015:
New and improved version with smoother ducts and more airflow directed towards the rear. The airflow feels very centered around the nozzle now. It performs better than any other I have tried on the Atom 80° Overhang test now.
A powerful cooler for 50x15mm blower fans. Being rear mounted means there's nothing obstructing the view of the print. The ducts are shaped to deliver a powerful blast from two sides without cooling the hot end too much, and a strong air flow can be felt all around the nozzle.
It mounts in the lower left hole of the lower bearing block. I recommend printing my plastic bearing blocks ( http://www.thingiverse.com/thing:1172838 ) and replacing the aluminum ones with them, because it lightens the printer considerably.
If you want to use the stock bearings, the hole might need to be tapped with a regular M4 tap, though you might get away with just threading in the screw if you use a shorter 10 mm screw. There is no need to remove the block to tap the hole, as there should be no screw in the hole originally. If you feel the flow is not centered around the nozzle try printing the little spacer to move the duct back a little.
Mounting it is not rocket science, and if you need to make some mods to adapt it to your printer because your printer isn't 100% equal to mine then deal with it. Just do it.
Requires:
12V 50x50x15 mm blower fan. I use a cheap bushing fan with 0.18A rated current draw.
Here's a very cheap one that should work fine:https://www.banggood.com/DC-12V-2-Pin-0_13A-50mm-Brushless-Turbine-Blower-Cooling-Fan-for-3D-Printer-p-1146208.html?p=HD240528697332015103
1x M4x10 mm to 12 mm screw for mounting the duct to the printer.
1x M4x20 mm screw for mounting the blower to the duct.
Here's a handy assortment for this and more projects:https://www.banggood.com/Suleve-M4CH1-M4-Carbon-Steel-Hex-Socket-Cap-Screws-Bolts-Nuts-Assortment-Kit-250Pcs-p-1210779.html?p=HD240528697332015103
Similar models
thingiverse
free

AM8/E3D Hemera Rear Mount Part 5015 Cooling Fan - Mount and Duct
...hat doesn't block the fan.
the pillow block will likely need to be tapped to fit the screw that you use. i used an m4 screw.
thingiverse
free

Monoprice Maker Select Plus Rear mounted fan duct by davoo2017
...left side of the bearing block.
the fan for this duct will still be the normal stock fan that should have came with your printer.
thingiverse
free

Modified Cobra Cooler (w/ extra clearance)(for Wanhao Duplicator i3v.2 / v.2.1) by xtchronosage
...he cobra cooler has the perfect balance between simplicity and cooling ability. it has become my mainstay cooler for 2 years now.
cults
free

Fan guard with feet for 120mm fan.
...d.com/220v-12cm-solder-absorber-fan-for-soldering-iron-ktv-cabinet-p-1106793.html?p=hd240528697332015103&cur_warehouse=cn
thingiverse
free

D-Bot Titan dual blower v2 center/offcenter by faekie
...new version of the fan nozzle that directs airflow more towards nozzle and less around it.
none of the parts has been tested yet.
thingiverse
free

Raise3D Cold End Fan Duct 40 mm by kim_moelgaard
... to allow this without any modifications.
cover is provided to stop airflow to the printbed when printing with filaments like abs
thingiverse
free

Hemera 4020 parts cooler blower fan mount and nozzle
...will have to glue the fan shroud to the fan.
you can print the mount without supports but supports are needed for the fan nozzle.
thingiverse
free

50x15 blower duct for Wanhao Duplicator 6 / Monoprice Ultimate by claancy
...r fan wire on the rear of the duct
blower attaches to duct with 2, 18mm long m4 machine screws threaded directly into the plastic
thingiverse
free

Smartrapcore cooler fan duct by andreasL
...0/04 : added a hole for a m3 screw to tight on the sensor , recentered the fan mounting holes, tightened the end of the air duct.
thingiverse
free

TAZ Fan Dual Duct with smaller fan screw holes by kerog777
...e design to shrink the holes so that the screws can be inserted directly into the duct, self-tapping. openscad code is included.
Tahustvedt
thingiverse
free

Hextronix HXT900 servo by tahustvedt
... hxt900 servo by tahustvedt
thingiverse
accurate model of a hextronix hxt900 servo. made from measurements form an actual servo.
thingiverse
free

540 AND 550 MOTORS. by tahustvedt
...e
540 and 550 motor models to help with design work. the backplate timing isn't right, but all dimensions are very accurate.
thingiverse
free

RC airplane wheel chocks. by tahustvedt
... chocks. by tahustvedt
thingiverse
wheel chocks for rc planes. these fit 114 mm/4,5" wheels. scale up or down as necessary.
thingiverse
free

Lynx Helicopter cookie cutters by tahustvedt
...edt
thingiverse
cookie cutters in the shape of the rnoaf westland lynx mk. 86 helicopter. 01 is 21 cm long and 02 is 28 cm long.
thingiverse
free

Wing for Schumacher CAT XLS by tahustvedt
...le wing for the schumacher cat xls and other vintage cat's. print solid for strength.
catwing02 has integrated mounting lugs.
thingiverse
free

Hitec HS-65HB Mighty Feather servo by tahustvedt
...ghty feather servo by tahustvedt
thingiverse
accurate model of a hitec hs-65hb servo. modeled from measurements of a real servo.
thingiverse
free

Gary the pilot. by tahustvedt
...your slicer to achieve the height you need. i didn't use any support between the head and headset arch and it came out great.
thingiverse
free

Hitec HS-225MG Mighty Mini servo by tahustvedt
...i servo by tahustvedt
thingiverse
an accurate model of the hitec hs-225mg servo modeled using measurements from an actual servo.
thingiverse
free

Skis for RC planes by tahustvedt
...he curved underside with thick ca and then glue the keels. use a spring, rubber band or rubber bumper to hold it level in flight.
thingiverse
free

Wanhao Duplicator i3 fan mount spacers by tahustvedt
...f fans which are mounted to the original mounting bracket on the wanhao duplicator i3 printer.
the spacers are 3mm and 1mm tall.
Cobra
design_connected
$20

Cobra
...cobra
designconnected
franco albini cobra computer generated 3d model. designed by albini, franco.
design_connected
$9

Cobra
...cobra
designconnected
martinelli luce cobra table lights computer generated 3d model. designed by elio martinelli.
3ddd
$1

Arte / Cobra
...arte / cobra
3ddd
arte , cobra
бра arte cobra № по каталогу a2901ap-1br
3d_export
$20

shelby cobra
...shelby cobra
3dexport
shelby cobra
turbosquid
$45

cobra
...royalty free 3d model cobra for download as max, obj, and stl on turbosquid: 3d models for games, architecture, videos. (1542809)
turbosquid
$91

cobra
...ty free 3d model cobra for download as 3ds, obj, c4d, and fbx on turbosquid: 3d models for games, architecture, videos. (1270029)
3ddd
$1

Cobra
...cobra
3ddd
моделил по фото
turbosquid
free

Cobra
... available on turbo squid, the world's leading provider of digital 3d models for visualization, films, television, and games.
turbosquid
$15

Cobra
... model cobra for download as 3ds, max, obj, wrl, fbx, and stl on turbosquid: 3d models for games, architecture, videos. (1484340)
3ddd
$1

COBRA
...cobra
3ddd
торшер который вспоминает змею
Wanhao
thingiverse
free
Wanhao Logo Plate / Wanhao Logo Schild by JMDesigns
...wanhao logo plate / wanhao logo schild by jmdesigns
thingiverse
wanhao logo plate / wanhao logo schild
thingiverse
free
Wanhao logo by nebtio
...wanhao logo by nebtio
thingiverse
wanhao logo
thingiverse
free
Wanhao keychain by Rein3003
...wanhao keychain by rein3003
thingiverse
a keychain with the logo of wanhao
thingiverse
free
Wanhao Di3 v2 Light / Wanhao Di3 v2 Beleuchtung by JMDesigns
...wanhao di3 v2 light / wanhao di3 v2 beleuchtung by jmdesigns
thingiverse
wanhao di3 v2 light / wanhao di3 v2 beleuchtung
thingiverse
free
TUSH For Wanhao by wtmi1992
...tush for wanhao by wtmi1992
thingiverse
the ultimate spool holder, modified for the top of the wanhao control box. fits snug.
thingiverse
free
fanduct wanhao d12 by theopoilmek
...fanduct wanhao d12 by theopoilmek
thingiverse
fanduct pour wanhao d12
thingiverse
free
Wanhao i3 Marlin by johan21
...wanhao i3 marlin by johan21
thingiverse
marlin for wanhao i3 rampsboard 1.4.
thingiverse
free
Wanhao Duplicator i3 by imagineering4
...wanhao duplicator i3 by imagineering4
thingiverse
these are the stl files for the improvements to the wanhao duplicator i3, v2
thingiverse
free

Wanhao D6 filament guard
...wanhao d6 filament guard
thingiverse
this is a filament guard for wanhao d6 machine to avoid the filament unrolling
thingiverse
free
Wanhao Duplicator i3 Model by Hilde3D
...wanhao duplicator i3 model by hilde3d
thingiverse
wanhao duplicator i3 model
Duplicator
turbosquid
$10

duplicate
...
turbosquid
royalty free 3d model duplicate for download as on turbosquid: 3d models for games, architecture, videos. (1566034)
turbosquid
$20

Wonderful duplicate kids room
...ul duplicate kids room for download as skp, 3ds, fbx, and obj on turbosquid: 3d models for games, architecture, videos. (1609462)
archive3d
free

Copier 3D Model
...hine duplicating machine
copier n160808 - 3d model (*.gsm+*.3ds) for interior 3d visualization.
3d_export
$30

connect four set
...ate objects that can be disassembled. includes one red and one black checker which can be duplicated to the standard 42 checkers.
3ddd
$1
Черепица
...del
- put it in your scene and duplicate
- level of detail can be edited
- open with 3ds max 2010-2013 or import in your program.
3d_export
$27

Dividing Cell / Ovule 3D Model
...al microbe blob ovum fiction science ovule duplication divide dividing
dividing cell / ovule 3d model duchampmodels 9691 3dexport
3d_ocean
$16

Folding Chair
...tubing. designed to be good low poly at a distance and mesh smooth pretty well and light weight for duplicating a lot. package...
3d_export
$8
wooden fence
... one post separate so the fence can be duplicated and extended. created in blender 3.0 file format fbx with texture painted maps.
3d_export
$8
wooden fence
... one post separate so the fence can be duplicated and extended. created in blender 3.0 file format fbx with texture painted maps.
3d_ocean
$2

DNA Strands Of 5 Types
... strands that can be multiplied and can be made long chains by duplicating them and can be easily applied materials and textures.
Cooler
archibase_planet
free

Cooler
...hibase planet
wine-cooler wine cooler kitchen equipment
rk wine cooler uc - 3d model (*.gsm+*.3ds) for interior 3d visualization.
archibase_planet
free
Cooler
...cooler
archibase planet
cooler
cooler seyedmms n271212 - 3d model (*.gsm+*.3ds) for interior 3d visualization.
archibase_planet
free
Cooler
...cooler
archibase planet
refrigerator cooler kitchen's technics
cooler - 3d model for interior 3d visualization.
archibase_planet
free
Cooler
...er
archibase planet
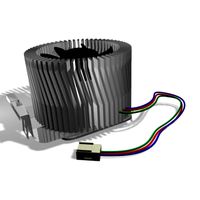
pc equipment cooler computer equipment
cooler n040908 - 3d model (*.gsm+*.3ds) for interior 3d visualization.
archibase_planet
free

Cooler
...cooler
archibase planet
cooler cpu fan pc equipment
cooler asus n080211 - 3d model (*.gsm+*.3ds) for interior 3d visualization.
3d_export
$5

Cooler
...cooler
3dexport
water cooler. program maya 2018. materials v-ray 3.6.
3d_export
$5

Juice cooler
...juice cooler
3dexport
juice cooler
turbosquid
$10
Cooler
...uid
royalty free 3d model cooler for download as max and fbx on turbosquid: 3d models for games, architecture, videos. (1478561)
turbosquid
$20
cooler
... available on turbo squid, the world's leading provider of digital 3d models for visualization, films, television, and games.
turbosquid
$20

cooler
... available on turbo squid, the world's leading provider of digital 3d models for visualization, films, television, and games.
I3
3d_export
$10

suv i3
...suv i3
3dexport
suv i3 2013 series
3d_ocean
$89

BMW i3 2012
...y, in real units of measurement, qualitatively and maximally close to the original. model formats: - *.max (3ds max 2008 scanl...
cg_studio
$99

BMW i3 20143d model
...
cgstudio
.3ds .c4d .fbx .lwo .max .obj - bmw i3 2014 3d model, royalty free license available, instant download after purchase.
cg_studio
$99

BMW i3 20123d model
...tudio
.3ds .c4d .fbx .lwo .max .mb .obj - bmw i3 2012 3d model, royalty free license available, instant download after purchase.
cg_studio
$99

BMW i3 20143d model
...tudio
.3ds .c4d .fbx .lwo .max .mb .obj - bmw i3 2014 3d model, royalty free license available, instant download after purchase.
humster3d
$75

3D model of BMW i3 2014
...
buy a detailed 3d model of bmw i3 2014 in various file formats. all our 3d models were created maximally close to the original.
humster3d
$40

3D model of Kitchen Set I3
...uy a detailed 3d model of kitchen set i3 in various file formats. all our 3d models were created maximally close to the original.
3d_ocean
$30

Kitchen set i3
...ensils oven plates shelves sink table ware
kitchen set i3 include 3d models: cooker, oven, sink, cupboards, table, chair, plates.
3d_ocean
$89

BMW i3 2014
...y, in real units of measurement, qualitatively and maximally close to the original. model formats: - *.max (3ds max 2008 scanl...
cg_studio
$99

BMW i3 Concept 20113d model
...i3
.3ds .c4d .fbx .lwo .max .obj - bmw i3 concept 2011 3d model, royalty free license available, instant download after purchase.
Rear
3d_export
$48
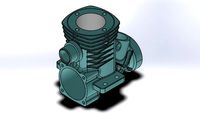
engine case rear
...re efficient as it eliminates the need for the propeller shaft while the differential merges with the transmission to save space.
turbosquid
$39
rear rim
... available on turbo squid, the world's leading provider of digital 3d models for visualization, films, television, and games.
3d_export
$5
Rear Suspension 3D Model
... suspension 3d model
3dexport
rear suspension spring sport car disc brake chasis
rear suspension 3d model bayazoff 30675 3dexport
turbosquid
$20

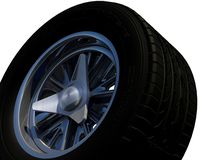
Rear sport wheel
...del rear sport wheel for download as ige, obj, stl, and sldas on turbosquid: 3d models for games, architecture, videos. (1227527)
turbosquid
$99

Rear tyre set
... available on turbo squid, the world's leading provider of digital 3d models for visualization, films, television, and games.
turbosquid
$49
Wet Rear tyre
... available on turbo squid, the world's leading provider of digital 3d models for visualization, films, television, and games.
turbosquid
$49
Hard rear tyre
... available on turbo squid, the world's leading provider of digital 3d models for visualization, films, television, and games.
turbosquid
$49
Medium Rear tyre
... available on turbo squid, the world's leading provider of digital 3d models for visualization, films, television, and games.
turbosquid
$49

Supersoft Rear tyre
... available on turbo squid, the world's leading provider of digital 3d models for visualization, films, television, and games.
turbosquid
$39
tractor rim rear
... available on turbo squid, the world's leading provider of digital 3d models for visualization, films, television, and games.
Mounted
3d_export
free

mounting bracket
...mounting plate is the portion of a hinge that attaches to the wood. mounting plates can be used indoors, cabinetry and furniture.
turbosquid
$2

MOUNTING
... available on turbo squid, the world's leading provider of digital 3d models for visualization, films, television, and games.
turbosquid
free

Mounts
... available on turbo squid, the world's leading provider of digital 3d models for visualization, films, television, and games.
turbosquid
free

Mount Fuji
...fuji
turbosquid
free 3d model mount fuji for download as obj on turbosquid: 3d models for games, architecture, videos. (1579977)
3d_export
$5

Headphone mount LR
...headphone mount lr
3dexport
headphone mount l+r
turbosquid
$39

Mount rainier
...quid
royalty free 3d model mount rainier for download as fbx on turbosquid: 3d models for games, architecture, videos. (1492586)
turbosquid
$5

pipe mounting
...quid
royalty free 3d model pipe mounting for download as obj on turbosquid: 3d models for games, architecture, videos. (1293744)
turbosquid
$3

Mounting Tires
...uid
royalty free 3d model mounting tires for download as fbx on turbosquid: 3d models for games, architecture, videos. (1708511)
3d_export
$5

Magnetic GoPro Mount
...pro mount
3dexport
cool magnetic mount for gopro. allows you to mount the camera on flat metal surfaces and get exclusive shots.
turbosquid
$5

Stone Mount
...ty free 3d model stone mount for download as ma, obj, and fbx on turbosquid: 3d models for games, architecture, videos. (1370306)