Thingiverse
CNC Router Dust Shoe by Pretengineer
by Thingiverse
Last crawled date: 4 years, 7 months ago
So you've got a CNC Router, and a 3D printer, and a small lathe - the world's your oyster! why are you paying a couple of hundred £ for a dust shoe....?
Well, maybe you don't have much spare time, or you're filthy rich. But assuming you're not...
I made a Sphinx by Kyo, and got bored with sitting there with a hoover trying to catch all the dust that was being generated. I've also recently taught myself how to use Fusion 360 and wanted a more interesting project to try.
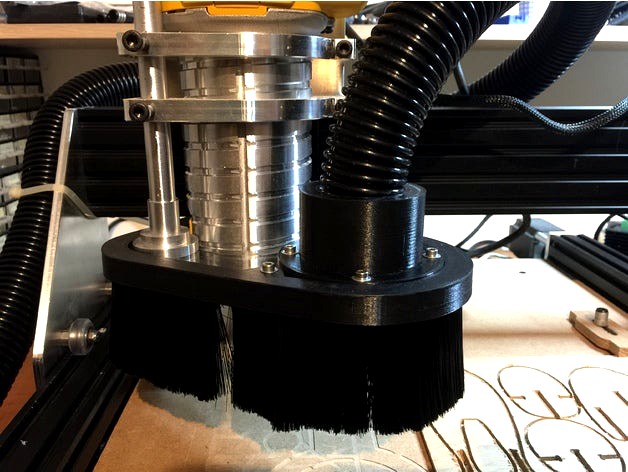
The good news - is it works exceptionally well! I couldn't detect any dust at all escaping while cutting. It's cheap (cost me around £30), it's lightweight and looks the part too.
The bad news, it's a bit involved and needs a bit of skill to make and put together.
This design is dependent on you having the mount from Chris Laidlaw. If you've made a Sphinx, and bought his plates, you've probably seen the flyer for the mount. http://chrisclub.wixsite.com/prototype-machining. Chris also does his own dust shoe design too.
I can thoroughly reccomend this router mount if you haven't yet bought one. Save the money on the Openbuilds mount and any store bought dust shoe, and you could buy one of these mounts instead and make your own shoe.
The design allows enough clearance to miss all parts of the machine structure, isn't overly heavy and you can wind it all the way up for access to the cutter and spindle locking button on the router.
You can get some 2" brush strip cheaply from Amazon: https://www.amazon.co.uk/gp/product/B016IXK42Q/ref=oh_aui_detailpage_o04_s00?ie=UTF8&psc=1
This works really well, and you get 2 strips so you can replace the brushes when necessary. The only downside is you need to bend it carefully by hand. Which can be a bit time consuming and frustrating. Just take your time, and if you have them, some small clamps really help to form it around the acrylic base plate.
I actually cut the strip a bit too short accidentally, which leaves a small gap. In testing, it looks like this could actually help direct and control the airflow.
Hoover hose is cheap enough: https://www.amazon.co.uk/gp/product/B000W5HQGY/ref=oh_aui_detailpage_o00_s00?ie=UTF8&psc=1
You'll have to cut one end off, and glue on a new end ring. I've included an STL file so you can print one. Glue it with Loctite 60 seconds all purpose superglue. Works really well on PETG and PLA. Don't forget the clip ring first before you glue the new end on :-)
The Henry hoover is cheap and supplies plenty of suction. It's also small enough to sit neatly under a bench.
You can get a bit of 10mm Acrylic sheet for £2.54 (plus shipping) from here: https://www.materials4me.co.uk/Plastics/Extruded-Acrylic/Sheet/p/261800
That's big enough to give you 2 goes at it. I ran a second one as the rebate for the brush needed to be a bit bigger for it to sit right.
The support pillar is made from a piece of 19mm ali bar stock. A single 10" length is enough, but at £1.56, it's worth getting a couple just in case:https://www.materials4me.co.uk/Metal/Aluminium/Round-Bar/p/289
The 2 retaining rings are made from 40mm bar stock, you only need about 4":https://www.materials4me.co.uk/Metal/Aluminium/Round-Bar/p/256971
Note - the photo i've supplied of the turned parts shows the support pillar before I turned down the thicker bottom section to allow it to be raised higher.
I'm using M3x20mm machine screws, each with a washer either side of the plastic components, and a nylok nut. You'll need 7 sets of that in total.
There's a single M5 x 25mm machine screw holding the support pillar components and the acrylic plate together.
The public link to the design on Fusion 360 is here so you can generate your tool paths:http://a360.co/2l884zZ
Hopefully that should all work ok. Leave some comments or shoot me a private message if you're having trouble.
Have fun!
Well, maybe you don't have much spare time, or you're filthy rich. But assuming you're not...
I made a Sphinx by Kyo, and got bored with sitting there with a hoover trying to catch all the dust that was being generated. I've also recently taught myself how to use Fusion 360 and wanted a more interesting project to try.
The good news - is it works exceptionally well! I couldn't detect any dust at all escaping while cutting. It's cheap (cost me around £30), it's lightweight and looks the part too.
The bad news, it's a bit involved and needs a bit of skill to make and put together.
This design is dependent on you having the mount from Chris Laidlaw. If you've made a Sphinx, and bought his plates, you've probably seen the flyer for the mount. http://chrisclub.wixsite.com/prototype-machining. Chris also does his own dust shoe design too.
I can thoroughly reccomend this router mount if you haven't yet bought one. Save the money on the Openbuilds mount and any store bought dust shoe, and you could buy one of these mounts instead and make your own shoe.
The design allows enough clearance to miss all parts of the machine structure, isn't overly heavy and you can wind it all the way up for access to the cutter and spindle locking button on the router.
You can get some 2" brush strip cheaply from Amazon: https://www.amazon.co.uk/gp/product/B016IXK42Q/ref=oh_aui_detailpage_o04_s00?ie=UTF8&psc=1
This works really well, and you get 2 strips so you can replace the brushes when necessary. The only downside is you need to bend it carefully by hand. Which can be a bit time consuming and frustrating. Just take your time, and if you have them, some small clamps really help to form it around the acrylic base plate.
I actually cut the strip a bit too short accidentally, which leaves a small gap. In testing, it looks like this could actually help direct and control the airflow.
Hoover hose is cheap enough: https://www.amazon.co.uk/gp/product/B000W5HQGY/ref=oh_aui_detailpage_o00_s00?ie=UTF8&psc=1
You'll have to cut one end off, and glue on a new end ring. I've included an STL file so you can print one. Glue it with Loctite 60 seconds all purpose superglue. Works really well on PETG and PLA. Don't forget the clip ring first before you glue the new end on :-)
The Henry hoover is cheap and supplies plenty of suction. It's also small enough to sit neatly under a bench.
You can get a bit of 10mm Acrylic sheet for £2.54 (plus shipping) from here: https://www.materials4me.co.uk/Plastics/Extruded-Acrylic/Sheet/p/261800
That's big enough to give you 2 goes at it. I ran a second one as the rebate for the brush needed to be a bit bigger for it to sit right.
The support pillar is made from a piece of 19mm ali bar stock. A single 10" length is enough, but at £1.56, it's worth getting a couple just in case:https://www.materials4me.co.uk/Metal/Aluminium/Round-Bar/p/289
The 2 retaining rings are made from 40mm bar stock, you only need about 4":https://www.materials4me.co.uk/Metal/Aluminium/Round-Bar/p/256971
Note - the photo i've supplied of the turned parts shows the support pillar before I turned down the thicker bottom section to allow it to be raised higher.
I'm using M3x20mm machine screws, each with a washer either side of the plastic components, and a nylok nut. You'll need 7 sets of that in total.
There's a single M5 x 25mm machine screw holding the support pillar components and the acrylic plate together.
The public link to the design on Fusion 360 is here so you can generate your tool paths:http://a360.co/2l884zZ
Hopefully that should all work ok. Leave some comments or shoot me a private message if you're having trouble.
Have fun!