Thingiverse
CloverPlus v3 Delta 3D Printer by pbmax
by Thingiverse
Last crawled date: 4 years, 6 months ago
CloverPlus v3
This is the next iteration of the CloverPlus mini delta 3D printer design. Most of the CloverPlus v2 parts have been redesigned or significantly changed.
Please see all designs that were used to create this printer in the remix section.
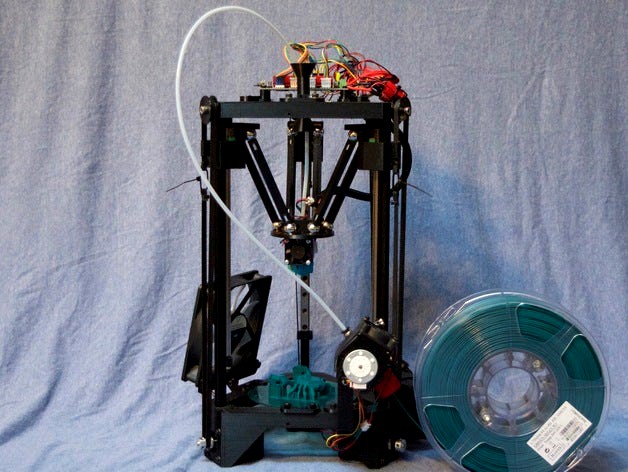
The CloverPlus v3 is a small, mostly-printable 3D printer with delta kinematics. It uses MR9 linear rails with MGN9C rail carriages that attach to 10mm MicroRax or standard 15mm aluminum extrusions. The top and bottom frame parts can be printed either as single parts or as 3 separate parts each, depending on the build volume you have to work with.
All design files (BOM, STLs, OpenSCAD source) are on GitHub; any design files here on Thingiverse are for display purposes only
GitHub repository: https://github.com/mpeterson333/CloverPlus_v3
Time lapse video: https://youtu.be/XVPE6OeyMtI
Please comment if you have any questions or just want to say hi. :)
Printable Diameter: 100mm+
Printable Height(300mm extrusions): 97mm (E3Dv6), 107mm (J-head)
Printable Height(350mm extrusions): 147mm (E3Dv6), 157mm (J-head)
Delta Radius (MR9 linear rails, 10mm extrusions): 50.929mm
Delta Radius (MR9 linear rails, 15mm extrusions): 51.182mm
Delta Arm Length: 115mm
Note that the 15mm extrusion version delta radius has not yet been tested, but is generated by the same calculation as used for the 10mm extrusion version.
A detailed bill of materials has been provided that lists sources and pricing for all parts, along with some assembly information. Right now there isn't a detailed build guide, but as with v2 I will post details of the trickier aspects of assembly below.
Updates
2019-12-28 - I've updated the FoldaRap PG35L extruder, available in the github repository, so that it can print flexible materials. I've successfully tested the new part and the extruder is working without issue. I'm getting no clogs, even with 3mm retracts, on multiple brands of TPU. You can find the source here and the STL here. It requires an additional 10mm length of PTFE tubing (beyond the bowden tube itself) cut into an arrow shape on one end.
2019-02-09 - I've posted a couple of new photos of the 15mm extrusion & rails version of the CPv3, one of which shows the adapted FoldaRap PG35L extruder.
3/21/2017 - I have the 15mm top and bottom frame parts printed and loosely assembled with 15mm extrusions, but I haven't checked belt alignment yet. The math says it should be okay. :) It may be a while before I find the time to physically test it out. The dual M3 nut plates used with the 10mm microrax extrusions will work with standard 15mm extrusions; links to these are available in the BOM. Because of this I did not modify the extrusion mount mechanism for the 15mm extrusions.
2/11/2017 - Parts compatible with 15mm extrusions have been pushed to github. These include top and bottom frame parts (both one-piece and 3 separate parts versions) along with a new rail carriage belt grip. The 15mm-compatible frame parts are slightly larger than the 10mm parts to accommodate the increased extrusion size without sacrificing build volume. The top pulley and motor mounts have been skewed to account for the wider extrusions and to keep the belt path straight. Also, a hot-end mount for the DeltaPrintr mini hot end has been added. The 15mm extrusion parts have not been tested (I'm reasonably sure they're correct, in that the belt path is good), but the hot end mount has been tested working.
1/14/2017 - The sideways extruder mount was posted to github quite a while back; this works much better for loading filament. I've also been testing carriages and an effector for 10mm balls. This design change makes the printer look better, but so far the new ball size isn't performing as well due to less metal in close proximity to the magnets. I'm experimenting with alternate magnet sizing at the moment; I'll post another update here when I've made some forward progress. I'm still pretty happy with the quality produced by the rails build and all the latest parts. At some point I'd like to tinker with 15mm extrusions as suggested by a commenter; my goal will be to keep dimensions largely the same. We'll see. :)
12/07/2016 - The rails build is now fully up and running and printing very well! A photo of the completed black rails build is now up, as are 2 close up photos of a low-poly crab model I printed with it this morning. I've also added a new bowden tube guide to github (see the rails build photo); this part keeps the bowden tube centered to minimize torque applied to the effector. Finally, I added a new fan shroud for the PG35L extruder source from the TrinityLabs Micro Extruder by ezmobius (thank you!). That thing is now linked in the remix section. I do plan to modify the extruder setup a bit to turn it on its side to make filament loading easier (it's a giant pain right now).
Source
OpenSCAD source is available for all parts on GitHub:
https://github.com/mpeterson333/CloverPlus_v3
Nearly everything is parameterized; it's fairly straight-forward to increase or decrease the size of all parts (for example leg length in the top and bottom frame parts to increase the build area and arm length in the arm parts to match the increased build area). Please ask me in the comments or via msg if you have any questions about the source.
Build Details
See the attached CloverPlus_v3_BOM.ods for part details. Let me know if something is missing or something doesn't make sense.
Build Tips
I used 3 M3 x 4mm screws to attach each 250mm MR9 linear rail to its extrusion. More may help with rigidity. A rail stop should be added at the bottom and can be added to the top. The microrax 2-screw extrusion nuts will work at either end to connect both the rail to the extrusion and the railstop to the extrusion. Standard M3 nuts can be used to attach the rails to 15mm extrusions.
This design uses 6mm diameter x 10mm long cylindrical N50 magnets. Using anything weaker may be problematic, though you're welcome to try.
Clean up the round magnet entry holes in the arms before attempting to jam in the magnets - the new arms are thinner in this area and prone to cracking if mistreated.
Extrusion sizing should be at least 300mm; my build uses 350mm. Higher would likely be possible, but watch acceleration and jerk settings as frame rigidity is reduced.
The extrusion stepper should have 84oz in of torque or more. Less may result in under- extrusion with PTFE-lined hot ends (E3Dv6 lite, for example) that can't melt plastic as fast as a good all metal hot end (E3Dv6 standard, for example). I use the PG35L geared stepper motor extruder included with the design; this removes torque from the equation.
Sand both the plastic and the steel balls / magnets with 120 - 300 grit sandpaper and then clean with alcohol before gluing. I use JB KwikWeld epoxy; it holds well and cures quickly. It can also be scraped off of the balls without too much trouble if you screw up. :) Gorilla glue will work and adhere more strongly, but you'll have to be careful to clamp the balls in place somehow.
Make sure the magnets slide all the way back into the arm recesses before gluing via the in the sides of the slots. Test the spacing to ensure the ball does not contact the magnet. Check for wobble where the arm contacts the balls after gluing and clean up the arm ends as needed (this shouldn't be necessary with the new arm design, but double-check anyway).
The bed glass in the photos is 120mm in diameter and 3/32" thick (about 2mm), though 115mm would probably work a little better. I cut it with a circle cutter out of a sheet of cheap glass from Lowes. I recommend using glue stick (Elmers purple or extreme) on PET or Kapton tape for printing PETG and PLA without a heated bed. You can apply it straight to the glass, but this will inevitably result in scratched and/or broken glass.
I use cork spacers for the motors to reduce vibration and provide some heat insulation. PETG's glass temp is about 85C, but PLA's is much lower at about 65C, so watch your motor temps if you print your frame with PLA.
0.4mm hot end nozzle size or smaller is recommended due to the build volume
Firmware setting delta variables are at the top. I highly recommend this delta calibration tool: http://escher3d.com/pages/wizards/wizarddelta.php
I recommend a 32-bit Smoothieware or Reprap Firmware based controller board. An 8-bit arduino-based board running Marlin will work, but it will have trouble running at 60mm/s or faster - prints will be rough and the steppers will stutter. Repetier firmware on 8-bit machines is reportedly better suited to delta printers than Marlin, but as I was not able to get my Osoyoo board to correctly stream g-code using Repetier without utterly failing, I can't personally recommend it.
For extra pizzazz (higher resolution) with a 32-bit controller, use 0.9degree / step steppers. I used 1.8d/step motors on my CloverPlus builds, but 0.9d steppers don't cost much more and are a good fit for small, highly-detailed prints.
Acceleration of 1500mm/s^2 and Junction Deviation of 0.05 (Smoothieware) or Jerk of 10 or lower (Marlin) is a good place to start.
If you have any questions, please ask in the comments! :)
This is the next iteration of the CloverPlus mini delta 3D printer design. Most of the CloverPlus v2 parts have been redesigned or significantly changed.
Please see all designs that were used to create this printer in the remix section.
The CloverPlus v3 is a small, mostly-printable 3D printer with delta kinematics. It uses MR9 linear rails with MGN9C rail carriages that attach to 10mm MicroRax or standard 15mm aluminum extrusions. The top and bottom frame parts can be printed either as single parts or as 3 separate parts each, depending on the build volume you have to work with.
All design files (BOM, STLs, OpenSCAD source) are on GitHub; any design files here on Thingiverse are for display purposes only
GitHub repository: https://github.com/mpeterson333/CloverPlus_v3
Time lapse video: https://youtu.be/XVPE6OeyMtI
Please comment if you have any questions or just want to say hi. :)
Printable Diameter: 100mm+
Printable Height(300mm extrusions): 97mm (E3Dv6), 107mm (J-head)
Printable Height(350mm extrusions): 147mm (E3Dv6), 157mm (J-head)
Delta Radius (MR9 linear rails, 10mm extrusions): 50.929mm
Delta Radius (MR9 linear rails, 15mm extrusions): 51.182mm
Delta Arm Length: 115mm
Note that the 15mm extrusion version delta radius has not yet been tested, but is generated by the same calculation as used for the 10mm extrusion version.
A detailed bill of materials has been provided that lists sources and pricing for all parts, along with some assembly information. Right now there isn't a detailed build guide, but as with v2 I will post details of the trickier aspects of assembly below.
Updates
2019-12-28 - I've updated the FoldaRap PG35L extruder, available in the github repository, so that it can print flexible materials. I've successfully tested the new part and the extruder is working without issue. I'm getting no clogs, even with 3mm retracts, on multiple brands of TPU. You can find the source here and the STL here. It requires an additional 10mm length of PTFE tubing (beyond the bowden tube itself) cut into an arrow shape on one end.
2019-02-09 - I've posted a couple of new photos of the 15mm extrusion & rails version of the CPv3, one of which shows the adapted FoldaRap PG35L extruder.
3/21/2017 - I have the 15mm top and bottom frame parts printed and loosely assembled with 15mm extrusions, but I haven't checked belt alignment yet. The math says it should be okay. :) It may be a while before I find the time to physically test it out. The dual M3 nut plates used with the 10mm microrax extrusions will work with standard 15mm extrusions; links to these are available in the BOM. Because of this I did not modify the extrusion mount mechanism for the 15mm extrusions.
2/11/2017 - Parts compatible with 15mm extrusions have been pushed to github. These include top and bottom frame parts (both one-piece and 3 separate parts versions) along with a new rail carriage belt grip. The 15mm-compatible frame parts are slightly larger than the 10mm parts to accommodate the increased extrusion size without sacrificing build volume. The top pulley and motor mounts have been skewed to account for the wider extrusions and to keep the belt path straight. Also, a hot-end mount for the DeltaPrintr mini hot end has been added. The 15mm extrusion parts have not been tested (I'm reasonably sure they're correct, in that the belt path is good), but the hot end mount has been tested working.
1/14/2017 - The sideways extruder mount was posted to github quite a while back; this works much better for loading filament. I've also been testing carriages and an effector for 10mm balls. This design change makes the printer look better, but so far the new ball size isn't performing as well due to less metal in close proximity to the magnets. I'm experimenting with alternate magnet sizing at the moment; I'll post another update here when I've made some forward progress. I'm still pretty happy with the quality produced by the rails build and all the latest parts. At some point I'd like to tinker with 15mm extrusions as suggested by a commenter; my goal will be to keep dimensions largely the same. We'll see. :)
12/07/2016 - The rails build is now fully up and running and printing very well! A photo of the completed black rails build is now up, as are 2 close up photos of a low-poly crab model I printed with it this morning. I've also added a new bowden tube guide to github (see the rails build photo); this part keeps the bowden tube centered to minimize torque applied to the effector. Finally, I added a new fan shroud for the PG35L extruder source from the TrinityLabs Micro Extruder by ezmobius (thank you!). That thing is now linked in the remix section. I do plan to modify the extruder setup a bit to turn it on its side to make filament loading easier (it's a giant pain right now).
Source
OpenSCAD source is available for all parts on GitHub:
https://github.com/mpeterson333/CloverPlus_v3
Nearly everything is parameterized; it's fairly straight-forward to increase or decrease the size of all parts (for example leg length in the top and bottom frame parts to increase the build area and arm length in the arm parts to match the increased build area). Please ask me in the comments or via msg if you have any questions about the source.
Build Details
See the attached CloverPlus_v3_BOM.ods for part details. Let me know if something is missing or something doesn't make sense.
Build Tips
I used 3 M3 x 4mm screws to attach each 250mm MR9 linear rail to its extrusion. More may help with rigidity. A rail stop should be added at the bottom and can be added to the top. The microrax 2-screw extrusion nuts will work at either end to connect both the rail to the extrusion and the railstop to the extrusion. Standard M3 nuts can be used to attach the rails to 15mm extrusions.
This design uses 6mm diameter x 10mm long cylindrical N50 magnets. Using anything weaker may be problematic, though you're welcome to try.
Clean up the round magnet entry holes in the arms before attempting to jam in the magnets - the new arms are thinner in this area and prone to cracking if mistreated.
Extrusion sizing should be at least 300mm; my build uses 350mm. Higher would likely be possible, but watch acceleration and jerk settings as frame rigidity is reduced.
The extrusion stepper should have 84oz in of torque or more. Less may result in under- extrusion with PTFE-lined hot ends (E3Dv6 lite, for example) that can't melt plastic as fast as a good all metal hot end (E3Dv6 standard, for example). I use the PG35L geared stepper motor extruder included with the design; this removes torque from the equation.
Sand both the plastic and the steel balls / magnets with 120 - 300 grit sandpaper and then clean with alcohol before gluing. I use JB KwikWeld epoxy; it holds well and cures quickly. It can also be scraped off of the balls without too much trouble if you screw up. :) Gorilla glue will work and adhere more strongly, but you'll have to be careful to clamp the balls in place somehow.
Make sure the magnets slide all the way back into the arm recesses before gluing via the in the sides of the slots. Test the spacing to ensure the ball does not contact the magnet. Check for wobble where the arm contacts the balls after gluing and clean up the arm ends as needed (this shouldn't be necessary with the new arm design, but double-check anyway).
The bed glass in the photos is 120mm in diameter and 3/32" thick (about 2mm), though 115mm would probably work a little better. I cut it with a circle cutter out of a sheet of cheap glass from Lowes. I recommend using glue stick (Elmers purple or extreme) on PET or Kapton tape for printing PETG and PLA without a heated bed. You can apply it straight to the glass, but this will inevitably result in scratched and/or broken glass.
I use cork spacers for the motors to reduce vibration and provide some heat insulation. PETG's glass temp is about 85C, but PLA's is much lower at about 65C, so watch your motor temps if you print your frame with PLA.
0.4mm hot end nozzle size or smaller is recommended due to the build volume
Firmware setting delta variables are at the top. I highly recommend this delta calibration tool: http://escher3d.com/pages/wizards/wizarddelta.php
I recommend a 32-bit Smoothieware or Reprap Firmware based controller board. An 8-bit arduino-based board running Marlin will work, but it will have trouble running at 60mm/s or faster - prints will be rough and the steppers will stutter. Repetier firmware on 8-bit machines is reportedly better suited to delta printers than Marlin, but as I was not able to get my Osoyoo board to correctly stream g-code using Repetier without utterly failing, I can't personally recommend it.
For extra pizzazz (higher resolution) with a 32-bit controller, use 0.9degree / step steppers. I used 1.8d/step motors on my CloverPlus builds, but 0.9d steppers don't cost much more and are a good fit for small, highly-detailed prints.
Acceleration of 1500mm/s^2 and Junction Deviation of 0.05 (Smoothieware) or Jerk of 10 or lower (Marlin) is a good place to start.
If you have any questions, please ask in the comments! :)