Thingiverse
Cherry Pi III by AndyCart
by Thingiverse
Last crawled date: 3 years ago
Update 19/08/2014
Added improved filament spool holder and disc and also a wiring grommet for where the cable bundle from the hot end and extruder stepper pass through the Z tower extrusion. The hole in the extrusion should be drilled 180mm from the base of the Z tower stepper mount. This allows full travel on the Z carriage with the 225mm rods (tube length) that I use with the 8mm drilled ball bearing and spring/string retention system. I normally drill two 5mm holes adjacent to each other and file the bridge between them out to form an oval. I've also added some detailed assembly images and a drawing that shows where the T nuts in the lower base are required.
Update 08/08/2014
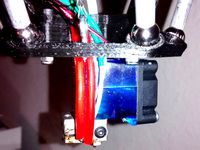
I've changed the design of the delta rods. Instead of using magnets I am now using 8mm stainless ball bearings drilled with a 4mm diameter, 4mm deep hole. They are sold for some sort of use in photography. Readily available on ebay. The effector and rod carrier designs have been changed so that they have 8mm sockets to accept the 8mm balls. The whole thing is locked together with Spectra line (100lb) and springs. I used 85mm, fairly strong ones. A little silicone grease before assembly should stop any wear. I've uploaded the amended .stl files and some images of how I assembled it all. There is also a write up in my thread on the Reprap forum. It really does make a rock solid, backlash free connection between the effectors and the towers. There is absolutely no play at the nozzle and I've been able to up 'quality' print speeds considerably.
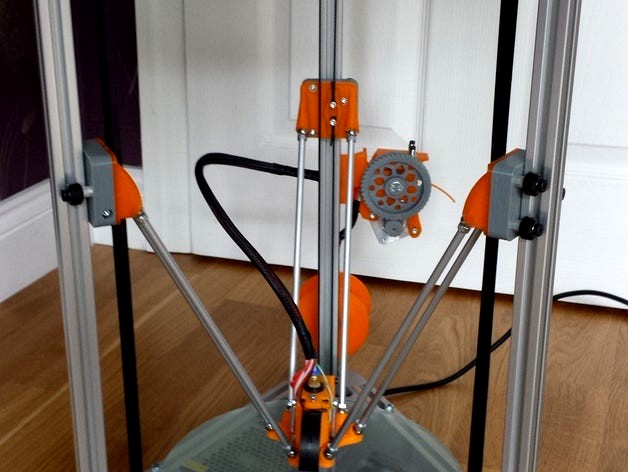
Anyone that has followed my previous designs has probably been expecting this :-) I've now got to a point where my Cherry Pi printer is at iteration three and I'm really happy with it. Version III incorporates mini V wheels for the carriages and a hot end Z probe for auto levelling and calibration. I use Rich Cattell's Marlin fork which enables all that. I have managed to substantially reduce the number of parts required and, due to the v wheels leaving the rear face of the extrusion free, been able to mount te extruder to the Z tower which results in a relatively short Bowden tube to the extruder. I have renamed the plastic parts to incorporate details of the quantity required and the settings and materials I used to print mine (P=perimeter, B=bottom layers, T=top layers). I've also switched to using a centrifugal fan as I feel it gives greater airflow. It's also easier to incorporate into the Z probe hot end design. The print areTa is around 190mm x 190mm x 250mm. I print at 100mm/s infill, 60mm/s outer perimeter, 70mm/s inner perimeter and 200mm/s travel. Acceleration is 3000 throughout and XY Jerk is 20. It would probably go higher but I'm happy at that and it doesn't seem to stress the machine too much.
BOM
Plastic parts as required
3 x 2020 Bosch/Rexroth Extrusion @ 600mm
9 x 2020 Bosch/Rexroth Extrusion @ 250mm
6 x 16mm x 5mm x 4mm flanged bearings
9 x Open Builds Mini V Wheel Kits
12 x 10mm spherical neodymium magnets
6 x 6mm aluminium tube (with 5mm ID, I drilled mine to this) @ 225mm
12 x M5 8mm SHCS machined with a 10mm ball end mill to form cup for magnet (rod ends)
4M GT2 belt
3 x GT2 pulleys
4 x 13mm x 6mm x 7mm micro switches
4 x NEMA 17 stepper motors
1 x Arduino Mega 2560
1 x RAMPS 1.4
1 x RRD Smart LCD Display
4 x 4988 stepper drivers
12V 5A PSU
Mains lead
1 x 50mm brushless centrifugal fan
250mm diameter glass/mirror build plate
J Head (Bowden type)
0.5M 4mm OD 2mm ID PTFE tube
2 x 1/8 NPT 4mm pneumatic fittings
5 x 608 bearings (extruder and spool holder)
100mm M8 threaded rod (spool holder)
M8 60mm hobbed bolt (hobbed at 25mm)
3 x M8 nut
8 x M8 washers
2 x M3 50mm SHCS (extruder clamp)
2 x compression springs to suit above
2 x tension springs to suit effector/hot end hinge
8 x M3 nut
3 x M5 45mm SHCS (top idlers)
3 x M5 nut
6 x M5 washer
18 x M3 8mm SHCS (stepper fixing, effector)
2 x M3 30mm SHCS (effector/hot end hinge & fan mount)
3 x M3 25mm SHCS (carriage adjuster)
2 x M3 15mm SHCS (effector springs)
61 M5 T-Nuts (i use these http://www.thingiverse.com/thing:28788)
61 M5 8mm SHCS
Apologies if I missed anything but I think it's mainly all there. Let me know.
Enjoy
Added improved filament spool holder and disc and also a wiring grommet for where the cable bundle from the hot end and extruder stepper pass through the Z tower extrusion. The hole in the extrusion should be drilled 180mm from the base of the Z tower stepper mount. This allows full travel on the Z carriage with the 225mm rods (tube length) that I use with the 8mm drilled ball bearing and spring/string retention system. I normally drill two 5mm holes adjacent to each other and file the bridge between them out to form an oval. I've also added some detailed assembly images and a drawing that shows where the T nuts in the lower base are required.
Update 08/08/2014
I've changed the design of the delta rods. Instead of using magnets I am now using 8mm stainless ball bearings drilled with a 4mm diameter, 4mm deep hole. They are sold for some sort of use in photography. Readily available on ebay. The effector and rod carrier designs have been changed so that they have 8mm sockets to accept the 8mm balls. The whole thing is locked together with Spectra line (100lb) and springs. I used 85mm, fairly strong ones. A little silicone grease before assembly should stop any wear. I've uploaded the amended .stl files and some images of how I assembled it all. There is also a write up in my thread on the Reprap forum. It really does make a rock solid, backlash free connection between the effectors and the towers. There is absolutely no play at the nozzle and I've been able to up 'quality' print speeds considerably.
Anyone that has followed my previous designs has probably been expecting this :-) I've now got to a point where my Cherry Pi printer is at iteration three and I'm really happy with it. Version III incorporates mini V wheels for the carriages and a hot end Z probe for auto levelling and calibration. I use Rich Cattell's Marlin fork which enables all that. I have managed to substantially reduce the number of parts required and, due to the v wheels leaving the rear face of the extrusion free, been able to mount te extruder to the Z tower which results in a relatively short Bowden tube to the extruder. I have renamed the plastic parts to incorporate details of the quantity required and the settings and materials I used to print mine (P=perimeter, B=bottom layers, T=top layers). I've also switched to using a centrifugal fan as I feel it gives greater airflow. It's also easier to incorporate into the Z probe hot end design. The print areTa is around 190mm x 190mm x 250mm. I print at 100mm/s infill, 60mm/s outer perimeter, 70mm/s inner perimeter and 200mm/s travel. Acceleration is 3000 throughout and XY Jerk is 20. It would probably go higher but I'm happy at that and it doesn't seem to stress the machine too much.
BOM
Plastic parts as required
3 x 2020 Bosch/Rexroth Extrusion @ 600mm
9 x 2020 Bosch/Rexroth Extrusion @ 250mm
6 x 16mm x 5mm x 4mm flanged bearings
9 x Open Builds Mini V Wheel Kits
12 x 10mm spherical neodymium magnets
6 x 6mm aluminium tube (with 5mm ID, I drilled mine to this) @ 225mm
12 x M5 8mm SHCS machined with a 10mm ball end mill to form cup for magnet (rod ends)
4M GT2 belt
3 x GT2 pulleys
4 x 13mm x 6mm x 7mm micro switches
4 x NEMA 17 stepper motors
1 x Arduino Mega 2560
1 x RAMPS 1.4
1 x RRD Smart LCD Display
4 x 4988 stepper drivers
12V 5A PSU
Mains lead
1 x 50mm brushless centrifugal fan
250mm diameter glass/mirror build plate
J Head (Bowden type)
0.5M 4mm OD 2mm ID PTFE tube
2 x 1/8 NPT 4mm pneumatic fittings
5 x 608 bearings (extruder and spool holder)
100mm M8 threaded rod (spool holder)
M8 60mm hobbed bolt (hobbed at 25mm)
3 x M8 nut
8 x M8 washers
2 x M3 50mm SHCS (extruder clamp)
2 x compression springs to suit above
2 x tension springs to suit effector/hot end hinge
8 x M3 nut
3 x M5 45mm SHCS (top idlers)
3 x M5 nut
6 x M5 washer
18 x M3 8mm SHCS (stepper fixing, effector)
2 x M3 30mm SHCS (effector/hot end hinge & fan mount)
3 x M3 25mm SHCS (carriage adjuster)
2 x M3 15mm SHCS (effector springs)
61 M5 T-Nuts (i use these http://www.thingiverse.com/thing:28788)
61 M5 8mm SHCS
Apologies if I missed anything but I think it's mainly all there. Let me know.
Enjoy
Similar models
thingiverse
free

Cherry Pi Delta 3D Printer by AndyCart
...the idler bearing belt guides - they disintegrated on me! i've posted a modified design on the 'files' section
andy
thingiverse
free

Mendel rotated geared extruder by JBFromOZ
...x .035) springs x 2 from century springs or similar 8mm trinity labs hob x 1 m3 nut x...
thingiverse
free
One Z-Motor / Filament holder solution for Prusa i3 Rework by WieMi
...t)
360mm m8 threaded rod (middle)
2x 380mm m8 threaded rod (right)
11x m3 nut
8x m3 - 8mm grub screw
8x m8 nut
5x 688zz bearing
thingiverse
free

East3D gecko Z bearing rod brace by delukart
...a m3 screw to lock the 608-zz bearing in place .
i didn't lock the bearing in place with the m3 screw. it dont need it realy.
thingiverse
free

Printable Z-Stage for Makerbot / Cupcake CNC by Iwo
...tamins):
* 2x precision rods, 8mm, >270mm long
* 3x linear bearings, 8mm / 15mm outside, 24mm high
* 45mm 12v fan
thingiverse
free
X-ends for holding 20x20 extrusion nuts/lm8uus by Simonious
...z-nut with spring pair - should fit m8 or similar i'm using it on acme 1/4" rods in the...
thingiverse
free

XY_Plotter by modelatolyesi
...
1x ball-pen spring.
electronics:
arduino uno
cnc shield.
2x a4988 stepper driver.
9g. servo.
4x micro switch.
extension cables.
thingiverse
free

Mini drill press with led light by pierrot93300
...aded shaft
3 lm8uu
6 nuts m8
6 nuts m3
6 screws m3*16mm
1 heatsink 28mm
1 switch on/off
36pcs m3*5mm hex screw (hw005) (optional)
thingiverse
free

Plane Blade and Chisel Sharpening Sled by fauxhican - Metric Remix
...e idea from 3dm4rk's remix, thanks).
2 - m8 x 30mm countersunk allen bolt.
2 - m8 lock nuts.
2 - 608rs (sealed) ball bearing.
thingiverse
free

Articulated arm by mroc
...figured it'd be fun to try to make something similar by 3d printing. i made three different versions with...
Andycart
thingiverse
free

Cherry Pi IIIS by AndyCart
... springs.
check out the forum post for full instructions and help with the build
http://forums.reprap.org/read.php?178,361141
thingiverse
free

Low Friction Spool Holder by AndyCart
...pool sizes. it allows very easy feeding of filament to the extruder with virtually no friction and swapping spools takes seconds.
thingiverse
free

Bug Bot by AndyCart
...t. total build cost is around £25.00
there's a video of him doing his thing here http://youtu.be/ogso3zanqsa
enjoy
andy
thingiverse
free
Andycart / Maso effector for Cherry Pi III 10mm ball bearing for E3D V6 Hotend by Zzyzxx71
...9;s fan.
i do not know if this will work with the e3d v5, i believe andy's oriignal effector was designed for it's use.
thingiverse
free

PrntQB V2 by AndyCart
... the completed machine here http://youtu.be/_oyftjf3l34.
i've added a better quality video here :-http://youtu.be/qpjg7uqw8mi
thingiverse
free

Cherry Pi IIIS Heated Bed Mount by AndyCart
...between the mount and the bed to help insulate the mount. the mount is printed in abs and i use 0.3mm layer height and 33% infill
thingiverse
free
Big Bullseye Clock by AndyCart
...asy winding. thanks to goofy for the idea for that. there's a video of the clock running here :-
https://youtu.be/l88bo01-u7i
thingiverse
free

Cherry Pi II by AndyCart
... nuts used throughout (http://www.thingiverse.com/thing:28788)
low friction spool mount
(http://www.thingiverse.com/thing:235925)
thingiverse
free

Core XY PrntQB by AndyCart
...ng for delta like speeds with cartesian precision. we'll see :-)
i am now waiting for the rest of the parts to ship.
andy
thingiverse
free

3dr spring socket arms by ekaggrat
...by ekaggrat thingiverse this is a modification to use andycart#39;s cherry pi spring socket joint idea in the...
Iii
3d_export
$17

JetRanger III
...jetranger iii
3dexport
jetranger iii
3ddd
$1
Jarron III
...jarron iii
3ddd
jarron iii
decorative glass vase
cg_studio
$139
Panzer III - PzKpfw III - Ausf.G3d model
....3ds .c4d .lwo .obj - panzer iii - pzkpfw iii - ausf.g 3d model, royalty free license available, instant download after purchase.
cg_studio
$139
StuG III - Sturmgeschutz III - Ausf.D3d model
....c4d .lwo .obj - stug iii - sturmgeschutz iii - ausf.d 3d model, royalty free license available, instant download after purchase.
3ddd
free

Velashape III
... syneron , candela
velashape iii — аппарат для лечения целлюлита
3d_ocean
$8
Inoplanet III
...inoplanet iii
3docean
3ds arman3dg games inoplanet low max poly trees
inoplanet iii
design_connected
$16
Richard III
...richard iii
designconnected
baleri italia richard iii armchairs computer generated 3d model. designed by philippe starck.
3d_export
$199

cinderella iii
...cinderella iii
3dexport
3d_export
$119

lara iii
...lara iii
3dexport
3ddd
$1
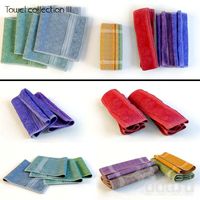
Towel Collection III
...towel collection iii
3ddd
полотенце
towel collection iii
Cherry
3ddd
$1

Cherry
...cherry
3ddd
cherry
люстра cherry
archibase_planet
free

Cherry
...cherry
archibase planet
cherry cherries berry
cherry n010808 - 3d model (*.gsm+*.3ds) for interior 3d visualization.
archibase_planet
free

Cherries
...cherries archibase planet cherries cherry berry food cherries n010812 - 3d model (*.gsm+*.3ds) for...
3d_ocean
$5

cherry
...ation food fruit fruits kitchen realistic red table
cherry cherries fruit fruits table decoration bowl kitchen food realistic red
3ddd
$1

Cherry
...cherry
3ddd
бра cherry
3ddd
$1

cherry
...cherry
3ddd
вишня
plate with cherries for tableware use
3d_export
free

cherry
...cherry
3dexport
cherry lowpoly<br>for fruits and vegetables collecion
3d_ocean
$20

Cherries
...cherries 3docean 3ds max architecture cherries cherry choice fruit deco decoration fruit fruits mental ray realistic...
3d_export
$25

Cherry
...ss what version your 3d program is. preview images are rendered blender cycles formats are: blander 3ds max maya cinema4d obj fbx
3d_export
$8

cherry
...cherry
3dexport
Pi
design_connected
$11

Pi
...pi
designconnected
ligne roset pi chairs computer generated 3d model. designed by thibault desombre.
3d_export
$5

raspberry pi
...raspberry pi
3dexport
carcasa para la raspberry pi
turbosquid
$18

pied
... available on turbo squid, the world's leading provider of digital 3d models for visualization, films, television, and games.
3ddd
$1

Emme pi light
...emme pi light
3ddd
emme pi light
люста emme pi light
3ddd
$1

Emme pi light
...emme pi light
3ddd
emme pi light
бра классическое emme pi light
3ddd
$1

Emme Pi Light
...emme pi light
3ddd
emme pi light
3ddd
$1

Emme Pi Light
...emme pi light
3ddd
emme pi light
design_connected
$16

Pi-Air
...pi-air
designconnected
living divani pi-air lounge chairs computer generated 3d model. designed by harry & camila.
3d_ocean
$15

Manneken Pis
...picting a naked little boy urinating into a fountain’s basin. (wikipedia) the model was sculpted in blender 2.70a rendered wit...
3ddd
$1

Emme pi light
...emme pi light
3ddd
emme pi light
люстра классическая фирма: emme pi light
артикул: 3595/5/cot/12/wh