Thingiverse

Cheap & Easy to Build Steel Filament Storage Rack - Store 80 Spools or more! by sneaks
by Thingiverse
Last crawled date: 3 years, 1 month ago
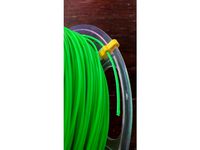
I've been trying to come up with a heavy duty rack to store my filament rolls that is built well and doesn't break the bank. Today I found a solution that I love and I wanted to share it here on Thingiverse.
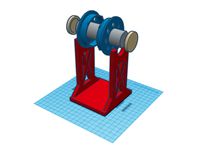
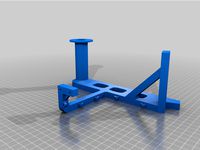
My solution was assembling a rack made of steel electrical handy boxes and 1/2in EMT conduit. It is extremely rugged, works perfect, and is extremely inexpensive to make. You can make a rack in about 10 minutes that holds up to 20 spools with $6.15 in parts. Once made, you can set it on a table, on a shelf, mount it to a wall, the possibilities are endless.
Basic Rack - Total Cost $6.15 - Holds up to 20 Spools
2x #5836134 Handy Boxes $.89ea // Link: https://www.homedepot.com/p/Single-Gang-Drawn-Handy-Box-1-7-8-in-Deep-with-1-2-in-KO-s-8660/100560024
4x #97271 1/2in EMT Connectors $.44ea // Link: https://www.homedepot.com/p/Halex-1-2-in-Electrical-Metallic-Tube-EMT-Set-Screw-Connector-96271/100204006
1x #101543 10' section 1/2in EMT $2.61ea // Link: https://www.homedepot.com/p/1-2-in-EMT-Conduit-101543/100400405
2x2 Rack - Total Cost $29.76 - Holds up to 80 Spools
8x #5836134 Handy Boxes $.89ea // Link: https://www.homedepot.com/p/Single-Gang-Drawn-Handy-Box-1-7-8-in-Deep-with-1-2-in-KO-s-8660/100560024
1x #2122 50pc 1/2in EMT Connectors $9.47ea // Link: https://www.homedepot.com/p/RACO-EMT-1-2-in-Insulated-Set-Screw-Connector-50-Pack-2122/203637583
5x #101543 10' section 1/2in EMT $2.61ea // Link: https://www.homedepot.com/p/1-2-in-EMT-Conduit-101543/100400405
Tools to Assemble:
Hammer
Flathead Screwdriver
Pliers
Hand Saw
For anyone not familiar with using conduit with electrical boxes, have a look at this video, it will show you how to put the connectors in the box. https://www.youtube.com/watch?v=i4pH4hUCT7g
Once all the connectors are installed in the boxes, simply cut the 1/2 EMT to length, install it in the connectors, and tighten the screws. For my 2x2 rack pictured above, I assembled 8 of the boxes with connectors. 4 similar to the one shown in the video, and 4 with the 2 inside connectors on the opposite side. I then cut 8 sections at 28in, 4 sections at 9in, and 4 sections at 6in. Then just put it all together. The nice thing with this design is you can use any length you want for the conduit. This makes it easy to make it fit the rack anywhere.
If anyone wants to keep going and make 3+ Tiers, you can use a Handy Box plate with a 1/2 Knockout: https://www.homedepot.com/p/RACO-Single-Gang-Handy-Box-Cover-with-1-2-in-Knockouts-25-Pack-861/202058330 and just keep going up!
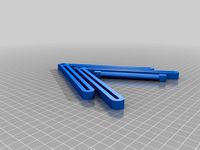
The 2 STL files are for anyone that wants to put a blank plate on the handy box. One is a basic plate and the second has a spot where you can store your filament clips so you don't lose them. Each plate will need two #6 screws to attach it to the box.
IMPORTANT! Please keep in mind the box edges are sharp and can cut you. Also, I recommend wiping everything down with alcohol when done to get all the oil off. Definitely don't want oil getting on your filament. Happy Building!
My solution was assembling a rack made of steel electrical handy boxes and 1/2in EMT conduit. It is extremely rugged, works perfect, and is extremely inexpensive to make. You can make a rack in about 10 minutes that holds up to 20 spools with $6.15 in parts. Once made, you can set it on a table, on a shelf, mount it to a wall, the possibilities are endless.
Basic Rack - Total Cost $6.15 - Holds up to 20 Spools
2x #5836134 Handy Boxes $.89ea // Link: https://www.homedepot.com/p/Single-Gang-Drawn-Handy-Box-1-7-8-in-Deep-with-1-2-in-KO-s-8660/100560024
4x #97271 1/2in EMT Connectors $.44ea // Link: https://www.homedepot.com/p/Halex-1-2-in-Electrical-Metallic-Tube-EMT-Set-Screw-Connector-96271/100204006
1x #101543 10' section 1/2in EMT $2.61ea // Link: https://www.homedepot.com/p/1-2-in-EMT-Conduit-101543/100400405
2x2 Rack - Total Cost $29.76 - Holds up to 80 Spools
8x #5836134 Handy Boxes $.89ea // Link: https://www.homedepot.com/p/Single-Gang-Drawn-Handy-Box-1-7-8-in-Deep-with-1-2-in-KO-s-8660/100560024
1x #2122 50pc 1/2in EMT Connectors $9.47ea // Link: https://www.homedepot.com/p/RACO-EMT-1-2-in-Insulated-Set-Screw-Connector-50-Pack-2122/203637583
5x #101543 10' section 1/2in EMT $2.61ea // Link: https://www.homedepot.com/p/1-2-in-EMT-Conduit-101543/100400405
Tools to Assemble:
Hammer
Flathead Screwdriver
Pliers
Hand Saw
For anyone not familiar with using conduit with electrical boxes, have a look at this video, it will show you how to put the connectors in the box. https://www.youtube.com/watch?v=i4pH4hUCT7g
Once all the connectors are installed in the boxes, simply cut the 1/2 EMT to length, install it in the connectors, and tighten the screws. For my 2x2 rack pictured above, I assembled 8 of the boxes with connectors. 4 similar to the one shown in the video, and 4 with the 2 inside connectors on the opposite side. I then cut 8 sections at 28in, 4 sections at 9in, and 4 sections at 6in. Then just put it all together. The nice thing with this design is you can use any length you want for the conduit. This makes it easy to make it fit the rack anywhere.
If anyone wants to keep going and make 3+ Tiers, you can use a Handy Box plate with a 1/2 Knockout: https://www.homedepot.com/p/RACO-Single-Gang-Handy-Box-Cover-with-1-2-in-Knockouts-25-Pack-861/202058330 and just keep going up!
The 2 STL files are for anyone that wants to put a blank plate on the handy box. One is a basic plate and the second has a spot where you can store your filament clips so you don't lose them. Each plate will need two #6 screws to attach it to the box.
IMPORTANT! Please keep in mind the box edges are sharp and can cut you. Also, I recommend wiping everything down with alcohol when done to get all the oil off. Definitely don't want oil getting on your filament. Happy Building!
Similar models
thingiverse
free

Wall Brackets for 3D Printer Filament
...in-x-10-ft-electric-metallic-tube-emt-conduit-853428/100400405
if you like my designs tip me a few meters of filament. thank you.
thingiverse
free

Filament Spool Rack Bracket by Kerby
...bracket by kerby
thingiverse
this is a filament spool rack i designed for a shelf. i used 1/2" metal conduit cut to length.
thingiverse
free

Filament Spool Holder 50-80mm for 1/2" Conduit (remix) by hward13
...to use a piece of 1/2" conduit for the center rod, so i cut out the threaded section to make it slide easily on the conduit.
thingiverse
free

Tension nut and filament guide for 1/2 inch EMT conduit by prpickett
...guide. printed with 1.75 mm abs filament. i have found that this greatly reduces filament uncoiling and jumping off of the spool.
thingiverse
free

Makerpipe Endcap / Foot for EMT Conduit by nafis
...connector off-set was causing the stand to rock. i designed these end-caps that also act as feet to raise the emt off the ground.
thingiverse
free

Makerpipe Crossover Clamp for EMT using U-bolts by nafis
... the position of the two conduits.
u-bolts available at amazon ( https://amzn.to/2zn1fob )
wing nuts ( https://amzn.to/3awx5nr )
thingiverse
free

Spool Holder Spacer for 1 Inch PVC Pipe by alexhop
...edepot.com/p/everbilt-6-zinc-plated…/204276448
pvc spacers, print 3 for ends and middle: http://www.thingiverse.com/thing:2320205
thingiverse
free

Another spool hanger by philharlow
...g off. the inner screw might be tough without a finger screwdriver or wrench type screwdriver, but i'm sure it could be done.
thingiverse
free

The desrondiers setup 1/2 EMT pipe holder by iknovvmyabcs
...nt spools on 1/2 emt electrical conduit. you can get a 10 foot piece for a few dollars so it's pretty economical and scalable
thingiverse
free

Makerpipe Telescoping EMT Adapters by nafis
...e money off of them. check out https://www.prusaprinters.org/prints/59940-makerpipe-telescoping-emt-adapters for the parts i used
Sneaks
thingiverse
free

sneaking thief
...sneaking thief
thingiverse
sneaking halfling thief
thingiverse
free

sneak-it by colin721
...sneak-it by colin721
thingiverse
support chaussure
thingiverse
free

Sneak drinkcoaster by RaimonElctrncs
... (100 by 100 by 5 mm), to fit in my coasterholder:
https://www.thingiverse.com/thing:3130397
made with love by:
raimon of idealab
thingiverse
free

Sneak Attack! Logo by EllenTheEmu
...a 3d model of the sneak attack logo that i made in tinkercad. feel free to edit it/ use it for whatever you want (within reason).
thingiverse
free
![Stridsvagn 81/Strv 81 [SNEAK PEEK] by 3DimensionPrinter](/t/8705876.jpg)
Stridsvagn 81/Strv 81 [SNEAK PEEK] by 3DimensionPrinter
...stridsvagn 81/strv 81 [sneak peek] by 3dimensionprinter
thingiverse
[sneak peak]
swedish tier viii premium medium tank
\\
:)
thingiverse
free

V-slot wire sneak by mbailly2
...9;re not using that particular groove for a wheel). i use the short 25 mm one for thin wires and the 75 mm one for thicker wires.
thingiverse
free

Nerf - Sneak Attacker Rail Expansion by Yoji00
...i00
thingiverse
this started mostly as a joke, but it's actually pretty useful. the same could be said for the blaster, too.
thingiverse
free

Flexible Components for Sneaks Mount system by XboxOldie
...e flexibility with the ff-join,
see pictures uploaded in addition.
the print was done with a 4mm rim and support on the bed only.
thingiverse
free

Elf Folk Sneak Peek tier 1 unit by Kejopp
...olk sneak peek tier 1 unit by kejopp
thingiverse
first unit of the forest folk, an elven ranger stay tuned for the full release!
thingiverse
free

iPhone Sneak A Peak Holder by 17holeinone
...n a security camera or baby camera.
i'm using this to hang the iphone on my 3d printer so i can monitor my prints remotely.
80
thingiverse
free

Corner bracket 80 x 80 x 80 x 5 mm by Jacksy71
...ingiverse
corner bracket 80 x 80 x 80 x 5 mm.
bracket 80 x 80 x5 mm
plate 80 x 160 x 5 mm
thickness 5 mm.
holes for screws 4 mm.
thingiverse
free

Open Sketch Box 80-80-25 by David_Mussaffi
...open sketch box 80-80-25 by david_mussaffi
thingiverse
open sketch box 80-80-25
thingiverse
free

Surtidor años 80 (gas pump 80s) by GonzaloLS
...surtidor años 80 (gas pump 80s) by gonzalols
thingiverse
surtidor de los años 80
fuel pump from 80s
thingiverse
free

Fan Cover 80 x 80 mm by pdiqlosis
...fan cover 80 x 80 mm by pdiqlosis
thingiverse
to use with cooler 80 mm
thingiverse
free

BTR 80 cookiecutter
...btr 80 cookiecutter
thingiverse
btr-80
thingiverse
free

MTZ 80 by Kartez90
...mtz 80 by kartez90
thingiverse
printable mtz 80 tractor model.
thingiverse
free

Flow alignment for fan 80 x 80 mm by cepera3000
...flow alignment for fan 80 x 80 mm by cepera3000
thingiverse
flow alignment for fan 80 x 80 mm
abs/pla
80x80x12.2 mm
0.2 mm
thingiverse
free

Sample card holder for 80 x 80 mm cards by crijnsjan
...sample card holder for 80 x 80 mm cards by crijnsjan
thingiverse
box for sample cards 80 x 80 mm
thingiverse
free

number 80 by markg42
... number 80 can be used for different purposes when the number 80 is needed ie birthday or door number. print took around 2 hours.
thingiverse
free

iar 80 cookiecutter by jbelux
...iar 80 cookiecutter by jbelux
thingiverse
iar 80
Rack
thingiverse
free

Rack
...rack
thingiverse
a rack
thingiverse
free

OPEN Rack - Blank Rack by Boulon
...open rack - blank rack by boulon
thingiverse
blank rack for open rack 1 to 7 units
thingiverse
free

kitchen Rack
...kitchen rack
thingiverse
kitchen rack
thingiverse
free

Rack by modestos93
...rack by modestos93
thingiverse
this is a rack and pinion
thingiverse
free

Material rack
...material rack
thingiverse
material rack
thingiverse
free

Weapon Rack
...weapon rack
thingiverse
a little weapon rack
thingiverse
free

Drying Rack
...drying rack
thingiverse
resin print drying rack
thingiverse
free

rack attachment by paulrice_
...rack attachment by paulrice_
thingiverse
roof rack atttachment for surg rack
thingiverse
free

File Rack
...file rack
thingiverse
this is a small rack for storing a set of files purchased from walmart
thingiverse
free

Rack
...rack
thingiverse
watch zombieland double tap online
Steel
thingiverse
free

Silent Steel
...silent steel
thingiverse
up next is silent steel. quick quiet perfect for any kind of hunting.
thingiverse
free

steel shot by Louisa
...steel shot by louisa
thingiverse
steel shot
thingiverse
free

HBOT Steel
...hbot steel
thingiverse
work 300300280
steel 2-3mm
if you need source files in solidworks format, write to me in pm
thingiverse
free

Caps for steel profiles
...caps for steel profiles
thingiverse
caps for steel profiles.
for now it contains just a table leg caps 25x25x2 steel profile.
thingiverse
free

Steel Sword by YogurtBear71
...steel sword by yogurtbear71
thingiverse
steel sword from skyrim
thingiverse
free

Skyrim Steel Mace
...skyrim steel mace
thingiverse
a model of a steel mace from skyrim.
thingiverse
free

Beskar Steel Ingot
...beskar steel ingot
thingiverse
beskar steel ingot i made from the mandelorian.
thingiverse
free

Max Steel by HarryZitra
...max steel by harryzitra
thingiverse
max steel knee (number reference of toy: 1687hr2)
thingiverse
free

Steel cabinet handle by molracing
...steel cabinet handle by molracing
thingiverse
steel cabinet handle
thingiverse
free

16x16x1 Steel Plug by Lucas0560
...16x16x1 steel plug by lucas0560
thingiverse
plug for a 16x16x1 steel
Storage
thingiverse
free

STORAGE by leonk
...storage by leonk
thingiverse
storage
thingiverse
free

Drills storage
...drills storage
thingiverse
drills storage on the wall.
thingiverse
free

Storage by Matthewkaye
...storage by matthewkaye
thingiverse
this is a little storage box.
thingiverse
free

Storage box
...storage box
thingiverse
a simple sealable storage box.
thingiverse
free

Storage Box
...storage box
thingiverse
storage box with inspirational quotes.
thingiverse
free

Storage box
...storage box
thingiverse
storage container
110mm x 100mm x 72mm
thingiverse
free

Storage holder and Storage holder for wall by ADK08
...storage holder and storage holder for wall by adk08
thingiverse
holder
thingiverse
free

PringlesCase - Storage
...ge
thingiverse
this is my design of a pringles storage case, with/without dividers and two different highs and stackable design.
thingiverse
free

screws storage
...screws storage
thingiverse
storage for small things, screws, etc
thin walls 0.8 mm for less filament usage
thingiverse
free

Storage Sign by geniusdesign
...storage sign by geniusdesign
thingiverse
storage sign
Cheap
thingiverse
free

Cheap Ace by AuroraRobotics
...cheap ace by aurorarobotics
thingiverse
parts for cheap ace
thingiverse
free

super cheap target
...uper cheap target
thingiverse
very cheap,easy to use and print
shooting target
i use this thing for: air rifle,22lr and flobert.
thingiverse
free

Cheap vernier caliper cover
...cheap vernier caliper cover
thingiverse
this is a replacement cover for my cheap vernier calipers.
thingiverse
free

Lamp Screen cheap by jesusmartin
...lamp screen cheap by jesusmartin
thingiverse
this is a cheap and fast to print model for a screen lamp.
thingiverse
free

Cheap Mobile Phone Stand
...cheap mobile phone stand
thingiverse
cheap mobile phone stand. design allow to use usb cable from bottom.
thingiverse
free

Wedding rings (cheap...) by Beatrice1975
...ngs (cheap...) by beatrice1975
thingiverse
very cheap wedding rings. you can always say in your defense, that love has no price.
thingiverse
free

Fan Shroud for cheap Kossel by Roxanna77
...fan shroud for cheap kossel by roxanna77
thingiverse
simple fan shroud for cheap kossel
thingiverse
free

Cheap Hand Drill "lite" by LaBidouille
...cheap hand drill "lite" by labidouille
thingiverse
cheap hand drill "lite"
thingiverse
free

Cheap lab laser by raul7321
... cheap laser for education labs. i use a rechargeable battery (18650, 3.7 v, 5.8 ah), and a charger module based in a ic tp4056.
thingiverse
free

Cheap CNC Router Remix by largeformat3dprinter
...ix by largeformat3dprinter
thingiverse
remix of cheap cnc router by nic6911.
converted to sketchup and designspark mechanical.
Store
thingiverse
free

Christmas symbols by MBot3d - Store Store by mbot3d
...christmas symbols by mbot3d - store store by mbot3d
thingiverse
jingle bell, jingle in the store!
thingiverse
free

battery store
...battery store
thingiverse
container to store 4 pieces cr123a lithium cells.
thingiverse
free

Equerre Store by luberth77
...equerre store by luberth77
thingiverse
fixation pour store vénitien
thingiverse
free

Store lamelle by aknote
...store lamelle by aknote
thingiverse
pièce d'arrêt pour store a lamelle.
thingiverse
free

Paint brushes store. by Tungs1O
...paint brushes store. by tungs1o
thingiverse
hanging store for paintbrushes.
thingiverse
free

Apple Store Concept by alexdfox
...apple store concept by alexdfox
thingiverse
apple concept store
thingiverse
free

Disney Store Key Display
...isplay
thingiverse
for collectors of shopdisney.com and disney store collectible store keys, this display was my first 3d model.
thingiverse
free

Ikea Store ENJE - Embout d'enrouleur de Store by KreizennDafar
... a enrouleur cote oppose de l'enrouleur
roller blind.
this object is the side of the store oppostite side to the rollet blind
thingiverse
free

Mailbox letters-store by the_cujo
...mailbox letters-store by the_cujo
thingiverse
u.s. mailbox to store your letters.
thingiverse
free

Fisherman Store by StefanoV
...fisherman store by stefanov
thingiverse
simple keychain
Spools
thingiverse
free

Spool Support For Anycubic Spool Holder and AMZ3D Spools by Kobaratsu
... amz3d spools by kobaratsu
thingiverse
spool axis support to avoid jerks on spool, using anycubic spool holder and amz3d spools
thingiverse
free

Spool adapter for Warhorse spool
...spool adapter for warhorse spool
thingiverse
a simple spool adapter to use abs warhorse spool with a 72 mm hole diameter.
thingiverse
free

Spool holder for 1KG Spools by angkor
...spool holder for 1kg spools by angkor
thingiverse
spool holder for 1kg spools
thingiverse
free

Spool holder
...for up to 1kg spools and should fit all spools ...
thingiverse
free

Spool assembler
... empty spool with this spool assembler
just cut an empty spool in half , put your filament and assemble with this spool assembler
thingiverse
free

Small Spool and Spool Stand by Beckman13
...ool holder are meant for 50 gram flexible filaments. the two sides of the spool holder are meant to slide together and interlock.
thingiverse
free

spool spindle cap for 25mm spools by Seadevil
...spool spindle cap for 25mm spools by seadevil
thingiverse
spool spindle cap for 25mm spools
thingiverse
free

spool ! by St0rmingBr4in
...spool ! by st0rmingbr4in
thingiverse
this is a spool !
thingiverse
free

Spool Holder for large spools by dmonkey
...y
thingiverse
a spool holder that you can attach to the back of a makerbot replicator that can hold large filament spools (1kg)
thingiverse
free

Spool roll
...spool roll
thingiverse
spool roll
Build
thingiverse
free

building
...building
thingiverse
building
thingiverse
free

building by WillandMrData2
...giverse
building.
real life size building.
"again just covering building, along the lines of my one print building".
thingiverse
free

Buildings by DONW999
...buildings by donw999
thingiverse
buildings
thingiverse
free

building by arli3d
...building by arli3d
thingiverse
building
thingiverse
free

building by Syzguru11
...building by syzguru11
thingiverse
building
thingiverse
free

build by kallik
...build by kallik
thingiverse
build
thingiverse
free

Building by taroskyabby22
...building by taroskyabby22
thingiverse
this is a building
thingiverse
free

Building by tbritten
...building by tbritten
thingiverse
building
thingiverse
free

building by jamfox
...building by jamfox
thingiverse
building
thingiverse
free

build by nagato
...build by nagato
thingiverse
build
Easy
thingiverse
free

Easy Puzzle
...easy puzzle
thingiverse
easy puzzle with 6 parts.
thingiverse
free

Knife easy by Nonokill29
...knife easy by nonokill29
thingiverse
easy to print !!!
thingiverse
free

Easy box by Goopy25de
...easy box by goopy25de
thingiverse
easy flip box
thingiverse
free

Easy Puzzle 2
...easy puzzle 2
thingiverse
easy puzzle with 6 parts.
thingiverse
free

Proxmark Easy by francis2054
...proxmark easy by francis2054
thingiverse
accurate model of the proxmark easy
thingiverse
free

HOTEND EASY I3Mega
...hotend easy i3mega
thingiverse
easy hotend for i3 mega ................project in progress.................
thingiverse
free

Easy BOX by vartur
...easy box by vartur
thingiverse
easy box. necessary to made: rivet and riveter.
thingiverse
free

Easy Print Turkey
...easy print turkey
thingiverse
easy print turkey. no supports required. do not eat.
thingiverse
free

Easy phone stand
...easy phone stand
thingiverse
easy to print phone stand.
and it works well also :d
thingiverse
free

Easy Puzzle cube
...easy puzzle cube
thingiverse
forms a solid, 3x3 cube when solved. easy difficulty.
Filament
thingiverse
free

Filament holder for 1,75mm filament by Boschlike
...ent holder for 1,75mm filament by boschlike
thingiverse
filament holder for 1,75mm filament.
mountable on the prusa mk3s+ frame.
thingiverse
free

Filament Holder SUNLU Filament by TrisiT
...filament holder sunlu filament by trisit
thingiverse
remix for the sunlu filament rolls.
thingiverse
free
Filament stand
...filament stand
thingiverse
basic filament stand for filament coils with bigger diameter.
thingiverse
free
Filament Holder
...filament holder
thingiverse
this filament stand is to hold the filament without using the as-built location
thingiverse
free
Filament clip
... clip
really easy to print and use. no hole to insert the filament. the filament stay in place because pressed against the spool.
thingiverse
free

Filament hanger
...filament hanger
thingiverse
hanger for filaments. it helps you organize your filaments and work space.
thingiverse
free

filament holder
...filament holder
thingiverse
filament holder
thingiverse
free
Filament Cradle
...filament cradle
thingiverse
filament cradle
thingiverse
free

Filament Holder (Filament Spool) by herenkeskin
...filament holder (filament spool) by herenkeskin
thingiverse
this is a filament holder. i printed this part on my tevo tarantula.
thingiverse
free
Pyramid Filament Mount with Filament Sensor by wlbillmartin
...pyramid filament mount with filament sensor by wlbillmartin
thingiverse
pyramid filament mount with filament sensor
(9:30)
More
thingiverse
free

More stability, more rings, more bulbs, more fun. by mirok
...e bulbs, more fun. by mirok
thingiverse
little changes in tank and bubble wheel for more stability and printing without support.
thingiverse
free

More Juul, More fun
...more juul, more fun
thingiverse
just some double hitters i quickly designed
thingiverse
free

more bolter
...more bolter
thingiverse
more
thingiverse
free

Maduro No more
...maduro no more
thingiverse
maduro no more - venezuela
no mas maduro
thingiverse
free

Rahul More
...rahul more
thingiverse
dasd
thingiverse
free

More Vases
...more vases
thingiverse
some vases i modelled in maya
thingiverse
free

BE MORE CHILL by MarcoLozano1022
...chill by marcolozano1022
thingiverse
i made this be more chill logo because i wanted some be more chill merch for my self. enjoy
thingiverse
free

more and more cube gears by faggahz
...inting.
globe holder: https://www.thingiverse.com/thing:1109942. maybe of different scaling, use the globe holder published here.
thingiverse
free

more shrines by SirDenderan
...more shrines by sirdenderan
thingiverse
ok some more shrines for my heroquest ...
have fun
and allways
nice dice
thingiverse
free

Even More Than Even More Lego Weapons by sammer
...even more than even more lego weapons by sammer
thingiverse
i made this in tinkercad