Thingiverse

CH1P-E 2.0 Claptrap Walking Robot by mayrthom
by Thingiverse
Last crawled date: 3 years, 1 month ago
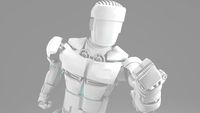
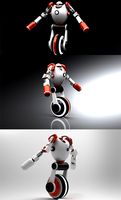
This Chip-E is remixed with CL4P-TP aka Claptrap from the video game Borderlands. This gives Chip-E an even more robotic look. Besides that we have added arms to enable better dancing abilities. With his new eye (Pi-Cam) he can see and snap pictures. Speaking of it we have added a Raspberry Pi Zero, with this major hardware upgrade the possibilities are almost endless. So e.g. we changed the little piezo speaker to a real speaker, which we connected over a lowpass filter to the GPIO Pin 18 of the Pi according to adafruits instructions: “https://learn.adafruit.com/adding-basic-audio-ouput-to-raspberry-pi-zero”. So now the ChipE is capable to talk in a real Language or to play songs.
The big problem we ran into with the Raspberry is, that there aren’t enough PWM pins, which are essential for the servos. We thought about using the adafruit servo driver, but we didn't want to wait until it arrives, so we added an Arduino UNO, which communicates over I2C with the Pi and just does the PWM-Stuff for it. An Arduino Nano would be even better, because it's smaller, but we had the UNO already at home.
Of course the RobotGeek Geekduino is useable as well.
One idea was, to program a web interface for the Robot on the Raspberry, so it’s possible to control CH1P-E over your smartphone.
We wanted to use the original servos from RobotGeek, but they were hard to come by for us here in Austria, so we used MG995 servos, but we designed
the body so, that the Robotgeek servos are useable as well. We changed the shoes, feet and legs for the MG995 differently. The arms are moved by standard 9g servos. There are no ball bearings needed. The feet for the MG995 are screwed together with tapping screws.
By using the RobotGeek kit, only the Raspberry Pi stuff (pi zero, pi camera, speaker components), the servo for the arms and the tapping screws must be bought seperatly.
If you want to use the RobotGeek Servos print the part with the "_RobotGeek" ending, otherwise use the "_995" Parts.
We tried to use as many snap fits and screw connections as possible. Only the camera holder for the picam, the speakercap and the antenna must be glued in.
Currently we are in the process of programming the Robot, but we don't have enough time to complete it right now.
Features list:
Raspberry Pi as brain
Arduino as PWM Controller
real speaker
Pi camera
HD 44870 16x2 LCD
LED
moving Arms
Sweet dancing moves
optional Features:
IR Receiver
Electronic parts list:
4x mg995 servos or alternatively 4x RobotGeek 180° Servos
2x 9g servos
1x raspberry pi zero w
1x raspberry pi camera module
1x arduino uno/nano or alternatively the RobotGeek Geekduino (we used the uno because we already had it)
1x HD44780 16x2 LCD Display + I2C adapter (usuallsy they are already soldered together)
1x mini speaker + 1x 10nF +1x 10µF capicators + 1x 150Ω + 1x 200Ω resistors for the lowpass
1x LED
1x toggleswitch
1x coax power jack, panel mount
1x batterypack 6V
1x step down regulator 5V or alternatively 5V voltage regulates(we had to use 3 in parallel)
header pins
perfboard
Mechanical part list:
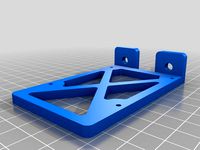
1x Body.stl
1x topcap.stl
1x Antenna.stl
1x picam_holder.stl
1x speaker_cap.stl
1x arm_left.stl
1x arm_right.stl
4x tapping screw 1.2 x 4.5mm for fixing the arms on the servos
4x tapping screw 2.8 x 12mm for mounting the topcap
+for the RobotGeek typ:
2x Long C Bracket form RobotGeek
1x Foot_Left_RobotGeek.stl
1x Foot_Right_RobotGeek.stl
1x Shoe_Left_RobotGeek.stl
1x Shoe_Right_RobotGeek.stl
+for the MG995 typ:
1x foot_left_995.stl
1x foot_right_995.stl
1x shoe_left_995.stl
1x shoe_right_995.stl
2x leg_995.stl
2x bearing_995.stl
8x tapping screw 2.8 x 12mm for the feet
See CH1P-E walking:https://youtu.be/0-S2gbGk48I
See CH1P-E dancing:https://youtu.be/xD_imHESIJE
The big problem we ran into with the Raspberry is, that there aren’t enough PWM pins, which are essential for the servos. We thought about using the adafruit servo driver, but we didn't want to wait until it arrives, so we added an Arduino UNO, which communicates over I2C with the Pi and just does the PWM-Stuff for it. An Arduino Nano would be even better, because it's smaller, but we had the UNO already at home.
Of course the RobotGeek Geekduino is useable as well.
One idea was, to program a web interface for the Robot on the Raspberry, so it’s possible to control CH1P-E over your smartphone.
We wanted to use the original servos from RobotGeek, but they were hard to come by for us here in Austria, so we used MG995 servos, but we designed
the body so, that the Robotgeek servos are useable as well. We changed the shoes, feet and legs for the MG995 differently. The arms are moved by standard 9g servos. There are no ball bearings needed. The feet for the MG995 are screwed together with tapping screws.
By using the RobotGeek kit, only the Raspberry Pi stuff (pi zero, pi camera, speaker components), the servo for the arms and the tapping screws must be bought seperatly.
If you want to use the RobotGeek Servos print the part with the "_RobotGeek" ending, otherwise use the "_995" Parts.
We tried to use as many snap fits and screw connections as possible. Only the camera holder for the picam, the speakercap and the antenna must be glued in.
Currently we are in the process of programming the Robot, but we don't have enough time to complete it right now.
Features list:
Raspberry Pi as brain
Arduino as PWM Controller
real speaker
Pi camera
HD 44870 16x2 LCD
LED
moving Arms
Sweet dancing moves
optional Features:
IR Receiver
Electronic parts list:
4x mg995 servos or alternatively 4x RobotGeek 180° Servos
2x 9g servos
1x raspberry pi zero w
1x raspberry pi camera module
1x arduino uno/nano or alternatively the RobotGeek Geekduino (we used the uno because we already had it)
1x HD44780 16x2 LCD Display + I2C adapter (usuallsy they are already soldered together)
1x mini speaker + 1x 10nF +1x 10µF capicators + 1x 150Ω + 1x 200Ω resistors for the lowpass
1x LED
1x toggleswitch
1x coax power jack, panel mount
1x batterypack 6V
1x step down regulator 5V or alternatively 5V voltage regulates(we had to use 3 in parallel)
header pins
perfboard
Mechanical part list:
1x Body.stl
1x topcap.stl
1x Antenna.stl
1x picam_holder.stl
1x speaker_cap.stl
1x arm_left.stl
1x arm_right.stl
4x tapping screw 1.2 x 4.5mm for fixing the arms on the servos
4x tapping screw 2.8 x 12mm for mounting the topcap
+for the RobotGeek typ:
2x Long C Bracket form RobotGeek
1x Foot_Left_RobotGeek.stl
1x Foot_Right_RobotGeek.stl
1x Shoe_Left_RobotGeek.stl
1x Shoe_Right_RobotGeek.stl
+for the MG995 typ:
1x foot_left_995.stl
1x foot_right_995.stl
1x shoe_left_995.stl
1x shoe_right_995.stl
2x leg_995.stl
2x bearing_995.stl
8x tapping screw 2.8 x 12mm for the feet
See CH1P-E walking:https://youtu.be/0-S2gbGk48I
See CH1P-E dancing:https://youtu.be/xD_imHESIJE
Similar models
grabcad
free

Line Following Robot using Arduino Uno and Raspberry Pi Zero
...line following robot using arduino uno and raspberry pi zero
grabcad
3d printing line following robot
grabcad
free
![[Component] Robot Arm 3DOF - REV.1 | Lengan Robot 3DOF Dengan Akrilik](/t/5365751.jpg)
[Component] Robot Arm 3DOF - REV.1 | Lengan Robot 3DOF Dengan Akrilik
...t] robot arm 3dof - rev.1 | lengan robot 3dof dengan akrilik
grabcad
robot arm 3dof acrylic - servo mg995, arduino uno, lcd 16x2
grabcad
free
![[B-04-RA] Robot Arm 3 DOF V.1.1 (Revision 1)](/t/10604197.jpg)
[B-04-RA] Robot Arm 3 DOF V.1.1 (Revision 1)
...[b-04-ra] robot arm 3 dof v.1.1 (revision 1)
grabcad
robot arm 3dof acrylic - servo mg995, arduino uno, lcd 16x2
thingiverse
free

Monka 6x4 robot chassis by Jirkasirka
... you will need:
4x tt motor
6x wheel
servo s3003
2x 625bearing
m3, m4, m5 bolts ans nuts and other custom electronic(arduino ...)
thingiverse
free

JoyBonnet Raspberry Pi Zero Controller by ZeroPie
...opie
thingiverse
you need to print
1x top
1x bottom
6x button 1
2x button 2
4x separator
use flat philips #4 x 3/4 inches screws
thingiverse
free

Raspberry Pi Camera Mount by Creater
... colorfabb woodfill filament.
parts required for assembly:
3x m3 33mm screws
2x m3 19mm screws
4x m2 5mm screws
4x m3 screw nuts
thingiverse
free

Modular Frame for Raspberry Pi 3 B+ and Arduino with PWM
...erse
modular frames for raspberry pi 3 b+ and arduino with adafruit 16-channel 12-bit pwm/servo driver - i2c interface - pca9685
thingiverse
free

SMARS QUAD MOD by tristomietitoredeituit
...rial from my links, it will not cost you extra money and you will allow me to finance new projects! i would really appreciate it!
thingiverse
free
Raspberry Pi 2020 holder by Euter
...ews with spacers to mount raspberry pi. you can mount raspberry pi to both sides. m3 holes are designed to be tapped with m3 tap.
grabcad
free

16 Channel PWM Servo Controller
...16 channel pwm servo controller
grabcad
16-channel 12-bit pwm/servo driver i2c interface pca9685 for arduino / raspberry pi.
Claptrap
3ddd
$1

Claptrap
...s been programmed with an overenthusiastic personality, and brags frequently, yet also expresses severe loneliness and cowardice.
turbosquid
free

Claptrap 3d model NEW YEAR SALE
...l borderlands claptrap 3d model for download as blend and fbx on turbosquid: 3d models for games, architecture, videos. (1669553)
thingiverse
free

claptrap - tm
...claptrap - tm
thingiverse
claptrap - tm
thingiverse
free

Claptrap by 15PerezM
...ptrap by 15perezm
thingiverse
this is a model of the borderlands character claptrap. the wheel rolls and requires some assembly.
thingiverse
free

Claptrap Keychain by Carflo
...claptrap keychain by carflo
thingiverse
claptrap keychain. you can scale it yourself later if too big or too small.
thingiverse
free

Super General Claptrap trinket
...super general claptrap trinket
thingiverse
super general claptrap trinket from borderlands 3.
thingiverse
free

Claptrap by kscannon
... rather then millimeters. check print size before printing. i had to adjust in printing program to get the base to be 127mm wide.
blendswap
free

Claptrap
...commons libre open source 3d art
many people played borderlands and i've thinked i made a claptrap :)have fun whith it !
thingiverse
free

Claptrap by moJoE542
...n axle. just print and snap together. a larger scale is recommended because the arms can be fragile when printed on a small scale
thingiverse
free

Claptrap by 3DprintA18
...model behind the eye and lower panel, the model is thin here to allow light through if you print in white or translucent plastic.
Walking
design_connected
$4

Walking
...walking
designconnected
chista walking computer generated 3d model.
3d_export
$5

walking machine
...walking machine
3dexport
walking machine in solid works
3ddd
$1

Walking Cabinet
...walking cabinet
3ddd
тумба , markus johansson
walking cabinet
3d_export
$10

a walking bunker
...a walking bunker
3dexport
this is a walking bunker that is eguipped with a double machine and a vizer/
turbosquid
$35

A Walking Bridge
...d
royalty free 3d model a walking bridge for download as skp on turbosquid: 3d models for games, architecture, videos. (1514530)
turbosquid
$20

walking man
...quid
royalty free 3d model walking man for download as blend on turbosquid: 3d models for games, architecture, videos. (1219967)
turbosquid
$19

Walking girl
...squid
royalty free 3d model walking girl for download as fbx on turbosquid: 3d models for games, architecture, videos. (1495941)
turbosquid
$55

lion walking
...
royalty free 3d model lion walking for download as ma and ma on turbosquid: 3d models for games, architecture, videos. (1604914)
turbosquid
$5

Walking Bridge
...yalty free 3d model walking bridge for download as ma and obj on turbosquid: 3d models for games, architecture, videos. (1523555)
3d_export
$7

walking closet
...walking closet
3dexport
Robot
3d_ocean
$20

Robot
...robot
3docean
character metal robot robot robotic white
robot model for 3dsmax 2009 and greater
3d_ocean
$45
Robot
...robot
3docean
fighing machine robot
a fighting robot from the scrapyard.
3d_ocean
$18
Robot
...robot
3docean
machin robot science fiction
high poly robot.
3d_export
$7

Robot
...robot
3dexport
robot
3d_export
$5
robot
...robot
3dexport
robot
3d_export
free

Robot
...robot
3dexport
robot
turbosquid
$10

Robot/ Alien Robot
...
royalty free 3d model robot/ alien robot for download as max on turbosquid: 3d models for games, architecture, videos. (1442828)
3d_export
$5

robot
...robot
3dexport
robot in blender
3ddd
$1
robot
...robot
3ddd
робот
robot
3ddd
$1

Robot
...robot
3ddd
робот
robot
0
turbosquid
$12

Calligraphic Digit 0 Number 0
...hic digit 0 number 0 for download as max, obj, fbx, and blend on turbosquid: 3d models for games, architecture, videos. (1389318)
3d_export
$6

set-0
...set-0
3dexport
turbosquid
$6

hedge 0
...yalty free 3d model hedge 0 for download as max, obj, and fbx on turbosquid: 3d models for games, architecture, videos. (1450353)
turbosquid
$5

Nuber 0
...oyalty free 3d model nuber 0 for download as ma, obj, and fbx on turbosquid: 3d models for games, architecture, videos. (1564674)
turbosquid
$22

0.jpg
... available on turbo squid, the world's leading provider of digital 3d models for visualization, films, television, and games.
turbosquid
free

Steam Locomotive Fowler 4F 0-6-0
... available on turbo squid, the world's leading provider of digital 3d models for visualization, films, television, and games.
turbosquid
$10

Liquid Number 0
... model liquid number 0 for download as c4d, 3ds, fbx, and obj on turbosquid: 3d models for games, architecture, videos. (1689919)
turbosquid
$45

Dragon360_perspShape_tmp.0.jpg
... available on turbo squid, the world's leading provider of digital 3d models for visualization, films, television, and games.
turbosquid
$8

Rocks Debris 0
... available on turbo squid, the world's leading provider of digital 3d models for visualization, films, television, and games.
3d_export
$18

wood-guardrail-fence 0
...wood-guardrail-fence 0
3dexport
wood-guardrail-fence 0<br>3ds max 2015
E
3ddd
$1
WALL-E
...wall-e
3ddd
wall-e , робот
wall-e
3d_export
$100

e-rickshaw
...e-rickshaw
3dexport
e-rickshaw- it have 3d model of passenger e-rickshaw
3d_ocean
$12
Wall E
...wall e
3docean
character robot wall e
its a 3d model of wall e….
turbosquid
$68
Model-E Droids 2-E Q-E Star Wars
... available on turbo squid, the world's leading provider of digital 3d models for visualization, films, television, and games.
cg_studio
$45
Model-E Droids 2-E Q-E Star Wars3d model
....3ds .c4d .obj .vue - model-e droids 2-e q-e star wars 3d model, royalty free license available, instant download after purchase.
3d_export
$100
e-rickshaw
...e-rickshaw
3dexport
e-rickshaw design for passenger it have all mechanical component
design_connected
$7

Cone E
...cone e
designconnected
bonaldo cone e computer generated 3d model. designed by pasini, ennio.
3ddd
$1

Wall-E NEW
...wall-e new
3ddd
wall-e , робот
wall-e
design_connected
$29

Extrasoft E
...extrasoft e
designconnected
living divani extrasoft e computer generated 3d model. designed by lissoni, piero.
3ddd
$1

E-Turn
... скамейка
современная скамейка фирмы kundalini.
модель e-turn.
дизайнер brodie neil.
размеры: h 42 cm l 185 cm w 54 cm
2
design_connected
$11

No 2
...no 2
designconnected
sibast no 2 computer generated 3d model. designed by sibast, helge.
turbosquid
$6

Cliff Rock 2-2
...uid
royalty free 3d model cliff rock 2-2 for download as obj on turbosquid: 3d models for games, architecture, videos. (1619161)
turbosquid
$29

Book variation 2 2
...3d model book variation 2 2 for download as max, obj, and fbx on turbosquid: 3d models for games, architecture, videos. (1366868)
turbosquid
$22

Classic baluster (2) (2)
...assic baluster (2) (2) for download as max, obj, fbx, and stl on turbosquid: 3d models for games, architecture, videos. (1483789)
turbosquid
$99

Smilodon 2 Pose 2
... available on turbo squid, the world's leading provider of digital 3d models for visualization, films, television, and games.
turbosquid
$20

Barrel Barricade 2-2
... available on turbo squid, the world's leading provider of digital 3d models for visualization, films, television, and games.
turbosquid
$6

Wall Trophy (2) (2)
... available on turbo squid, the world's leading provider of digital 3d models for visualization, films, television, and games.
turbosquid
free

Tire label 2 of 2
... available on turbo squid, the world's leading provider of digital 3d models for visualization, films, television, and games.
3ddd
$1

Кровать, 2 тумбочки, 2 светильника
...кровать, 2 тумбочки, 2 светильника
3ddd
кровать, 2 тумбочки, 2 светильника
нормальное качество
формат 3ds max
без текстур
3ddd
free

Кровать, 2 тумбочки, 2 светильника
...кровать, 2 тумбочки, 2 светильника
3ddd
кровать, 2 тумбочки, 2 светильника
нормальное качество
формат 3ds max
без текстур