Thingiverse
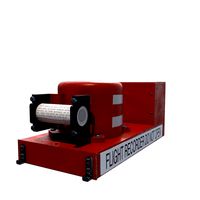
Cessna Flight Sim Control Box
by Thingiverse
Last crawled date: 4 years, 3 months ago
Cessna style push/pull throttle, prop, mixture control box, also housing flaps and elevator trim. This is a front plate for the box I made, a faceplate for the flaps, drawings for the rest of the box, and a complete set of links and info for all parts used.
Cost: ~$40 (a savings of about $300 to $1000 for commercial equivalent)
VR has a long way to go before actual simulator experience is sufficient. VR controller inputs to access things you use a LOT, or need to adjust QUICKLY without dorking around fighting hard to see and touch virtualized panels is key. I considered these controls to be CORE, minimum required physical controls along with my yoke (or stick) and rudder pedals while in VR flight sim. Throttle quadrants can be purchased (Logitech, upcoming Honeycomb, etc), but most are not push/pull. Almost all push/pull flight sim throttles are hundreds of dollars (there is literally one for $1000.... absolutely asinine, costing you more than the parts for the real plane!) You can build this entire thing for probably $30-$40 and the only feature quality you will lack compared to the real thing is twist fine-tuning of mixture (there is no friction lock either).
This is made of several parts by various authors on Thingiverse, including my own parts and remixes for a complete solution. One of my pet peeves with Thingiverse is lazy people that don't include a full set of details or instructions how to complete a project. Something you wont suffer from here.
The components:
Throttle Sliders and instructions:https://www.thingiverse.com/thing:4082593
This link also has all the info about what rods to buy, where to buy, etc.
Throttle Knob:https://www.thingiverse.com/thing:4080886
Alternative throttle knobs, more realistic to Cessna spec, but may need to adjust the hole size to 6mm:https://www.thingiverse.com/thing:3154957https://www.thingiverse.com/thing:2806962
Mixture/prop Knobs:https://www.thingiverse.com/thing:4080886
Elevator Trim:https://www.thingiverse.com/thing:3874786
Note that I used a stop point in my slicer to change colors for the white text on black plate. See below for what electronics I used for this.
Also use my notes on how to assemble, it's better than the original.https://www.thingiverse.com/make:746238
Flaps:https://www.thingiverse.com/thing:2794595
Note that the flap control by Jay737 doesn't have a faceplate, and included here in the files is a STL for a faceplate I made for it, again, using a stop point to swap colors for the text. Also BTW, in X-plane (or other flight sim) this flap design is not true to Cessna as a lever, but more of a toggle up/down for more or less flaps, but otherwise realistic.
The Electronics:
Linear and multi-turn pots:
The parts used are mentioned in the respective Thingiverse links above. But I'll go ahead and list them here.
3x Slider pots:
100mm travel, standard fader pots from Digikeyhttps://www.digikey.com/product-detail/en/panasonic-electronic-components/EVA-NF3R15B14/PNF100SB-ND/244381
1x Multi-turn pot:
10K Ohm 10-Turn Rotary Wire Wound Precision Potentiometer Pothttps://www.amazon.com/gp/product/B079JN626M/ref=ppx_od_dt_b_asin_title_s01?ie=UTF8&psc=1
Flaps switch:
The original author doesn't say what switch they used. But it's a huge switch. I had a tiny switch on hand (https://www.digikey.com/product-detail/en/e-switch/100SP3T1B1M1QEH/EG2375-ND/378844), but had to redesign the bracket a little in order to work. I cannot share that design, as that author does not allow remix or modification. He also used a metal lever, but if you just grab his measurements (which are provided on his site) you can easily draft and 3D print that instead and would be plenty strong. Again, sorry I can't include that drawing, but I did reach out to that author and will update this if I get the green light.
Arduino:
Find any Arduino case or mounting plate that is low profile (there are TONS on thingiverse). One that will hold the arduino and screw down to the inside of your box is what you want. Get an Arduino Uno, and then follow these instructions on forcing an Arduino Uno to be a USB joystick.
Download UnoJoy (https://github.com/AlanChatham/UnoJoy)
Upload the UnoJoy sketch to your Arduino (UnoJoy/UnoJoyArduinoSample/UnoJoyArduinoSample.ino)
Boot Arduino into DFU mode (see video)
Install drivers (UnoJoyWin)
Run TurnIntoAJoystick.bat (downloaded with UnoJoy files)
See this how-to video for reference:https://www.youtube.com/watch?v=8kGl2Yd-clI
Your Arduino Uno is now a USB Joystick!
Wiring:
You will need to know how pots and switches work. I might include a full schematic in the future, but basically, pots have 3 connectors. You need to power + and - to them, and then the 3rd connector is the "signal" wire that splits the voltage and tells the Arduino where your position is relative to the + or - side of the pot. Use the 5v and GND pins of the Arduino to power all the pots (and yes, I just soldered all the positives together and into a single wire for 5v on the Arduino, same for negatives, as you can see in my mess of wires that I didn't care to lay out more professionally). All "signal" wires for the pots (3 sliders and 1 multi-turn for the trim control) are wired into A0,A1,A2,A3 of your Arduino, and it doesn't matter which order (they will show up and you will configure X-Plane, P3D or FSX as to what is what).
The wire I used was a iPhone USB cable where the connector crapped out. Yep, I keep dead USB cables for just such occasions. :)
A volt and Ohm meter is handy to measure things and see that you are dealing with the right connectors. The pots also have a spec sheet you can refer to. Do some Youtube on how to wire a Potentiometer if electronics is not your strong side. It's easy, but it helps to see the basics in action.
The Flaps switch is an On-Off-On. Ground the center post to negative, and then run both other connectors to any digital I/O pin of your Arduino (such as 4 and 5).
You can test that all this is working in Windows 10 Control Panel / Devices. Find the UnoJoy Joystick, go to settings, and a generic joystick dialog should appear showing any inputs it sees from your Arduino. Your flight sim will also see these same inputs and you can configure them in game!
The Box:
I included here only the front plate STL, as well as the flaps faceplate. All other parts to construct this are linked herein to remixes, or to online drawings. I could post all STLs for all box walls if the community is really interested, but... I highly recommend using 1/4" (5mm) Birch ply or some light thin wood, as its much lighter and much cheaper than all the filament it would take to print this. I considered printing it, but am mounting it on a motion chair, and weight matters.
I recommend two things for anyone interested in doing this:
1) Customize the plate and box to suit your situation - I don't necessarily feel I have perfect measurements, distances, etc, and not a lot of room in the resulting box. In a real Cessna, the trim is much lower down from the throttle, and you'll notice this when reaching for things in VR. But I was just going for a compact all-in-one box.
2) Print the front panel but make the rest out of wood, and/or use the STL as a guide for your CNC router and do the whole thing out of wood. I paper printed a drawing of the panel and placed it on wood to create mine, but the hole alignment wasn't perfect and I'm a perfectionist. wishing I had CNC :)
Similar models
thingiverse
free

Flight sim throttle by akaki
... analog pins of your arduino.
connect switches to gnd and digital pins. there is an example of a 3-way switch in the source code.
thingiverse
free
Box for Cessna 172 Throttle Mixture controls by peddiparth
...om, front, back and sides with clear packing tape. i left the top unattached in case i need to make any changes to the box later.
thingiverse
free

Yoke And Throttle Controls for Flight Simulator Using Arduino by dvilardi
...r and reset pins)
mdf wood base and screws
wires (tip: use old ethernet cables)
(optional) pov analog joystick module and buttons
thingiverse
free
Flight Control Board FCB01 by CarstenMK
...n mod for thrustmaster twcs throttle (hotas). create a pc button box controller, based on arduino leonardo microcontroller board.
thingiverse
free

Flight Sim Throttle by Kintar
...t didn't feel like paying $200+ for a full hotas setup. this is a simple enclosure where you can mount a sensor and arduino.
thingiverse
free
Throttle Knob - Cessna 172 Flight Simulator by allanglen
...spruce a-820 friction lock control.
for more information about the project, see the details at https://cessna172sim.allanglen.com
thingiverse
free
Flap Control - Cessna 172 Flight Simulator by allanglen
...https://cessna172sim.allanglen.com.
for details about this part, see https://cessna172sim.allanglen.com/docs/flap-control-panel/.
thingiverse
free

CH Throttle Quadrant Throttle Knob by AstarothReborn
...he ch quadrant flight sim controller. not yet tested, as i don't have a printer yet.
(also an exercise in learning openscad).
thingiverse
free
HOTAS Throttle Joystick by XDr4g0nX
...nter yourself? contact me on my etsy store and i'll be happy to print it for you:https://www.etsy.com/shop/xdr4g0nx3dprinting
thingiverse
free
Snap-on Switch Pro controller HOTAS joystick by akaki
...he linkage dimensions depend on which side joycon you use and how far up you mount it, you might need to shorten the linkage bar.
Cessna
3d_export
$17
Cessna 172
...cessna 172
3dexport
cessna 172
3ddd
$1

Cessna 404
...cessna 404
3ddd
самолет
cessna 404 — лёгкий двухмоторный самолёт.
3ddd
$1
самолет cessna 1721
...самолет cessna 1721
3ddd
самолет , cessna
cessna 1721 airplane
3d_export
$22

Cessna Citation Latitude
...cessna citation latitude
3dexport
cessna citation latitude
3d_export
$42
Cessna 172 3D Model
...cessna 172 3d model
3dexport
cessna 172
cessna 172 3d model evermotion 92781 3dexport
3d_export
$40
Cessna airplane 3D Model
...cessna airplane 3d model
3dexport
cessna airplane
cessna airplane 3d model evermotion 92779 3dexport
3d_ocean
$20
Cessna Caravan Amphibian
...ssna plane plane polygon textured vehicle
cessna caravan amphibian model. no interior, only front seats. sample texture included.
turbosquid
$45
Cessna Citation
... available on turbo squid, the world's leading provider of digital 3d models for visualization, films, television, and games.
evermotion
$24
Cessna am73
...t equipment with all textures, shaders and materials. it is ready to use, just put it into your scene. evermotion 3d models shop.
cg_studio
$120
Cessna Skylane3d model
...d model
cgstudio
.3ds .lwo .max .obj - cessna skylane 3d model, royalty free license available, instant download after purchase.
Sim
turbosquid
$6

sim
...osquid
royalty free 3d model sim for download as 3dm and max on turbosquid: 3d models for games, architecture, videos. (1669193)
turbosquid
$39
Sim Card
... available on turbo squid, the world's leading provider of digital 3d models for visualization, films, television, and games.
turbosquid
free

SIM Card
... available on turbo squid, the world's leading provider of digital 3d models for visualization, films, television, and games.
design_connected
$16
Deck SIM, PIM
...deck sim, pim
designconnected
de padova deck sim, pim computer generated 3d model. designed by nichetto, luca.
turbosquid
$7

smart phone and sim
...free 3d model smart phone and sim for download as 3dm and max on turbosquid: 3d models for games, architecture, videos. (1669641)
turbosquid
$35
Grameenphone Sim Card
... grameenphone sim card for download as max, fbx, obj, and 3ds on turbosquid: 3d models for games, architecture, videos. (1527884)
turbosquid
$3
Flow Leather Chair and Sim
...lty free 3d model flow leather chair and sim for download as on turbosquid: 3d models for games, architecture, videos. (1510088)
turbosquid
$19
Nokia 107 Dual SIM
... available on turbo squid, the world's leading provider of digital 3d models for visualization, films, television, and games.
turbosquid
$15
Nokia 225 Dual Sim
... available on turbo squid, the world's leading provider of digital 3d models for visualization, films, television, and games.
turbosquid
$12
Nokia 130 Dual SIM
... available on turbo squid, the world's leading provider of digital 3d models for visualization, films, television, and games.
Flight
3d_export
$5
flight case
...flight case
3dexport
flight case
3ddd
$1

Zgallerie / Flight
...zgallerie / flight
3ddd
profi.кофейный , zgallerie
кофейный столик flight, zgallerie
archibase_planet
free
Flight suit
...archibase planet
flight suit clothing clothes
flight suit 2005-v3 n070712 - 3d model (*.gsm+*.3ds) for interior 3d visualization.
3ddd
$1

Flight
... zgallerie , приставной
приставной столик фирмы zgallerie
turbosquid
$19
Flight Recorder
...ee 3d model flight recorder for download as max, obj, and fbx on turbosquid: 3d models for games, architecture, videos. (1264654)
3ddd
$1
Flight Nicoletti Home
...flight nicoletti home
3ddd
nicoletti home , угловой
flight nicoletti home
turbosquid
$29
Flight of stairs
... available on turbo squid, the world's leading provider of digital 3d models for visualization, films, television, and games.
turbosquid
$20
Flight Hunter
... available on turbo squid, the world's leading provider of digital 3d models for visualization, films, television, and games.
turbosquid
$18
Flight Cases
... available on turbo squid, the world's leading provider of digital 3d models for visualization, films, television, and games.
turbosquid
$13
Flight case
... available on turbo squid, the world's leading provider of digital 3d models for visualization, films, television, and games.
Control
3d_ocean
$4
Controller TQFP32
...qfp32
3docean
chip controller cpu electronic gpu mcu micro controller silicon smd tqfp wafer
a micro controller in tqfp32 package
3d_ocean
$4
Controller TQFP44
...44
3docean
chip controller cpu electronic gpu mcu micro controller package smd tqfp tqfp44
a micro controller in a tqfp44 package
3d_export
$15
control unit
...control unit
3dexport
control unit
3ddd
$1
Yacht control
...yacht control
3ddd
yacht control
3d_export
$5
controle pgdm
...controle pgdm
3dexport
carcaca controle pgdm
turbosquid
free
controler
... available on turbo squid, the world's leading provider of digital 3d models for visualization, films, television, and games.
3ddd
$1
Control
...
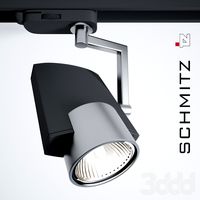
http://www.schmitz-leuchten.de/html-ru/einzelleuchten-lampentyp-details.php?lamptype_no=700&group;=917&id;=731
3d_ocean
$4
Controller TQFP100
...100
3docean
chip computer cpu electronic gpu mcu micro controller pin platine silicon wafer
a micro controller in tqfp100 package
3d_ocean
$4
Controller TQFP64
...qfp64
3docean
chip computer cpu gpu mcu micro controller package silicon tqfp tqfp64 wafer
a micro controller in a tqfp64 package
3d_ocean
$7

Remote controller
... control switcher tv remote
remote controller for tv, sound systems etc easy to edit textures photo real rendered with mental ray
Box
archibase_planet
free

Box
...box
archibase planet
box carton cardboard box
box 2 - 3d model (*.3ds) for interior 3d visualization.
archibase_planet
free

Box
...box
archibase planet
carton cardboard box box
box 1 - 3d model (*.3ds) for interior 3d visualization.
3d_export
$6

box
...box
3dexport
box
3d_export
$5

Box
...box
3dexport
box
3d_export
$5

box
...box
3dexport
box
3d_export
$5

box
...box
3dexport
box
archibase_planet
free

Box
...box
archibase planet
box box for paper notebook pencil
box - 3d model (*.gsm+*.3ds) for interior 3d visualization.
archibase_planet
free

Box
...box
archibase planet
box carton cardboard box
box n170111 - 3d model (*.gsm+*.3ds) for interior 3d visualization.
archibase_planet
free

Box
...box
archibase planet
box carton cardboard box
box n050411 - 3d model (*.gsm+*.3ds) for interior 3d visualization.
archibase_planet
free

Boxes
...boxes
archibase planet
boxes box case bin
boxes n281213 - 3d model (*.gsm+*.3ds+*.max) for interior 3d visualization.