Thingiverse
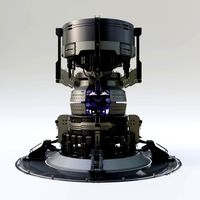
#CatchTheWind > Charge your Phone > Vertical Wind Turbine Generator by KG1610
by Thingiverse
Last crawled date: 3 years ago
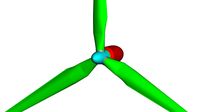
In Spirit of the competition > I wanted to make something useful ..... and started with the goal of charging my iPhone using the power of the wind.
Immediately a turbine comes to mind.
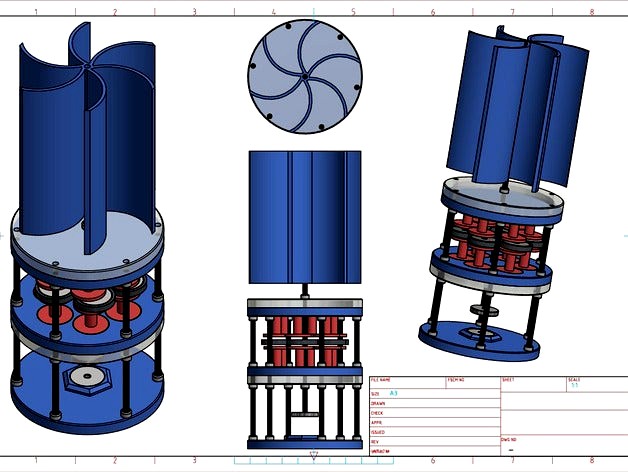
This Vertical Turbine will drive a generator and then charge small DC devices.
I wanted to make it portable, you can take it anywhere and charge your phone.
It is magnetically levitated. The repelling magnets will handle the weight of the Rotor. Let the wind make it Turn and generate electricity.
I can add another generator section. i.e Magnet Rotor with Coils.
Things still to consider
The Turbine >
Many different designs
how many blades should i use ?
Reading up on Wikipedia - i might change the Turbine.
The Generator >
The current design uses round coils.
I might change this to use pie shaped winding's instead.
Will update on progress as i go along.
There is only one company that is selling Makerbot Machine's here in South Africa (Rectron) - I went past last week and was blown away. Makerbot is amazing.
Update : 2015-07-06
I wanted to start the Build on the weekend.
I have run into a horrible problem .. this build I made to be the maximum size possible for my printer.
While the model shows in the center of the print bed the actual print is not and Prints off the heated bed. ?!?
I don't know why this is happening - anyone run into a similar problem please let me know.
I will sort this during the course of the week and aim to print this weekend.
Update : 2015-07-09
I had to change my original design. Its a bit smaller now.
uploaded new Files for this. I have printed the base and the coil Base and the Coils. (Uploaded Pics and new STL Files)
Will Start the winding Tonight. :(:
Update : 2015-07-13
Productive sessions this weekend.
Changed the Coil design so i could attach them to a drill
(winding the coils by hand would have taken 45 years)
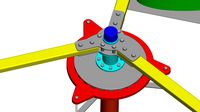
Changed the Magnet Rotor, nicer design i printed and completed the original one (Pic Attached) but will reprint new design
Designed a back cover for the coil base (for all the wiring etc)
Printed the Turbine (Pic Uploaded) (15 hour Print !?)
Printed 6 coils and wound them.
coming together nicely
Update : 2015-07-14
Printed new Rotor
my printer is not closing off the Top layer 100 % now ?
I increased the extrusion rate by 2 % to correct this - if anyone knows why - please let me know.
Pics of the coil winding are up too.
Update : 2015-07-21
Printer has been giving me problems - have to leave it alone for a bit then give it some love. Its weird . Prints perfectly ! then not.
its printing great again - printed the Coil Base Cover
See pics
The Coils are hurting me , I keep dropping them / breaking them.
The thickness of the coil prints is not strong enough for so much wire. if your printing these make sure they are 100 % infill otherwise just don't manhandle them be gentle.
I broke 4 - reprinted with 100 % infill
The Turbine Blade - I was testing my design with a fan . It Does work but can be much better,
I am going to change the Blade
it will use 3 Blades instead of 6 and will print 1 mm thick sheets for the blades.
I have added a Pic of where i am so far.
Going from Thought to product : - designing something and making it is a process. I never saw so many changes coming but until you put it together you wont know.
Immediately a turbine comes to mind.
This Vertical Turbine will drive a generator and then charge small DC devices.
I wanted to make it portable, you can take it anywhere and charge your phone.
It is magnetically levitated. The repelling magnets will handle the weight of the Rotor. Let the wind make it Turn and generate electricity.
I can add another generator section. i.e Magnet Rotor with Coils.
Things still to consider
The Turbine >
Many different designs
how many blades should i use ?
Reading up on Wikipedia - i might change the Turbine.
The Generator >
The current design uses round coils.
I might change this to use pie shaped winding's instead.
Will update on progress as i go along.
There is only one company that is selling Makerbot Machine's here in South Africa (Rectron) - I went past last week and was blown away. Makerbot is amazing.
Update : 2015-07-06
I wanted to start the Build on the weekend.
I have run into a horrible problem .. this build I made to be the maximum size possible for my printer.
While the model shows in the center of the print bed the actual print is not and Prints off the heated bed. ?!?
I don't know why this is happening - anyone run into a similar problem please let me know.
I will sort this during the course of the week and aim to print this weekend.
Update : 2015-07-09
I had to change my original design. Its a bit smaller now.
uploaded new Files for this. I have printed the base and the coil Base and the Coils. (Uploaded Pics and new STL Files)
Will Start the winding Tonight. :(:
Update : 2015-07-13
Productive sessions this weekend.
Changed the Coil design so i could attach them to a drill
(winding the coils by hand would have taken 45 years)
Changed the Magnet Rotor, nicer design i printed and completed the original one (Pic Attached) but will reprint new design
Designed a back cover for the coil base (for all the wiring etc)
Printed the Turbine (Pic Uploaded) (15 hour Print !?)
Printed 6 coils and wound them.
coming together nicely
Update : 2015-07-14
Printed new Rotor
my printer is not closing off the Top layer 100 % now ?
I increased the extrusion rate by 2 % to correct this - if anyone knows why - please let me know.
Pics of the coil winding are up too.
Update : 2015-07-21
Printer has been giving me problems - have to leave it alone for a bit then give it some love. Its weird . Prints perfectly ! then not.
its printing great again - printed the Coil Base Cover
See pics
The Coils are hurting me , I keep dropping them / breaking them.
The thickness of the coil prints is not strong enough for so much wire. if your printing these make sure they are 100 % infill otherwise just don't manhandle them be gentle.
I broke 4 - reprinted with 100 % infill
The Turbine Blade - I was testing my design with a fan . It Does work but can be much better,
I am going to change the Blade
it will use 3 Blades instead of 6 and will print 1 mm thick sheets for the blades.
I have added a Pic of where i am so far.
Going from Thought to product : - designing something and making it is a process. I never saw so many changes coming but until you put it together you wont know.
Similar models
thingiverse
free

Wind turbine Blades and Rotor by Yerai
...f 8m / s and for that i have given them an angle of attack of 10 degrees.
if someone wants a different specification to ask me.
cg_trader
$35

3dPrinted windtubine | 3D
...ator windgenerator windfarm reprap 3dprinted electronics other wind turbine hugh piggott energy wind turbine gadgets wind turbine
thingiverse
free

Permanent Magnet Generator by motorheadv10
...r option for this project is to drive the rotor with a hard drive motor. i have included another option for the rotor and stator.
3dwarehouse
free

Wind Turbine rotor and blades
...wind turbine rotor and blades
3dwarehouse
the wind turbine rotor and blades assembled
cg_trader
$2

Wind Turbine
...ne clean green mill propellors fan grid electrical component plastic metal generator industrial machine wind turbine wind turbine
thingiverse
free

Mini Pulse Motor / Generator by KG1610
...uot;firing" the same time. the last generator had 6 coils with 4 magnets on the rotor and that = 2 coils firing at one time.
grabcad
free

Electromagnetic Motor Design
... sensor to change the direction of the current in the coils, thus providing a continuous torque to the rotor to keep it rotating.
grabcad
free

wind turbine
...lectricity. wind turns the propeller-like blades of a turbine around a rotor, which spins a generator, which creates electricity.
thingiverse
free

Generator by ztwillis
...t will be used for magnet wire, bearings, neodymium magnets, and other related materials to further refine my designs. thank you!
thingiverse
free

Modular vertical wind turbine blade in NACA9625 by samd
...ke a three blade unit 500mm tall, with 250mm radius, and mount it on a magnetically levitating bearing, then test it for startup.
Kg1610
thingiverse
free

Toothbrush Holder by KG1610
...toothbrush holder by kg1610
thingiverse
i like brushing my teeth while in the shower - needed a toothbrush holder
thingiverse
free

Tooth brush Holder by KG1610
...tooth brush holder by kg1610
thingiverse
tooth brush holder for the shower
fresh is best
thingiverse
free

Candle Holder by KG1610
...older by kg1610
thingiverse
many power cuts happening recently
simple candle holder
printed on prusa i3
lh 0.2 nozzle 0.4 pla
thingiverse
free

Sacred Geometry - Coaster by KG1610
...ded up with a coaster. use it for your coffee / water . hang it on your door . whatever.
combines the fruit of life with a cube..
thingiverse
free

Structured Water - Bottle Connector by KG1610
...yet - thanks josh) . copied his file and joined them together then added the hexagon outer section to hold the permanent magnets.
thingiverse
free

Generator by KG1610
...nect a buck/boost converter to achieve a stable output?
is this the best circuit ?? if you have any ideas / comments let me know.
thingiverse
free

#CatchtheWind > Portable > Simplified > Wind Turbine > by KG1610
...simple
easy to assemble
printed parts + magnets + copper wire + carbon rod = turbine
magnetically levitated - no bearing needed.
thingiverse
free

DIY Mendocino Motor by KG1610
...ng.
[2015-12-06]
built a "jig"
i needed an adjustable base to measure the distances of the magent's. [pics added]
thingiverse
free

Magnetically Levitated Simple Pulse Motor by KG1610
...ct sensor
video : https://www.youtube.com/watch?v=bz9e9sl4jvk
feature : http://3dprint.com/47056/3d-printed-motor-levitation/
thingiverse
free

Circle Light - LED Desk Light - ESP32 - WLED by KG1610
...ons - 1a power supply and usb connector
parts:
ws2812b rgb led strip
button - 12mm tactile switch with cap
esp32
1000uf capacitor
Catchthewind
thingiverse
free

Wind Spinner #CatchTheWind by cfrary
...lat hard surface where there is plenty of wind. the panels on the wind catcher will catch the wind and rotate it on its 8 wheels.
thingiverse
free

Windturbine HANDS #Catchthewind by vincentjalink
...e 4.0: updated the hands. this hands will work much better in the wind because they are more round. the other ones where to flat.
thingiverse
free

Sailcar (toy land sailboat) #CatchTheWind by cfrary
...boat. it has a fixed axle that doesn't turn, and trims the sail for wind shifts using a pulley system and crude weather vane.
thingiverse
free

#CatchTheWind. Wind turbine by plaszlonet
...o than the stl file, the ones uploaded are the latest version,could not reprint having some printer issues z motor controler(: )
thingiverse
free

pencapglider for catchthewind contest by Proto-X-3D
...for weight. if you flip the cap upside down you can shoot it from a rubber band. when slicing don't forget to add supports.
thingiverse
free

Simple Savonius Wind Turbine #CatchTheWind. by FabLab_Brindisi
...ons regarding its 3d printing and will be refined in the same shape with the addition of components that constitute the assembly.
thingiverse
free
#CatchtheWind > Portable > Simplified > Wind Turbine > by KG1610
...simple
easy to assemble
printed parts + magnets + copper wire + carbon rod = turbine
magnetically levitated - no bearing needed.
thingiverse
free

The House Beach #CatchTheWind by Brocolee
...the wind and wave, as faster the wind as bigger and intense the waves.
https://youtu.be/mvwsyqwlolwhttps://youtu.be/mwzqb0ptsxk
thingiverse
free

Wind Turbine #CatchTheWind. by plaszlonet
...om/watch?v=dazuxjdlbko&feature=youtu.behttps://www.youtube.com/watch?v=kthadvf36zuhttps://www.youtube.com/watch?v=rbjfvsfenqi
thingiverse
free

F22 Fighter Jet by K987
...jet by k987 thingiverse an f22 fighter jet model. catchthewind ...
Turbine
3d_export
$5

turbine
...turbine
3dexport
it is a turbine to use it in some spaceship
3d_export
$5

turbine
...turbine
3dexport
turbine, with animation included, more texture of it
3d_ocean
$4

Wind Turbine
...n
and render setup turbine wind
wind turbine, modeled with cinema4d r13 , render setup and textured, custom logo for wind turbine
turbosquid
$1

Turbine
...turbosquid
royalty free 3d model turbine for download as ige on turbosquid: 3d models for games, architecture, videos. (1385242)
3d_export
$40
wind turbine
...wind turbine
3dexport
wind turbine
3d_export
$40

wind turbine
...wind turbine
3dexport
wind turbine
3d_export
$40
wind turbine
...wind turbine
3dexport
wind turbine
3d_export
$40

wind turbine
...wind turbine
3dexport
wind turbine
3d_export
$40
wind turbine
...wind turbine
3dexport
wind turbine
3d_export
$40
wind turbine
...wind turbine
3dexport
wind turbine
Wind
design_connected
$4

Wind
...wind
designconnected
emmemobili wind dining tables computer generated 3d model. designed by chiara vaghi.
3d_ocean
$4
Wind Turbine
...n
and render setup turbine wind
wind turbine, modeled with cinema4d r13 , render setup and textured, custom logo for wind turbine
3d_export
$40
wind turbine
...wind turbine
3dexport
wind turbine
3d_export
$40
wind turbine
...wind turbine
3dexport
wind turbine
3d_export
$40
wind turbine
...wind turbine
3dexport
wind turbine
3d_export
$40
wind turbine
...wind turbine
3dexport
wind turbine
3d_export
$40
wind turbine
...wind turbine
3dexport
wind turbine
3d_export
$40
wind turbine
...wind turbine
3dexport
wind turbine
3d_export
$40

wind turbine
...wind turbine
3dexport
wind turbine
3d_export
$40

wind turbine
...wind turbine
3dexport
wind turbine
Charge
3d_export
$7
pneumatic charging car
...pneumatic charging car
3dexport
pneumatic charging car
turbosquid
$1

Charge Sword
...uid
royalty free 3d model charge sword for download as blend on turbosquid: 3d models for games, architecture, videos. (1196298)
turbosquid
$5

Overhead charge
...lty free 3d model overhead charge for download as fbx and obj on turbosquid: 3d models for games, architecture, videos. (1695997)
3d_export
$65

charging station
...charging station
3dexport
simple rendering of the scene file
3d_export
$65

soldiers charge
...soldiers charge
3dexport
simple rendering of the scene file
3d_export
$5
Charging Booth 3D Model
...charging booth 3d model
3dexport
charging booth
charging booth 3d model kanika 60018 3dexport
cg_studio
$30

Electric Vehicle Car Charging Station without Charging Units3d model
...ic vehicle car charging station without charging units 3d model, royalty free license available, instant download after purchase.
turbosquid
$29

Electric Vehicle / Car Charging Station without Charging Units(1)
... available on turbo squid, the world's leading provider of digital 3d models for visualization, films, television, and games.
3d_export
$5
glass battery with charge divisions
...glass battery with charge divisions
3dexport
glass battery with charge divisions, materials for eevee, under the subdiv.
turbosquid
$39

JBL Charge 3
... free 3d model jbl charge 3 for download as max, fbx, and obj on turbosquid: 3d models for games, architecture, videos. (1698833)
Phone
archibase_planet
free

Phone
...se planet
mobile phone smartphone cellular phone cell phone
phone n270513 - 3d model (*.gsm+*.3ds) for interior 3d visualization.
archibase_planet
free

Phone
... phone cell phone smartphone iphone cellular phone
phone iphone 4 apple n010113 - 3d model (*.3ds) for interior 3d visualization.
archibase_planet
free

Phone
...se planet
phone telephone dial telephone rotary phone
phone retro n130913 - 3d model (*.gsm+*.3ds) for interior 3d visualization.
archibase_planet
free

Phone
...se planet
phone telephone dial telephone rotary phone
phone n191213 - 3d model (*.gsm+*.3ds+*.max) for interior 3d visualization.
archibase_planet
free

Phone
...se planet
phone telephone rotary phone dial telephone
phone n150214 - 3d model (*.gsm+*.3ds+*.max) for interior 3d visualization.
archibase_planet
free

Phone
...se planet
phone telephone dial telephone rotary phone
phone n100414 - 3d model (*.gsm+*.3ds+*.max) for interior 3d visualization.
archibase_planet
free

Phone
...base planet
phone telephone rotary phone dial telephone
phone old n310116 - 3d model (*.gsm+*.3ds) for interior 3d visualization.
archibase_planet
free

Phone
...phone
archibase planet
equipment phone
phone n240110 - 3d model (*.3ds) for interior 3d visualization.
archibase_planet
free

Phone
...phone
archibase planet
telephone phone
mobile phone - 3d model (*.3ds) for interior 3d visualization.
archibase_planet
free

Phone
...phone
archibase planet
telephone phone
phone n021009 - 3d model (*.gsm+*.3ds) for interior 3d visualization.
Vertical
3ddd
$1
Vertical curtain
...vertical curtain
3ddd
роллеты
vertical curtain
modern curtain
design_connected
$11
Mr.Tubes Vertical
...mr.tubes vertical
designconnected
tonone mr.tubes vertical computer generated 3d model.
3ddd
free

Vertical gardening
... фитомодуль , фитостена
vertical gardening
2000x1000x165
vizpark
$5

Einstein Vertical
...tical is a set of 3d brick textures for modern buildings, including mulit-textures and 4k tileable textures with material layers.
turbosquid
$5

brazier vertical
... free 3d model brazier vertical for download as sldas and ige on turbosquid: 3d models for games, architecture, videos. (1647570)
turbosquid
$18
Vertical blinds
...ee 3d model vertical blinds for download as max, obj, and fbx on turbosquid: 3d models for games, architecture, videos. (1604868)
3d_export
$40

vertical stirling engine
...vertical stirling engine
3dexport
vertical stirling engine
turbosquid
$6
vertical fence
...d model vertical fence for download as c4d, 3ds, dxf, and obj on turbosquid: 3d models for games, architecture, videos. (1571631)
turbosquid
$50

Vertical Garden
... available on turbo squid, the world's leading provider of digital 3d models for visualization, films, television, and games.
turbosquid
$20

vertical flag
... available on turbo squid, the world's leading provider of digital 3d models for visualization, films, television, and games.
Generator
3d_export
$17
Generator
...generator
3dexport
generator
archibase_planet
free
Generator
...base planet
generator electric generator
generator electric n300715 - 3d model (*.gsm+*.3ds+*.max) for interior 3d visualization.
design_connected
$20

Generation
...generation
designconnected
knoll generation computer generated 3d model. designed by formway design.
3d_export
$8

generator
...generator
3dexport
generator - obj, 3ds, fbx.
3d_export
$7

generator
...generator
3dexport
generator extures 4k resolution, basecolor -normal -metallic -ao-roughness-height tris:3084
turbosquid
free
generator
...rator
turbosquid
free 3d model generator for download as max on turbosquid: 3d models for games, architecture, videos. (1492909)
3ddd
$1

general
...general
3ddd
генерал
turbosquid
$99

generator
...urbosquid
royalty free 3d model generator for download as ma on turbosquid: 3d models for games, architecture, videos. (1514125)
turbosquid
$20

Generator
...rbosquid
royalty free 3d model generator for download as max on turbosquid: 3d models for games, architecture, videos. (1244841)
turbosquid
$2
Generator
...rbosquid
royalty free 3d model generator for download as fbx on turbosquid: 3d models for games, architecture, videos. (1245541)