Thingiverse

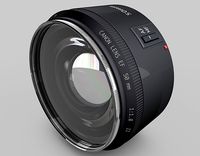
Canon Digital Lens Mount for JK Optical Printer
by Thingiverse
Last crawled date: 4 years, 2 months ago
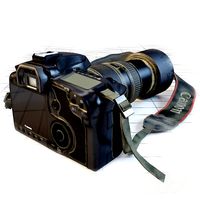
This is a solution to an obscure problem when using a Canon SLR with a JK Optical Printer (a device originally designed for optical effects and reframing of Super8 and 16mm movie film).
I sometimes use my JK with a Canon Rebel XSi to transfer Super8 and 16mm film to high-res digital files. To attach the JK bellows to the camera I used a modified Canon body cap, but I quickly ran into a serious problem when using Canon's Live View in manual exposure mode: The Live View image is crazy dark even when ISO/Shutter/Aperture are dialed in to correct values. This makes it impossible to focus and frame, and causes exposure confusion since the brightness of the Live View doesn't match the exposure of the frames being shot.
There are numerous threads about this issue on the interwebs. The source of the problem is a lack of electronic communication between the manual lens and the body, which confuses the Live View exposure preview algorithm. (If the body displays an aperture of "F00" you're in trouble!) The smartest solution for most users of manual lenses is to buy an "AF Confirm chip" on eBay and glue it to the back of the lens mount. This fools the body into thinking there's a digitally-controlled aperture and the exposure algorithm works correctly. But... I'm cheap and I happen to have a broken 18-55mm EF-S kit lens lying around, so I made an adapter that re-uses the mount from the kit lens. It solves the Live View exposure problem and provides a nice clean mount for the JK bellows.
Steps:
Mount the kit lens on a camera and manually set the aperture to full open. (I don't think this actually matters at all, but I'm superstitious.)
Take the lens mount off the back of the kit lens. Don't lose the 4 screws because we will re-use them later. You will see a green circuit board. Unplug the tiny cables that connect it to the lens body, but leave the cable that connects to the lens mount.
Print the .STL file (with support because there's a little pocket underneath). I used 3 "shells" and 40% infill to make sure the walls were thick and sturdy.
Line up the printed adapter with the Canon lens mount, so the protruding solder points on the mount fit into the matching pocket in the adapter. You may have some wiggle-room in the rotation dimension. The adapter has a little nub that protrudes. It will eventually line up with the white dot on the camera body. For now, it should be oriented between a screw hole and depression in the mount's flange.
Mark the holes for the 4 screws. (I didn't model the holes because I'm lazy and I'm not sure that all kit lenses have the same hole spacing - It's not symmetrical!)
Drill pilot holes and carefully screw the mount and adapter together. The screws will grab nicely into the plastic and should sit flush with the flange so they don't scrape against the camera.
All done, now put it together on your JK and enjoy proper Live View exposure preview! (The camera will report whatever aperture the old kit lens was set to before it was taken apart, but it won't affect your exposures.)
NOTE: The included files differ from the part shown in the photos. I went back and fixed a few things:
The nub that lines up with the white dot on the camera body was off a little bit. I moved it so it should fall exactly in the right place.
I added a bevel to the side of the ring, to make it easier to tighten the thumbscrew that connects the JK bellows to the adapter. (In the photos I just cut it down with a knife, but the current FreeCAD model and STL file include it.) If your JK thumbscrew is on the top or somewhere else, you can rotate the whole bellows by releasing the set-screws on the JK lens board and choosing a new orientation.
Notes:
Designed in FreeCAD 0.18
Printed in PLA at 0.2mm resolution on a Wanhao Duplicator i3
Similar models
thingiverse
free

Kiev 10/15 Lens To Canon FL/FD/FDn Body Adapter by profhankd
...is to mount on a sony e-mount body, there is now a complete adapter for that posted as http://www.thingiverse.com/thing:1464062 .
thingiverse
free

Kiev 10/15 Lens To Leica M Body (Techart Pro LM-EA7) Adapter by profhankd
...lens to adjust the aperture. this adapter is very similar (on the kiev 10/15 end), but adapts to leica...
thingiverse
free

Vintage Lens Rehousing Canon FD 35mm f2 SSC, A homage to 'K35 cine Prime' by DoNotLeaN
...lens with different optical configurations. both versions are roughly similar in appearance, so i guess they will both fit,...
thingiverse
free

"Turn Vintage Still Lens into a Cinema lens" Canon FD 24mm f2.8 Rehousing by DoNotLeaN
...lens standard. however, it does not reach a level similar to the k35 cine prime due to several issues....
thingiverse
free

Kiev 10/15 Lens To Sony A7II-series Body Adapter by profhankd
...ge is designed to fit the later version, as used by the a7ii series cameras, and also fits the earlier version (with minor play).
thingiverse
free

Convert manual lens into a telescope: E-mount to eyepiece 1.25" by farhi
...itation is that there is no space to add a prism or mirror for an l-shaped eyepiece position. this is a direct view scope design.
cg_trader
$8

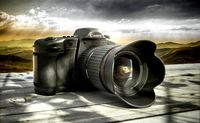
CANON 5D CAMERA
...nology plastic isolated illustration camera canon optical photographic clapboard photographer nikon electronics other camera lens
thingiverse
free

Sony E-Mount body to Nikon F-Mount Lens adapter by Bluebie
...t their actual mesh was not reused.todo: design a mechanism to lock the nikon lens in place, so it cannot accidentally come loose
thingiverse
free

Nikon 1 body to Canon EF lens tilt adapter
...s by wire, no focus control.
please be careful when using this, i don't want anyone to break their lens because of my adapter
cg_trader
free

canon rf 28 70 f2 lens
... classic dark equipment telephoto window white camera optic optical canon two story background eyewear sunglass other camera lens
Jk
turbosquid
$15

JK Tyre
...turbosquid
royalty free 3d model jk tyre for download as max on turbosquid: 3d models for games, architecture, videos. (1517420)
turbosquid
$28

Ritzwell JK armchair
...l ritzwell jk armchair for download as max, max, fbx, and obj on turbosquid: 3d models for games, architecture, videos. (1564952)
cg_studio
$69

Tatra JK 25003d model
...ra jk 25003d model
cgstudio
.3ds .max - tatra jk 2500 3d model, royalty free license available, instant download after purchase.
turbosquid
$30

JK Tyre 2 Wheel
...squid
royalty free 3d model jk tyre 2 wheel for download as on turbosquid: 3d models for games, architecture, videos. (1517424)
turbosquid
$15

JK-Tyre Single Wheel
...oyalty free 3d model jk-tyre single wheel for download as max on turbosquid: 3d models for games, architecture, videos. (1517425)
humster3d
$150

3D model of Hyundai Avante (JK) coupe with HQ interior 2014
... avante (jk) coupe with hq interior 2014 in various file formats. all our 3d models were created maximally close to the original.
3d_export
$5

bts tinyton jk cookie forms
...bts tinyton jk cookie forms
3dexport
2000% size<br>pla<br>0.4 mm<br>size 6 or 7 centimeters in height
3d_export
$129

jeep gladiator 75th anniversary jk 2018
...-------<br>thank you for buying this product. we look forward to continuously dealing with you.<br>creator 3d team!!!
3d_export
$129

jeep gladiator rubicon recon jk 2018
...-------<br>thank you for buying this product. we look forward to continuously dealing with you.<br>creator 3d team!!!
3d_export
$129

jeep wrangler 75th anniversary jk 2018
...-------<br>thank you for buying this product. we look forward to continuously dealing with you.<br>creator 3d team!!!
Canon
3d_export
$5

canon
...canon
3dexport
canon/obj/powpoly
3ddd
free
Canon 5D
...canon 5d
3ddd
canon , фотоаппарат
canon 5d
turbosquid
$3
Canon
...on
turbosquid
royalty free 3d model canon for download as ma on turbosquid: 3d models for games, architecture, videos. (1342900)
3d_export
$7
canon-5d
...canon-5d
3dexport
canon-5d
turbosquid
$90
CANON
... available on turbo squid, the world's leading provider of digital 3d models for visualization, films, television, and games.
turbosquid
$35

CANON
... available on turbo squid, the world's leading provider of digital 3d models for visualization, films, television, and games.
3d_export
$6
canon camera
...canon camera
3dexport
high poly model of camera canon
3ddd
$1

Ксерокс Canon
...ксерокс canon
3ddd
canon , ксерокс
буду рад, если кому-нибудь пригодится.
3d_export
$18
Canon 3D Model
...canon 3d model
3dexport
canon decoration broze gold objects
canon 3d model sarnidesign 401 3dexport
turbosquid
$8

Grandred-Canon
...osquid
royalty free 3d model grandred-canon for download as on turbosquid: 3d models for games, architecture, videos. (1271796)
Optical
design_connected
$9
Optic
...optic
designconnected
alessi optic computer generated 3d model. designed by colombo, joe.
3ddd
$1
обои OPTIC
...обои optic
3ddd
в архиве текстуры и фото обоев из коллекции optic.
archive3d
free
Optics 3D Model
...optics 3d model
archive3d
optics
optics - 3d model (*.gsm+*.3ds) for interior 3d visualization.
turbosquid
$49

optical eyewear
...id
royalty free 3d model optical eyewear for download as max on turbosquid: 3d models for games, architecture, videos. (1592243)
3d_ocean
$5

optical mouses
...al mouses
3docean
3d models computer electronics mouse
optical mouses 3d models. realistic mouse model. custom and unique design.
turbosquid
$10
Optic cross
...yalty free 3d model optic cross for download as sldas and ige on turbosquid: 3d models for games, architecture, videos. (1683403)
turbosquid
$7

OPTIC Mirror
... free 3d model optic mirror for download as max, obj, and fbx on turbosquid: 3d models for games, architecture, videos. (1223927)
turbosquid
free

Fiber optics
...d model fiber optics for download as 3ds, obj, fbx, and blend on turbosquid: 3d models for games, architecture, videos. (1211912)
turbosquid
$8

Mouse optical
...3d model mouse optical for download as 3ds, obj, c4d, and fbx on turbosquid: 3d models for games, architecture, videos. (1504476)
turbosquid
free

Optical puzzle
... optical puzzle for download as max, ige, fbx, stl, and sldas on turbosquid: 3d models for games, architecture, videos. (1405925)
Lens
3d_ocean
$16
Lens
...lens
3docean
camera film lens video widescreen
a standard camera lens with reflections.
3d_export
$15

Lens optical lens 3D Model
...odel
3dexport
lens optical accessories for the tablet accessories electronics
lens optical lens 3d model sergio108 76763 3dexport
turbosquid
$1

Lens
... available on turbo squid, the world's leading provider of digital 3d models for visualization, films, television, and games.
3ddd
free
Massive / Len
...massive / len
3ddd
massive , встроенный
светильник потолочный massive len
3d_ocean
$9
50mm Canon lens
...50mm canon lens
3docean
50mm canon foto lens photo
canon lens 50mm 1.8 the most practical affordable lens to start with
turbosquid
$20

Camera Lens
...osquid
royalty free 3d model camera lens for download as c4d on turbosquid: 3d models for games, architecture, videos. (1414988)
turbosquid
$2

Axicon Lens
...osquid
royalty free 3d model axicon lens for download as max on turbosquid: 3d models for games, architecture, videos. (1169215)
turbosquid
free

Camera Lens
...quid
royalty free 3d model camera lens for download as blend on turbosquid: 3d models for games, architecture, videos. (1546983)
turbosquid
$2

MAGNIFYING LENS
...y free 3d model magnifying lens for download as blend and fbx on turbosquid: 3d models for games, architecture, videos. (1633553)
turbosquid
$1

MAGNIFYING LENS
...y free 3d model magnifying lens for download as blend and fbx on turbosquid: 3d models for games, architecture, videos. (1633707)
Printer
archibase_planet
free

Printer
...inter
archibase planet
printer laser printer pc equipment
printer n120614 - 3d model (*.gsm+*.3ds) for interior 3d visualization.
archibase_planet
free

Printer
...rchibase planet
laser printer office equipment computer equipment
printer - 3d model (*.gsm+*.3ds) for interior 3d visualization.
turbosquid
$100

Printer
...er
turbosquid
royalty free 3d model printer for download as on turbosquid: 3d models for games, architecture, videos. (1487819)
turbosquid
$3

Printer
...turbosquid
royalty free 3d model printer for download as max on turbosquid: 3d models for games, architecture, videos. (1670230)
turbosquid
$1

printer
...turbosquid
royalty free 3d model printer for download as max on turbosquid: 3d models for games, architecture, videos. (1595546)
turbosquid
$1

printer
...turbosquid
royalty free 3d model printer for download as max on turbosquid: 3d models for games, architecture, videos. (1595105)
turbosquid
$10

Printer
...id
royalty free 3d model printer for download as max and 3dm on turbosquid: 3d models for games, architecture, videos. (1607146)
turbosquid
$7

Printer
...royalty free 3d model printer for download as ma, ma, and obj on turbosquid: 3d models for games, architecture, videos. (1644580)
turbosquid
$30

Printer
... available on turbo squid, the world's leading provider of digital 3d models for visualization, films, television, and games.
turbosquid
$20

Printer
... available on turbo squid, the world's leading provider of digital 3d models for visualization, films, television, and games.
Mount
3d_export
free

mounting bracket
...mounting plate is the portion of a hinge that attaches to the wood. mounting plates can be used indoors, cabinetry and furniture.
turbosquid
$2

MOUNTING
... available on turbo squid, the world's leading provider of digital 3d models for visualization, films, television, and games.
turbosquid
free

Mounts
... available on turbo squid, the world's leading provider of digital 3d models for visualization, films, television, and games.
turbosquid
free

Mount Fuji
...fuji
turbosquid
free 3d model mount fuji for download as obj on turbosquid: 3d models for games, architecture, videos. (1579977)
3d_export
$5

Headphone mount LR
...headphone mount lr
3dexport
headphone mount l+r
turbosquid
$39

Mount rainier
...quid
royalty free 3d model mount rainier for download as fbx on turbosquid: 3d models for games, architecture, videos. (1492586)
turbosquid
$5

pipe mounting
...quid
royalty free 3d model pipe mounting for download as obj on turbosquid: 3d models for games, architecture, videos. (1293744)
turbosquid
$3

Mounting Tires
...uid
royalty free 3d model mounting tires for download as fbx on turbosquid: 3d models for games, architecture, videos. (1708511)
3d_export
$5

Magnetic GoPro Mount
...pro mount
3dexport
cool magnetic mount for gopro. allows you to mount the camera on flat metal surfaces and get exclusive shots.
turbosquid
$5

Stone Mount
...ty free 3d model stone mount for download as ma, obj, and fbx on turbosquid: 3d models for games, architecture, videos. (1370306)
Digital
turbosquid
$20
Digits
...available on turbo squid, the world's leading provider of digital 3d models for visualization, films, television, and...
turbosquid
$79

Digital piano
... available on turbo squid, the world's leading provider of digital 3d models for visualization, films, television, and games.
turbosquid
$70
Digital Cameras
... available on turbo squid, the world's leading provider of digital 3d models for visualization, films, television, and games.
turbosquid
$50

Digital Indicator
... available on turbo squid, the world's leading provider of digital 3d models for visualization, films, television, and games.
turbosquid
$49

Digital Clock
... available on turbo squid, the world's leading provider of digital 3d models for visualization, films, television, and games.
turbosquid
$49
Digital Printer
... available on turbo squid, the world's leading provider of digital 3d models for visualization, films, television, and games.
turbosquid
$39

Digital scales
... available on turbo squid, the world's leading provider of digital 3d models for visualization, films, television, and games.
turbosquid
$25
Digital Durometer
... available on turbo squid, the world's leading provider of digital 3d models for visualization, films, television, and games.
turbosquid
$25

Digital Scales
... available on turbo squid, the world's leading provider of digital 3d models for visualization, films, television, and games.
turbosquid
$25
Digital 21
... available on turbo squid, the world's leading provider of digital 3d models for visualization, films, television, and games.